

|
|
|
|
|
|
Setting Up Packages and Services
This section includes the necessary steps for setting up a package and its services:
As you create and edit services and parameters, it is important to regularly save information to avoid losing input. Clicking Save Service in the Edit Services window can prevent the need to re-enter information in the event of a system failure.
Caution: When you add or edit the parameters of a service, you must select Add before choosing Back from the Edit Parameters window and returning to the Edit Services window.
If adding a new service or modifying an existing service in the Edit Services window, be sure to select Save Service before choosing Back. If you select Back before you save the modified information, a warning is briefly displayed on the status line at the bottom of the window.
Adding a Package
When you need to add a new group of services, you create a new package before adding the services. The Package Organizer Window and the following procedure show how to add a new package, BALANCE, to the Packages listing.
Package Organizer Window
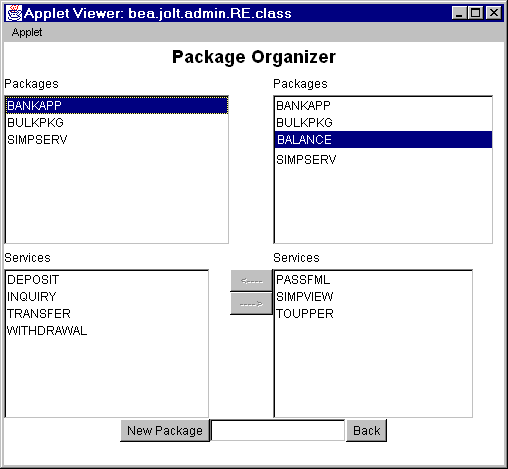
Instructions for Adding a Package
For a description of contents of this window, see Package Organizer Window Description.
The text field is activated.
The new name (shown in the preceeding figure as BALANCE) is displayed on the Packages list in random order.
Adding a Service
Services are definitions of available BEA Tuxedo services and can only be a part of a Jolt package.You must create the service as a part of a new or existing package.
The Repository Editor accepts the new service name exactly as it is typed (that is, all uppercase letters, abbreviations, misspellings are accepted). Service names must not exceed 30 characters.
The following figure shows the Edit New Services window for adding a service.
Edit Services Window: Add a New Service to a Package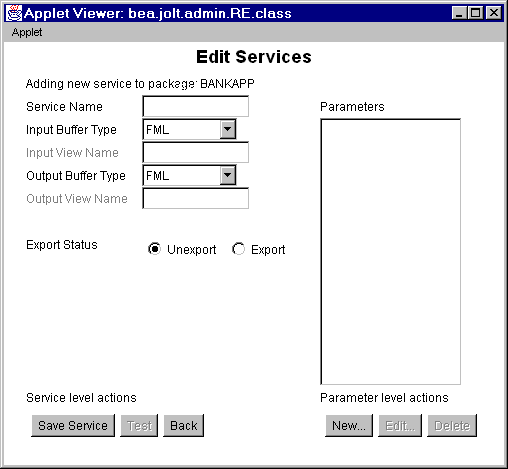
Adding a Service Window Description
The following table describes the options for adding services to a package in a package window.
Instructions for Adding a Service
The Services window opens, similar to the figure shown in Sample Services Window.
If you later decide that another package should contain the new service, use the Package Organizer to move the service to a different package. (See Grouping Services Using the Package Organizer for additional information.)
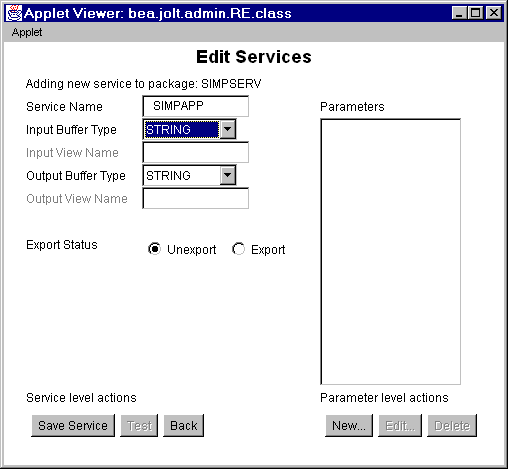
Although the same buffer type selected for the Input Buffer is automatically selected for the Output Buffer, you can select a different Output Buffer type.
Selecting CARRAY or STRING as a Service Buffer Type
If CARRAY or STRING is selected as the buffer type for a new service, only CARRAY or STRING can be added as the data type for the accompanying parameters. See also Adding a Parameter and Selecting CARRAY or STRING as a Parameter Data Type. For additional information, refer to Using the Jolt Class Library.
The following figure shows an example Edit Services window with STRING selected as the buffer type for the service SIMPAPP.
Edit Services Window: Select STRING Buffer Type
Clicking New under the label Parameter level actions in the Edit Services window is displayed the Edit Parameters window. Review the features in the following figure. Use this window to enter the parameter and screen information for a service.
Edit Parameters Window: Add a Parameter
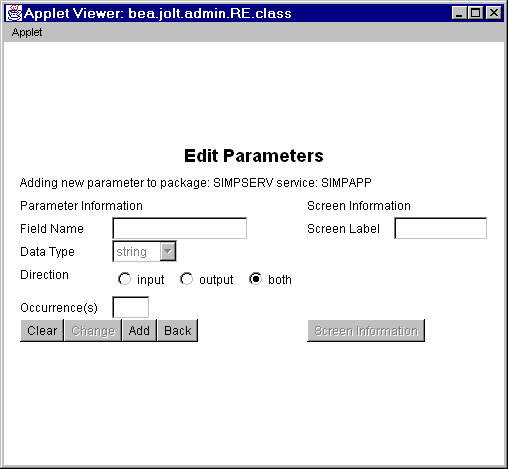
Adding a Parameter Window Description
Instructions for Adding a Parameter
Note: If the buffer type is FML or VIEW, the field name must match the corresponding parameter field name in FML or VIEW.
Warning: ![]() If you do not click Save Service before you click Back, the parameters are not saved as part of the service.
If you do not click Save Service before you click Back, the parameters are not saved as part of the service.
Selecting CARRAY or STRING as a Parameter Data Type
If CARRAY or STRING is the selected buffer type for a new service, only carray or string can be added as the data type for the accompanying parameters.
In this case, only one parameter can be added. It is recommended that you use the parameter name "CARRAY" for a CARRAY buffer type, and the parameter name "STRING" for a STRING buffer type.
See also Instructions for Adding a Service and Selecting CARRAY or STRING as a Service Buffer Type. For additional information, refer to Using the Jolt Class Library.
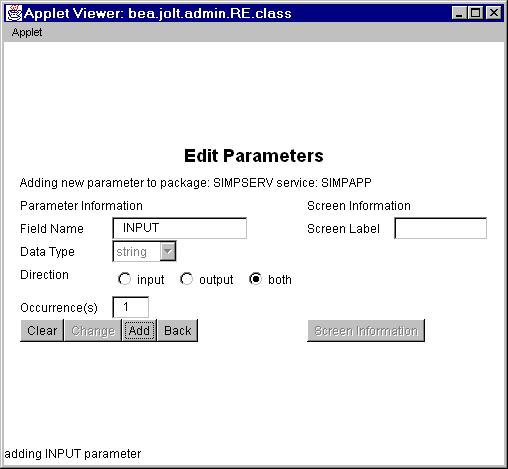
The following figure is an example of the Edit Parameters window with string as the selected data type for the parameter. The Data Type defaults to string and does not allow you to modify that particular data type. The Field Name can be any name.
Edit Parameters Window: string Data Type

|

|

|
|
|
|
Copyright © 2000 BEA Systems, Inc. All rights reserved.
|