|
|
The installation procedure for BEA Tuxedo Mainframe Adapter for TCP Gateway is slightly different for each platform on which the product can be installed. Follow the directions for the appropriate platform. The following information assists you in successfully installing this product:
| Note: | To upgrade from previous releases of eLink for Mainframe TCP, refer to BEA Tuxedo Mainframe Adapter for TCP Release Notes. |
The TMA TCP Gateway product runs on UNIX-based and Windows 2000 platforms. Complete the following tasks prior to installing the TMA TCP Gateway software:
A JDK is required by the InstallAnywhere installation product to install Tuxedo Mainframe Adapter for TCP. A JDK is installed with Tuxedo 9.0 or 9.1. Verify that the system PATH environment variable is set to the correct version of the JDK. If the JDK version displayed is lower than the required version, you will need to configure your PATH environment variable to use the required JDK that is installed with Tuxedo 9.0 or 9.1.
The TMA TCP Gateway product runs on Unix-based platforms and Windows 2000. Refer to the appropriate platform sections for installation instructions.
Perform the following steps to install the Tuxedo Mainframe Adapter for TCP Gateway software in console mode on a certified UNIX platform:
$ su -
Password:
# ls -l /dev/cdrom
total 0
brw-rw-rw- 1 root sys 22, 0 July 1 10:55 c1b0t010
# mount -r -F cdfs /dev/cdrom/c1b0t0l0 /mnt
If you are installing on an HP-UX system, use a command similar to the following command:
# mount -r -F cdfs -o cdcase /dev/cdrom/c1b0t010 /mnt
unix directory on your CD-ROM device. For example,# cd /mnt
# ls
tmatcp91_32_sol_9_sp.bintmatcp91_32_hpux_1123_pa.bintmatcp91_32_sles_9_x86.bintmatcp91_32_aix_53_ppc.bintmatcp91_32_win_2k3_x86.exeNTMF
UNIXMF
# sh tmatcp91_32_aix_53_ppc.bin -i consolePreparing to install...
Extracting the installation resources from the installer archive...
Configuring the installer for this system's environment...
Launching installer...
Preparing CONSOLE Mode Installation...
==========================================================================
(created with InstallAnywhere by Zero G)
--------------------------------------------------------------------------
==========================================================================
Introduction
------------
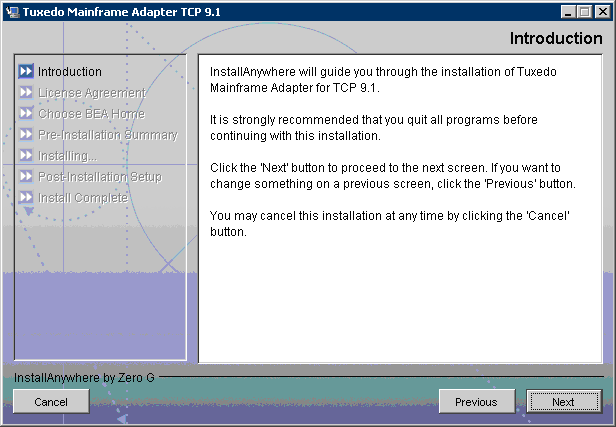
InstallAnywhere will guide you through the installation of Tuxedo Mainframe Adapter for TCP 9.1.
It is strongly recommended that you quit all programs before continuing with this installation.
Respond to each prompt to proceed to the next step in the installation. If you want to change something on a previous step, type 'back'.
You may cancel this installation at any time by typing 'quit'.
PRESS <ENTER> TO CONTINUE:ENTER
================================================================
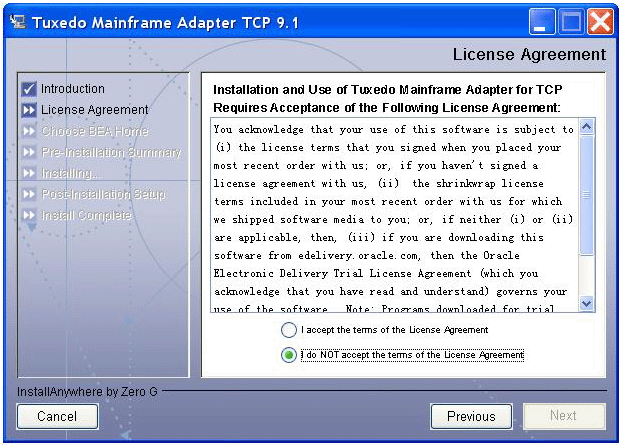
License Agreement
-----------------
Please read before installing:
You acknowledge that your use of this software is subject to (i) the license
terms that you signed when you placed your most recent order with us; or,
if you haven't signed a license agreement with us, (ii) the shrinkwrap
license terms included in your most recent order with us for which we shipped
software media to you; or, if neither (i) or (ii) are applicable, then, (iii)
if you are downloading this software from edelivery.oracle.com, then the
Oracle Electronic Delivery Trial License Agreement (which you acknowledge
that you have read and understand) governs your use of the software. Note:
Programs downloaded for trial use or downloaded as replacement media may not
be used to update any unsupported programs.
DO YOU ACCEPT THE TERMS OF THIS LICENSE AGREEMENT? (Y/N): Y
================================================================
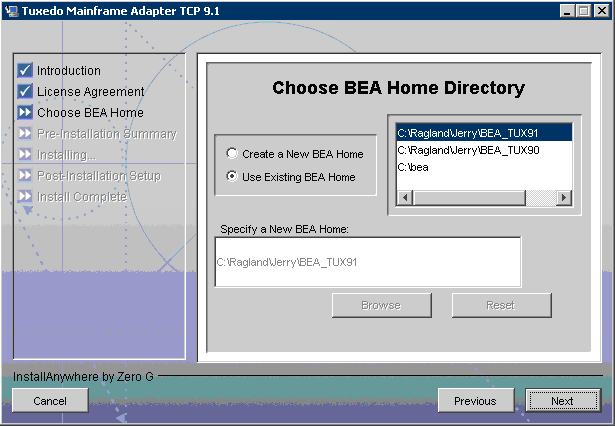
Choose BEA Home Directory
-------------------------
1- Create a New BEA Home
2- Use Existing BEA Home
Enter a number: 1
Specify a New BEA Home: /usr/bea
==========================================================================
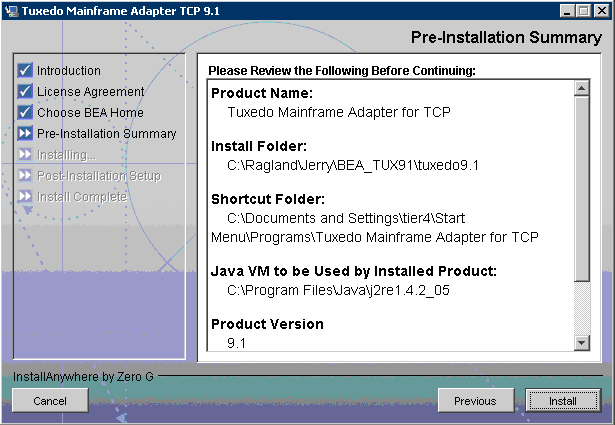
Pre-Installation Summary
------------------------
Please Review the Following Before Continuing:
Product Name:
Tuxedo Mainframe Adapter for TCP
Install Folder:
PATH
Java VM to be Used by Installed Product:
PATH
Product Version
9.1
Disk Space Information (for Installation Target):
Required: 2,833,299 bytes
Available: 528,988,708,864 bytes
PRESS <ENTER> TO CONTINUE: <ENTER>
=================================================================
Installing...
-------------
[===============|===============|===============|==============]
[--------------|---------------|---------------|---------------]
=================================================================...
.
.
.
=================================================================
Install Complete
----------------
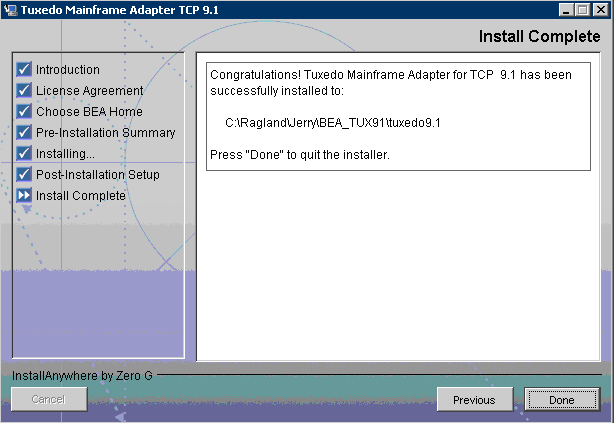
Congratulations. 'Tuxedo Mainframe Adapter for TCP 9.1' has been successfully installed to:
/usr/bea/tuxedo9.1
PRESS <ENTER> TO EXIT THE INSTALLER: <ENTER>
Perform the following steps to install the Tuxedo Mainframe Adapter for TCP Gateway software on a Windows platform or on a UNIX platform in Graphics Mode:
When installing on a Windows platform, Install Anywhere should start automatically when you load the CD. Proceed to Step 3.
If it does not, complete the following steps:
 Run. The Run dialog displays.
The following files should be located in root:
tmatcp91_32_aix_53_ppc.bintmatcp91_32_win_2k3_x86.exetmatcp91_32_hpux_1123_pa.bintmatcp91_32_sol_9_sp.bintmatcp91_32_SLES_9_x86.bin tmatcp91_32_win_2k3_x86.exe.$ su -
Password:
> ls -l /dev/cdrom
total 0
brw-rw-rw- 1 root sys 22, 0 July 1 10:55 c1b0t010
> mount -r -F cdfs /dev/cdrom/c1b0t0l0 /mnt
If you are installing on an HP-UX system, use a command similar to the following command:
> mount -r -F cdfs -o cdcase /dev/cdrom/c1b0t010 /mnt
> cd /mnt/
The following files should be located in root:
tmatcp91_32_aix_53_ppc.bintmatcp91_32_win_2k3_x86.exetmatcp91_32_hpux_1123_pa.bintmatcp91_32_sol_9_sp.bintmatcp91_32_SLES_9_x86.bin/mnt> sh tmatcp91_<platform>.binThe Introduction screen (see Figure 2-1) is displayed.
| Note: | If you click the Do Not Accept option button, you will not be able to continue with the installation. . You must either exit the installation or go back to the Introduction screen. |
c:\bea; the default for UNIX is $HOME/bea). The BEA Home directory is the root directory in which you install all BEA products.If you do not already have a BEA Home directory, you can create one by following these steps:
If you already have one or more BEA Home directories on your system, you can use one of those directories as follows:
From this message box, do one of the following:
From this message box, do one of the following:
This section provides instructions for uninstalling the Tuxedo Mainframe Adapter for TCP Gateway component. The following topics are discussed:
To uninstall Tuxedo Mainframe Adapter for TCP Gateway on a UNIX platform:
uninstaller_TMATCP directory with the following command:> cd <bea/home>/tuxedo9.1/uninstaller_TMATCP
<bea/home> sh UninstallTMATCP -i console
Listing 2-2 displays a Tuxedo Mainframe Adapter for TCP Gateway component uninstallation.
| Note: | The single-dash bar just beneath the double-dash bar in Listing 2-2 is a progress indicator. When the single-dash bar becomes the same length as the double-dash bar, uninstallation is complete. |
Preparing CONSOLE Mode Uninstall...
=================================================================
(created with InstallAnywhere by Zero G)
--------------------------------------------------------------------------
==========================================================================
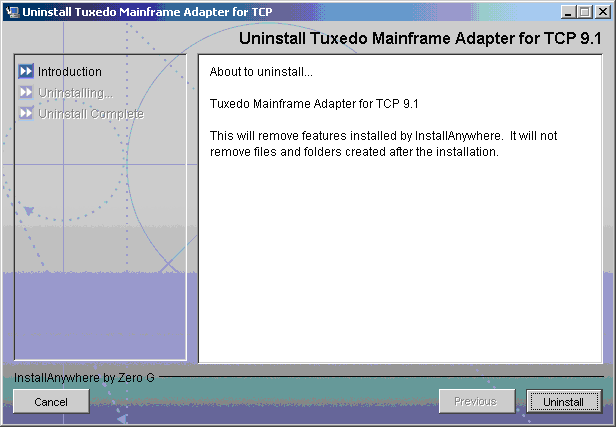
Uninstall Tuxedo Mainframe Adapter for TCP 9.1
----------------------------------------------
About to uninstall...
BEA Tuxedo Mainframe Adapter TCP 9.1
This will remove features installed by InstallAnywhere. It will not remove files and folders created after the installation.
PRESS <ENTER> TO CONTINUE: <ENTER>
=================================================================
Uninstalling...
------------
[==================|==================|==================|======]
[------------------|------------------|------------------|------]
================================================================
==========================================================================
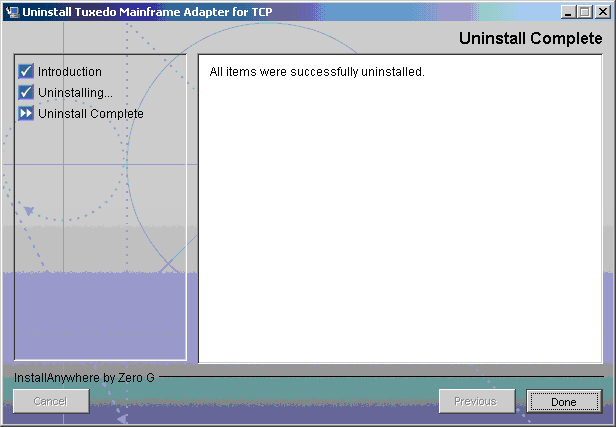
Uninstall Complete
------------------
Some items could not be removed.
PRESS <ENTER> TO EXIT THE UNINSTALLER: <ENTER>
Perform the following steps to uninstall the Tuxedo Mainframe Adapter for TCP Gateway software on a Windows platform:
ProgramsBEA WebLogic E-Business PlatformTuxedo Mainframe Adapter for TCP 9.1Uninstall BEA Tuxedo Mainframe Adapter for TCP from the Start menu. The Tuxedo Mainframe Adapter for TCP Uninstaller screen is displayed (Figure 2-7).
The Tuxedo Mainframe Adapter for TCP CD-ROM contains the following libraries and executable programs. After installing the TMA TCP software, verify that these libraries and programs are installed on your system.
Verify that the following files are installed by TMA TCP Gateway.
Verify that the following files are installed by TMA TCP Gateway.
Verify that the following files are installed by TMA TCP Gateway.
Verify that the following files are installed by TMA TCP Gateway.
Verify that the following files are installed by TMA TCP Gateway.


|