

|
|
|
|
|
|
Configuring the eLink TCP Security
The eLink TCP product supports a security feature that allows a requester from BEA Tuxedo services to pass a user ID through the CICS server interfaces for verification through a third-party security package. The following topics explain the how to set up security:
Service Request Processing with Security
The following sections describe the process flow for security verification of a service request.
Security Checking from UNIX to Mainframe
Figure 3-1 depicts the process flow for security verifications from eLink for Mainframe TCP for CICS on UNIX to a mainframe.
Figure 3-1 Security Checking for UNIX to Mainframe Transactions
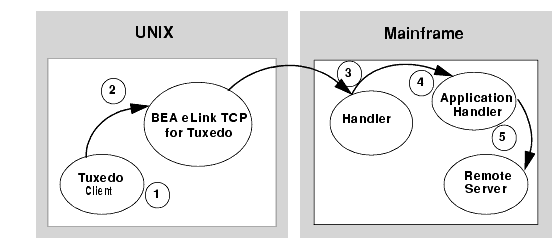
With each request, the eLink TCP for Tuxedo gateway passes the user's Tuxedo identity to the remote eLink TCP for CICS gateway (to the Handler).
Note: To pass authority checking, the user's Tuxedo identity must match the mainframe user ID exactly.
Note: You may need to update your surrogate security definitions to allow the successful invocation of the CICS application program (EXEC CICS START TRANSID). See your mainframe security administrator if your site has this requirement.
Security Checking from Mainframe to UNIX
Figure 3-2 depicts the process flow for security verifications from a mainframe to eLink TCP for Tuxedo on UNIX.
Figure 3-2 Security Checking for Mainframe to UNIX Transactions
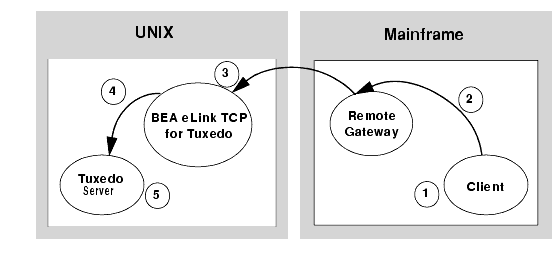
Note: To pass authority checking, the user's Tuxedo identity must match the mainframe user ID exactly.
Setting Up Security for eLink TCP for CICS
The eLink TCP for CICS product supports enhanced security. This interface allows a requester from BEA Tuxedo services to pass a User ID through the CICS server interface for authorization through your security package. For field definitions, refer to the Configuring and Administering BEA eLink TCP for CICS section.
Securing User Connections
Complete the following tasks to enable the security feature for each connection.
When SECURITY=Y, eLink TCP for CICS verifies the ACCOUNT and PASSWORD values from the User Connection Account match the RMTACCT and PASSWORD values in the eLink TCP for Tuxedo GWICONFIG file *FOREIGN section. If these values do not match and SECURITY=Y, a security error occurs.
If SECURITY=N, the gateway allows a connection without any verification.
Securing Inbound Services
Complete the following tasks to enable the security feature for each inbound service.
If SECURITY=N, the gateway starts user programs using the gateway's user ID (as controlled by the socket listener).
Securing Outbound Connections from CICS to UNIX
Complete the following tasks to enable the security feature for each outbound connection.
Verify that the parameter values for ACCOUNT and PASSWORD in the Requester screen match the RMTACCT and PASSWORD values in the *FOREIGN section of the eLink TCP for Tuxedo GWICONFIG file.
When SECURITY=Y, the requester program sends the ACCOUNT and PASSWORD to the remote UNIX system on connection initiation. When SECURITY=N, the gateway attempts to make a connection without any verification.
Securing Outbound Connections from CICS to CICS
Complete the following tasks to enable the security feature for each outbound connection.
Verify that the parameter values for ACCOUNT and PASSWORD in the Requester screen match the ACCOUNT and PASSWORD values in the User Connection Account screen.
When SECURITY=Y, the requester program sends the ACCOUNT and PASSWORD to the remote CICS system on connection initiation. When SECURITY=N, the gateway attempts to make a connection without any verification.
Securing Outbound Connections from CICS to IMS
Complete the following tasks to enable the security feature for each outbound connection.
Verify that the parameter values for ACCOUNT and PASSWORD in the Requester screen match the ACCOUNT and PASSWORD values in the GATEWAY TYPE=REMOTE statement.
When SECURITY=Y, the requester program sends the ACCOUNT and PASSWORD to the remote IMS system on connection initiation. When SECURITY=N, the gateway attempts to make a connection without any verification.
Securing Outbound Services
Complete the following tasks to enable the security feature for each outbound service.

|

|

|
|
|
|
Copyright © 2001 BEA Systems, Inc. All rights reserved.
|