

|
|
|
|
|
|
Defining Rules
Rules are used by the iiServer to evaluate the contents of a message and perform actions based on the evaluation results. You use the Rules interface to define rules and associated subscriptions.
Rules are defined within an application group/message type pair. Rules are uniquely identified by the application group/message type/rule name triplet.
Rule application groups allow you to easily maintain rules associated with business needs. An application group is a logical grouping used to organize rules. For example, a company can split rules into groups by projects or split projects into logical subgroups.
Each application group can contain several message types, and a message type can be in more than one application group. You define message types through the Rules definition mechanism. A message type defines the layout of a string of data. When using Formatter, the message type is the same as the input format name.
Each rule has evaluation criteria (called an expression) that consists of fields from the message and associated Rules operators linked together with Boolean operators. You define field names through the Formatter definition mechanism. Fields can be compared against constant data or other fields within a message.
A rule can have multiple subscriptions, and each subscription can have multiple actions. A subscription is created in the Subscription list, then assigned to one or more rules within an application group/message type.
A subscription is defined by an application group/message type in the same way as a rule. Subscriptions are groupings of actions processed when a rule evaluates true. A subscription cannot be executed if it is not assigned to a rule.
This section discusses the following topics:
Starting Rules
You can access the Rules application by using the steps described in the following procedure.
Note: If you do not have an assigned user ID and password, ask your system administrator to create them for you.
Figure 4-1 Rules Logon

Figure 4-2 Rules Main Window
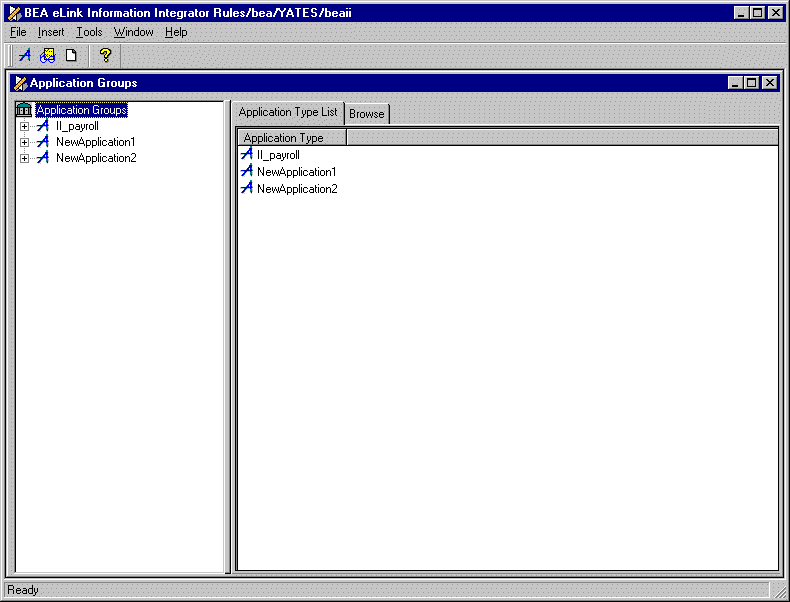
The Rules main window is divided into two panes. Rules components are displayed in an hierarchical or tree-structured organization in the left pane, with Application Groups at the top level of the hierarchy. The right pane contains tabs that are associated with the selected object.
Building Rules
This section describes how to build the following Rules components:
An application group allows you to logically organize rules associated with a particular subject. For example, an application group could be the accounting department of a company.
Adding an Application Group
You can add an application group using the steps described in the following procedure.
A text box appears at the top of the application group list. The cursor is positioned in the application group text box where you can type an application group name.
Note: The application group name must be 32 characters or less.
If you are using a case-insensitive database, you cannot use the same name with a change in case to identify components. For example, you cannot name one application group D1 and another d1. In a case-insensitive environment, make each item unique using something other than case differences.
The application group is highlighted and alphabetically positioned in the list in the left pane, and the New Message property sheet appears in the right pane.
An application group should contain at least one message type, which corresponds to your input formats. For the procedure to add a message type, refer to Adding a Message Type.
Copying an Application Group
You can copy an application group by using the steps in the following procedure.
The cursor is positioned in the application group text box. Type a unique application group name.
Note: The application group name must be 32 characters or less.
Deleting an Application Group
You can delete an application group by using the steps described in the following procedure.
Message Types
The message type is the input format name from Formatter. A rule is evaluated based on the message type.
An application group should contain at least one message type. For the procedure to add an Application Group, see Adding an Application Group.
Adding a Message Type
You can add a message type by using the steps described in the following procedure.
Figure 4-3 New Message Property Sheet
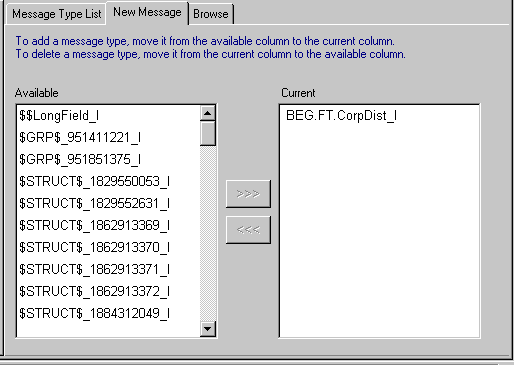
The Available box on the left displays available message types. This list contains the input format names defined in Formatter.
The Current box on the right displays the message types currently associated with the application group.
The message type appears in the Current list box and in the left pane below the application group.
Copying a Message Type
You can copy a message type to a different application group using the steps described in the following procedure.
Deleting a Message Type
You can delete a message type using the steps described in the following procedure.
Rules
A rule contains subscriptions that allow you to define message destination IDs, receiver locations, message formats, and any processes initiated upon message delivery.
Adding a Rule
You can add a rule using the steps described in the following procedure.
Note: The rule name must be 32 characters or less.
The rule is highlighted and alphabetically positioned in the list to create a new rule in the left pane. The Expressions property sheet appears in the right pane.
For the Rules engine to correctly process a rule, you must define the rule's expression and subscription. The procedure to add an expression to a rule is described in Expressions. The procedure to add a subscription to a rule is described in Subscriptions.
Deleting a Rule
When you delete a rule, the expression and links to subscriptions belonging to the rule are also deleted. The subscriptions are not deleted.
You can delete a rule by using the steps described in the following procedure.
Copying a Rule
The Duplicate function lets you copy the selected rule, which includes the rule's associated expression and its links to subscriptions. The new rule is owned by the current user who has update permission.
You can duplicate a rule by using the steps described in the following procedure.
The cursor is positioned in the rule box where you can type a unique rule name.
Note: The rule name must be 32 characters or less.
To change the rule's expressions, select the Expression tab and make the changes. For more information, refer to Expressions.
To change a rule's subscriptions, select the Subscription tab and make the changes. For more information, refer to Subscriptions.
Enabling a Rule
You can enable a disabled rule by using the steps described in the following procedure.
Disabling a Rule
You can disable a rule by using the steps described in the following procedure.
Expressions
The Expression tab is used to create, modify, or delete an expression for a selected rule.
The following tabs appear within the Expression tab:
The evaluation criteria for a rule consists of a Boolean expression containing the Boolean operators & and |, expressions, and parentheses to control the order of evaluation. You can use | to explicitly direct what Boolean operations do together.
There must be at least one space between the field name and the Rules operator as well as between the Rules operator and the comparison value. The EXIST and NOT_EXIST operators should be followed by at least one space before a parenthesis or a Boolean operator.
Creating or Modifying an Expression
You can create or modify an expression using the steps described in the following procedure.
Figure 4-4 Expression Tab
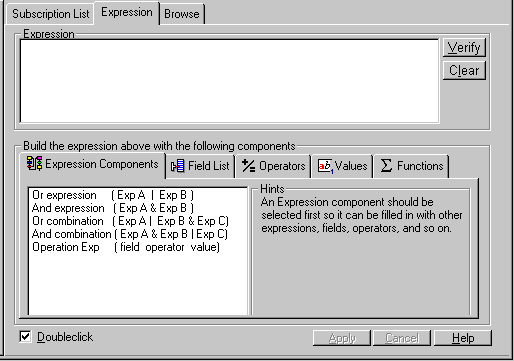
Use the Doubleclick checkbox to modify mouse action to a click or a double-click when selecting expression components.
Notes: The Literals AND and OR do not evaluate correctly in a rules expression. If you enter these values, a message box appears stating the expression is valid, but AND will be changed to &, and OR will be changed to |.
You can type the expression directly into the Expression box without using the component tabs. You can modify the expression by right clicking within the Expression window to access the text edit menu. Use the following text edit functions to modify your expression: Undo your last change, Cut, Copy, Paste, Delete, and Select All of the text within the Expression window.
You can create an expression that defaults to true to define a rule that will always be processed. To do this, type TRUE in the Expression box. In this case, subscriptions associated with this rule will also always be processed.
If you move out of the Expression tab by using the mouse or the keyboard, the expression is automatically saved.
Examples of expressions are shown in Table 4-1.
|
Description |
Layout |
Expression |
|---|---|---|
|
Default to TRUE |
|
TRUE |
|
Single Argument |
A |
F1 STRING= Acct |
|
Arguments use AND |
A & B & C |
F1 STRING= Acct & F2 INT= 100 & F3 INT= 150 |
|
Arguments use OR |
A | B | C |
F1 STRING=Acct | F2 INT= 100 | F3 INT= 150 |
|
Precedence |
A | B & C |
F1 STRING= Acct | F2 INT= 100 & F3 INT= 150 |
|
Nested Parens |
(A | ((B & (C)) | D)) |
(F1 STRING= Acct | ((F2 INT= 100 & (F3 INT= 150)) | F4 INT= 200)) |
You can clear an expression for a selected rule using the steps described in the following procedure.
Note: Rules will not allow you to overwrite an existing expression with a blank expression.
Subscriptions
After a rule is created, subscriptions that contain actions should be added to the rule's Subscription List. Each application/message group has its own Subscription List. You can drag and drop one or more subscriptions to any rule from the Subscription List or drag and drop into the Subscription List tab of a rule.
A subscription describes the actions that are performed if the rule's expressions pass evaluation. A subscription allows you to define message destination IDs, receiver locations, message formats, and any processes initiated upon message delivery.
A subscription can only be assigned to a rule within the same application group/message type.
Note: A subscription can be assigned to several rules if the rules are in the same application group and message type.
Adding a Subscription
You can add a subscription by using the steps described in the following procedure.
The subscription name must be 64 characters or less.
If there is no duplicate name for this subscription, the subscription is added and the Actions tab appears.
Each subscription should have at least one action. For the procedure to add an action, see Adding an Action.
Duplicating a Subscription
You can copy a subscription by using the steps described in the following procedure.
Deleting a Subscription
A subscription can only be deleted if it is not linked to any rules from the Subscription List.
If you own the subscription and the subscription is not linked to any rules, the subscription is deleted.
You can delete a subscription by using the steps described in the following procedure.
Adding a Comment to a Subscription
You can associate a comment with a subscription by using the steps described in the following procedure. A comment must be 64 characters or less.
Figure 4-5 Misc Tab

Removing a Subscription
Use the Remove function to remove a subscription from a rule. You cannot remove a subscription from the Subscription List, only from a rule. After you remove the subscription from the rule, the subscription will still be in the Subscription List.
You can remove a subscription by using the steps described in the following procedure.
Actions
Actions hold subscription instructions. The Actions affecting subscriptions include:
You can add an action to a subscription by using the steps described in the following procedure.
Figure 4-6 Actions Tab
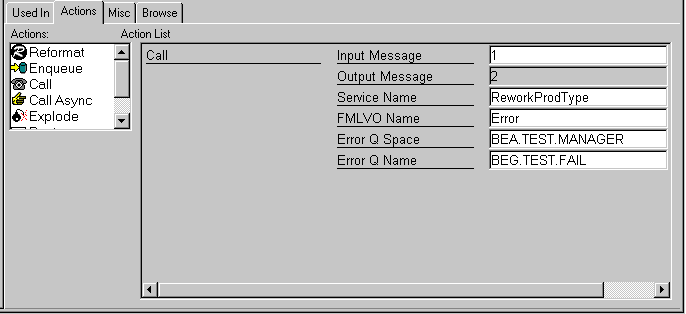
The parameters you enter in the Action Values box should be based on the type of action selected. The action types are described in Table 4-2.
|
Action |
Description |
|---|---|
|
Reformat |
Identifies the input and output message formats used when reformatting a message. In addition, the names of the input and output messages are assigned. These names may be used in other actions to identify the buffer to be used. Note: The FMLVO Name parameter is only used when the output type is set to FMLVO. |
|
Enqueue |
Identifies all the data required to place a typed buffer on a Tuxedo queue. In addition, you can optionally specify the values to be used for reply queue, failure queue, and priority. |
|
Post |
Permits entry of all the information required to post a typed buffer to the Tuxedo event broker. |
|
Call |
Obtains the necessary information to send a typed buffer to another Tuxedo service and accept a reply from that service. Note: The FMLVO Name, Error Q Space, and Error Q Name parameters are optional. |
|
Call Async |
Gathers information required to send a typed buffer to another Tuxedo service. Note: No reply is returned from the called service. |
|
Explode |
Parses an input message into its component parts using a supplied input format. After parsing is complete, explode performs the next action in the subscription list for each member of the subcomponent. The explode action taken for each action type includes:
Note: The Reformat, Call, Explode, and Return actions cannot be used after an Explode action.
|
|
Return |
Identifies the buffer that is returned to the client. The return action must be the last action defined. |
Deleting an Action
You can delete an action by using the steps described in the following procedure.
Conditional Branching
If Rules is started from the Formatter interface, Rules opens in Conditional Branching mode. The only application group that appears in the Rules tree is II_FORMATTER.
You can add message types, rules, arguments, subscriptions, and actions to the II_FORMATTER application group using the procedures described earlier in this section. However, there is a difference in the Actions tab.
The Actions tab only contains the Rules Field action. When adding or inserting Rules Field actions, three options are necessary:
See Adding an Action for details on adding and changing actions and options.

|

|

|
|
|
|
Copyright © 2000 BEA Systems, Inc. All rights reserved.
|