


|
This section describes the prerequisites needed to install the BEA AquaLogic Enterprise Security Administration Server, including system requirements, and prerequisite software and hardware. It does not include information for installing a Security Service Module, for which see Installing Security Service Modules.
The Administration Server requires certain software components to operate properly. Review these requirements carefully before installing the product.
Table 3-1 lists the system requirements for the Administration Server.
| Note: | The machine on which you install the Administration Server must have a static IP address. The IP address is used by the Security Service Modules and Service Control Manager for connectivity. Also, on a Windows platform, the file system must be configured for NTFS and not FAT. |
AquaLogic Enterprise Security Administration Server requires that you install one of the following servlet containers prior to installing the product:
|
|||
|
|||
|
|||
BEA AquaLogic Enterprise Security uses an implementation of the Transport Layer Security (TLS) 1.0 specification (see TLS Protocol). The server hosting the AquaLogic Enterprise Security Administration Server supports TLS on a dedicated listen port that defaults to 7010. To establish a secure connection, a Web browser connects to the Administration Server by supplying the listen port and the secure address (HTTPS) in the connection URL, for example,
https://myserver:7010.
|
|||
Optionally, you can use Log4j to configure a reporting application to support auditing features. For further information on how to use Log4j with the Administration Server, see:
http://jakarta.apache.org/log4j/docs/.
|
If you are using Apache Tomcat, the user performing the AquaLogic Enterprise Security installation must have permission to access the Apache Tomcat directory. Therefore, when you install the Apache Tomcat, you should specify this user as the User Name on the Apache Tomcat Setup: Configuration Options page or assign access permission to this user.
You can use Apache Tomcat with JDK 1.4 or JDK 1.5. Note the following:
If you use Tomcat with JDK 1.4, you must also install the JDK 1.4 Compatibility Package, which is required by Tomcat 5.5 and which you can find on the Tomcat 5.5 download page.
If you use Tomcat with JDK 1.5, then you need to edit the BEA_HOME/ales25-admin/config/WLESTomcat.conf file to add the following parameter:
-Djavax.xml.transform.TransformerFactory=com.sun.org.apache.xalan.internal.xsltc.trax.TransformerFactoryImpl
Otherwise Tomcat will use the org.apache.xalan.processor.TransformerFactoryImpl class, resulting in an exception when you attempt to log in to the AquaLogic Enterprise Security Administration Console.
This section describes pre-installation tasks for using the Oracle, Sybase, Microsoft SQL Server, or PointBase databases with AquaLogic Enterprise Security. Follow the instructions for your chosen database.
To configure an Oracle policy database, you must create the policy database, create a security role and a user account, and grant the security role and user access. The user account is necessary so that the policy for the instance of the Administration Server managed by this user can have a dedicated storage area allocated in the database instance.
| Note: | To perform this procedure, you must log into the Oracle database server as a database administrator. |
To set up a policy database and a new user account, perform these steps:
sqlplusdba/password@ASERVER
dba is the username you use to access the database.
password is your database administrator password.
ASERVER is the name of the Oracle service (as defined in your tnsnames.ora file).
SQL>connect sys as sysdba
SQL>create tablespace DATA datafile `C:/Oracle/oradata/ASI/data.dbf'
size 10M autoextend on next 1M MAXSIZE 250M;
SQL>create roleasi_role;
SQL> grant create session toasi_role;
SQL> grant create table toasi_role;
SQL> grant create sequence to asi_role; SQL> grant create trigger to asi_role;
where: asi_role is the new role.
The following example uses the default tablespaces generated when the Oracle database was first installed, although you can specify any tablespaces.
| Note: | In this example, you use the default tablespaces generated when you created and configured the Oracle database instance, however, you can specify any tablespaces. |
SQL> create userusernameidentified bypassword
SQL>default tablespaceDATA quotaunlimitedon DATA;
username is the name to assign to the new user account.
password is the password to assign to the new user account.
unlimited is size of the tablespace (shown here as set to unlimited).
conn sys as sysdba;grantasi_roletousername;
commit;
In this case, you grant SELECT permission to the user you created in step 3. The Oracle database server does not allow you to grant the permission to the asi_role. BEA AquaLogic Enterprise Security uses this dynamic view to check whether one of its tables is currently being accessed. Therefore, the SELECT permission is required.
This section describes how to configure a Sybase policy database. You must create the policy database, create a security role and a user account, and grant the security role and user access. The user account is necessary so that the policy for the instance of the Administration Server managed by this user can have a dedicated storage area allocated in the database instance.
To set up the user account, create the login to the Adaptive Server Enterprise database, create the user for policy database, and grant the user privileges to manipulate the policy schema.
| Note: | BEA strongly recommends that you not use the dbo of the policy database as the policy owner. While it is possible to do so, it requires additional database configuration that is beyond the scope of this guide. |
Please refer to Creating Sybase Database Devices if you have not already created the required database devices asi_data_dev and asi_log_dev as shown in this section.
To set up a policy database and a new user account, perform these steps:
where: server_name is the database server name.
1>use master
2>go
1>create database sspolicy on asi_data_dev = 250
log on asi_log_dev =  250
2>go
where: sspolicy is the name of the database. The name sspolicy is used only for the purpose of the example. You can assign any name to the database. In this example, the minimum database sizes, 250 MB, are used. If you choose to use other sizes, enter those sizes instead.
asi_data_dev and asi_log_dev are the names of the two devices.
isql command prompt, type the following commands:1>use master1>
2>gosp_addlogin asi,password,sspolicy, null, "asi login"2>go
where: password must be at least six alphanumeric characters or other characters allowed by Sybase and sspolicy is the name of the default database. If an asi login already exists, you must use the sp_modifylogin command to set its default database to sspolicy.
isql command prompt, type the following commands:1>usesspolicy2>go1>sp_adduser asi2>go
isql command prompt, type the following commands:1>usesspolicy2>go
1>grant all to asi
2>go
The PointBase and Microsoft SQL Server JDBC drivers are not shipped as part of AquaLogic Enterprise Security 2.5. If you plan to use either the PointBase or Microsoft SQL Server databases, you need to acquire the JDBC drivers before beginning the AquaLogic Enterprise Security 2.5 installation. The drivers are needed so that AquaLogic Enterprise Security 2.5 can populate the database with the tables and default data during installation.
The Oracle and Sybase drivers do ship with AquaLogic Enterprise Security 2.5.
AquaLogic Enterprise Security 2.5 uses Kodo 4.0.1 for database operations. The Kodo documentation is available at http://download.oracle.com/docs/cd/E13189_01/kodo/docs40/index.html.
This section describes pre-installation tasks fore MSSQL Server 2000.
AquaLogic Enterprise Security 2.5 uses the MSSQL 2005 JDBC driver for connectivity to both MSSQL 2000 and MSSQL 2005. The JDBC driver is 100% compatible between both SQL server versions.
You can find the Microsoft SQL 2005 Driver by using the following URL:
http://www.microsoft.com/downloads/details.aspx?FamilyId=6D483869-816A-44CB-9787-A866235EFC7C&displaylang=en
In the instructions that follow, the Microsoft SQL Enterprise Manager Utility is used to create a database to store AquaLogic Enterprise Security 2.5 policy data, create a user for AquaLogic Enterprise Security 2.5 database connectivity, and to assign database permissions to the user.
The Enterprise Manager can be launched from Programs->Microsoft SQL Server-> Enterprise Manager
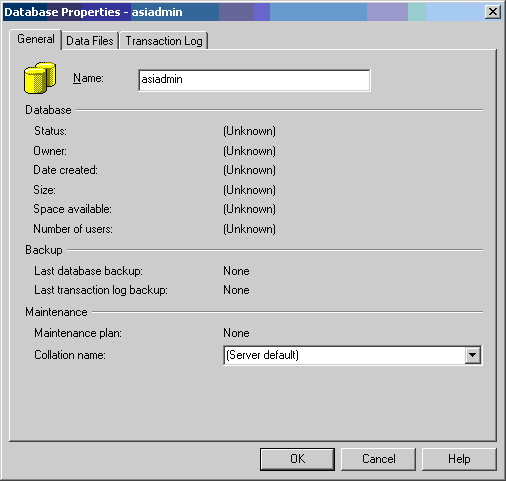
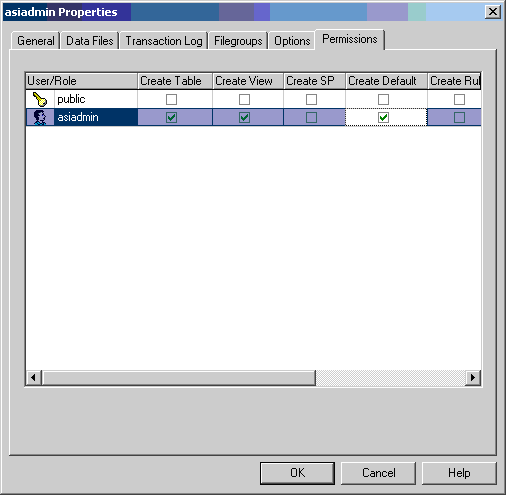
Figure 3-1 shows that a database named asiadmin has been created.
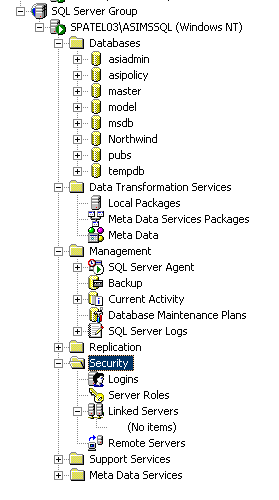
To create a User, select the "Security Folder" in the left pane of the Enterprise Manager and select "Logins." Right-click on "Logins" and select "New Login..." from the context menu. Figure 3-2 shows the location of the Security folder.
Perform the following actions:
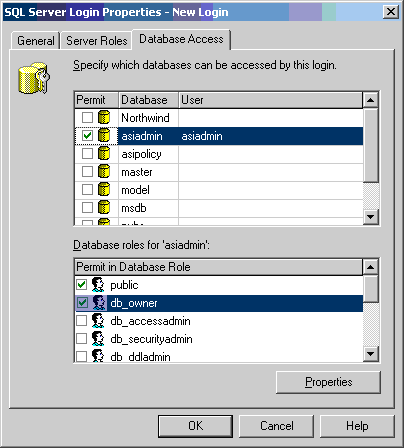
Click on the "Database Access" tab and find the database that was created in Step, as shown in Figure 3-4. Set the "Permit" column for the database in the "Specify which databases can be accessed by this login" table and set the role for the user as "db_owner" in the "Database roles for 'asiadmin'" table.
This section describes pre-installation tasks for PointBase 5.1.
WebLogic Server 9.x ships with a version of PointBase 5.1, which is available in Weblogic_Home/common/eval/pointbase.
Scripts to start PointBase 5.1 and the PointBase Console are available in Weblogic_Home/common/eval/pointbase/tools.
Only PointBase 5.1 is supported. The PointBase version (4.x) that ships as part of WebLogic Server 8.1 is not supported and will not work.
The JDBC driver for PointBase is bundled with the PointBase server.
If the PointBase Sever that ships as part of WebLogic Server 9.x is used as the database for AquaLogic Enterprise Security 2.5, the JDBC driver is available in Weblogic_Home/common/eval/pointbase/lib/pbclient51.jar.
To configure a policy database, perform the following steps:
startPointbase.cmd/sh script located in Weblogic_Home/common/eval/pointbase/tools./common/eval/pointbase/tools.
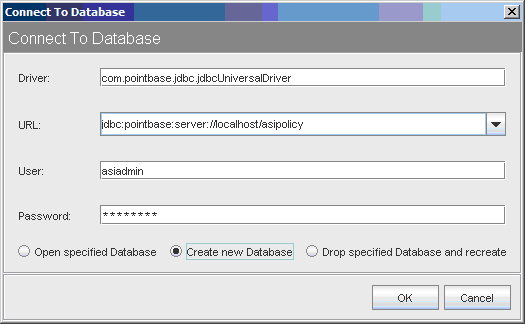
jdbc:pointbase:server://<server>/<database_name>
The dialog box should look as shown in Figure 3-7.
The product software cannot be used without a valid license. When you install the Administration Server, the installation program creates an evaluation license that expires in 90 days.
To use the Administration Server in a production environment, you must purchase a license. For information about purchasing a license, contact your BEA Sales Representative.
If you are installing the Administration Server on a computer on which the Administration Server was previously installed, refer to Uninstalling and make sure all of the uninstall steps were completed; otherwise the installation may fail.


|