30 Integrating Wikis and Blogs
This chapter describes how to integrate the wiki and blog functionality into your WebCenter Portal Framework applications to enable your application end users to collaborate and share content and ideas.
This chapter includes the following topics:
30.1 Introduction to Wikis and Blogs
A wiki is a collection of useful content or information that users can browse, update, and remove, sometimes without the need for registration. This ease of interaction and the variety of operations make wiki an effective tool for collaborative authoring, where multiple people create written content together.
Blogs are typically personal records of an individual user's experience and opinions. They provide a useful tool for discussing and/or evangelizing any type of idea, strategy, or point of view. Blogs may be projected out to a select group of people or to a wider audience. Typically, each blog contains various blog posts, with the most recently added blog post displayed at the top. Blogs invite readers to comment on the overall concepts.
You can integrate wikis and blogs into your Portal Framework applications through the Documents tool. There is no limitation on the number of wiki pages or blogs that you can expose in an application.
30.2 Requirements for Wikis and Blogs
To support the wiki and blog functionality, the Documents tool relies on WebCenter Content. For wiki and blog functionality to be available in your Portal Framework applications, the following prerequisites must be met:
-
WebCenter Content 11g must be installed and configured as the default content repository for WebCenter Portal. Wiki and blog functionality is not available with WebCenter Content 10g. For information about installing and configuring WebCenter Content 11g, see the "Managing Content Repositories" chapter in Administering Oracle WebCenter Portal.
-
A connection to WebCenter Content 11g must be established. For information, see Section 25.2.1, "Creating a Content Repository Connection Based on the Oracle Content Server Adapter."
-
Complete the steps covered in Section 4.2, "Preparing Your Framework Application for Tools and Services," as needed. For example, you can use the Activity Stream feature to track activities such as when a blog or wiki document is created or updated. End users can add comments on wiki documents and blog posts to express their views. To enable the Comments and Activities Stream features, you must register a connection to a database that has the
WebCenterschema installed.
After completing these requirements, you can use the Documents tool to add wikis and blogs to your Portal Framework applications:
-
To add wikis to your application, you will need to add a documents task flow that provides the Add Wiki Document action (such as the Document Explorer task flow). See Section 30.3, "Integrating Wikis."
-
To add blogs to your application, you use the blog tasks flows. See Section 30.4, "Integrating Blogs."
If you want to convert wikis and blogs in your Portal Framework applications into PDF, your application administrator must configure the WebCenter Conversion component, as described in the "Enabling the Conversion of Wikis and Blogs into PDFs" section in Administering Oracle WebCenter Portal.
30.3 Integrating Wikis
This following sections provide the information you need to add wiki documents to your Portal Framework applications:
-
Section 30.3.2, "Adding the Document Explorer Task Flow to Provide the Wiki Functionality"
-
Section 30.3.3, "Modifying Document Explorer Task Flow Parameters"
-
Section 30.3.5, "Displaying Wiki Page Links Within Content Presenter"
30.3.1 About Integrating Wikis
To provide your end users with the ability to add and manage wiki documents at runtime, you need to add the Document Explorer task flow to your Portal Framework application. When you add this task flow at design time, it is built into the application for end users, and enables them to work with wiki documents at runtime.
The Document Explorer task flow has associated parameters. For information, see Section 29.7.2, "Document Explorer Task Flow Parameters."
30.3.2 Adding the Document Explorer Task Flow to Provide the Wiki Functionality
To prepare your Portal Framework application and add the Document Explorer task flow for enabling the wiki functionality:
-
Ensure that you have completed the requirements listed in Section 30.2, "Requirements for Wikis and Blogs."
Note:
While setting up the connection, you must choose an authentication method. If you choose identity propagation, you must implement ADF security in your application and configure secure socket layer (SSL) on WebCenter Content.If you choose external application, you must specify the external application you want to use for authenticating users to WebCenter Content.
For information, see Section 4.2.1.1, "Implementing Security for Tools and Services."
-
Create or open the JSF page on which you want to provide the wiki functionality (see Section 15.2, "Creating Pages in a WebCenter Portal Framework Application").
-
Choose a method for adding the Document Explorer task flow to the page:
-
To add the Document Explorer task flow prepopulated with a selected folder or file, see Section 29.4, "Adding a Selected Folder or File to a Page."
-
To add the Document Explorer task flow standalone as an "empty" task flow that you can populate using the task flow menus and actions, see Section 29.5, "Adding a Content Task Flow to a Page."
For information about the parameters that you can set for the Document Explorer task flow, see Section 29.7.2, "Document Explorer Task Flow Parameters."
When you run the page, the Document Explorer task flow displays in your default browser, as shown in Figure 30-1. End users can create a wiki document by clicking New Wiki Document. For more information, see Section 30.3.4, "What Happens at Runtime."
Figure 30-1 Creating a New Wiki Document

Description of ''Figure 30-1 Creating a New Wiki Document''
-
30.3.3 Modifying Document Explorer Task Flow Parameters
The way you modify parameters of a Document Explorer task flow is the same as any other documents task flow. For information, see Section 29.6, "Modifying Content Task Flow Parameters." For information about the specific parameters that you can modify, see Section 29.7.2, "Document Explorer Task Flow Parameters."
30.3.4 What Happens at Runtime
At runtime, authorized users can create wiki documents in a Portal Framework application in which the wiki functionality has been exposed. Users can also edit, download, rename, share, and subscribe to a wiki document and view its history and properties.
At runtime, the folder that you exposed through the Document Explorer task flow is shown as the root folder. End users can create a wiki document by clicking New Wiki Document (Figure 30-2), which opens the Rich Text Editor (RTE) (Figure 30-3), displaying a blank wiki document.
Figure 30-2 Creating a New Wiki Document

Description of ''Figure 30-2 Creating a New Wiki Document''
Users can add and edit wiki content using the Rich Text Editor (RTE), which is a fully-integrated HTML text editor (Figure 30-3).
Figure 30-3 Rich Text Editor Displaying New Wiki Document
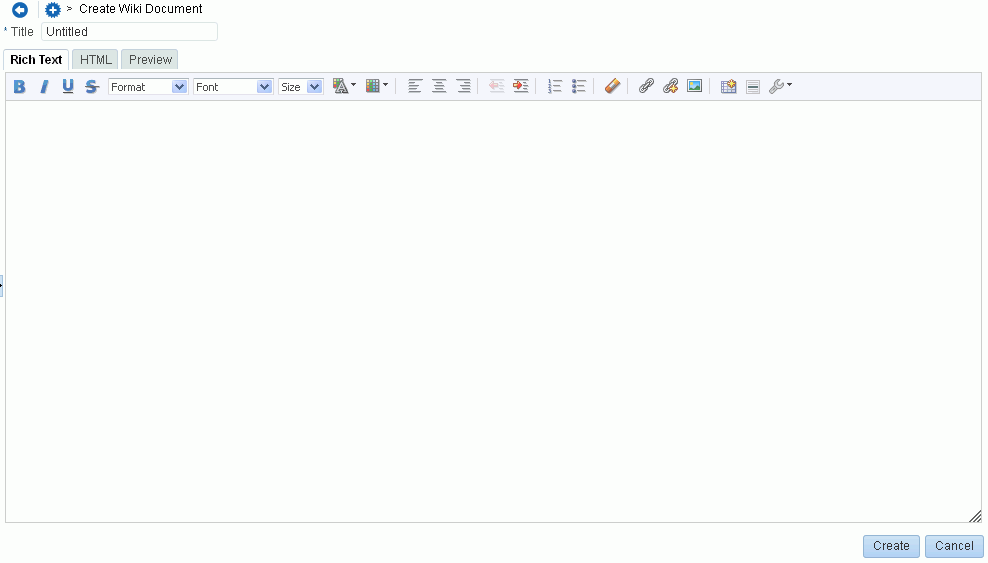
Description of ''Figure 30-3 Rich Text Editor Displaying New Wiki Document''
Note:
By default, the Wiki Markup tab is hidden in the RTE. To show and hide the Wiki Markup tab, your system administrator can edit a configuration file, as described in the "Showing and Hiding the Wiki Markup Tab in the Rich Text Editor" section in Administering Oracle WebCenter Portal.By default, all wiki documents are created directly under the root folder (Figure 30-4).
Figure 30-4 Wiki Document Created Using New Wiki Document Action

Description of ''Figure 30-4 Wiki Document Created Using New Wiki Document Action''
The runtime procedures for adding and managing wiki documents in a Portal Framework application are the same as those in WebCenter Portal. For generic information, refer to the "Working with Wikis" chapter in Using Oracle WebCenter Portal.
30.3.5 Displaying Wiki Page Links Within Content Presenter
At runtime, users can choose to display an existing wiki document using Content Presenter, as described in the "Adding a Selected Folder or File to a Page" section in Building Portals with Oracle WebCenter Portal.
When a wiki document is displayed using a Content Presenter display template, by default the links present in the wiki document render in the Document Viewer. You can configure your application to display link targets within Content Presenter.
To open the targets of links present in a wiki document within Content Presenter rather than the Document Viewer:
-
Open the
adf-config.xmlfile. This file is located underDescriptors/ADF META-INFin the Application Resources section of the Application Navigator. -
Update the
Namespaceentry as follows:xmlns:wpsC="http://xmlns.oracle.com/webcenter/framework/service"
-
Update the
ResourceActionHandlerentry as follows:<wpsC:adf-service-config xmlns="http://xmlns.oracle.com/webcenter/framework/service"> <resource-handler class="oracle.webcenter.portalframework.sitestructure.handler.NavigationResourceActionHandler"/> </wpsC:adf-service-config> -
Save
adf-config.xml.
30.4 Integrating Blogs
When you integrate the blogs functionality into your Portal Framework application, authorized end users can create and manage blog posts. To enable the blog functionality, you need to add the blog task flows.
This following sections provide the information you need to add blogs to a Portal Framework application:
30.4.1 Understanding the Blog Task Flows
If you want to include a blog on a page, along with other page components, you can use the blog task flows to add one or more elements of a blog to a page. Table 30-1 lists and describes the blog task flows:
| Blog Task Flow | Description | Example as Exposed on a Page |
|---|---|---|
|
Blog Archives |
Displays a composite list of blogs based on dates. |
|
|
Blog Banner |
Displays a banner for the blog. |
|
|
Blog Digest |
Displays a blog or blog post. |
|
|
Recent Blog Posts |
Displays a list of most recent blog posts. |
|
|
Blogs |
Displays a blog or blog post with a default design. |
|
30.4.2 Adding a Blog to a Page
To add a blog to a page in your Portal Framework application:
-
Ensure that you have completed the requirements listed in Section 30.2, "Requirements for Wikis and Blogs."
Note:
While setting up the connection, you must choose an authentication method. If you choose identity propagation, you must implement ADF security in your application and configure secure socket layer (SSL) on WebCenter Content.If you choose external application, you must specify the external application you want to use for authenticating users to WebCenter Content.
For information, see Chapter 4, "Implementing Security for Tools and Services."
-
Create or open a page in your application where you want to expose the blog functionality (see Section 15.2, "Creating Pages in a WebCenter Portal Framework Application").
-
Before you add a blog task flow to your page, consider whether or not you want to allow your end users to edit the task flow. To enable runtime editing of the page, see Chapter 18, "Enabling Runtime Editing of Pages Using Composer."
-
Add a blog to the page using an existing folder to create a default blog page, or by creating a custom blog by selecting component blog task flows:
30.4.2.1 Adding a Blog Using an Existing Folder
If you have an existing folder, perhaps already containing blog posts, you can establish that folder as the source of blog posts for a blog, instead of creating a new "empty" blog (see Section 30.4.2.2, "Adding a Custom Blog to a Page Using the Blog Task Flows"). At runtime, the blog displays the blog posts in that folder.
To expose a selected folder and its contents as a blog on a page:
-
In the Application Resources panel, navigate to Connections, then Content Repository.
-
Locate the name of your WebCenter Content connection, then expand it to navigate to the folder that you want to establish as the blog folder.
Tip:
You can expose any folder as a blog. To better organize your blogs, you may consider storing each blog folder in a parent folder; for example, a folder named Blogs. You can create a folder using either a documents task flow or the WebCenter Content console.Files stored in the blog folder are identified as blog posts in their metadata
Typefield, which is set toBlog Post. Uploading an HTML file into a blog folder does not expose it as a blog post, unless you set itsTypetoBlog Post. -
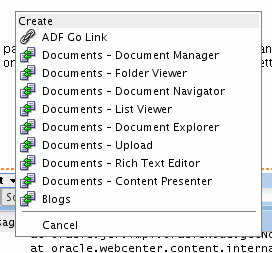
Drag the folder onto the page, and release the mouse button to display a menu listing all available task flows (Figure 30-5).
Figure 30-5 Menu of Available Task Flows for Selected Folder
Description of ''Figure 30-5 Menu of Available Task Flows for Selected Folder''
-
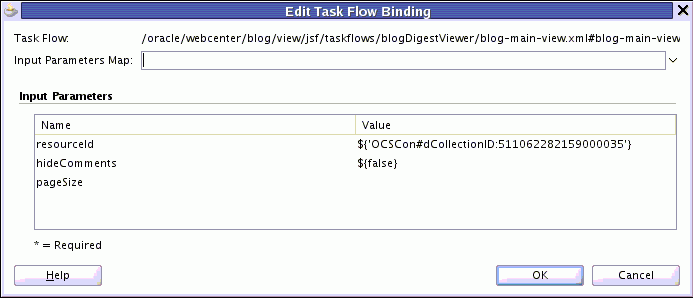
From the menu, choose Blogs to open the Edit Task Flow Binding dialog (Figure 30-6).
Figure 30-6 Specifying Parameters for Blogs Task Flow
Description of ''Figure 30-6 Specifying Parameters for Blogs Task Flow''
-
In the Edit Task Flow Binding dialog, the
resourceIdvalue is automatically populated with the resource ID of the selected folder. Click OK to accept the default task flow parameters, or modify the parameters as desired. For more information, see Section 30.4.5.5, "Blogs Task Flow Parameters." -
Save your page and the page definition file, then run your page to your browser by right-clicking the page (not the page definition file) and choosing Run.
The new blog is given the same name as the selected folder. Existing files under the folder become blog posts if the Type property of the file is set to Blog Post. As posts are added to the blog at runtime, the blog posts are stored in this folder. See Section 30.4.3, "What Happens at Runtime."
30.4.2.2 Adding a Custom Blog to a Page Using the Blog Task Flows
You may want to add an "empty" blog task flow onto your page, either as one component on a page, or as the entire page. For example, in cases where you do not have a content repository connection, or want to use an EL expression as a parameter to dynamically bind to a target item, you may want to use this method instead of the method described in Section 30.4.2.1, "Adding a Blog Using an Existing Folder." Additionally, the individual blog task flows enable you to customize the appearance of a blog.
To add a customized blog task flow to a page:
-
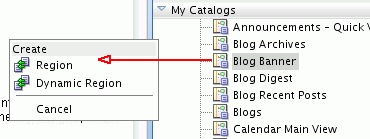
In the Resource Palette, expand the WebCenter Portal - Services Catalog. Under Task Flows, select the blog task flow that you want to add, drag it onto your page, and release the mouse button.
For information about each of the five blog task flows, see Section 30.4.1, "Understanding the Blog Task Flows."
-
From the menu that displays, choose Region (Figure 30-7).
Figure 30-7 Adding Blog Task Flow Using Resource Palette
Description of ''Figure 30-7 Adding Blog Task Flow Using Resource Palette''
-
In the Edit Task Flow Binding dialog, click OK to accept the default task flow parameters, or modify the parameters as desired. For information, see Section 30.4.5, "Blog Task Flow Parameters."
-
Repeat these steps for each blog task flow that you want to comprise your blog.
-
Save your page and the page definition file, then run your page to your browser by right-clicking the page (not the page definition file) and choosing Run.
Internally, the new blog is given the same name as the folder specified by the resourceID; however, the name visible on the page is the value you specify in the Title parameter of the Blog Banner task flow. Existing files under the folder become blog posts if the Type property of the file is set to Blog Posts. As posts are added to the blog at runtime, the blog posts are stored in this folder. See Section 30.4.3, "What Happens at Runtime."
30.4.3 What Happens at Runtime
At runtime, the folder specified by the resourceID parameter for the blog task flow is exposed as a blog on the page:
-
If you created a blog as described in Section 30.4.2.1, "Adding a Blog Using an Existing Folder," then the name of the folder that you exposed as a blog is displayed as the name of your blog in the blog banner.
-
If you created a blog as described in Section 30.4.2.2, "Adding a Custom Blog to a Page Using the Blog Task Flows," then the name of the folder that you specified in the
resourceIDparameter of the blog task flow is the name of your blog internally; however, the name visible on the page is the value that you specified in theTitleparameter of the Blog Banner task flow.
Authorized users can create blog posts, and the posts are displayed on the blog page. Users can perform tasks such as edit, download, comment upon blog posts, and so on.
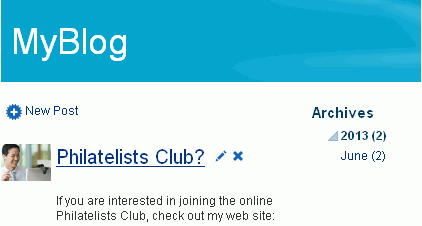
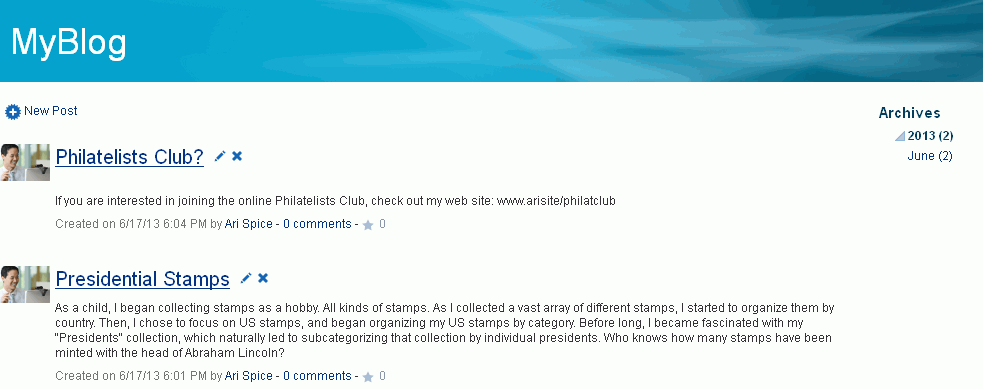
On the default blog page (Figure 30-8), and in the Blog Archives task flow, the Archives section provides links to blog posts by year and by month. Clicking a month displays all blog posts created during that month.
A blog displays various details for each blog post. These include the blog post title, the blog post content, date of creation or modification, name of the user who created or last modified the post, and the number of comments on the blog post. Authorized users can click the Edit Post icon to edit a post, and click the Post comments link to enter comments on a blog post.
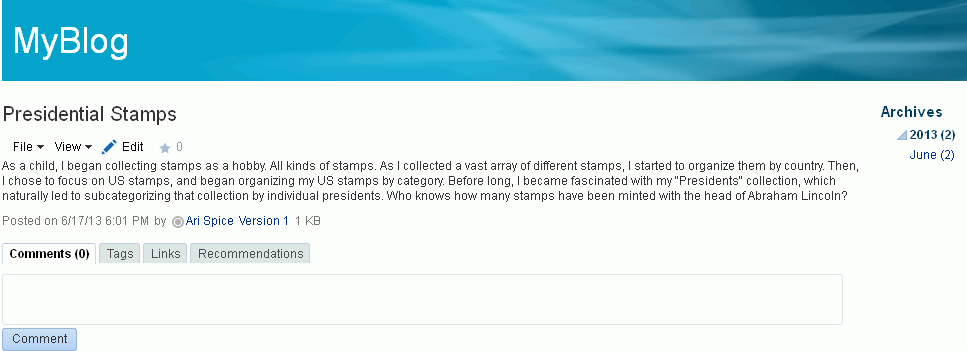
Clicking a blog post title opens the blog post to occupy the entire the blog page (Figure 30-9), providing controls to manage the blog post.
When public users (not logged in) view a blog post in a Portal Framework application, they will not see the profile photos associated with each blog post because the anonymous-role that is assigned to public users is not granted permission to view profiles by default (see Table 74-2, "Automated Security Grants for Portal Framework Applications"). Your system administrator can use the grantPermission WLST command (see the "grantPermission" section in the WebLogic Scripting Tool Command Reference) to allow public users to view profile photos for blog posters. For example:
grantPermission(appStripe=<app-name>,
  principalClass="oracle.security.jps.internal.core.principals.JpsAnonymousRoleI mpl",
  principalName="anonymous-role",
  permClass="oracle.webcenter.peopleconnections.profile.security.ProfilePermission",
  permTarget="/oracle/webcenter/peopleconnections/profile/s8bba98ff_4cbb_40b8_beee_296c916a23ed/.*",
  permActions="view")
The procedures for managing blogs at runtime in a Portal Framework application are the same as those for managing blogs in WebCenter Portal. For information, see the "Working with Blogs" chapter in Using Oracle WebCenter Portal.
30.4.4 Modifying Blog Task Flow Parameters
The procedure for modifying the parameters of a Blogs task flow is the same as any other documents task flow. For information, see Section 29.6, "Modifying Content Task Flow Parameters." For information about the specific parameters that you can modify, see Section 30.4.5, "Blog Task Flow Parameters."
30.4.5 Blog Task Flow Parameters
Each blog task flow has its own set of parameters. You can configure these values when you add the task flow to your page, or modify the values at any time.
The following sections describe the parameters for the blog task flows:
30.4.5.1 Blog Archives Task Flow Parameters
The Blog Archives task flow displays a composite list of blogs based on dates.
Parameters that are unique to the Blog Archives task flow are shown in the Edit Task Flow Binding dialog box when you add the task flow to a page. Table 30-2 describes the Blog Archives task flow parameters.
Table 30-2 Blog Archives Task Flow Parameters
| Parameter | Description |
|---|---|
|
|
The resource ID of the blog folder (see Figure 30-6), which can be specified in the following formats:
|
30.4.5.2 Blog Banner Task Flow Parameters
The Blog Banner task flow task flow displays a banner for the blog.
Parameters that are unique to the Blog Banner task flow are shown in the Edit Task Flow Binding dialog box when you add the task flow to a page. Table 30-3 describes the Blog Banner task flow parameters.
Table 30-3 Blog Banner Task Flow Parameters
| Parameter | Description |
|---|---|
|
|
The resource ID of the blog folder (see Figure 30-6), which can be specified in the following formats:
|
|
|
(Optional) The background image to be used in the blog banner. When not specified, the background image will default to an image provided by the current skin. |
|
|
(Optional) The title to be used for the blog banner. Default: The blog folder name. |
30.4.5.3 Blog Digest Task Flow Parameters
The Blog Digest task flow displays a blog or blog post.
Parameters that are unique to the Blog Digest task flow are shown in the Edit Task Flow Binding dialog box when you add the task flow to a page. Table 30-4 describes the Blog Digest task flow parameters.
Table 30-4 Blog Digest Task Flow Parameters
| Parameter | Description |
|---|---|
|
|
The target blog resource to display. This can be either a folder ID, in which case the blog listing for this folder will display, or a document ID, in which case the blog post will display. A folder can be specified in the following formats:
Note: To allow users to add new blog posts (by clicking New Post in the task flow), the specified folder must have a security group assigned in WebCenter Content. |
|
|
A four-digit number specifying the target year used to filter blog entries. Example: |
|
|
A number from 1 to 12 specifying the target month used to filter blog entries. For this parameter to take effect, the Filter Year parameter must also be specified. Example: |
|
|
Specifies whether the Comments feature is exposed:
|
|
|
The number of blog posts displayed in the Blog Digest Viewer before the Next and Previous icons are enabled. Default: |
30.4.5.4 Blog Recent Posts Task Flow Parameters
The Blog Recent Posts task flow displays a list of most recent blog posts.
Parameters that are unique to the Blog Recent Posts task flow are shown in the Edit Task Flow Binding dialog box when you add the task flow to a page. Table 30-5 describes the Blog Recent Posts task flow parameters.
Table 30-5 Blog Recent Posts Task Flow Parameters
| Parameter | Description |
|---|---|
|
|
The resource ID of the blog folder (see Figure 30-6), which can be specified in the following formats:
|
|
|
The number of recent posts to display. Default: |
30.4.5.5 Blogs Task Flow Parameters
The Blogs task flow displays a blog or blog post with a default design.
Parameters that are unique to the Blogs task flow are shown in the Edit Task Flow Binding dialog box when you add the task flow to a page. Table 30-6 describes the Blogs task flow parameters.
Table 30-6 Blogs Task Flow Parameters
| Parameter | Description |
|---|---|
|
|
The target blog resource to display. This can be either a folder ID, in which case the blog listing for this folder will display, or a document ID, in which case the blog post will display. A folder can be specified in the following formats:
Note: To allow users to add new blog posts (by clicking New Post in the task flow), the specified folder must have a security group assigned in WebCenter Content. |
|
|
Specifies whether the Comments feature is exposed:
|
|
|
The number of blog posts displayed in the Blogs task flow before the Next and Previous icons are enabled. Default: |


