D Deploying Images and JAR files as Part of a Shared Library JAR file
If you have customized an application, a skin, or a resource bundle, you need to deploy it as a JAR file within a shared library JAR file. This appendix explains how to do this.
D.1 How to Deploy Images and JAR Files as Part of a Shared Library JAR File
In this section, we use an example in which you include in a shared library JAR file the files you previously created:
-
customSkin.jaras described in Section 9.2.7, "How to Choose a Skin in Process Workspace" -
customer-impl.jaras described in Appendix C, "Customizing Applications in Process Workspace and the Worklist Application" -
ResourceBundle.jaras described in Appendix B, "Customizing a Resource Bundle".
To deploy images and JAR files as part of a shared library JAR file:
-
Create a temp directory,
mkdir temp. -
Unzip all the jar files into the
tempfolder.unzip customSkin.jar -d temp/ unzip customer-impl.jar -d temp/ unzip ResourceBundle.jar -d temp/
After you do this, you can see a
META-INFfolder included in the temp folder.Note:
You can create animagesdirectory inside thetempdirectory and copy your customized logo file into it. Then from the application preferences, you can refer to it as/images/customizedLogo.jpg. -
Create a
MANIFEST.MFfile underMETA-INFdirectory. This file should contain the following:Manifest-Version: 1.0 Ant-Version: Apache Ant 1.7.1 Created-By: 19.1-b02 (Sun Microsystems Inc.) Implementation-Vendor: Oracle Implementation-Title: Custom Client Applib Implementation-Version: 1.0 Product-Name: Custom Client Applib Specification-Version: 1.0 Extension-Name: custom.client.applib
-
To ensure that all required class files and other skin files are available in the shared library, package everything into the file
custom.client.applib.jar. To do this, navigate to the temp directory and run the following command:jar -cvfm custom.client.applib.jar META-INF/MANIFEST.MF *
You have now created the shared library under the
tempdirectory. It looks like this:temp/custom.client.applib.jar. -
Deploy
custom.client.applib.jaron the Oracle WebLogic Server as a shared library. To do this: From the Oracle WebLogic Server Console, click Deployments and Install, navigate to the JAR file location, and deploy. -
Restart the Worklist Application or Process Workspace from the Oracle WebLogic Server. Figure D-1 shows the interface for restarting the Worklist Application.
Figure D-2 shows the Oracle WebLogic Server interface for restarting the Worklist Application.
Figure D-2 Restarting Worklist Application

Description of "Figure D-2 Restarting Worklist Application"
-
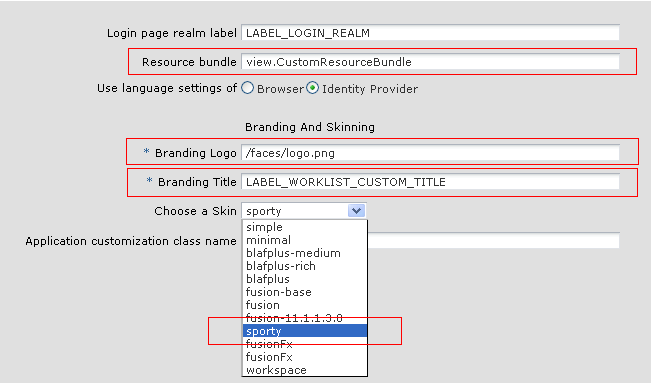
Log in to either Worklist Application or Process Workspace, navigate to the Application Preferences page, and specify your customized items. Figure D-3 highlights the fields to specify.
Figure D-3 Setting Application Preferences

Description of "Figure D-3 Setting Application Preferences"
Note:
To be sure that your branding logo is retrieved, in the Branding Logo field, be sure to precede the file name of your logo with the path name/faces/.
