OCI Compute Images
Describes OCK images used to create Kubernetes nodes on OCI.
Creating clusters with the OCI provider requires a custom compute image in the target compartment. The bootable container image must be customized to work in OCI, and must be converted into an appropriate format. After an appropriate image has been created, it must be imported to the target compartment.
Note:
If you're using customized Kubernetes Cluster API template files, you first need to create an image for the compute instance architecture, and upload it to OCI. If you're not using customized templates, you don't need to create and upload the image manually, as it's done for you automatically when you create the Kubernetes cluster.
Bootable OCK images in Qcow2 format can be
created using the ocne image create command with the --type
oci option. By default, the image is created for the architecture of the
system where the command is run. Images can be created for other architectures using the
--arch option.
The resulting OCK image can be imported into OCI using the ocne image upload
command, and used as the boot volume for compute instances. When you use the
ocne image upload command to upload a Qcow2 image, the conversion
to the appropriate format is performed automatically.
The image is uploaded to an OCI Object Storage bucket. After the upload is complete, the object is imported as a custom compute image.
The custom compute image can then be used to create compute instances for a Kubernetes cluster.
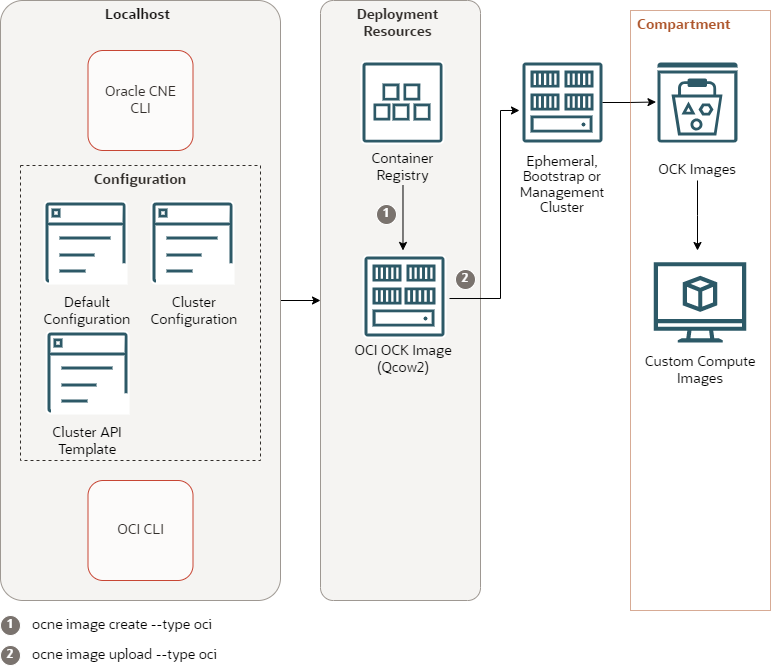
Figure 7-2 OCK Images for an OCI Cluster

The architecture has the following components:
-
CLI: The CLI used to create and manage Kubernetes clusters. The
ocnecommand. -
Default configuration: A YAML file that contains configuration for all
ocnecommands. -
Cluster configuration: A YAML file that contains configuration for a specific Kubernetes cluster.
-
Cluster API template: A YAML file that contains Cluster Resources for the Kubernetes Cluster API to create a cluster.
-
OCI CLI: The OCI CLI is installed on the localhost, including the configuration to read and write to the tenancy and compartment.
-
Container registry: A container registry used to pull the images used to create nodes in a Kubernetes cluster. The default is the Oracle Container Registry.
-
OCI OCK image: The CLI is used to create this image, based on the OCK image, pulled from the container registry. The CLI is then used to upload this image to OCI.
-
Ephemeral cluster: A temporary Kubernetes cluster used to perform a CLI command.
-
OCI Object Storage bucket: The OCK image is loaded into an Object Storage bucket. When the upload is complete, a custom compute image is created from the OCK image.
-
Custom compute image: The OCK image is available as a custom compute image and can be used to create compute nodes in a Kubernetes cluster.
The CLI uses any configuration files supplied to generate an OCK image. The CLI pulls the bootable Qcow2 OCK image from the container registry, and coverts it to an image that can be used for OCI. The CLI loads the OCK image to an OCI Object Storage bucket. The OCK image is then converted to a custom compute image, which can be used to create compute nodes in a Kubernetes cluster.
Note:
The object in the bucket isn't automatically removed, and must be cleaned up manually when no longer required.