 Integrating
with Google through OpenIDConnect (OIDC) Plugin
Integrating
with Google through OpenIDConnect (OIDC) Plugin Before You Begin
This 15-minute tutorial shows you how to integrate Google, a
sample social identity site, by configuring OpendIDConnectPlugin
(OIDC) in Oracle Access Management.
Background
From 12c (12.1.3.0) Bundle Patch onwards Oracle Access
Management provides an out-of-the-box authentication plugin
called “OpenIDConnectPlugin” (OIDC). This is a generic plugin
that allows you to integrate with any OpenID 2.0 social identity
providers, such as Google,Facebook, Oracle Identity Cloud
Service or even Oracle Access Management. This plugin redirects
to the Identity Provider (IDP) it is integrated with, using
OpenIDConnect protocol. After authenticating the user at the
IDP, the control is submitted back to Oracle Access Management
server where the user is asserted by Oracle Access Management
and an Oracle Access Management session is created.
In this tutorial, you will learn how to configure
OpendIDConnectPlugin in the Oracle Access Management console in
order to integrate it with Google.
What Do You Need?
- An environment with:.
- Oracle Enterprise Linux 6.6 or later with access to internet
oraclecredentials- A basic understanding of Linux
- An installation and configuration of the following:
- Oracle Access Management 12c PS3 (12.2.1.3.0)
- Oracle Access Manager Bundle Patch 12.2.1.3.0 (Patch Number:27863715)
- Webgate 12c
 Register
a Client in Google
Register
a Client in Google
In this section, you will set up credentials in Google and
obtain the client_id and client_secret
values.
Note: The steps and the User Interface (UI)
described below may change at any time when Google API Console
is updated.
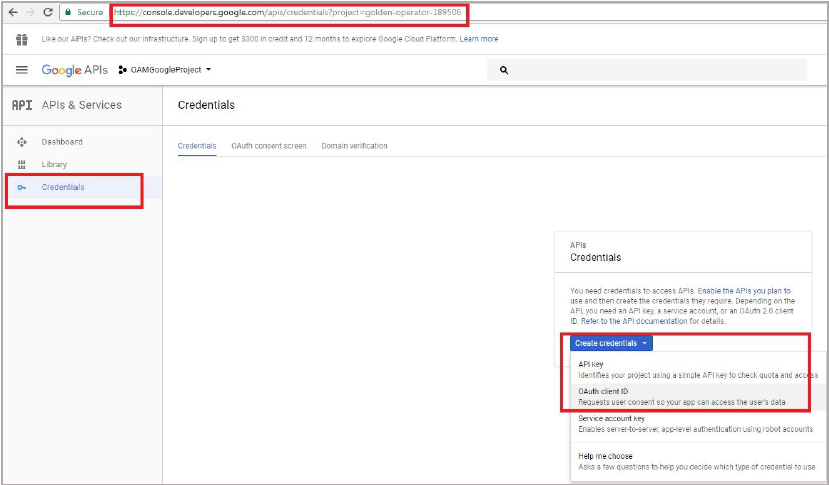
- Go to
console.developers.google.com. - Click Create Project and enter a name for the project, and click Create.
- If the APIs & Services page is not already open, open the console on the left side menu and select APIs & Services.
- On the left, click Credentials.
- On the Credentials page, select Create
Credentials, then select OAuth client ID.
Description of the illustration - Configure consent screen by clicking Configure consent screen.
- In the Application Name field, enter
Oracle
                    Access Management
. - In the Authorized Domains field, enter
oracle.comand click Save. - Select Web application for the Application Type.
- In the Authorized URIs field, enter the
endpoint on Oracle Access Management server as redirect URI
for the client. For example,
http(s)://OAM
                    HOST:port/oam/server/auth_cred_submit
. This is the URI where the authorization code is sent after the user completes the authentication and authorization with Oracle Access Management server. - Click Create.
- Copy client_id and client_secret to your clipboard as you will need them when you configure Authentication Module in Oracle Access Management.
- Click OK.
 Create
a New Authentication Module
Create
a New Authentication Module
In this section, you will create a new authentication module in the Oracle Access Management console.
- Start a web browser and login to the Oracle Access
Management console at
http://hostname:port/oamconsoleusing your admin credentials. - From the Application Security tab, click Authentication Modules link in the Plug-ins tile.
- From Create Authentication Module drop-down list, select Create Custom Authentication Module.
- Enter
Google-AuthModulein the Name field and click the Steps tab. - Click Add and enter
OIDCin the Step Name field in the Add new step screen. - Select OpenIDConnectPlugin from the Plug-in Name drop-down list and click OK.
- Click Add again and enter
UIin the Step Name field. - Select UserIdentificationPlugIn from the Plug-in Name drop-down list and click OK.
- Click the Steps Orchestration tab.
- From the Initial Step drop-down list, select OIDC.
- Set the values as shown in the figure below:
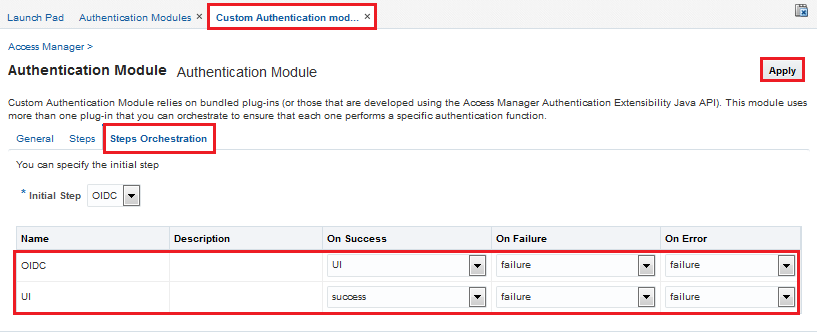
Description of the illustration - Click Apply.
- Click the Steps tab and select the OpenIDConnectPlugin (OIDC).
- Follow the below table to guide you with the fields, sample
values, and descriptions for the Step Details section:
Field Value Mandatory/Optional Description id_domain Text Optional Enter the identity domain. It is required for integration with Oracle Access Management as an IDP since all the artifacts (client) are created under the Identity Domain in Oracle Access Management. oauth_client_secret
Mandatory Enter the OAuth client secret. token_end_point Text Optional Enter the access token endpoint, it is required ONLY if the IDP does not support Discovery URL. authz_end_point
Optional Enter the authorization endpoint, (required ONLY if the IDP does not support Discovery URL) require_proxy
Optional Set it to false, if the plugin does not use the proxy configuration and redirects directly to the IDP.
Note: If proxy is required to connect to the IDP, add this setting before starting the server:Dhttp.proxy.Host=www-proxy.example.com -Dhttp.proxy.Port=80provider google Mandatory Enter google. scope
Optional The default “scope” sent to the IDP is openid email. If this has to be overwritten, we can set a new scope with this plugin parameter. userinfo_end_point
Optional Enter the user information token endpoint, it is required ONLY if the IDP does not support Discovery URL. additional_parameters
This is not used as of now. It can be left blank. discovery_ur https://accounts.google.com Mandatory Enter the discovery URL at IDP-end with the format, http(s)://URL host. It provides authorization, token, and userinfo endpoints information
The baseURL, /.well-known/openid-configurationis appended to the discover URL for building the expected format ofhttp(s)://URL host/.well-known/openid-configuration. The plugin fetches authorization, token and user information endpoints from this discovery URL and redirects to the same.username_attr email Mandatory This parameter indicates, which attribute should be read from the Identity Token.
Sends the email of the user via “email” attribute.
E.g.: {“email” : “John.Doe@gmail.com”}oauth_client_id
Mandatory Enter the OAuth client id. - Click Save.
- Select UserIdenitificationPlugIn.
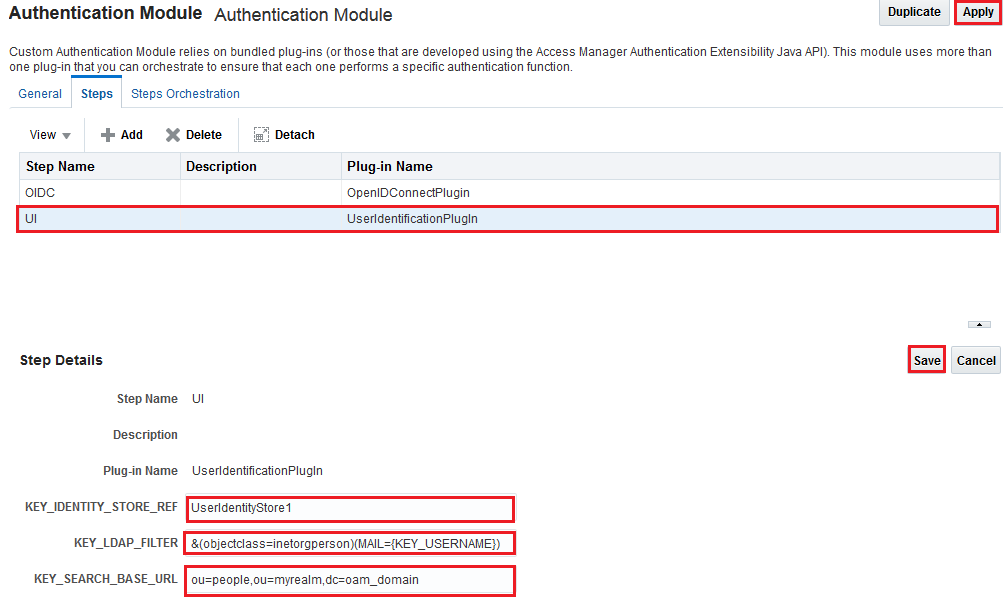
Description of the illustration - In the KEY_IDENTITY_STORE_REF field, enter
UserIdentityStore1. - In the KEY_LDAP_FILTER field, enter
&(objectclass=inetorgperson)(MAIL={KEY_USERNAME}). - In the KEY_SEARCH_BASE_URL field, enter
ou=people,ou=myrealm,dc=<domain
                    name>
. - Click Save, then click Apply.
 Create
New Authentication Scheme
Create
New Authentication Scheme
In this section, you will create and configure an
authentication scheme that uses the authentication module that
you created and configured in the previous sections. In
addition, you will set the Challenge Parameters to
initial_command=NONE so that the control is passed on to the
plugin.
- From the Application Security tab, click the Authentication Schemes link in the Access Manager tile.
- Click Create Authentication Scheme.
- Set the values as shown in the figure below:
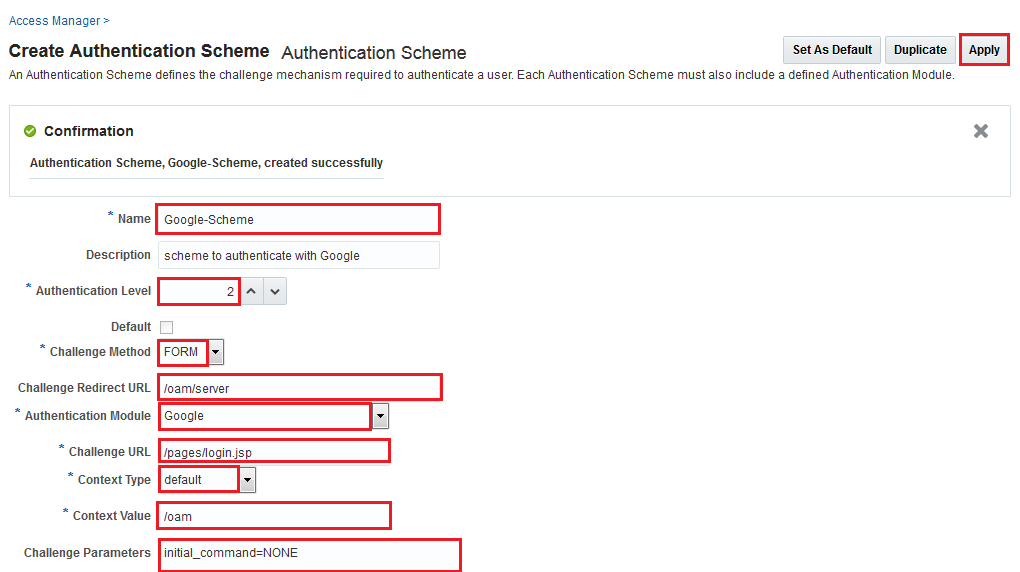
Description of the illustration - Click Apply.
 Modify
Authentication Policy in Application Domain
Modify
Authentication Policy in Application Domain
In this section, you will modify the authentication policy in the application domain of the protected resource to use the authentication scheme created in the previous section.
- From the Application Security -> Launch Pad tab, click Application Domains in the Access Manager tile.
- Click Search.
- From Search Result, click the application domain for the protected resource.
- Click the Authentication Policies tab.
- Click Protected Resource Policy.
- From the Authentication Scheme drop-down, select Google-Scheme.
- In the Resources tab, click ADD.
- In the Add Resources screen, enter
IAMSuiteAgentin the Host Identifier field. - Enter
/index.htmlin the Resource URL field. - Click Add Selected.
- Click Apply.
 Verify
that User Exists in Identity Store
Verify
that User Exists in Identity Store
In this section, you will verify that the user exists in the back-end Identity Store, such as Oracle Internet Directory or Oracle Unified Directory or Embedded LDAP server. In this example, the back-end identity store is Oracle WebLogic's Embedded LDAP server.
- Launch Oracle WebLogic Server Administration Console.
- In the Oracle Administration WebLogic Console, select Security Realms from the left pane and click the realm you have configured. For example, “myrealm”.
- Select the Users and Groups tab.
- From Users, click the user that has set up credentials in Google.
- In the Attributes table, verify the value of the mail attribute. The value must exactly match with the Google email id. For example, John.Doe@gmail.com.
 Configure
Social Login in Oracle Access Management
Configure
Social Login in Oracle Access Management
In this section, you will configure social login in Oracle
Access Management. The relevant settings are in the setDomanEnv.sh
file.
- Launch the terminal window as
oracle. - Enter the following command:
- Open the
setDomainEnv.shfile using any text editor. - Add JAVA_OPTIONS:
-Dhttp.proxy.Host=<proxy host>and-Dhttp.proxy.Port=<proxy port>for Oracle Access Management Managed Server. - Add
-DUseSunHttpHandler=true.
$ cd /u01/app/oracle/admin/domains/<domainname>
 Access
Protected Resource
Access
Protected Resource
In this section, you will access the protected resource. In
this example, http://<oam.example.com>:7777/index.html
is the protected resource.
- Close any open existing browsers and open a new browser.
- Access
http://<oam.example.com>:7777/index.html. You will be redirected to the Google login page. - Log into Google with your user credentials.