3.3 Running the Configuration Assistant
- After the Oracle GoldenGate Veridata installation is complete,
navigate to the bin directory, and run
vdtca.shto display the Configuration Assistant. - If you choose to install a new MySQL instance, then ensure that the
system does not have any other MySQL database installed on the same node.
Note:
The Schema Prefix field supports only the following specific set of characters, as described in Permitted characters in unquoted identifiers of the MySQL Reference Manual:- ASCII: [0-9,a-z,A-Z$_] (basic Latin letters, digits 0-9, dollar, underscore)
- Extended: U+0080 .. U+FFFF
Note:
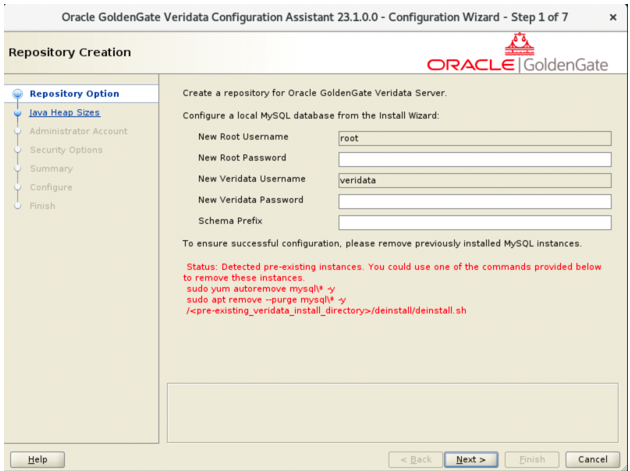
If the Configuration Assistant detects a pre-existing MySQL instance in the system, then it displays the information with red text shown as follows:For releases 23c to 23.4.0.0:Figure 3-7 Repository Creation Page for a New MySQL Install
 For releases 23.5.0.0 and later:
Figure 3-8 Repository Creation Page for a New MySQL Install

- In version 23.5, you can choose to install MySQL either with sudo privileges or without sudo privileges, depending on your system permissions and installation requirements.
- If you select the non-sudo option and click Next, a message is displayed to confirm a non-sudo installation.
- If you select the sudo option, a message is displayed indicating that you must manually execute the MySQL startup script using sudo privileges to start the MySQL service.
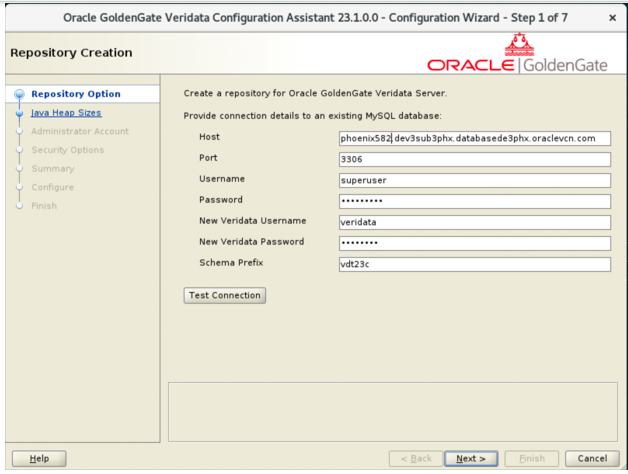
If MySQL is an existing database, then in the Repository Creation page, enter the database details for all the text fields.Note:
If the Configuration Assistant shows a warning message saying it has detected a pre-existing MySQL for the new MySQL installation option, then run the following command:yum list installed | grep mysqland verify if any MySQL database or package is installed in the system. If you are sure that the MySQL database does not exist in the system, then you can safely ignore the warning and proceed with the configuration. For example,pcp-pmda-mysql.x86_64package can cause a false warning.- The New Veridata Username and the Username cannot be same. The new veridata user which gets created as part of this process will be allowed to access only the Veridata repository being created.
- Ensure that the user given in Username has full privilege
on the Mysql instance as this user would create a veridata repository in
database. If the user does not have the sufficient privileges then the
same can be provided by running below queries in MySQL:
CREATE USER 'superuser'@'%' IDENTIFIED BY 'superpassword';
GRANT ALL PRIVILEGES ON *.* TO 'superuser'@'%' WITH GRANT OPTION;
FLUSH PRIVILEGES;
SHOW GRANTS FOR 'superuser'@'%';
Figure 3-9 Repository Creation Page for an Existing MySQL
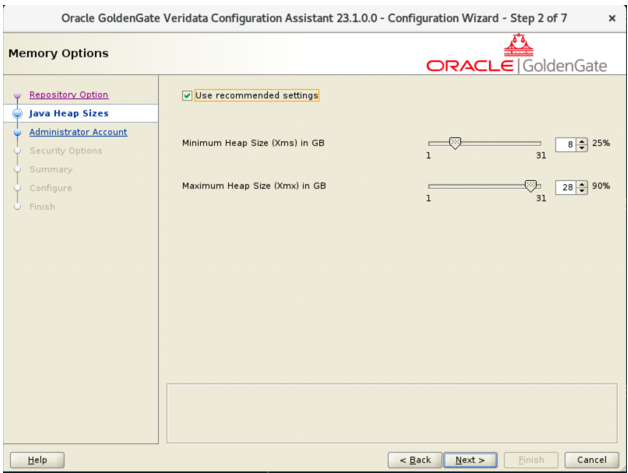
- In the Memory Options page, for the Java Heap Sizes,
select Use recommended settings (or modify according to your
requirements) and click Next.
Figure 3-10 Memory Options
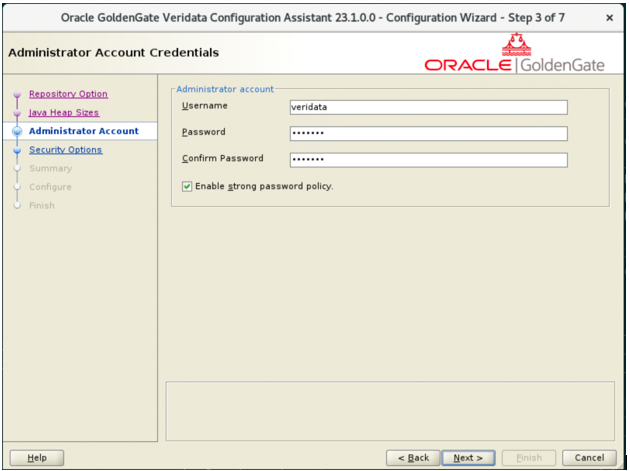
- In the Administrator Account Credentials page, enter the
Veridata Administrator Username, Password, and Confirm
Password and click Next.
Figure 3-11 Administrator Account Credentials
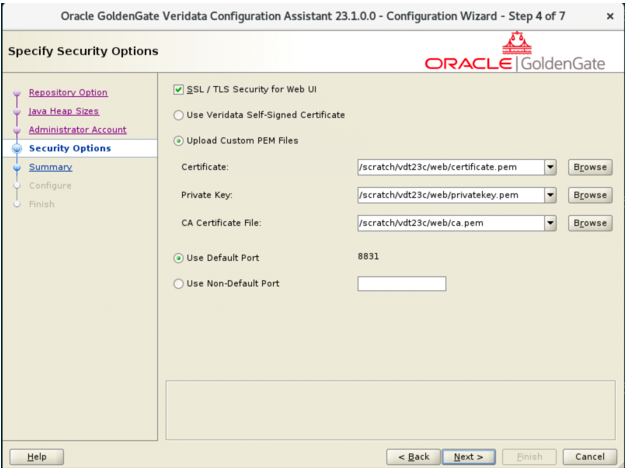
- The Security Options step of the Oracle GoldenGate Veridata
Configuration Assistant allows users to configure the security settings for the
Web User Interface (UI) by selecting encryption options, certificates, and
communication ports. The primary function of this screen is to secure the
connection between the client and the server using SSL/TLS protocols. This point
outlines each of the available options and describes how to configure them.
- SSL / TLS Security for Web UI
- Purpose: Enabling this option ensures that communication between the Web UI and users is encrypted using SSL (Secure Sockets Layer) or TLS (Transport Layer Security).
- Default Setting: This checkbox is enabled by default, meaning SSL/TLS is turned on.
- Implications: If disabled, the communication will not be encrypted, making it vulnerable to eavesdropping and other security threats. You can opt in to disable SSL/TLS for faster and simpler deployment in a test environment.
Note:
The SSL / TLS Security for Web requires 8830 port to be open apart from the selected port. If 8830 the port is not open, then Oracle GoldenGate Veridata server does not start after the installation. In such a case, do the following after installation:- Update the following property in
<VERIDATA_HOME>/config/oggvdt_cainput.properties
                                            server.port=8830
to an available port. - Start the Oracle GoldenGate Veridata server
from
<VERIDATA_HOME>/bin:./run.sh
- Certificate Configuration
To secure the Web UI, Oracle GoldenGate Veridata uses X.509 certificates. The configuration wizard provides two ways to specify certificates outlined as follows:
- Use Veridata Self-Signed Certificate:
- Purpose: Use this option if you want Veridata to automatically generate a self-signed SSL certificate.
- Pros:
- Quick and easy setup with no need for external certificate files
- Useful in non-production environments or internal use cases where a trusted Certificate Authority (CA) is not necessary.
- Cons:
- Self-signed certificates are not trusted by web browsers without manual intervention.
- Not suitable for production environments where certificates must be validated by a third-party CA.
- Upload Custom PEM Files
- Purpose: This option allows users to specify their own SSL certificate, private key, and CA certificate files (in PEM format).
- Required Files: This is the public
certificate (usually with a
.pemor.crtextension) that will be used to identify the server to clients.- File Input Field: Certificate
- Example Path:
/scratch/vdt23c/web/certificate.pem
- CA Certificate File: This file
contains the certificate(s) of the Certificate Authority
(CA) that signed the server certificate. The CA file is
used to verify that the server certificate is
trusted.
- File Input Field: CA Certificate File
Example Path:
                                                  /scratch/vdt23c/web/ca.pem
- When to Use: This option is best suited for production environments where an official SSL certificate issued by a trusted CA (such as Let’s Encrypt, DigiCert, or GoDaddy) is required.
- Use Veridata Self-Signed Certificate:
- Port Configuration
Oracle GoldenGate Veridata operates over specific ports, and users can define whether to use the default port or a custom one.
- Use Default Port (8831)
- Purpose: The default port for SSL/TLS connections to the Veridata Web UI is 8831.
- When to Use
- Suitable for environments where port 8831 is open and available.
- Easier to configure, especially in less restrictive network environments.
- Use Non-Default Port
- Purpose: Allows users to specify a custom port for Veridata to use for SSL/TLS traffic instead of the default 8831.
- When to Use
- In cases where the default port (8831) is blocked or already in use.
- When a specific port policy is enforced by your IT or security team (for example, using port 443 for HTTPS traffic).
- Configuration: Enter the custom port number into the input field provided.
- Use Default Port (8831)
Figure 3-12 Security Options
- SSL / TLS Security for Web UI
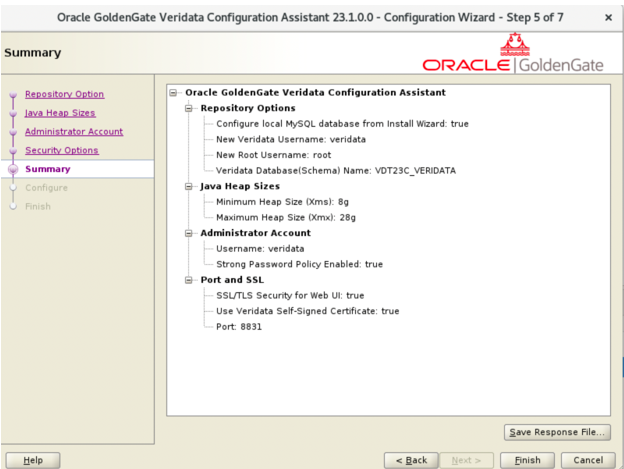
- Review the configuration summary on the Summary page. Click
Save Response File to save the respose file if needed.
Figure 3-13 Conifuguration Assistant Summary
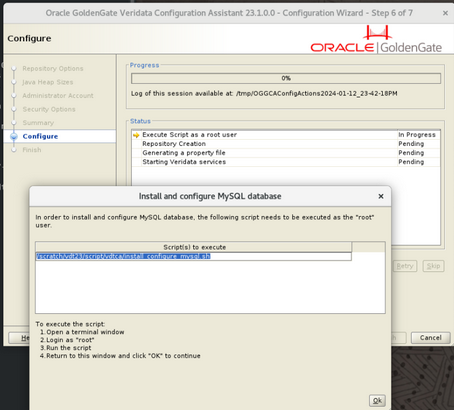
- Open a terminal and run
sudo suto change toroot. After you see the following screen, run the script as root.Figure 3-14 Configure root
Note:
The root script should typically take 10-15 seconds.If theinstall_configure_mysql.shscript was executed successfully, the console will display the following information:- The Configuration Assistant will set the root user password as what you entered in the next stage of veridata repository creation.
-
MySQL has been installed and started.
-
Please return to the Configuration Assistant and click OK to continue.
Then follow the console instruction, return to the Configuration Assistant and click OK to continue.
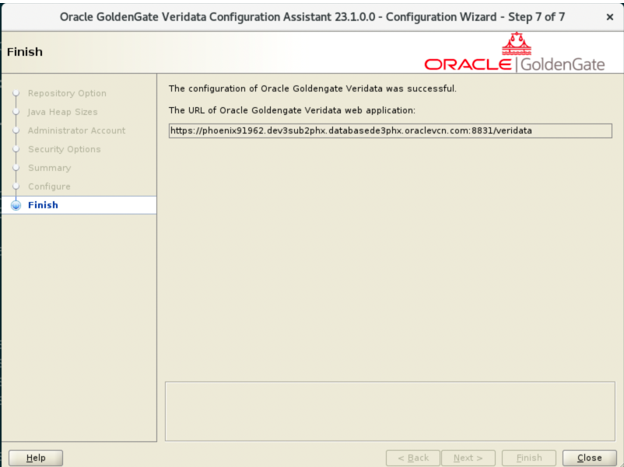
- After a successful configuration, the Finish page displays
the URL of Oracle Goldengate Veridata web application. Input the URL to a web
browser to verify that the Oracle GoldenGate Veridata server is running.
Figure 3-15 Configuration Complete
Parent topic: Install