Deploy Oracle Analytics Server Using Oracle Cloud Marketplace
If you subscribe to Oracle Cloud with Universal Credits or have an Oracle Fusion Middleware on-premises license for Oracle Analytics Server, you can deploy Oracle Analytics Server on Oracle Cloud using Oracle Cloud Marketplace. Two quick-deploy templates are available. Select the one that matches your subscription with Oracle: Universal Credits (UCM) or Bring Your Own License (BYOL).
- Complete the prerequisites tasks and record all the information you need in the checklist provided. See Before You Begin.
- Sign into Oracle Cloud
Infrastructure Console. Ensure that you have all the required security policies to deploy Oracle Analytics Server, and access to the compartments containing the prerequisite network and database infrastructure.
- In Oracle Cloud
Infrastructure Console, click
 in the top left corner.
 - Click Marketplace. Under Marketplace, click All Applications.
- Search for Oracle Analytics Server.
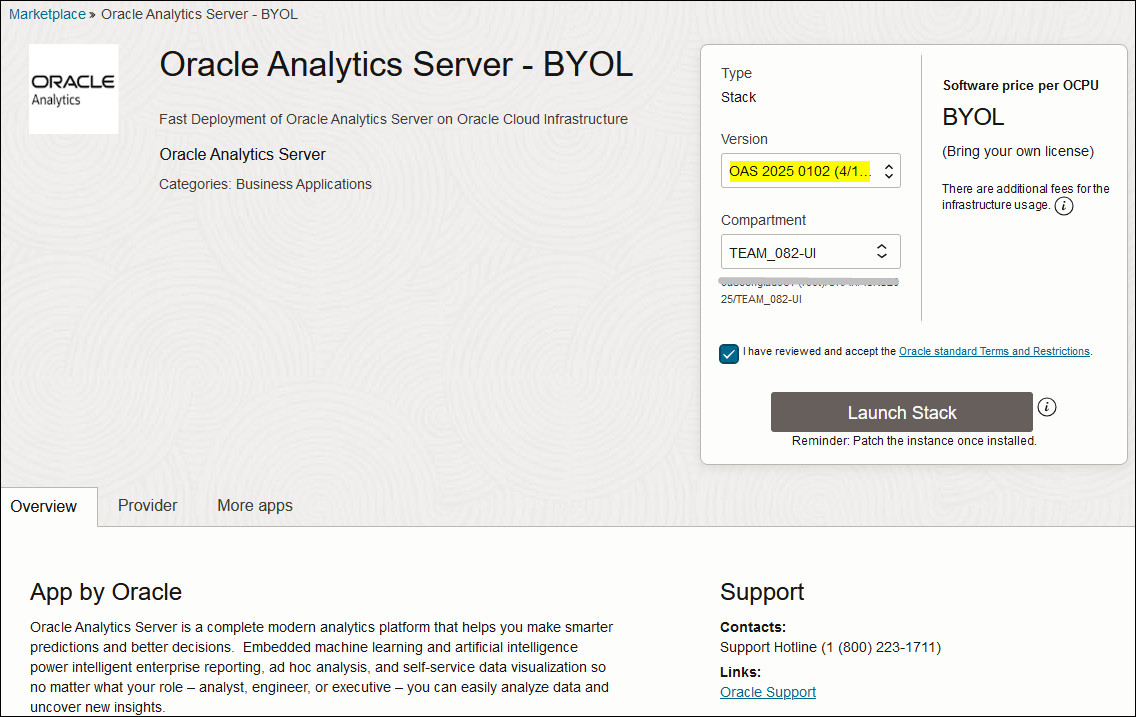
- Click Oracle Analytics Server - UCM or Oracle Analytics Server - BYOL.
- On Oracle Analytics Server's Marketplace page, select the version of Oracle Analytics Server you want to deploy.
- Select the compartment in which to deploy and run the stack. For example,
MyStacks.This is where you want to store Oracle Resource Manager (ORM) stack and jobs. - Review the Oracle standard terms and restrictions, and then select I have reviewed and accept the Oracle Standard Terms and Restrictions.
- Click Launch Stack.
- On the Create Stack page, enter details for your
stack.
- Enter a name for your Oracle Analytics Server stack. For example,
My-OAS-Marketplace-Stack. - Add your own description or leave the default. For example,
Stack to install Oracle Analytics Server on my TEST compute
                                instance
. - Add tags to organize and track resources within your tenancy.
- Click Next.
- Enter a name for your Oracle Analytics Server stack. For example,
- In Oracle Analytics Server Compute Instance, set values
for the compute instance on which Oracle Analytics Server will be deployed.
- Display Name - Enter a name for the
compute instance. For example,
MyTestOAS. - Target Compartment - Select the
compartment in which to deploy the Oracle Analytics Server compute instance that this stack generates. For example,
MyOracle_Analytics_Server.If you want Oracle Analytics Server to use resources located in a different compartment, ensure that you have the required policies to access them. For example, the VCN, subnet, and database you plan to use.
- Availability Domain - Select the domain in which to create the compute instance. Required only if your tenancy has more than one availability domain.
-
Shape - Select a shape for the compute instance.
If you select a flexible shape, you can specify the number of OCPUs and the amount of Memory (GB) that you want for the compute instance.
OCPUs - Enter a value between 1 and 64. The default is 1 OCPU.
Memory - Enter a value between 1 and 1024 GB. The default is 15 GB.
- Boot Volume Size - Select the size of the boot volume in GB. The minimum volume is 400 GB.
- SSH Public Key - Browse and select the public SSH key file or paste the value of the SSH key that you created to access the compute instance.
- Display Name - Enter a name for the
compute instance. For example,
- In Network Configuration, select the network on which
you want to deploy the compute instance for Oracle Analytics Server.
- VCN Compartment - Select the
compartment containing the Virtual Cloud Network (VCN) you want to use.
For example,
MyNetwork. - Virtual Cloud Network - Select the
Virtual Cloud Network (VCN) where you want to create the compute
instance. For example,
MyVCN. - Subnet Compartment - Select the compartment containing the subnet you want to use.
- Subnet - Select a subnet for the
compute instance. For example,
MySubnet.Note:
If you select a private subnet, you must set up a separate public subnet and a bastion compute instance (or load balancer) to provide administrative access to the compute instance. See Set Up Network Resources. - Assign a Public IP Address to the Compute Instance - Generates a public IP address for the compute instance. Only applicable if you select a public subnet. Don’t select this option if the subnet is private.
If you can't see the compartment, VCN, or subnet you want, check you have the required permissions.
- VCN Compartment - Select the
compartment containing the Virtual Cloud Network (VCN) you want to use.
For example,
- In Oracle Analytics Server Domain Configuration, select
Create Oracle Analytics Server Domain.
Note:
Don't select Create Oracle Analytics Server Domain, if you're creating an additional Oracle Analytics Server compute instance to scale out an existing Oracle Analytics Server deployment. - Optional: Select Use Oracle ATP Database if the database where you
plan to store Oracle Analytics Server product schemas is Oracle Autonomous Transaction
Processing (ATP). Deselect if you plan to use Oracle Database.
Note:
If you want to use Oracle ATP with Oracle Analytics Server 2024 (Step 7) you must manually create the Oracle Analytics Server domain. Deselect the option Create Oracle Analytics Server Domain, and skip Step 16. After deploying Oracle Analytics Server, follow these steps to manually create the domain with Oracle ATP: Configuring the Oracle Analytics Server Domain with the Configuration Assistant. - Provide details for Oracle Analytics Server domain configuration.
- Analytics Administrator Username -
Name of the user who will administer Oracle Analytics Server. Because this is a new user, you can enter any suitable username. For
example,
myoasadmin. - Analytics Administrator Password - Password for the Oracle Analytics Server administrator. Because this is a new password, enter any suitable password. The password must be at least 8 characters long and contain only alphanumeric, underscore (_), dollar ($) or pound (#) characters.
- Database Connection String - Connect
string for the database you want to use to store Oracle Analytics Server product schemas. The database must be a pluggable database (PDB) on
an Oracle Cloud virtual machine DB system (either Oracle ATP or Oracle
Database).
-
Oracle Autonomous Transaction
Processing (ATP)
Use the database connection string format:
jdbc:oracle:thin:@(description=
                                            (address=(protocol=tcps)(port=<port>)(host=<your_hostname_or_ip_address>))(connect_data=(service_name=<your_ATP_service_name>))
For example:
jdbc:oracle:thin:@(description=
                                            (address=(protocol=tcps)(port=1521)(host=adb.us-ashburn-1.oraclecloud.com))(connect_data=(service_name=myoasdb_medium.adb.oraclecloud.com))(retry_count=20)(retry_delay=3)(security=(ssl_server_dn_match=no)))
If you haven't done so already, you can obtain the connection string from the ATP wallet. See Prerequisites for an Oracle Autonomous Transaction Processing Database.
-
Oracle Database
Use the database connection string format:
<hostname or IP
                                            address>:<port>:<PDB_name>.<DB_domain>
For example:
oasdb.sub12345678901.oasvcn.oraclevcn.com:1512:OASDB1213_pdb1.sub12345678901.oasvcn.oraclevcn.com
-
Oracle Autonomous Transaction
Processing (ATP)
- Database Administrator Username -
Name of an existing user with database administration privileges. For
example,
myoasdba. - Database Administrator Password - Password of the user with database administration privileges.
- Database Schema Prefix - Prefix
added to the name of each database schema created for Oracle Analytics Server. For example,
MyOAS. - Database Schema Password - Password
to access the database schemas used by Oracle Analytics Server. This is a new password so you can enter any suitable value that
satisfies the password policy of database you want to use.
Note:
For example, a pluggable database (PDB) on an Oracle Cloud virtual machine DB system, has the following password policy:
- A minimum of 9 and a maximum of 30 characters.
- At least two uppercase characters.
- At least two lowercase characters.
- At least two special characters. The valid special characters are: underscore ( _ ), dollar ($), or a pound or hash sign (#). You can use two of the same characters or any combination of two of the same characters.
- At least two numeric characters (0 - 9).
- URL for the ATP Wallet in Object
Storage - (Oracle Analytics Server 2025 only) Pre-authenticated request URL with access to the
Autonomous Transaction Processing (ATP) wallet that you uploaded to
Object Storage. Use the format:
https://<object storage
                                location>/<ATP wallet zip filename>
For example:
https://objectstorage.<region>.oraclecloud.com/p/par_ID/n/namespace_ID/b/mybucket/o/myATPwallet.zipIf you haven't done so already, you can create a pre-authenticated request URL for the ATP wallet file from the Objects page. See Prerequisites for an Oracle Autonomous Transaction Processing Database.
Tip:
To ensure Oracle Analytics Server deployment goes smoothly, test the database connection and database administrator credentials before you create the stack. - Analytics Administrator Username -
Name of the user who will administer Oracle Analytics Server. Because this is a new user, you can enter any suitable username. For
example,
- Click Next.
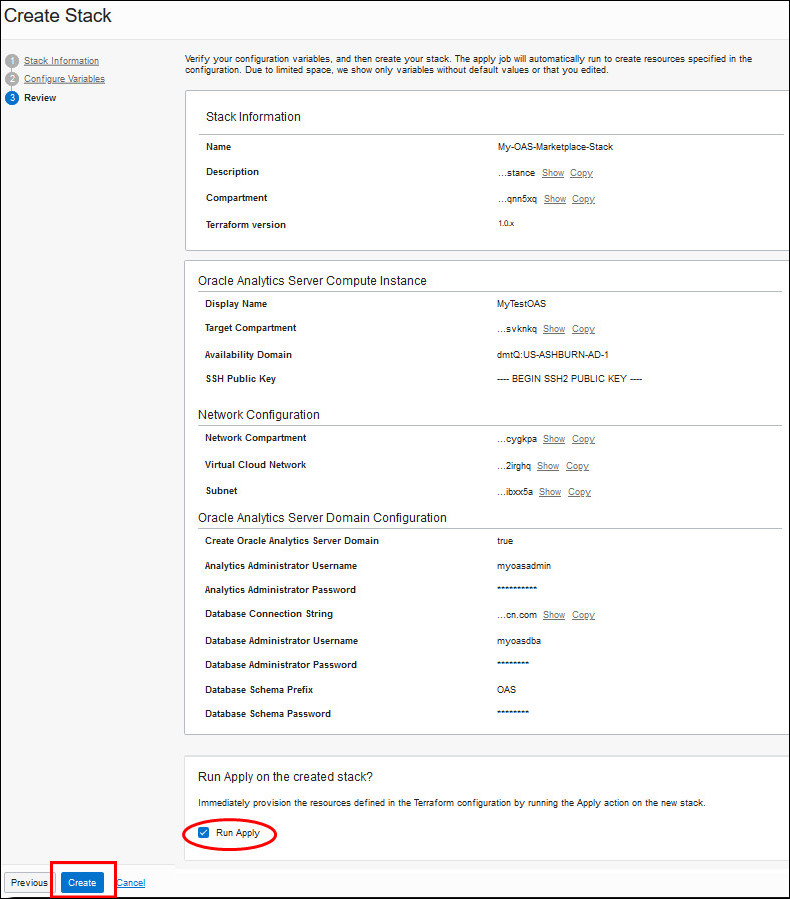
- Review the information you provided for the compute instance.
- Make sure you select Run Apply, and then click
Create.
Monitor progress on the Job Details page. When the stack job finishes, the state changes from In Progress to Succeeded.
If you opted to create and configure a domain, the process takes about 30 - 40 minutes to complete and starts in the background immediately after the stack job finishes. The exact time depends on multiple factors, including the current load on your network and database.
- To track the deployment process, use SSH to connect to the compute instance and
monitor the deployment logs in the
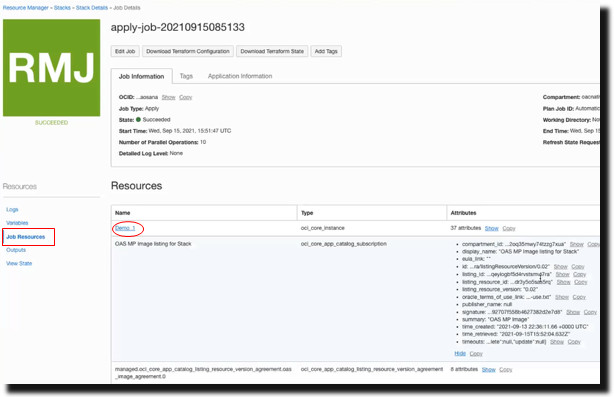
/var/logdirectory (oas_cloudinit.logandoas_create_domain.log). When Oracle Analytics Server is ready to use, you see the file/u01/app/oas-scripts/oas_install.finish. - In the Job Details page, click Job Resources to access
the compute instance (oci_core_instance) generated by the stack.
Click the name of the compute instance to navigate to more detail and bookmark this page because you might need this page later.
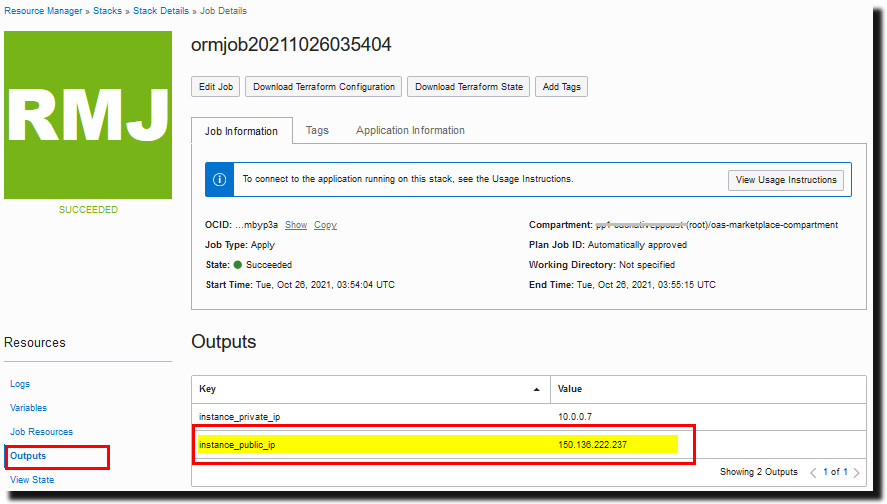
- In the Job Details page, click Outputs to see the public
IP address assigned to the compute instance (if any).
If available, copy the public IP address. You can use the public IP to sign-in and verify your Oracle Analytics Server deployment. See Sign-in and Verify Oracle Analytics Server.
- In the Job Details page, click View State to review the
Terraform state file for this stack.
Resource Manager stores the Terraform state file (
.tfstate) for the stack in JSON format. This file maps your stack's resources to your configuration and maintains essential configuration metadata, such as resource dependencies. See also To view the state of a stack.The Terraform state file contains all the data you provided, including the passwords you specified for the domain creation phase. If you don’t want these passwords to be visible to anyone who has access to this job, you should skip the domain creation. Instead, you can add all the information required to create the domain to the files on the compute instance, and create the domain manually using the scripts provided. See How do I create the Oracle Analytics Server domain manually?.


