Note:
- This tutorial is available in an Oracle-provided free lab environment.
- It uses example values for Oracle Cloud Infrastructure credentials, tenancy, and compartments. When completing your lab, substitute these values with ones specific to your cloud environment.
Use Lifecycle Environments in Oracle OS Management Hub
Introduction
Learn to create a lifecycle environment to promote versioned custom software sources through its lifecycle stages in Oracle OS Management Hub. A lifecycle environment is a user-defined pipeline to deliver select, versioned content in an ordered manner.
Instances best suited for lifecycle environments are appliance-like and have minimal tolerance for variability in their installed software. You deliver updates to instances as fixed versions of content that you define within a versioned custom software source. The only time the content changes is when a new versioned custom software source is created and promoted to a stage.
You can create a lifecycle environment with a maximum of five stages and assign instances to each stage. Then, create a versioned custom software source with specific package updates to promote through the stages. Promotion installs all content in the versioned source onto the instances in the stage. To learn more about lifecycle environments, visit the Understanding Lifecycle Environment Documentation.
Objectives
In this tutorial, you’ll learn how to:
- Create a lifecycle environment and lifecycle stages
- Register existing OCI compute instances to lifecycle stages using profiles
- Create a versioned custom software source using a package list
- Promote the versioned custom software source to the first lifecycle stage
- Promote the versioned custom software source through the following stages
Prerequisites
Access to an Oracle Cloud Infrastructure tenancy with:
- An administrative user group, a dynamic group identifying instance resources, and the IAM policies that enable OS Management Hub.
- Oracle Linux compute instances.
- The following vendor software sources:
- ol8_baseos_latest-x86_64
- ol8_appstream-x86_64
- ol8_addons-x86_64
- ol8_uekr6-x86_64
- Virtual Cloud Network (VCN) or configured network access that supports OS Management Hub.
Configure OCI Resources
Note: If running in your tenancy, read the linux-virt-labs GitHub project README.md and complete the prerequisites before deploying the lab environment.
-
Open a terminal on the Luna Desktop.
-
Clone the
linux-virt-labsGitHub project.git clone https://github.com/oracle-devrel/linux-virt-labs.git -
Change into the working directory.
cd linux-virt-labs/ol -
Install the required collections.
ansible-galaxy collection install -r requirements.yml -
Update the Oracle Linux instance configurations.
cat << EOF | tee instances.yml > /dev/null compute_instances: 1: instance_name: "ol-host-01" type: "server" 2: instance_name: "ol-host-02" type: "server" 3: instance_name: "ol-host-03" type: "server" instance_shape: "VM.Standard.E5.Flex" EOF -
Deploy the lab environment.
ansible-playbook create_instance.yml -e localhost_python_interpreter="/usr/bin/python3.6" -e "@instances.yml"The free lab environment requires the extra variable
localhost_python_interpreter, which setsansible_python_interpreterfor plays running on localhost. This variable is needed because the environment installs the RPM package for the Oracle Cloud Infrastructure SDK for Python, located under the python3.6 modules.The default deployment shape uses the AMD CPU and Oracle Linux 8.
-
Wait for the playbook to reach the pause task. Do not hit enter or close the terminal. The playbook creates OCI compute instances and resources to use with OS Management Hub. Progress to the next step when the pause task is displayed.
Important: Do not hit enter or close the terminal window for the duration of the lab. Minimize the window and continue with the next steps.
Access the OS Management Hub Section on the OCI Console
-
Open the OCI console in a browser.
-
Use your account username and password to login to the OCI console.
-
Use the navigation menu of the OCI console landing page to navigate to Observability and Management and click on OS Management Hub.

Create the Lifecycle Environment
You must create a lifecycle environment and define its stages (for example, development, test, and production). A minimum of two stages is required. The maximum is five stages.
-
Click on Lifecycle environments under the OS Management Hub navigation section.
-
Click Create.
-
Enter the following name for the lifecycle environment:
Lifecycle_ol8 -
Optionally, enter a description.
-
Set the location as Oracle Cloud Infrastructure.
-
Specify the OS and architecture information as the following:
- OS vendor: Oracle
- OS version: Oracle Linux 8
- Architecture: x86_64
Note: These software source selections must match the compute instances that you intend to use.
-
Define three stages for the lifecycle environment.
-
Enter the following name for the first stage.
Development -
Enter the following name for the second stage.
Test -
Click Add stage and enter the following name for the third stage.
Production
-
-
Click Create.
-
On the Lifecycle environments page, click on Lifecycle_ol8 to view the lifecycle environment’s details page.
The lifecycle details page displays important information, including its stages, associated instances, jobs, and reports.
Creating a Lifecycle Environment Profile
Create profiles so that you can associate instances with lifecycle stages when registering the instance with OS Management Hub.
You will need to create a registration profile for each stage in the lifecycle and then register instances or attach instances already managed by OS Management Hub.
Create the Development Stage Profile
-
Click Create Profile on the Lifecycle_ol8 Details page.

-
Enter the following name for the Development profile:
Dev_Lifecycle_ol8 -
Optionally, enter a description.
-
Select the Development lifecycle stage.
-
Click Create.
Create the Test Stage Profile
-
Click Create Profile again on the Lifecycle_ol8 Details page.
-
Enter the following name for the Test profile:
Test_Lifecycle_ol8 -
Optionally, enter a description.
-
Select the Test lifecycle stage.
-
Click Create.
Create the Production Stage Profile
-
Click Create Profile again on the Lifecycle_ol8 Details page.
-
Enter the following name for the Production profile:
Prod_Lifecycle_ol8 -
Optionally, enter a description.
-
Select the Production lifecycle stage.
-
Click Create.
These stage-specific profiles and their details can be viewed on the Profiles page under the OS Management Hub menu.
Assign Instances to each Stage in the Lifecycle Environment
You can use these lifecycle stage-specific profiles when registering instances with OS Management Hub.
-
Navigate to the Compute service and select Instances using the main OCI navigation menu.

Register Existing Compute Instances
To register OCI compute instances to OS Management Hub and attach them to specific lifecycle stages, you must enable the Oracle Cloud Agent (OCA) plugin and select the lifecycle stage profile. Use each lifecycle stage profile to register one instance.
Register an Instance to the Development Stage
-
Click Instances under the Compute section and click on the ol-host-01 instance.
-
Click on the Oracle Cloud Agent tab on the compute instance’s details page.
-
Enable the OS Management Hub Agent plugin and set the OS Management Hub service profile to Dev_Lifecycle_ol8.
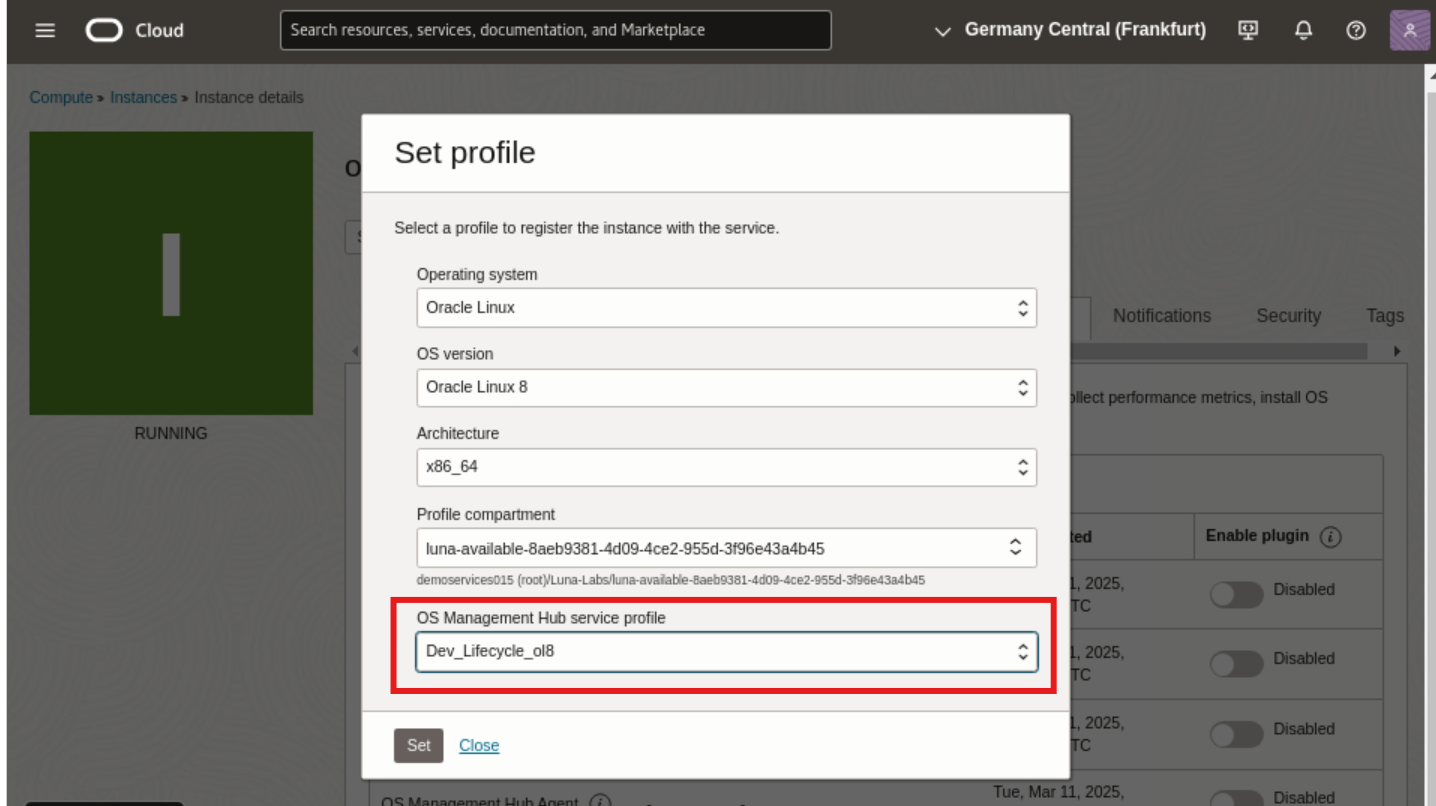
In some situations, the OS Management Hub Agent shows as stopped after being enabled. Ignore this and proceed to the next step.
Register an Instance to the Test Stage
-
Return to Instances under the Compute section and click on the ol-host-02 instance.
-
Click on the Oracle Cloud Agent tab on the compute instance’s details page.
-
Enable the OS Management Hub Agent plugin and set the OS Management Hub service profile to Test_Lifecycle_ol8.
Register an Instance to the Production Stage
-
Return to Instances under the Compute section and click on the ol-host-03 instance.
-
Click on the Oracle Cloud Agent tab on the compute instance’s details page.
-
Enable the OS Management Hub Agent plugin and set the OS Management Hub service profile to Prod_Lifecycle_ol8.
-
Navigate back to the Lifecycle_ol8 details page. Wait for the instance to register with the Lifecycle_ol8 lifecycle environment.
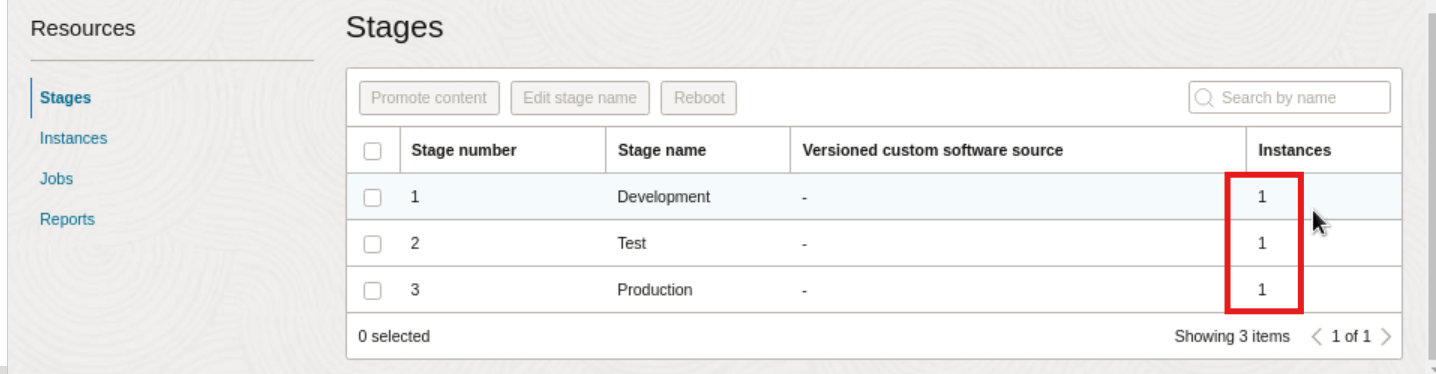
Note: This step may take several minutes. Refresh the page and wait for the instance counts for each stage to reach 1.
Manage Attached Instances
You can no longer manage attached instances as standalone instances. Managing attached instances occurs from the Resources section on the Lifecycle Environment details page.
-
Click Instances under Resources on the Lifecycle details page.
The Instance resource lists each instance and its associated stage, compartment location, and status. Instances can be attached, detached, and rebooted from this resource.
Important: When attaching an instance to a lifecycle stage, the service:
- Detaches previously attached software sources from the instance.
- Attaches the versioned custom software source associated with the lifecycle stage to the instance. If the stage has no versioned custom software source, no changes are made to the instance until the software is added.
- Installs all the packages and modules in the attached versioned custom software source to the instance.
Create the Versioned Custom Software Source
Now that the stages have been defined and instances associated, the lifecycle environment is ready for versioned custom software content. A versioned custom software source is a custom software source specifically used with lifecycle environments.
A versioned custom software source has several distinct attributes:
- Version designator: When creating a versioned source, you assign a version to the software source.
- Specific package content: During creation, you use filters or a package list to limit the content. A versioned custom software source should only include the packages and modules you want to install on target instances.
- Immutable: Once created, you can’t change the packages and modules in the software source or its version.
Carefully select the packages and modules in the versioned custom software source. When promoted to a lifecycle stage, the service installs all content in the source to the attached instances.
-
Click Software Sources under the OS Management Hub navigation section.
-
Select Create custom software source from the action menu.
Add Basic Details
-
Enter the following name for the versioned custom software source:
Ol8_monthly_update -
Optionally, enter a description.
-
Enter the following version identifier:
1.0Adding a version disables the automatically update content option.
-
Disable Automatically resolve dependencies.
Important: When auto-resolve is enabled, the service automatically resolves package and module dependencies. Dependency resolution only includes packages from vendor software sources that are selected for the custom software source. If a dependent package resides in a software source that’s not associated with the custom software source, the package will not be included.
-
Click Next.
Select Software Sources
-
Specify the OS version, vendor, and architecture as the following:
- OS vendor: Oracle
- OS version: Oracle Linux 8
- Architecture: x86_64
-
Keep the default compartment selected since it contains vendor software sources.
-
Select the software sources that the registration profile will assign. Select the following:
- ol8_baseos_latest-x86_64
- ol8_appstream-x86_64
- ol8_addons-x86_64
- ol8_uekr6-x86_64
-
Click Next.
Select Package Content
Specify the packages for the versioned custom software source. You can use either filters or a package list to identify specific content.
- For a package list, see Package List Format documentation for information on valid formatting.
- Use filters to either include or exclude content to build versioned custom software sources. The types of filters include groups, modules, and packages. See the Using filters documentation for more information.
Provide a Package List
-
Select Provide package list.
-
Only include the latest version is enabled. This option is required for versioned custom software sources.
-
Select Paste package list.
-
Paste the following package list into the window:
pam-1.3.1-27.el8.x86_64 openssl-libs-1.1.1k-12.el8_9.x86_64 libreport-filesystem-2.9.5-15.0.4.el8.x86_64 -
Click Next.
Review
-
Review and click Submit.
A create software source job named Create Ol8_monthly_update and refresh metadata is in-progress on the Jobs page under the OS Management hub section.
When the create software source job completes, the versioned custom software source is ready to be promoted to the first stage in the lifecycle environment.
Promote a Versioned Custom Software Source into the Lifecycle Environment
The first step for a versioned custom software sources and their content is to be promoted to the first stage in the lifecycle environment.
When the versioned custom software source is promoted to a stage, the service:
- Associates the versioned custom software source with the lifecycle stage.
- Detaches previously attached software sources from the instance.
- Attaches the versioned custom software source to the instance associated with the lifecycle stage.
- Installs all the packages and modules in the attached versioned custom software source to the instance.
Check out the documentation for another example of promoting content through lifecycle stages.
Promote the Versioned Custom Software
-
On the Lifecycle environment page, click on Lifecycle_ol8 to view the lifecycle environment’s details page.
-
Select Development stage on the list. This stage is the first stage in the lifecycle environment.
-
Click Promote content.
-
Keep the default name for the promotion job.
-
Enter an optional description for the promotion job.
-
Keep the default compartment selection.
-
Select Ol8_monthly_update from the available versioned custom software sources.
-
Schedule the promotion job to Run immediately.
-
Click Promote.
View the Promotion Job
-
View the promotion job status by clicking on the Jobs resource and selecting the In Progress jobs tab.
When the promotion job is complete, the job will move to the Completed jobs tab.
-
Click on the name of the Promote software source to Lifecycle_ol8 Development job to view its Job work details.
-
On the Associated work resource, two jobs are listed. The first job assigns the versioned custom software source to all instances associated with the Development stage, and the second job installs the content to the instance.
In this case, there is only one associated instance, so there is only one install job. If there were multiple instances associated with the stage, there would be multiple install jobs listed.
Promote a Versioned Custom Software Source to the Next Stage
To promote versioned custom software source to the next stage in the lifecycle environment, return to the lifecycle’s Stages resource.
Promote to the Test Stage
-
On the Lifecycle environment page, click on Lifecycle_ol8 to view the lifecycle environment’s details page.
-
Select test stage on the list. This stage is the second stage in the lifecycle environment.
-
Click Promote content.
-
Keep the default name for the promotion job.
-
Enter an optional description for the promotion job.
-
Schedule the promotion job to Run immediately.
-
Click Promote.
The promotion job is viewable under the Jobs resource. It will assign and install the versioned custom software source from the preceding lifecycle stage to its associated instances.
Promote to the Production Stage
The final promotion in this 3-stage lifecycle environment assigns and installs the versioned custom software source to the Production stage.
-
Select Production stage on the list. This stage is the third stage in the lifecycle environment.
-
Click Promote content.
-
Keep the default name for the promotion job.
-
Enter an optional description for the promotion job.
-
Schedule the promotion job to Run immediately.
-
Click Promote.
The promotion job is viewable under the Jobs resource.
Next Steps
As updates to packages and content included in the versioned custom software source become available for development and testing, you would create a new versioned custom software source with a new version indicator and promote it into the lifecycle environment starting at the first stage. This user-defined pipeline creates a controlled environment to deliver select content in a staged manner.
Related Links
- Lifecycle Environment Documentation
- Versioned Custom Software Source Documentation
- Oracle OS Management Hub Documentation
- Oracle OS Management Hub Training Track
- Oracle Linux Training Station
More Learning Resources
Explore other labs on docs.oracle.com/learn or access more free learning content on the Oracle Learning YouTube channel. Additionally, visit education.oracle.com/learning-explorer to become an Oracle Learning Explorer.
For product documentation, visit Oracle Help Center.
Use Lifecycle Environments in Oracle OS Management Hub
G30573-01
Copyright ©2025, Oracle and/or its affiliates.