Back to Oracle Help Center
If you are a site manager that currently works in Oracle Clinical One Platform Platform, this is your go-to guide for all site-related issues.
Note: All tasks in this guide can be performed in both Production and Training modes.
Manage subjects: What do you want to do?
Manage shipments and supplies: What do you want to do?
Manage subjects: What do you want to do?
1Add and screen a subject

On the Home page, click either the name of the study (to enter study data) or the Training Mode button (to practice).
Can't see the study on the Home page?
Along the top, make sure Subjects is selected, and click Add Subject.
Answer the questions on each form, and click Save and then Screen.
Need to screen fail or rescreen a subject?
Take note of the subject number, and click Return to All Subjects.
Note: In a rollover study, subjects are no longer screened since they've already been screened in the original study.
Read detailed instructions or  watch training!
2Enter data, complete a visit, and dispense kits

Did you start the visit before scheduled?
On the Home page, click either the name of the study (to enter study data) or the Training Mode button (to practice).
Click the Subjects tab if it is not already selected.
Locate the subject to update. To filter your view of subjects, enter some or part of the subject number in the Search field in the upper right above the table of subjects.
Depending on what your next step is, do one of the following:
- To start a scheduled visit, locate it in the Next Visits column. Click that visit.
- To start an Adverse Event (AE) or Concomitant Medications (CM) event, click an entry in the AE/CM column.
- If you want to dispense during an unscheduled visit, locate the subject, select the checkbox next to the subject, and choose Unscheduled visit from the Manage subjects drop-down.
Answer the questions on each form, and click Save and then Randomize or Dispense.
Note: A scheduled visit is only complete after you answer all of the required questions. If you don't have the subject's answer to one or more questions, flag the question. Read step-by-step instructions on flagging questions.
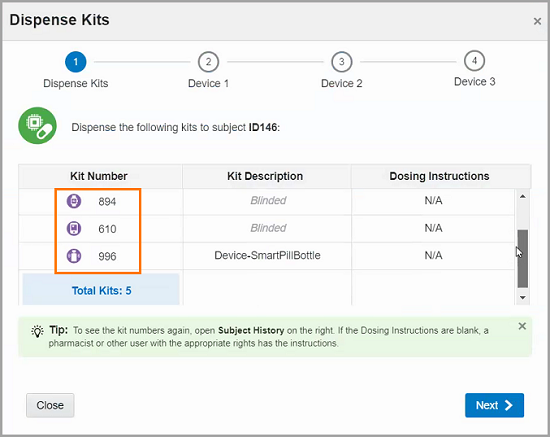
After you click Dispense, do one of the following:
- If the subject is allowed to titrate, choose whether to maintain the current dose, titrate up, or titrate down, and click Next.
- If the subject brought back any reusable kits to the site, mark the kits as reusable on the Reusable Kits pop-up, and click Continue to Dispensation.
- If your study features devices managed through an Oracle mHealth connection, activate each device.
If needed, answer queries or update your answers on certain queries.
Can't click Randomize or Dispense?
Need to find the kit numbers to dispense?
Don't know how to answer a query?
Read detailed instructions or watch training!
3Enter data in a repeating form

On the Home page, to enter study data, click the name of the study or click Training Mode to practice.
Click the Subjects tab if it is not already selected.
Locate the subject to update. To filter subjects, enter part of the subject number in the Search field on the upper right above the table.
Locate the scheduled visit in the Next Visits column.
Repeating forms are displayed in a table view. If this is the first time you add data in a repeating form, double-click anywhere in the first row of the table.
If you already added a repeating form and you want to add a new one click the Add button in the upper right corner of the form section.
The form appears in a new pop-up window. Answer the questions on the form and click Save.
To edit or modify values in a repeating form, double-click the table row where the data is displayed. Edit the data and click Save.
When you have finished adding data in the repeating form, click Save.
Read detailed instructions or watch training!
4Mark a subject as complete

On the Home page, click either the name of the study (to enter study data) or the Training Mode button (to practice).
Along the top, make sure Subjects is selected.
Select a subject with a checkbox in the upper-right corner of their avatar. 
From the Manage Subjects drop-down, select Complete or Withdraw.
Click Complete Study.
Confirm the decision, and click Complete Study.
If a study completion visit opens, complete it now or later. A subject's status is updated to Complete only when all of their visits in a study are completed.
Marked a subject as complete in error?
Read detailed instructions or watch training!
5Withdraw or transfer a subject

Does the subject need to transfer? Contact your CRA for assistance.
To withdraw a subject:
On the Home page, click either the name of the study (to enter study data) or the Training Mode button (to practice).
Along the top, make sure Subjects is selected.
Select the subject to withdraw.
From the Manage Subjects drop-down, select Withdraw.
Confirm the withdrawal, enter a reason, and click Withdraw.
If your study has a withdrawal visit, you can complete it now or later.
Read detailed instructions or watch training!
6Enroll a subject in a rollover study

If your study allows you to enroll subjects in a rollover study you now see a rollover question in the study completion form.
On the Home page, click either the name of the study (to enter study data) or the Training Mode button (to practice).
Along the top, make sure Subjects is selected.
Select a subject with a checkbox in the upper-right corner of their avatar.
From the Manage Subjects drop-down, select Complete or Withdraw.
Click Complete Study.
Fill out the study completion form attached to the visit. When you reach the rollover question, if the subject consents, select Yes from the Select Answer drop-down to enroll the subject in the rollover study.
Click Complete Study.
Read detailed instructions.
7Perform a code break

A code break unblinds a subject's treatment arm. Depending on the study protocol, Oracle Clinical One Platform might automatically withdraw a subject that you unblind using a code break, and you might be required to complete a withdrawal visit
On the Home page, click either the name of the study (to enter study data) or the Training Mode button (to practice).
Along the top, make sure Subjects is selected.
In the table, select the checkbox to the left of the subject you want to unblind.
Above the table of subjects, from the Manage Subjects drop-down, select Code Break.
Click Continue.
Confirm the subject number and study name, and select the checkbox to confirm the code break.
Indicate if an adverse event occurred, and click Unblind.
Review the unblinding results for the subject, and click one of the following options:

If the study has a withdrawal visit, click Start Withdrawal Visit. You can complete the visit now or later.
The subject's status changes to Withdrawn even if you don't complete the visit.
If the study doesn't have a withdrawal visit, click Done.
The subject's status changes to Withdrawn.
Read detailed instructions or watch training!
8What if something unexpected happened with a subject?
What happened?

I screen failed a subject in error.
I randomized a subject in error.
I need to randomize after a randomization failure.
I need to decide what to do with a subject who cannot titrate.
Manage shipments and supplies: What do you want to do?
9Receive a shipment

On the Home page, click either the name of the study (to enter study data) or the Training Mode button (to practice).
Can't see the study on the Home page?
Along the top, click Supplies, and make sure the Shipments tab is selected.
From the Filter by Status drop-down, select In Transit.
Select the checkbox next to the shipment that arrived, and on the right, review the kits in the packing list against the kits in the shipment.
Click Add Shipment to Inventory.
6. Follow the steps prompted as required according to the temperature excursion settings in your study:
Note: Some steps may not be required for your study.
Temperature excursion? Enter Temperature monitor status.
Quarantined kits? Select the kits with Quarantined status.
Damaged kits? Select them, and select the Damaged status.
Missing kits? Select them, and select the Missing status.
Review the kit list and make sure every kit is tagged accordingly. Remaining kits will be added to inventory as available.
Click Finish.
Read detailed instructions or watch training!
10Reconcile kits

Some studies require kit reconciliation. If you're not sure whether this step is required, contact your CRA.
On the Home page, click either the name of the study (to enter study data) or the Training Mode button (to practice).
Along the top, make sure Subjects is selected.
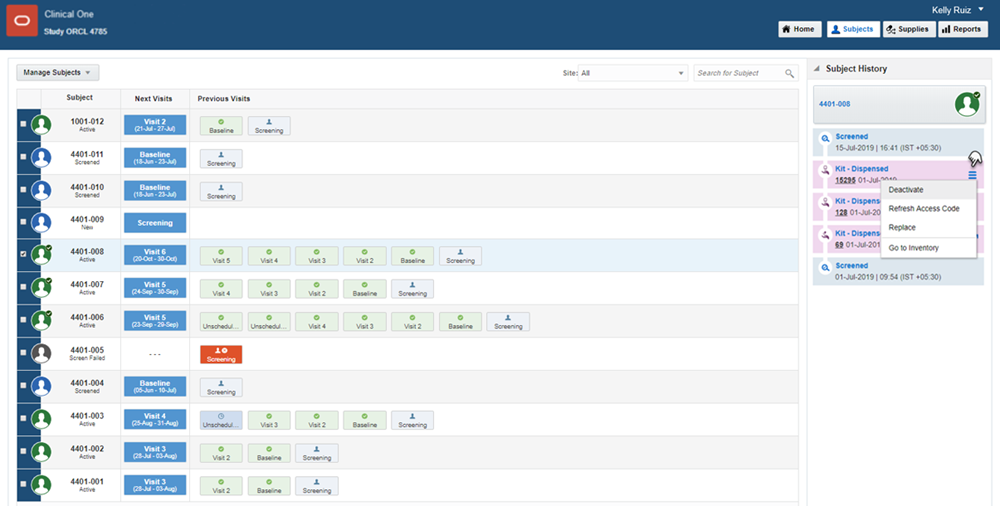
Select the subject who returned the kit.
On the right in Subject History, click the kit.
From the Kit Status drop-down, select Returned to Site.
Specify the returned and missing units and a reason, and click Update Kit.
Read detailed instructions or watch training!
11Destroy kits, or ship kits to a drug destruction facility


Some studies require kit destruction, which can occur either at your site (if the site is drug destruction capable) or at a depot that is a drug destruction facility. If you're not sure whether this step is required, contact your CRA.
Before you can perform these steps, your CRA has to mark kits as Pending Destruction.
On the Home page, click either the name of the study (to enter study data) or the Training Mode button (to practice).
To destroy kits at your site:
Destroy kits outside Oracle Clinical One Platform according to the protocol and any relevant SOPs.
Along the top, click Supplies, and click the Inventory tab.
From the Status drop-down above the table, select Pending Destruction.
On the right, below Inventory Management, select Update Kit.
From the Kit Status drop-down, select Destroyed.
Enter a reason, and click Update Kit.
Read detailed instructions or watch training!
To ship kits to a drug destruction depot:
Along the top, click Supplies, and make sure the Shipments tab is selected.
From the Filter by Status drop-down, select Pending Destruction.
Select a shipment, and on the right, click Download List of Kits. We recommend printing the report.
Fulfill the shipment outside Oracle Clinical One Platform.
Read detailed instructions.
12What if something happens to a kit or shipment?
What happened?
A subject lost or damaged a kit.
A kit was lost or damaged at our site.
A kit wasn't dispensed to a subject.
13What if we need extra supply for a clinic day?

On the Home page, click either the name of the study (to enter study data) or the Training Mode button (to practice).
Along the top, click Supplies, and make sure the Shipments tab is selected.
Click Request Shipment.
Don't see the button? This study doesn't allow sites to request shipments. Contact your CRA for assistance.
Enter a reason, and click Request.
Read detailed instructions or watch training!
 You're done!
Find out more about Clinical One Suite
Get more information
See the Oracle Clinical One Platform documentation library on the Oracle Help Center.
Other resources
Watch short training videos on the Oracle Help Center for subjects and site supplies.
Contact Support
For assistance, contact Oracle Life Sciences Support.
Can't find what you need?
Write to us at clinical_one_doc_feedback_us_grp@oracle.com