Using Stationery Template Editor
Template Preparation and Sample Data
After selecting to create or update a stationery template two files (*.rtf and *.xml) are downloaded to a folder on your workstation.
Note:
When creating a new stationery template you must first rename the sample*.rtf to something different. You cannot upload a customized template with the filename sample*.rtf.
Open RTF file
Navigate to the download folder and open the RTF template file using Microsoft Word; either double-click the file in Windows Explorer or launch Microsoft Word and the use the File | Open menu from within Word.
Load Sample XML Data File
-
Click the BI Publisher tab on the toolbar and click Sample XML.
-
Navigate to the folder where the sample XML file was downloaded to.
-
Select the file and click Open.
Note:
The Oracle BI Publisher toolbar appears in Microsoft Word after installation of the Oracle BI Publisher software. If the toolbar does not appear automatically, select View, select Toolbars, and then select Template Builder to add it to the existing toolbar display. Also ensure that BI Publisher add-in is enabled in COM Add-Ins (File, Options, Add-Ins, Manage COM Add-Ins, Go)Figure 9-1 Load Sample XML Data
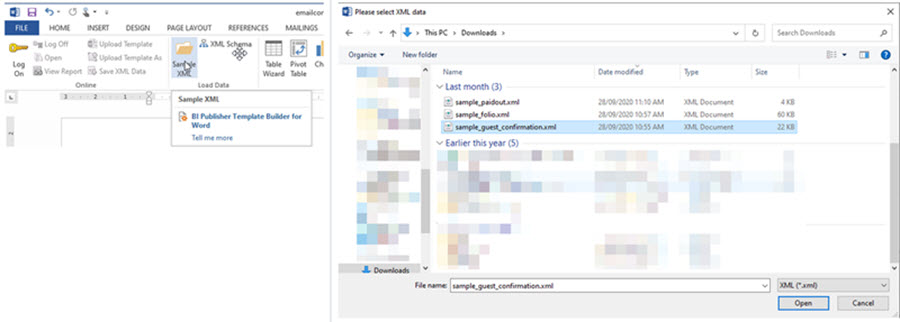
The XML data file will always be named sample_xxxx, corresponding to the type of template you are customizing. For example, if you are creating a confirmation letter template and you named the RTF file “email_confirmation,” you will not see a corresponding XML file. Rather, you would select and load the “sample_guest_confirmation.xml” , listing all the available elements for customization on the confirmation template. Once the XML is selected, a “Data loaded successfully” message appears and informs you that the sample XML data is now loaded for use in customization.
Each tag set is an element. For example, <RESERVATION_MADE_DATE_ISO>2020-12-12</RESERVATION_MADE_DATE_ISO> is the date the reservation was created. RESERVATION_MADE_DATE_ISO is the tag name. The data between the tags is the value of the element. For example, the value of <RESERVATION_MADE_DATE_ISO> is a date 2020-12-12 (12th December 2020).
Note:
Sample XML files contain property details elements such as Property Code,<RESORT>, Property Name <RESORT_FULL_NAME>, Property
Address <RESORT_FULL_ADDRESS>, Property Phone <RESORT_PHONE_NO> - ensuring one template can be shared
across multiple properties.
Identifying Placeholders and Groups
The template content and layout must correspond to the content and hierarchy of the input XML file. Each data field in the template must map to an element in the XML file. Each group of repeating elements in the template must correspond to a parent-child relationship in the XML file.
To map the data fields you define placeholders. To designate the repeating elements, you define groups.
When you mark up the template design, you define placeholders for the XML elements. The placeholder maps the template report field to the XML element. At runtime the placeholder is replaced by the value of the element of the same name in the XML data file.
Using Placeholders
Each data field in the report template must correspond to an element in the XML file. When you mark up the template design, you define placeholders for the XML elements. The placeholder maps the template report field to the XML element. At runtime the placeholder is replaced by the value of the element of the same name in the XML data file.
Identifying Group of Repeating Elements
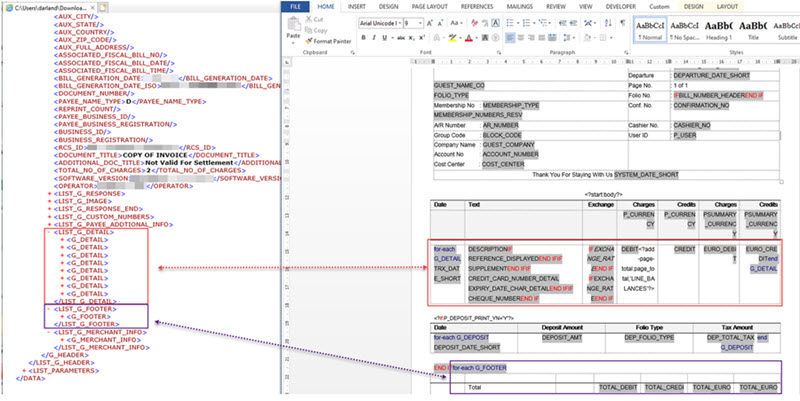
Stationery templates often contain groups of repeating fields; this occurs when data is fetched from multiple entities in a parent-child 1:many relationship. For the folio this applies to the posting details for one reservation. Fields that belong to one of the child entities are prefixed with a G_ to identify a repeating group of fields. At runtime, BI Publisher loops through the occurrences of the element in the XML and outputs the data for all records within the group.
The following is the XML file that correspondence to a folio RTF template
Figure 9-2 Sample_folio.xml and Repeating Groups
Adding Markup to the Template Layout
BI Publisher converts the formatting that you apply in Microsoft Word to XSL-FO.
You add markup to create the mapping between the layout and the XML file and to include features that cannot be represented directly in the format.
The most basic markup elements are placeholders, to define the XML data elements; and groups, to define the repeating elements.
Creating PlaceholdersThe placeholder maps the template field to the XML element data field. At runtime the placeholder is replaced by the value of the element of the same name in the XML data file.
Enter placeholders in the document using the following syntax:
<?XML element tag name?>The placeholder must match the XML element tag name exactly and is case sensitive.
-
Using the Basic RTF Method: Insert the placeholder syntax directly into the template document.
-
Using the Form Field Method: Insert the placeholder syntax in Microsoft Word's Text Form Field Options window. This method allows you to maintain the appearance of the template.
-
Using the Basic RTF Method
-
Enter the placeholder syntax in the document where you want the XML data value to appear.
-
Enter the element's XML tag name using the syntax:
<?XML element tag name?>In the example, the template field "Reservation Made Date" maps to the XML element RESERVATION_MADE_DATE_ISO in the document, enter:
<?RESERVATION_MADE_DATE_ISO?>
-
-
Using the Form Field Method
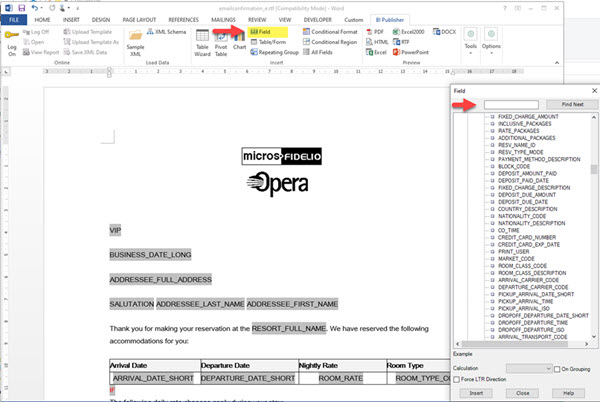
After the XML data file has been loaded use the 123 Field option on the BI Publisher toolbar tab to insert new fields in the template.
Search and select the XML tag or field to add to the customizable report from the list of available fields. The tree of available fields is divided into the sections applicable to the report groupings, (for example, header, footer, body, and so on). You can add fields by selecting and dragging the element to the document or double clicking on a selected field from this list to insert at the current cursor location.Note:
It is recommended that tables are used in your layout to keep the field positions static. When creating a new table in Word, be sure to set the AutoFit behavior to ‘AutoFit to Contents’ to avoid truncating fields larger than the actual cell size or resizing a cell to accommodate a field with a longer description than the display data. Refer to Microsoft Word Help (F1) for more details.Figure 9-3 Insert Form Field
Defining Groups
By defining a group, you notify BI Publisher that for each occurrence of an element, you want the included text and fields displayed.
At runtime, BI Publisher loops through the occurrences of the element and outputs the fields each time.
All sample stationery templates are preconfigured with the required groups for the corresponding XML data file.
For the folio, for each occurrence of G_DETAIL in the XML file, you want the template to display the child elements TRX_DATE, DESCRIPTION, REFERENCE_DISPLAYED, DEBIT, CREDIT and so on.
To designate a group of repeating fields, insert the grouping tags around the elements to repeat.
Insert the following tag before the first element
<?for-each:XML group element tag name?>Insert the following tag after the final element:
<?end for-each?>Inserting Images
-
Embedding images in the RTF template
-
Referencing images available on a website or content management system.
Embedding images quickly increases the template's size, whereas referencing external images results in a significantly smaller file. Externally referenced images can also be updated without modifying the template(s).
For HTML confirmation email delivery, the image URL reference method must be used. The recipient's email client will download the images from the website or content management system when the email is opened and display the image at the specified location in the email body.
Note:
By default, emails client may block images from initial download and provide a specific action to download these images on demand.
Embedding Images in Template
Note:
There is a file size limit of 10MB for RTF templates.Reference Image by URL
Note:
Ensure to include an alternative text link for an image.-
Insert a dummy graphic into the layout in Word by selecting Insert and then selecting Pictures.
-
Right-click the image and select the Format Picture option and then click the Alt Text tab.
-
Enter the following syntax to reference the image location:
url:{'http://<image location>'}
Figure 9-4 Format Picture and Alt Text tab

For example, enter:
The dummy graphic (used as a place holder within the RTF) can be set to the required image size using picture tools.
At runtime, the placeholder graphic is replaced with the image available at the specified web address
Formatting Date and Numbers
-
Microsoft Word's native number format mask.
-
Oracle's Format-Number function.
-
Microsoft Word's native date format mask.
-
Oracle's format-date function.
-
Oracle's abstract date format masks. (Recommended for multilingual templates.)
For more information of formatting dates, numbers and currency values see Formatting Numbers, Dates, and Currencies.
Formatting Dates
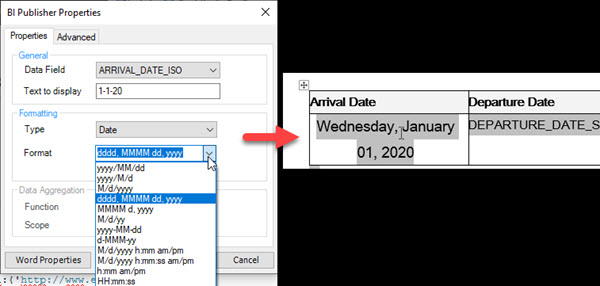
In addition to pre-formatted dates in string format in the XML, all date fields are also available in canonical date/time format.
Canonical date fields are identified with the suffix _ISO in the element name and can be formatted to suit your needs:
-
Double click the date placeholder in the template.
-
Set Text to Display to a test date.
-
Set Type to Date.
-
Select a date format from the list.
-
Click OK.
Figure 9-5 Formatting Dates
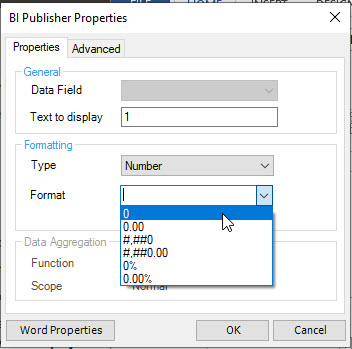
Formatting Numbers
-
Double click the number placeholder in the template.
-
Set Text to Display to a test number.
-
Set Type to Number.
-
Select a number format from the list.
-
Click OK.
Figure 9-6 Formatting Numbers
Using Conditional Formatting
Conditional formatting occurs when a formatting element appears only when a certain condition is met.
BI Publisher supports the usage of simple "if" statements, as well as more complex "choose" expressions.
For additional information, see Using Conditional Formatting .
Note:
To define a conditional block you can also use the conditional region wizard launched from the BI Publisher toolbar.Using IF Statements
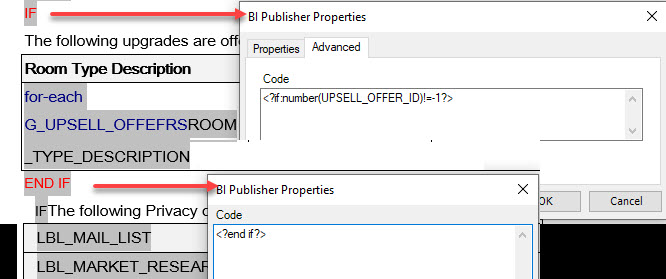
Use an if statement to define a simple condition; for example, if a data field is a specific value.
-
Insert the following syntax to designate the beginning of the conditional area.
<?if:condition?> -
Insert the following syntax at the end of the conditional area:
<?end if?><?if: [ELEMENT][CONDITION]?>Conditional block
<?end if?>
Note:
Ensure the [ELEMENT] from the XML is referenced in matching caseFigure 9-7 Placeholders defining conditional block between <?IF()> and <?end if?>
IF statements can be combined with other string functions.
CONTAINS
Using the CONTAINS function, an expression can be constructed to output conditional text when an element contains a specific string value. This is similar to a LIKE operator.
<?if: contains(ELEMENT,’txt_to_search_for’)=’true’?>Yes it does <?end if?>STARTS-WITH
To evaluate the start of a string, use the STARTS-WITH function:
<?if: starts-with(COMPANY_NAME,'Oracle')?><?end if?>Using Inline IF Statements
You can use “if” statements to change text output in boilerplate text.
Use the BI Publisher context command to place the if statement into the inline sequence rather than into the block (the default placement).
Using the @inline syntax, a sentence string can be constructed conditionally; for example:
The program was <?if@inline:SUCCESS=’N’?>not<?end
if?> successful.
- The program was successful. (If SUCCESS does not equal ’N’)
- The program was not successful. (If SUCCESS equals ’N’)
For more information refer Controlling the Placement of Instructions Using the Context Commands.
Using IF-THEN-ELSE
BI Publisher supports the common programming construct "if-then-else". "if-then-else" is extremely useful when you must test a condition and conditionally show a result.
Use the following syntax to construct an if-then-else statement in the RTF template:
<?xdofx:if element_condition
then result1 else result2 end if?>
For example, the following statement tests the AMOUNT element value. If the value is greater than 1000, show the word "Higher"; if it is less than 1000, show the word "Lower"; if it is equal to 1000, show "Equal":
<?xdofx:if AMOUNT > 1000 then 'Higher'
  else
  if AMOUNT < 1000 then 'Lower'
   else
   'Equal'
end if?>
Using CHOOSE Statement
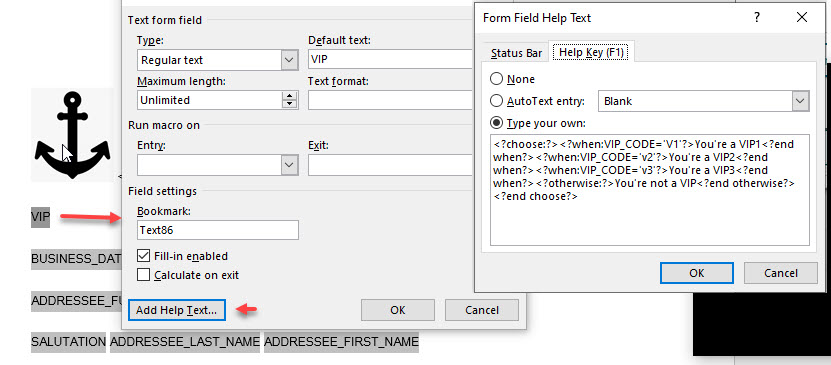
Use the choose, when, and otherwise elements to express multiple conditional tests. If certain conditions are met in the incoming XML data, then specific sections of the template are rendered. This is a very powerful feature of the RTF template.
<?choose:?>
<?when:expression?> <?end when?>
<?otherwise?> <?end otherwise?>
<?end choose?> <?choose:?>
<?when:VIP_CODE='V1'?>You're a VIP1<?end when?>
<?when:VIP_CODE='V2'?>You're a VIP2<?end when?>
<?when:VIP_CODE='V3'?>You're a VIP3<?end when?>
<?otherwise:?>You're not a VIP<?end otherwise?>
<?end choose?>Figure 9-8 <?CHOOSE:?> Example
Adding Conditions for Internal Parameters
Each customizable report contains internal parameters that are used for report generation. These parameters can be utilized when creating conditions for report generation.
For example, if you need to display a graphic on a confirmation letter only when generating in PDF format, these internal parameters would be used.
<PARAM_NAME>DESFORMAT</PARAM_NAME><PARAM_VALUE>PDF</PARAM_VALUE>In this example, a condition is created for text to only appear if the report output is PDF format. To accomplish this, add the field PARAM_NAME and then double click to edit. In the Form Field Help Text screen, insert the following line:
<?if:PARAM_VALUE[../PARAM_NAME='DESFORMAT']='PDF'?> <?end if?>Figure 9-9 Conditional Image for PDF Output

Adding Hyperlinks for PDF and HTML Output
The RTF template may contain links on text and images to web locations.
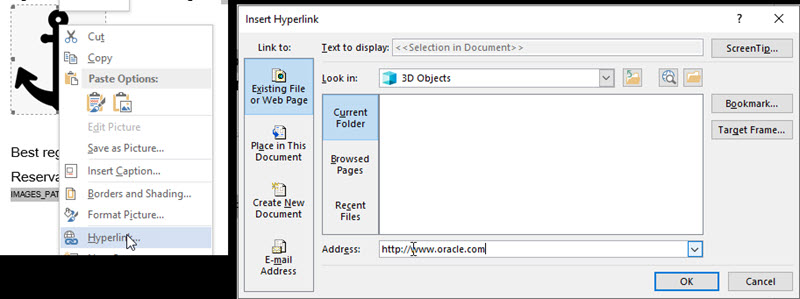
When a hyperlink is setup on an image placeholder, the image becomes a click-able image (button) in the document.
-
Select the area of text or image in the template
. -
Right click and select Hyperlink.
-
Enter the URL in the Address.
-
Click OK.
Figure 9-10 Insert Hyperlink
-
Links can also be defined on images in the template for PDF and HTML output. Select an image and select Insert and then select Hyperlink. In the resulting email or PDF file, the image is a button the recipient can click to launch the URL.
Non-Western Fonts
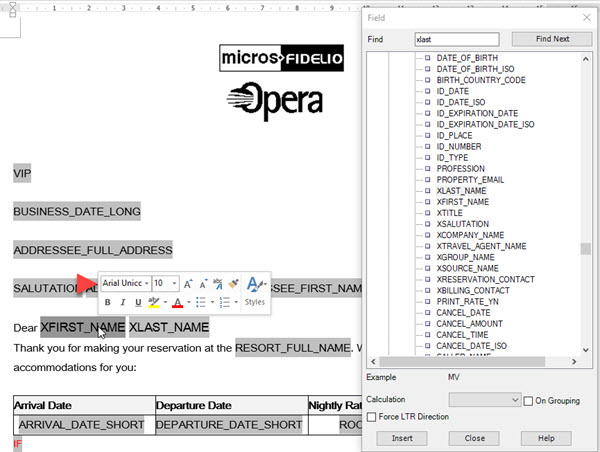
To support internationalization and non-Western character sets, select the Arial Unicode font to format any date or character (string) fields or text that output non-Western characters.
Note:
Alternate name XML elements (prefixed with X) will contain the western/primary name when no alternate name details exist for the profile. Your template layouts only need to reference the X-fields.Figure 9-11 Selecting Arial Unicode font
Extended SQL and XSL Functions
<?xdofx:expression?> for extended SQL functions <?xdoxslt:expression?> for extended XSL functions<?xdofx:if [ELEMENT][condition] then result1 else result2 end if?><?xdofx:nvl(TOTAL_COST_OF_STAY,0)-nvl(TOTAL_DEPOSIT_PAID,0)?> For further information, refer to Extended SQL and XSL Functions.
Preview using Sample XML
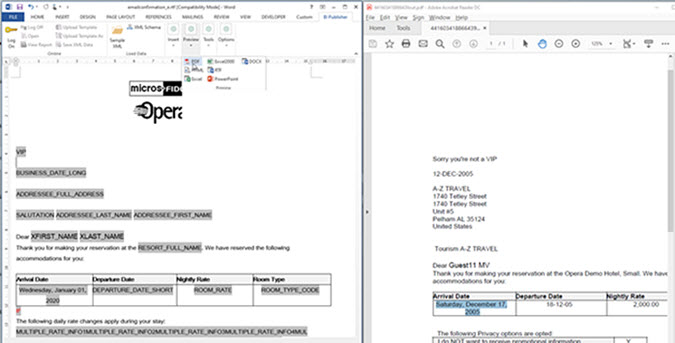
Once you've finished customizing the template, you can preview from within Microsoft Word to verify the layout, format masks and test that conditions are correct.
From the BI Publisher tab on the toolbar, select Preview then select PDF or HTML
Figure 9-12 Preview Template
Save RTF File
Ensure you save your modified RTF template; from within Microsoft Word click Cntrl + S or click File then click Save.
Refer to step 11 in Configuring Stationery Templates topic for information on uploading the modified RTF template to OPERA Cloud.