8 Appendix B – Generating SSH Keys
To generate the Secure Shell (SSH) keys, use the following steps according to your operating system:
-
On Linux:
-
On the user system that will be transferring the file: ssh<user>@<ftpclient.customer.com>.
-
Generate the SSH key for the user if one does not already exist:
-
ssh-keygen-t rsa.
-
Select the default option for the key filename.
-
You can skip the passphrase or enter a new one if you want increased security. If you enter a passphrase, you are prompted for it every time you log into SFTP.
-
After the process is complete, the following files should generate in the user home directory:
-
– ~ <user>/.ssh/id_rsa Private Key
-
– ~ <user>/.ssh/id_rsa.pub Public Key
-
-
Send only the public key file to Nor1 (~ <user>/.ssh/id_rsa.pub).
-
-
On Windows:
There are many Microsoft Windows-based SFTP clients on the market; some of them are free and some are not. Nor1 does not endorse, recommend, or support any particular Microsoft Windows-based SFTP client. The following example demonstrates a Windows-based SFTP using PuTTy:-
Download PuTTy from here.
-
Run the installer.exe on your machine.
-
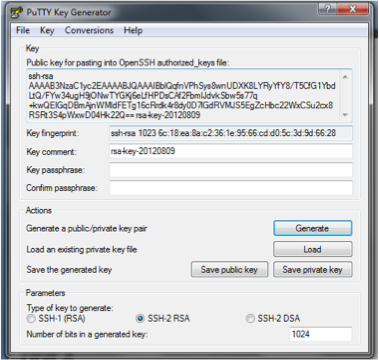
Open PuTTyGen and select Generate (wiggle your cursor around during generation). From this Key Generator, you must copy/paste the OpenSSH key into Notepad and then copy/paste the OpenSSH key from Notepad into an email to Nor1.

-
-
Select the Save public key button and the Save private key button to save these to a folder on your computer.
-
In PuTTyGen, select menu option Conversions -> Export OpenSSH key and save OpenSSH format of the private key to a folder on your computer. This OpenSSH Format will be used in OPERA configuration. (Save both PuttyGen and OpenSSH formats of Private key).
-
Send the public key file to Nor1.