Transactions
After you click Begin Table or Begin Check, or after accessing a check using the View
Check icon (![]() ) on the home page, the transaction page appears.
The transaction page shows menu items, family groups, and other check
functions.
) on the home page, the transaction page appears.
The transaction page shows menu items, family groups, and other check
functions.
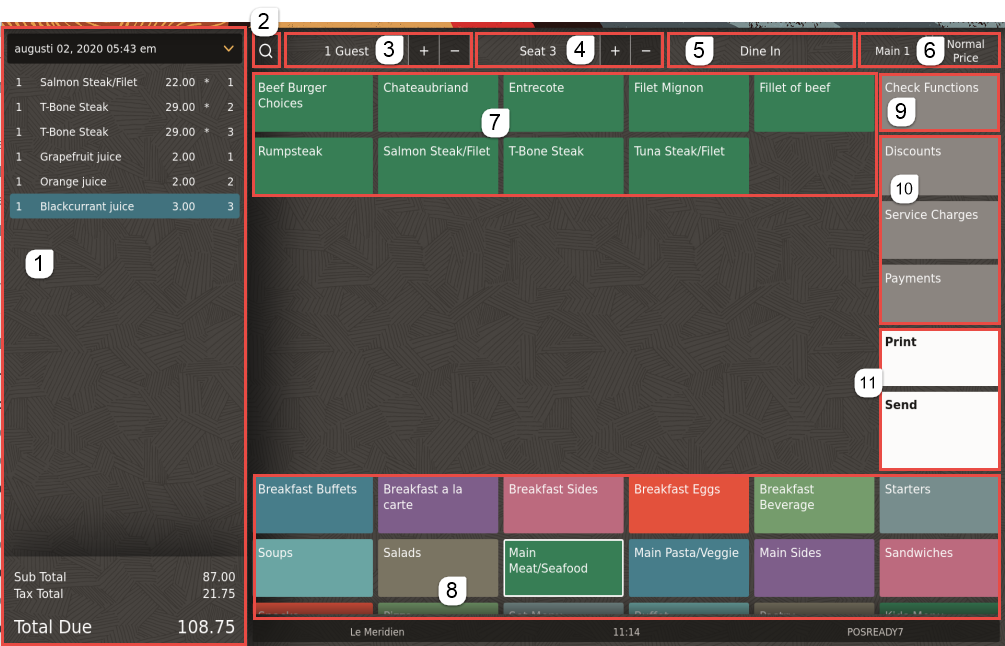
Figure 1-12 TSR Transaction Page on Workstations and Tablets

The following table describes the areas called out in the image.
Table 1-7 TSR Transaction Page
| Callout Number | Area | What You Use It For |
|---|---|---|
|
1 |
Check detail |
View check details, such as the date and time, menu items on the check, the subtotal, taxes, and total due. Click the drop-down arrow in the header to view the check number, employee, and order channel (if configured). The columns in the check detail show the quantity, menu item description, cost, and seat number. Other symbols are used, such as the asterisk for previous round items, V for voided items, and H for held items. You can also use gestures in the TSR check detail area. |
|
2 |
Search |
Search for menu items. Click the Search icon ( Menu items appear in alphabetical order in groups. Upper and lower case can be used. To clear the search entry, click the blue cross. |
|
3 |
Guests |
Select + and – to change the number of guests on the TSR check. When you select + and the guest count is at 9, the number rolls to 1. To use the Guest Count number pad to enter a larger number of guests, click Guest, enter the number, and then click OK. The maximum number of guests is 9999. |
|
4 |
Seats |
Select + and – to change the seat numbers on a TSR check. When you select + and the seat count is at 9, the number rolls to 1. To enter more than 9 seats, click Seats, enter the number, and then click OK. The maximum number of seats is 64. |
|
5 |
Order type |
Select the order type to change the value. A list of order types appears. In the image example, click Dine In to change the order type to another (such as Take Out). |
|
6 |
Menu levels |
Set the Main and Sub Menu Levels. A list of menu levels appears. In the image example, click Main 1 to change the menu level to another. |
|
7 |
Menu items |
Select a menu item to add it to the check. If sort priority is not used, menu items are listed in alphabetical order. |
|
8 |
Family groups |
Select a family group to see menu items for that specific family group. Menu item buttons and the family group button are the same color, which cannot be changed. Family groups are listed at the bottom of the page and names are automatically displayed in number order. |
|
9 |
Check Functions |
Access additional functions that you can use while in a check. The Check Functions and Transaction Functions chapter contains more information. |
|
10 |
Discounts, Service Charges, Payments |
Apply a discount, service charge, or payment to a check. Discounts and service charges are configured in the EMC and listed in the relevant menus, if assigned to SLU 1. |
|
11 |
Print, Send |
Print the check or send (service total) menu items to the kitchen. |
Parent topic: Table Service Restaurant Operations