3 Environment Variables

This topic describes the systematic instructions to configure the environment variables consumers.

Specify User ID and Password, and login to Home screen.

The user needs to define a set of variables that will be accessible across the particular configuration of the consumer. The syntax for accessing environment variables is below: $env.Environment_Group_Name.Environment_Variable_Name

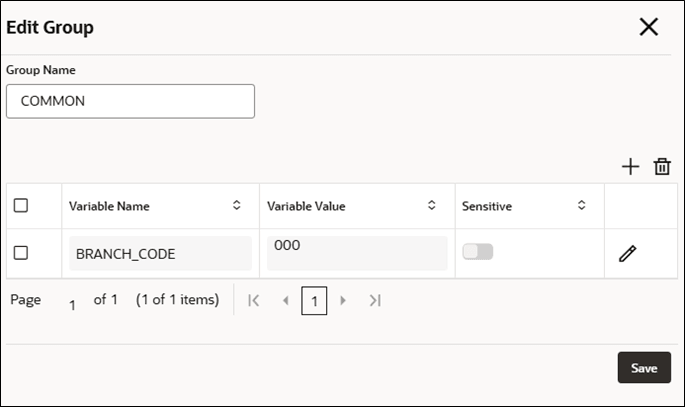
For example, $env.COMMON.BRANCH_CODE

  1. 1. On Service Consumers screen, click the required service consumer.
    The Environment Variables screen is displayed.

    Figure 3-1 Environment Variables


New Group

Users can create multiple groups and variables.

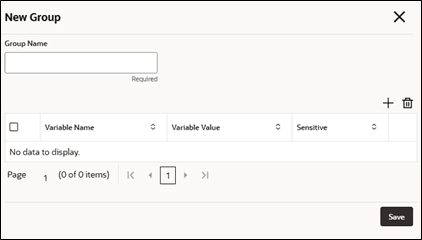
  1. Click New Group.
    The New Group screen is displayed.
  2. On New Group screen, specify the fields.

    Note:

    The fields marked as Required are mandatory.

    For more information on fields, refer to the field description table.

    Table 3-1 New Group - Field Description

    Field Description
    Group Name Specify the name of the environment group.

    Note:

    • Enter 0 to maximum of 255 characters.
    • No numeric value at beginning and no space allowed.
    Variable Name Specify the name of the environment variable.

    Note:

    • Enter 0 to maximum of 255 characters.
    • No space allowed at beginning or ending of the characters.
    Variable Value Specify the value of the environment variable.

    The value can either be hardcoded or Velocity mapping.

    Sensitive With this flag, user can mark the variables which are sensitive in nature.

    So, The values will not be shown as plain text in routing hub configuration.

  3. Click Save to save the details.

Import Group

The user can import environment variables.

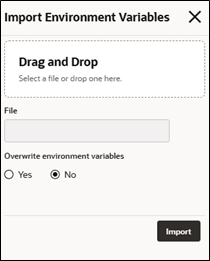
  1. Click Import Environment Variables.
    The Import Environment Variables screen displays.

    Figure 3-3 Import Environment Variables


  2. Specify the fields on Import Environment Variables screen.

    Note:

    The fields marked as Required are mandatory.

    For more information on fields, refer to the field description table.

    Table 3-2 Import Environment Variables - Field Description

    Field Description
    File Select the file using Select.

    Note:

    Allows only to select one file and accepts JSON and ZIP file.
    Overwrite environment variables Select the respective radio button to specify if the environment variables (from the JSON file) should replace the current environment variables. The options available are:
    • Yes - This option overwrites the environment variables.
    • No - This option retains the existing environment variables.
  3. Click Import to import the selected environment variable file.

View / Edit Group

The user can view or modify environment variables.

  1. On the Group tile, click Edit Group.
    The Edit Group screen is displayed.
  2. Click Save to save the modified environment variable details.

Delete Group

The user can delete the environment group..

  1. On the Group tile, click Delete icon.

Export Group

User can export the environment variable configuration as JSON file. The option for Export is provided to move the configurations from one environment to another.

  1. On Environment Variables screen, click Export Group.
    The Confirmation - Export screen is displayed.

    Figure 3-5 Confirmation - Export


  2. Click Confirm to export the environment variables in JSON file.