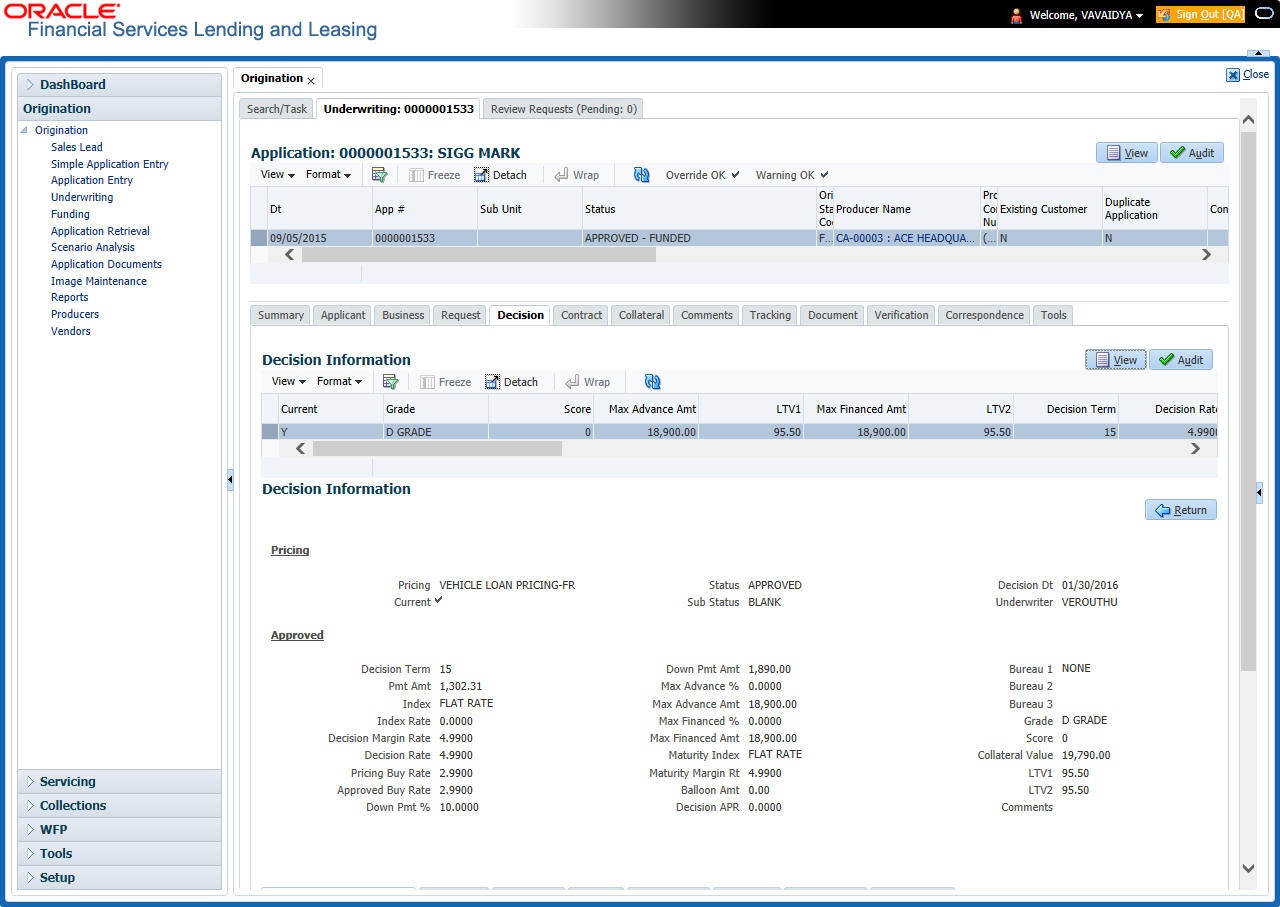
7.8 Decision Tab
If the application was initially approved automatically, the system displays its recommendations on the Decision tab’s Approved section.
If the application was initially rejected automatically, the system displays its reasons on the Decision link’s Stipulation sub tab.
- If the data meets your approval, change the status of the application to either APPROVED or REJECTED and enter any stipulations.
- If you reject the application, change the status to REJECTED and enter the reasons for the adverse action on the Stipulations sub screen.
You can use the quick calculator provided with the drop-down list adjacent to the Calculate button to calculate the required Loan parameters. You can also use the calculator available in Tools section for completing this step. For detailed information on using the Calculator tools, refer Tools chapter in the document.
- Open the Underwriting screen and load the underwriting application you want to work with.
- Click Decision tab.
- Perform any of the Basic Operations mentioned in Navigation chapter.
A brief description of the fields is given below:
Table 7-26 Decision
Field Do this Pricing section Current Check this box to indicate that this is the current decision. Pricing View the pricing. Decision Dt View the decision date. Underwriter View the underwriter id. Status View the application status. Sub Status View the application sub-status. Approved section Decision Term Specify the approved decision term. Pmt Amt Specify the approved payment amount. Index Specify the index type. Index Rate Specify the approved index rate. Decision Margin Rate Specify the approved decision margin rate. Decision Rate Specify the approved decision rate.
Note: For Islamic products this field is displayed as Profit Rate.
Pricing Buy Rate View the pricing buy rate. Approved Buy Rate View the approved buy rate which is by default the Pricing Buy Rate displayed above. You can also specify the required approved buy rate. Down Pmt % Specify the approved down payment percentage. Down Pmt Amt Specify the approved down payment amount. Max Advance % Specify the approved advance percentage. Max Advance Amt Specify the approved advance amount. Max Financed % Specify the maximum amount financed percentage. Max Financed Amt Specify the maximum amount financed. Maturity Index Select the approved post maturity index. Maturity Margin Rt Specify the maturity rate. Balloon Amt Specify the balloon amount. Decision APR Specify the decision APR. Bureau 1 Specify the Bureau 1. Bureau 2 Specify the Bureau 2. Bureau 3 Specify the Bureau 3. Grade Select the credit grade. Score Specify the credit score. Collateral Value View the collateral value. LTV1 View the loan to value ratio. LTV2 View the loan to value ratio. Comments Specify comments, if any. - Perform any of the Basic Actions mentioned in Navigation chapter.
- Click Select Pricing.
The system determines the best pricing match of all enabled Loan pricing strings in the Setup menu and displays the results in the Pricing and Approved sections.
- Quick CalculateIn the Decision Information section, there is a drop-down list adjacent to the Calculate button with following options to auto calculate different Loan decision parameters based on the data provided. Select the required option from the drop-down list and click Calculate:
- CALCULATE PAYMENT
- CALCULATE INTEREST RATE
- CALCULATE TERM
- CALCULATE LOAN AMOUNT
The system displays the requested calculation in the respective field.
- Re-Score
A Re-Score button is available next to Calculate. Whenever any sensitive Financial or Collateral information is amended in the Application, OFSLL displays a warning message Scoring sensitive information is changed. Re-score the application. You need to click on Re-Score to re-validate the grade and pricing accordingly.
The display of the warning message to Re-score the application can be controlled using the respective System parameter. If the defined System Parameter is flagged Y, only then the message is displayed.
If you are underwriting a Loan, record the following information on the Decision tab:
- If you are approving the application, complete the Approved section with the values you want to approve as an underwriter. You can update the default values that appeared when you selected the pricing string in step 3. (The system calculator may be of use when completing this section. For more information, refer the Tools chapter).
- Click Calculate. The system displays the decision calculation in the respective field.
