A.2.48 Add New Customer
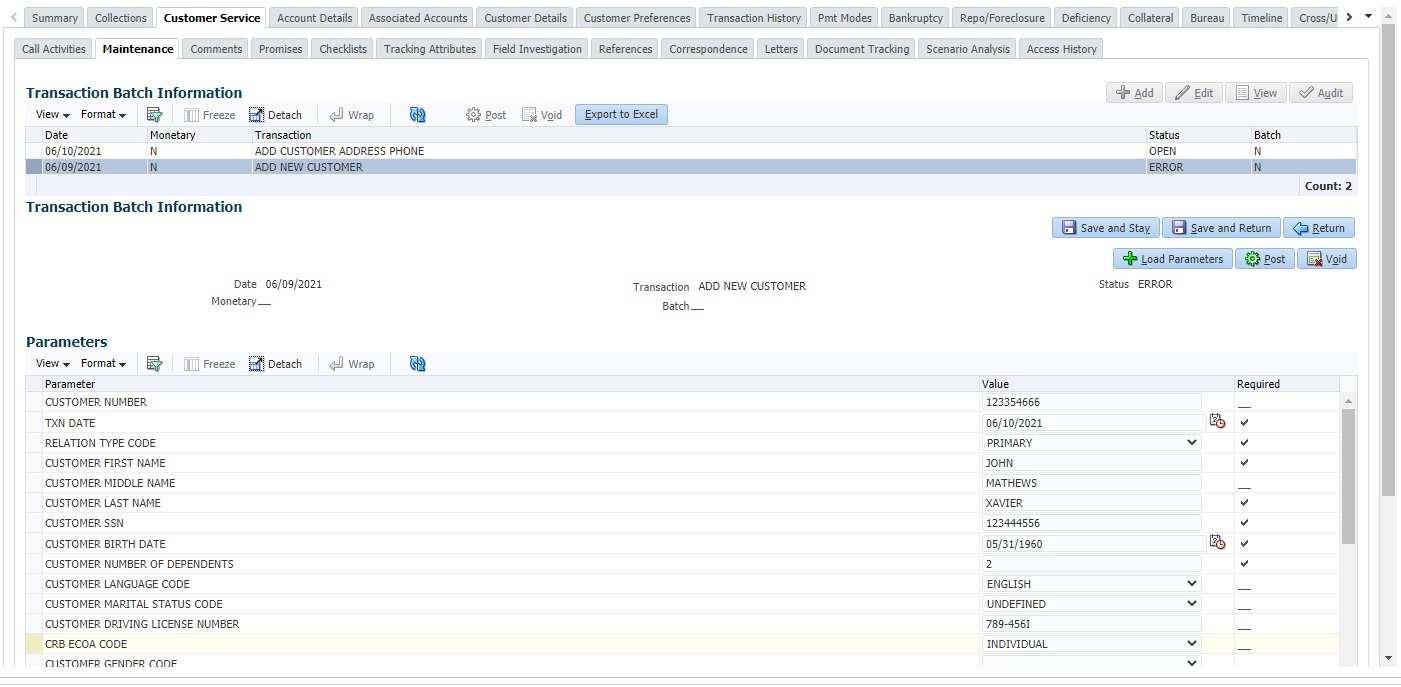
During the servicing stage of an account, you can add customer details into the system by posting ADD NEW CUSTOMER transaction in Customer Service > Maintenance > Transaction Batch Information section.
Before creating the transaction, ensure that ADD NEW CUSTOMER transaction is enabled in Transaction Codes setup screen and is allowed to post based on your user privileges.
While adding, you can also set the customer relation as primary to the account by selecting the appropriate RELATION TYPE CODE. Once added, the same becomes the current/primary customer and the current indicator is set to Y by default. Also the address details of an existing current/primary account is updated to new customer details. However, if there is a different address to be updated, the same can be done by posting ADD CUSTOMER ADDRESS PHONE non-monetary transaction.
Table A-146 To add customer details
| Transaction | Parameters |
|---|---|
| ADD NEW CUSTOMER (CUS_ADD_MAINT) |
CUSTOMER NUMBER Specify the new customer number. |
|
TXN DATE Select the transaction posting date from the adjoining calendar. |
|
|
RELATION TYPE CODE Select the account relation type (Primary, Spouse, and so on) from the drop-down list which are attached to account. |
|
|
CUSTOMER FIRST NAME Specify the first name of the customer. |
|
|
CUSTOMER MIDDLE NAME Specify the middle name of the customer. |
|
|
CUSTOMER LAST NAME Specify the last name of the customer. |
|
|
CUSTOMER SSN Specify customer’s social security number. |
|
|
CUSTOMER BIRTH DATE Specify customer’s birth date from adjoining calendar. |
|
|
CUSTOMER NUMBER OF DEPENDENTS Specify the number of dependents for the customer. |
|
|
CUSTOMER LANGUAGE CODE Select the customer language code from the drop-down list. |
|
|
CUSTOMER MARITAL STATUS CODE Select the customer marital status from drop-down list. |
|
|
CUSTOMER DRIVING LICENSE NUMBER Specify the customer driving license number. |
|
|
CRB ECOA CODE Select the credit bureau’s Equal Credit Opportunity Act code from where the customer credit score is received from the drop-down list. |
|
|
CUSTOMER GENDER CODE Select the customer gender code from the drop-down list. |
|
|
CUSTOMER DISABILITY INDICATOR Select the customer disability indicator as either Yes or No from the drop-down list. |
|
|
CUSTOMER SKIP INDICATOR Select the customer skip indicator as either Yes or No from the drop-down list. |
|
|
CUSTOMER STOP CORR INDICATOR Select the customer stop correspondence indicator as either Yes or No from the drop-down list. |
|
|
CUSTOMER CLASS TYPE CODE Select the customer class type code from the drop-down list. |
|
|
CUSTOMER ENABLED INDICATOR Select the customer enabled indicator as either Yes or No from the drop-down list. |
|
|
CUSTOMER CHRISTIAN NAME Specify the customer Christian name. |
|
|
CUSTOMER FULL NAME Specify customer’s full name. |
|
|
PRIVACY OPTOUT Select the customer’s privacy opt out indicator as either Yes or No from the drop-down list. |
|
|
CUSTOMER PASSPORT NUMBER Specify the customer’s passport number. |
|
|
CUSTOMER PASSPORT ISSUE DATE Select the customer’s passport issue date from adjoining calendar. |
|
|
CUSTOMER PASSPORT EXPIRY DATE Select the customer’s passport expiry date from adjoining calendar. |
|
|
CUSTOMER NATIONAL ID Specify the customer national id. |
|
|
VISA NUMBER Specify customer visa number. |
|
|
NATIONALITY CODE Select the nationality code from the drop-down list. |
|
|
PAYMENT HIERARCHY Specify the payment hierarchy code. |
|
|
CATEGORY CODE Select the customer category code from the drop-down list. |
On successfully posting the transaction, a confirmation message is displayed in Result section and the details are populated in Customer Service > Customer Details tab.
Parent topic: Nonmonetary Transactions
