3.4 Users
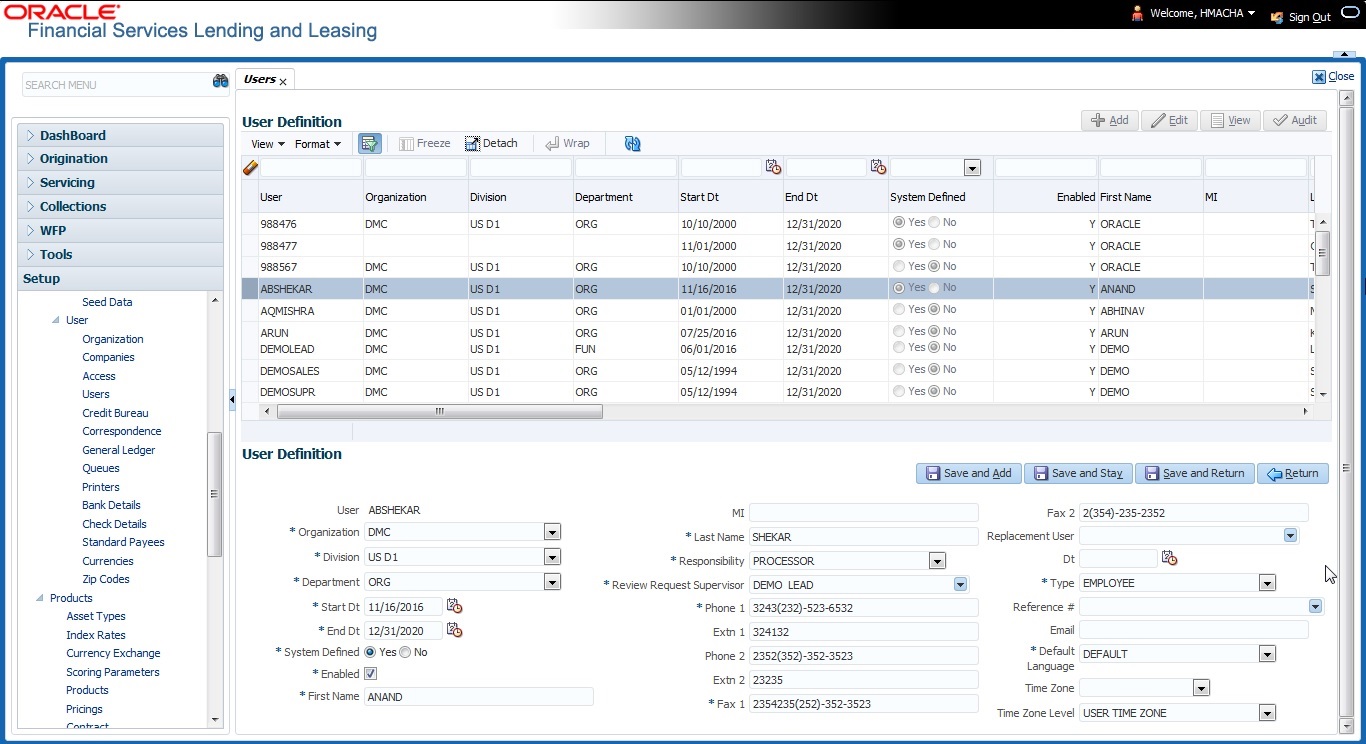
The Users screen allows you to create and set up an user. In the User Definition section, you can assign a user an identification name and password to log on to the system. You can also assign the organization, division, and department where each user is located. Additional fields allow you to record information for contacting the user. You can also define the time frame within which a user has access to the system to ensure compliance to the company’s schedule. This is a very useful feature to prevent logins during scheduled maintenance.
- What menu items does the user have access to?
- What transactions can the user perform on the Maintenance screen on the Customer Service screen?
-
Note:
The system’s SUPERUSER responsibility grants access to the entire system. Give careful consideration to the number and type of users who receive this responsibility.
- Click Setup > Setup > Administration > User > Users. The system displays the Users screen.
- In the User Definition section, perform any of the Basic Operations mentioned in Navigation chapter.
A brief description of the fields is given below:
Table 3-22 User Definition
Field Do this User Specify the user ID.
Note: This field is a unique indicator and cannot be updated, edited, or deleted once saved.
Organization Select the organization to which the user belongs, from the dropdown list. Division Select the division to which the user belongs, from the drop-down list. Department Select the department to which the user belongs, from the dropdown list. Start Dt Specify the start date for the user. You can also select from the adjoining calender icon. End Dt Specify the end date for the user. You can also select from the adjoining calender icon. System Defined Select Yes, if the entry is system defined. System defined entries cannot be modified.
Select No, if the entry is not system defined and it can be modified.
Enabled Check this box to enable the user. First Name Specify the first name of the user. MI Specify the middle initial of the user. Last Name Specify the last name of the user. Responsibility Select the responsibility for the user from the drop-down list.
Note: The users mapped to the role Responsibility can only view the screens.
Review Request Supervisor Select the supervisor responsibility who can also review and respond to review requests from the drop-down list.
The list displays the corresponding Review Request Supervisors who are either one or more levels higher from the above selected user Responsibility as maintained in RESPONSIBILITY_CD lookup code.
Phone 1 Specify the user’s primary phone number. Extn 1 Specify the phone extension for the primary phone number. Phone 2 Specify the user’s alternate phone number. Extn 2 Specify the phone extension for the alternate phone number. Fax 1 Specify the user’s primary fax number. Fax 2 Specify the user’s alternate fax number. Replacement User Select the user ID of the replacement user from the drop-down list. Dt Specify the date from when the replacement is effective. You can also select from the adjoining calender icon.
Note: These two fields allow you to create a replacement user for the current user. This is particularly useful when a new employee assumes the duties of a former. By completing the Replacement User and Replacement Dt field, the system recognizes the replacement user as the current user on the effective date. For more information, refer the section, Replacement Users.
Type Select the user type from the drop-down list. Reference # Specify the reference number for the user from the drop-down list. Email Specify user’s email address. Default language Select the default language from the drop-down list. Time Zone Select the required Time Zone from the drop-down list, The specified time zone would be applicable at company level. Time Zone Level Select the time zone level (Organization, Company or User) that would apply by default, when specific time zone is not specified at Company and User level. - Perform any of the Basic Actions mentioned in Navigation chapter.
This section consists of the following topics:
