3.5.5 Importing a trusted certificate into an Oracle Wallet
The HTTPS servers used by Experian, Equifax, and CSC for their Internet based credit report services (as well as all HTTPS servers) contain a site certificate signed by a trusted Certificate Authority (CA). The CA is an entity that guarantees the identity of the HTTPS server. If the client trusts the CA, and the CA says that the HTTPS server is who they say they are, then the client inherently trusts the HTTPS server. Normally, a client tool such as Microsoft Internet Explorer has a large store of trusted CA certificates which makes secure communication between a client and a trusted HTTPS server relatively seamless and uneventful. Unfortunately, the store of CA certificates in the default Oracle wallet is rather small and it is likely that it will not contain the certificate of the CA that is certifying one or more of the credit bureau web sites. This means that the CA certificate must be imported into the wallet. To do this, the certificates must first be exported from a browser and then imported into the Oracle wallet using the Oracle Wallet Manager.
- Use Microsoft Internet Explorer and connect to one of the HTTPS URLs referenced in the Oracle Wallet Manager Setup section of this document.
If the web site asks for a user id and password, cancel the dialog box and remain on the top-level HTTPS screen.
- Once connected, from the browser’s File menu, choose Properties.
- Click the Certificates button.
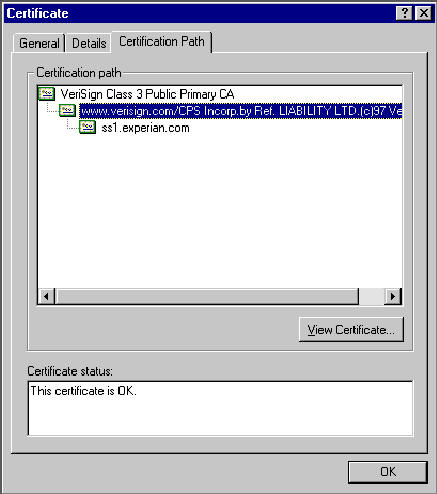
- Click the Certification Path tab. The bottom-most certificate is the one generated by the host itself. The one or more certificates above the bottom-most one are of greater importance to this task. The screen shot below displays a web site with two CAs (an intermediate, and a primary). Whether it is an intermediate CA or a primary one, the steps are the same for saving the certificate as a text file.
- Click the first certificate above the bottom-most certificate (it may be the only certificate above the bottom-most certificate).
- Click the View Certificate button.
- Click the Details tab.
- Click the Copy to File button.
- Click the Next button.
- Choose the Base 64 encoded format.
- Click the Next button.
- Enter a filename and location for the file.
- Click the Next button.
- Click the Finish button.
- Repeat steps 5 through 14 for the next certificate in the certification path, if any.
Parent topic: Credit Bureau
