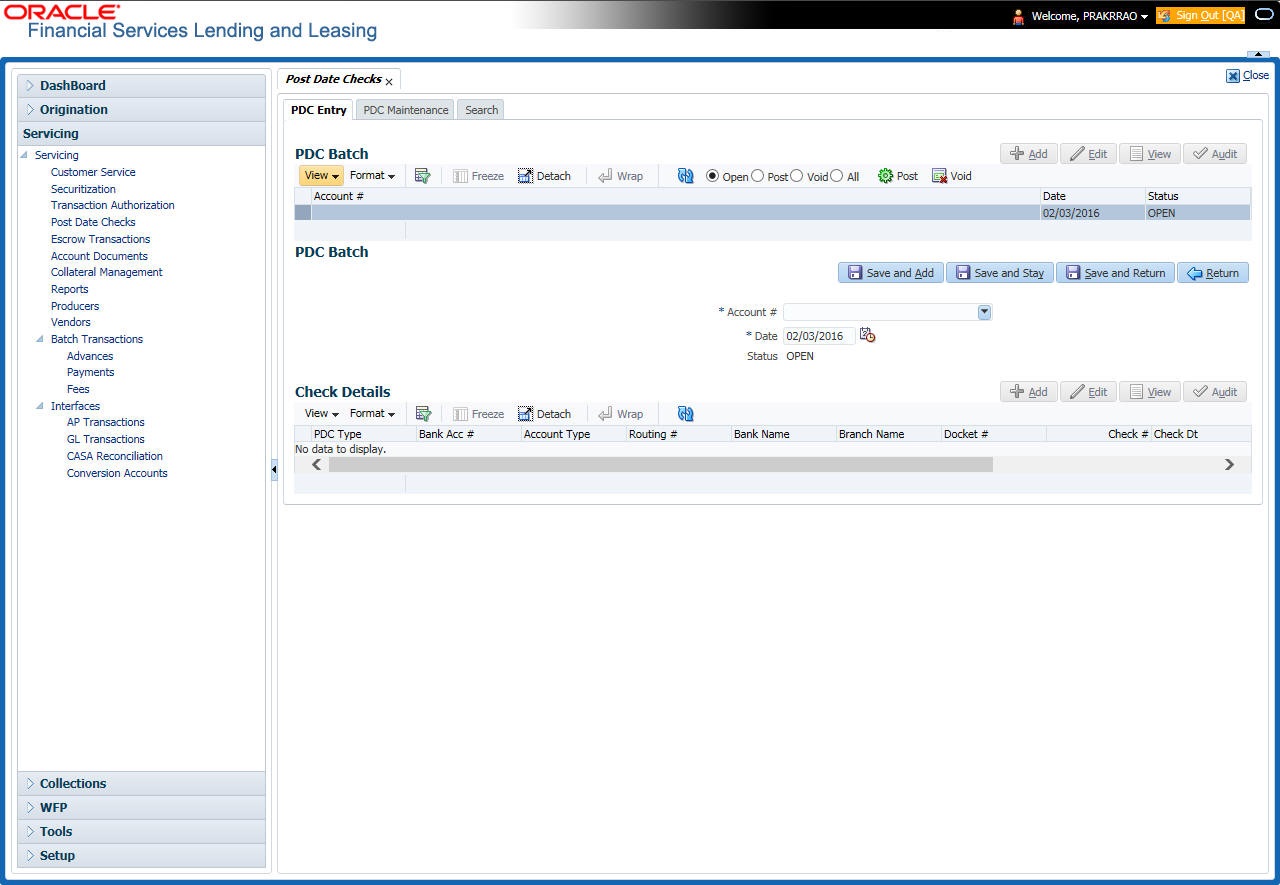
7.1 PDC Entry Tab

The PDC Entry link opens the PDC Entry screen which enables you to record details about the post dated checks collected from customer.

When post dated check is processed by the PDC batch, the status changes to PROCESSED. All the processed checks will then be picked by the Payment Batch and processed. After this, the system posts s payment transaction on the Payment screen’s Payment Entry tab.

The View Options section enables you to view PDC batches by status (Open, Post, Void, and All). You can choose whether the PDCs from the customer are for a single Line of credit account or for multiple Line of credit accounts in the same bank. Once you enter the Line of credit account number of the customer in the PDC Batch section, The system displays all Line of credit accounts pertaining to the customer.

The information has to be captured to facilitate the inward sorting i.e. sorting the cheques by Line of credit product group and location and then vaulting them in boxes placed in the vaults at the PDC center and subsequently send them for clearance on the day the payment is due. Usually the PDCs are sent for clearance a few days before the actual due date.

Information maintained here can be viewed at Customer Service > Account Details > Contract Information > PDC sub tab.

After the batch has been created, click POST in Action section to post the batch of PDCs to Line of credit account. You can also click VOID in the Action section to cancel the PDC entry on a Line of credit account.

To view the PDC Entry section

  1. On the Oracle Financial Services Lending and Leasing Application home screen, click the Servicing > Servicing > Post Dated Cheques > PDC Entry.
  2. On the PDC Entry screen’s View Options section, select the type of PDC batch you want to view.

    Table 7-1 Type of PDC batch

    If you choose: System displays in the PDC Batch section:
    Open All batches with OPEN status.
    Post All batches with POST status.
    Void All batches with VOID status.
    All All batches, regardless of the status.
  3. In this section, you can perform any of the Basic Operations mentioned in Navigation chapter.

    A brief description of the fields is given below:

    Table 7-2 Fields

    Field Do this
    Account Select the account number.
    Date Specify the date.
    Status View the status.
  4. Perform any of the Basic Actions mentioned in Navigation chapter
  5. In the Check Details section, you can perform any of the Basic Operations mentioned in Navigation chapter.

    A brief description of the fields is given below:

    Table 7-3 Check Details

    Field Do this
    PDC Type Select the post dated check type, SECURITY CHECKS or POST DATED CHECKS FOR PAYMENT.
    Bank Acc # Specify the account number, on which the cheque is drawn.
    Account Type Specify the type of the account
    Routing # Specify routing number of the cheque. It is the number printed on cheque, also called MICR number (Magnetic Ink Character Recognition).
    Bank Name Specify the bank name of the customers cheque
    Branch Name Specify the Branch name of the customers cheque
    Docket # Specify the docket number where post dated checks are supposed to be stored
    Check # Specify the starting cheque number
    Check Dt

    Select the check date. In case there are multiple checks being deposited that have sequential serial numbers, the date of the first cheque in the series would be entered in the date field. The remaining cheque dates would be anniversary dates based on the frequency set up.

    For example, the cheque range could be from 111 to 180. If date on first cheque-111 is October 12, 2003 and the frequency is set to Monthly, the next cheque would be picked up for processing on November 12, 2003.

    Check Amt Specify the appropriate cheque amount.
    Status Specify if there are any additional status of the PDC.
    Comments Specify any remarks for the details.

    Once the PDC batch is posted, an entry appears in Post Dated Checks section on the Customer Service screen’s Payment Mode tab, with OPEN status.

    The status changes to PROCESSED when post dated check is sent for clearance on the preprocessing day and the payment is received. At that time, a payment transaction is posted on the Payments screen’s Payment Entry screen.