- Customer and Accounts User Guide
- Account Facility
- Create Account Facility
2.1 Create Account Facility
This topic describes the systematic instructions to enable or disable virtual account facility for a customer.
- On Home screen, click Virtual Account Management. Under Virtual Account Management, click Customer.
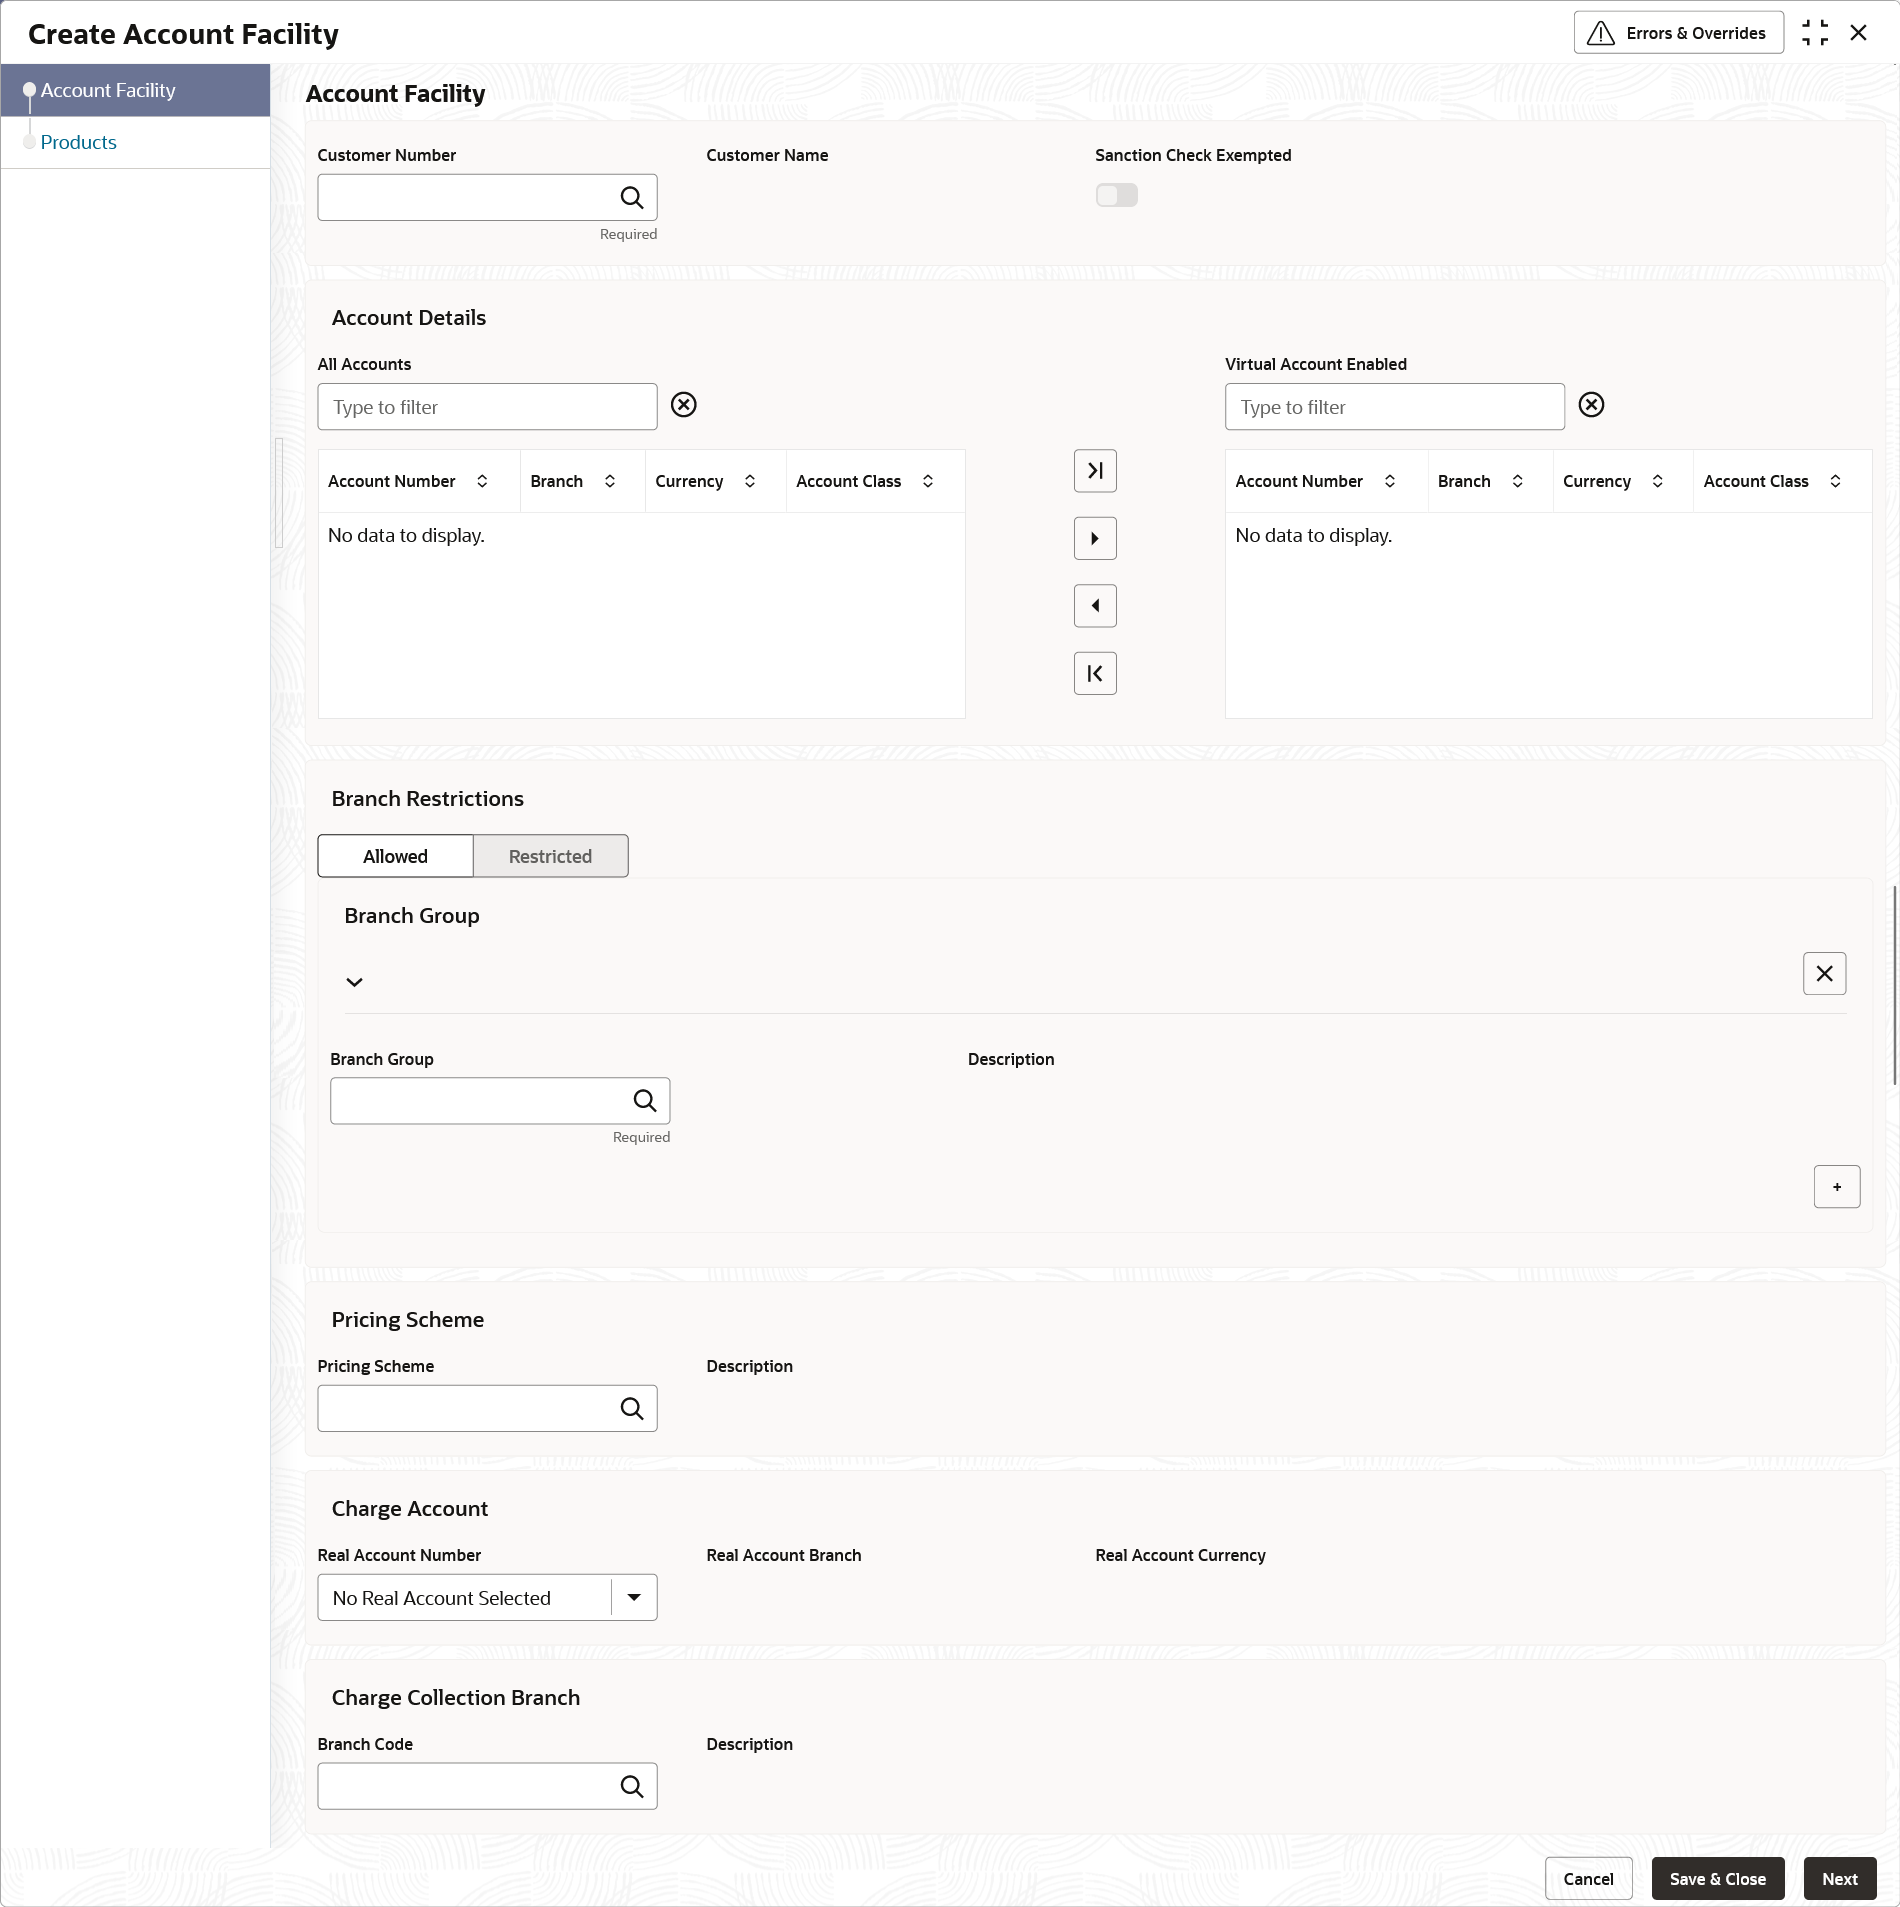
- Under Customer, click Account Facility. Under Account Facility, click Create Account Facility.The Create Account Facility - Account Facility screen displays.
Figure 2-1 Create Account Facility - Account Facility
- Specify the fields on Create Account Facility - Account Facility screen.For more information on fields, refer to the field description table.
Note:
The fields marked as Required are mandatory.Table 2-1 Create Account Facility - Account Facility – Field Description
Field Description Customer Number Click Search icon to view and select the required customer number. The customer information is stored and used from the DDA system.
Customer Name Displays the brief description about the selected Customer Number. Sanction Check Exempted By default, it is disabled. If enabled, the customer is exempted from sanction check. It will be enabled only if Sanction Check Required is selected while configuring the bank parameters.
All Accounts Displays the list of all the account of the selected customers. Specify the name of the account on the filter and/or select the required account to enable the virtual account facility that appears on the grid.
Virtual Account Enabled Displays the list of the accounts enabled for the virtual account facility. Branch Restrictions Select the option to allow/restrict the virtual accounts to be opened under specific branches. The available options are:- Allowed
- Restricted
Branch Group Click Search icon to view and select the required branch group. Description Displays the brief description about the selected Branch Group. Note:
For more information on branch group creation and branch linking, refer to the Branch Group topic in Configuration User Guide.Pricing Scheme Click Search to view and select the required pricing scheme. Note:
If a pricing scheme linked to a customer is changed in the middle of a charge cycle, the charges configured for the updated pricing scheme will be applied for the entire charge cycle. Any pending event-based charges (Customer setup and Structure setup charges) will be calculated based on the existing pricing scheme. Any newly created structure will be charged based on the updated pricing scheme.Description Displays the brief description about the selected Pricing Scheme. Real Account Number Click Search to view and select the required real account number to collect the charges. Real Account Branch Displays the account branch based on the selected Real Account Number. Real Account Currency Displays the account currency based on the selected Real Account Number. Branch Code Click Search to view and select the required branch code. This branch code will be used during charge postings. Description Displays the brief description about the selected Branch Code. - Click > to move the selected account into the Virtual Account Enabled grid. The list of accounts displayed in the grid is enabled for virtual account facility.
Note:
The user can use the respective options to move the records back and forth from one grid to another. The user can also filter to select the required account and move the record.
Products
The Products screen allows the user to select the one or more product templates.
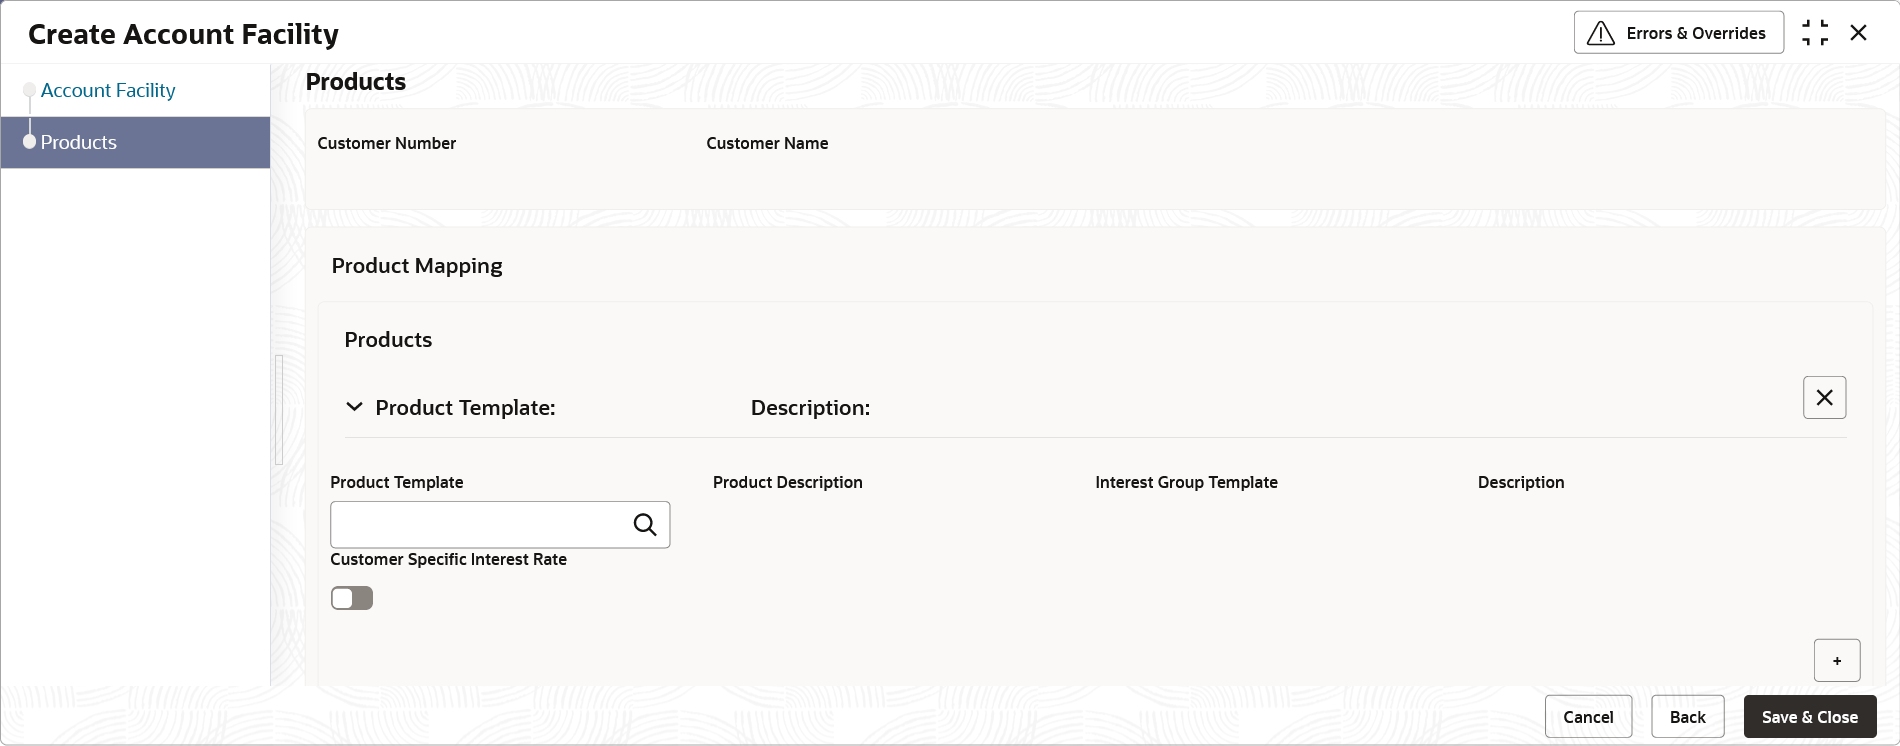
- Click Next.The Create Account Facility - Products screen displays.
Figure 2-2 Create Account Facility - Products
- Specify the fields on Create Account Facility - Products screen.For more information on fields, refer to the field description table.
Note:
The fields marked as Required are mandatory.Table 2-2 Create Account Facility - Products – Field Description
Field Description Customer Number Based on the customer number selected in Account Facility screen, the information is auto-populated. Customer Name Based on the customer name selected in Account Facility screen, the information is auto-populated. Product Template Click Search icon to view and select the required product template. Displays the list of product templates that are allowed for the customer category. For more information, refer to the Restrictions section of Account Product Proposition topic in Configuration User Guide. Note:
Product Template/s are allowed to be attached during the account facility creation only. Once a facility is created, the customer account product/s will automatically be created based on the product template/s attached. Any further maintenances on customer account products needs to be performed through View Customer Account Product screen or if any subsequent product templates need to be attached to a customer, it can be performed through Create Customer Account Product screen.Product Description Based on the Product Template selected, the information is auto-populated. Interest Group Template Based on the Product Template selected, the information is auto-populated. Description Based on the Product Template, selected the information is auto-populated. Customer Specific Interest Rate By default, this is disabled. If enabled, indicates if a customer specific interest rate needs to be maintained. Note:
If Customer Specific Interest Rate is selected, a new Customer Interest group will be created and mapped to the customer and Virtual Account product in IC else the Interest Group template selected will be mapped. The Interest products will be based on the Interest Group template selected. - Click + to map the multiple product templates to a customer.
- Click Save to save the details.The user can view the enabled virtual account facility details in the View Account Facility.
Note:
After enabling an account for virtual account facility, the user can either go ahead and create a virtual account and/or a virtual identifier. - Click Cancel to close the details without saving.
Parent topic: Account Facility

