- Guarantee/SBLC Advise Amendment Beneficiary Consent Islamic User Guide
- Guarantee Advise Amendment Beneficiary Consent Islamic
- Data Enrichment
- Additional Details
2.3.4 Additional Details
This topic provides the systematic instructions to capture the additional details in Data Enrichment stage of Guarantee Advise Amendment Beneficiary Consent process.
- Limits and Collateral section
- Charges, commission and Taxes simulated from back office and populated in this screen
- Preview Messages simulated from back office and populated in this scree
- On Additional Details screen, click the 3 dots on any
Additional Details tile to view the details.
Figure 2-11 Additional Details
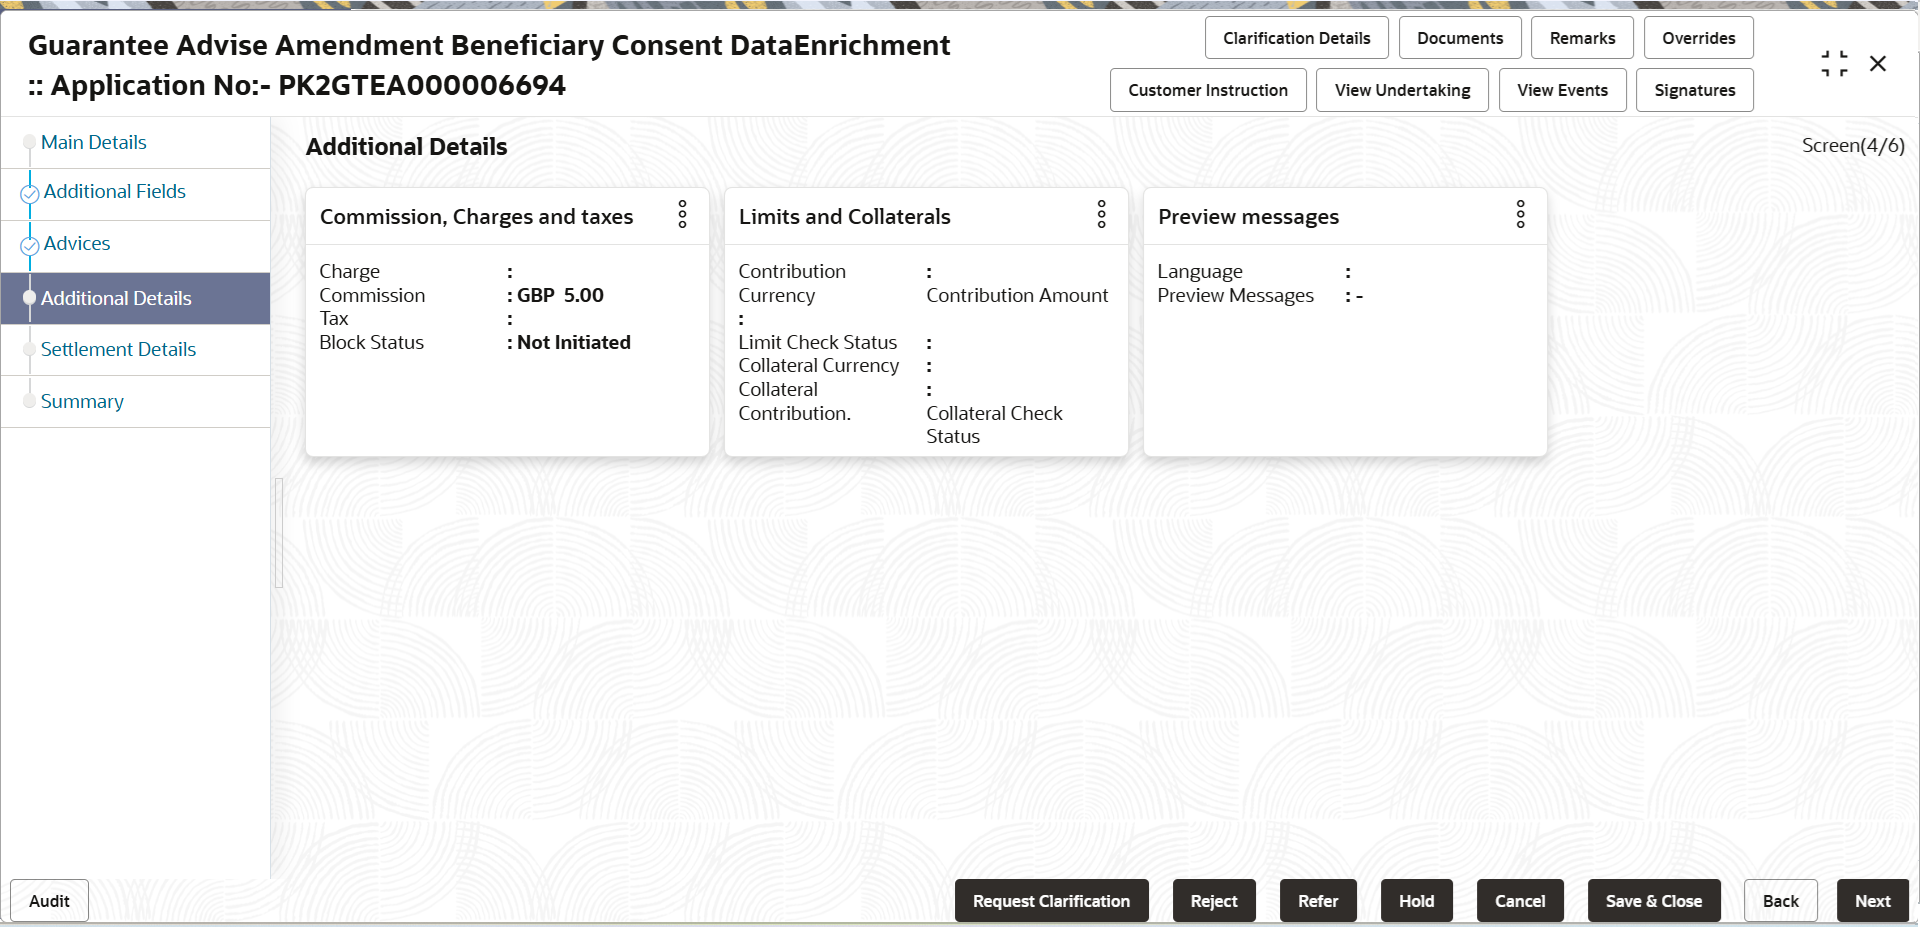
Description of the illustration deadditionaldetails.pngLimits and Collaterals
In this section user can to attach more than one line.On Approval, system should not release the Earmarking against each limit line and system should handoff the “Limit Earmark Reference Number “to the back office. On successful handoff, back office will make use of these “Limit Earmark Reference Number” to release the Limit Earmark done in the mid office (OBTFPM) and should Earmark the limit from the Back office.
In case multiple Lines are applicable, Limit Earmark Reference for all lines to be passed to the back office.
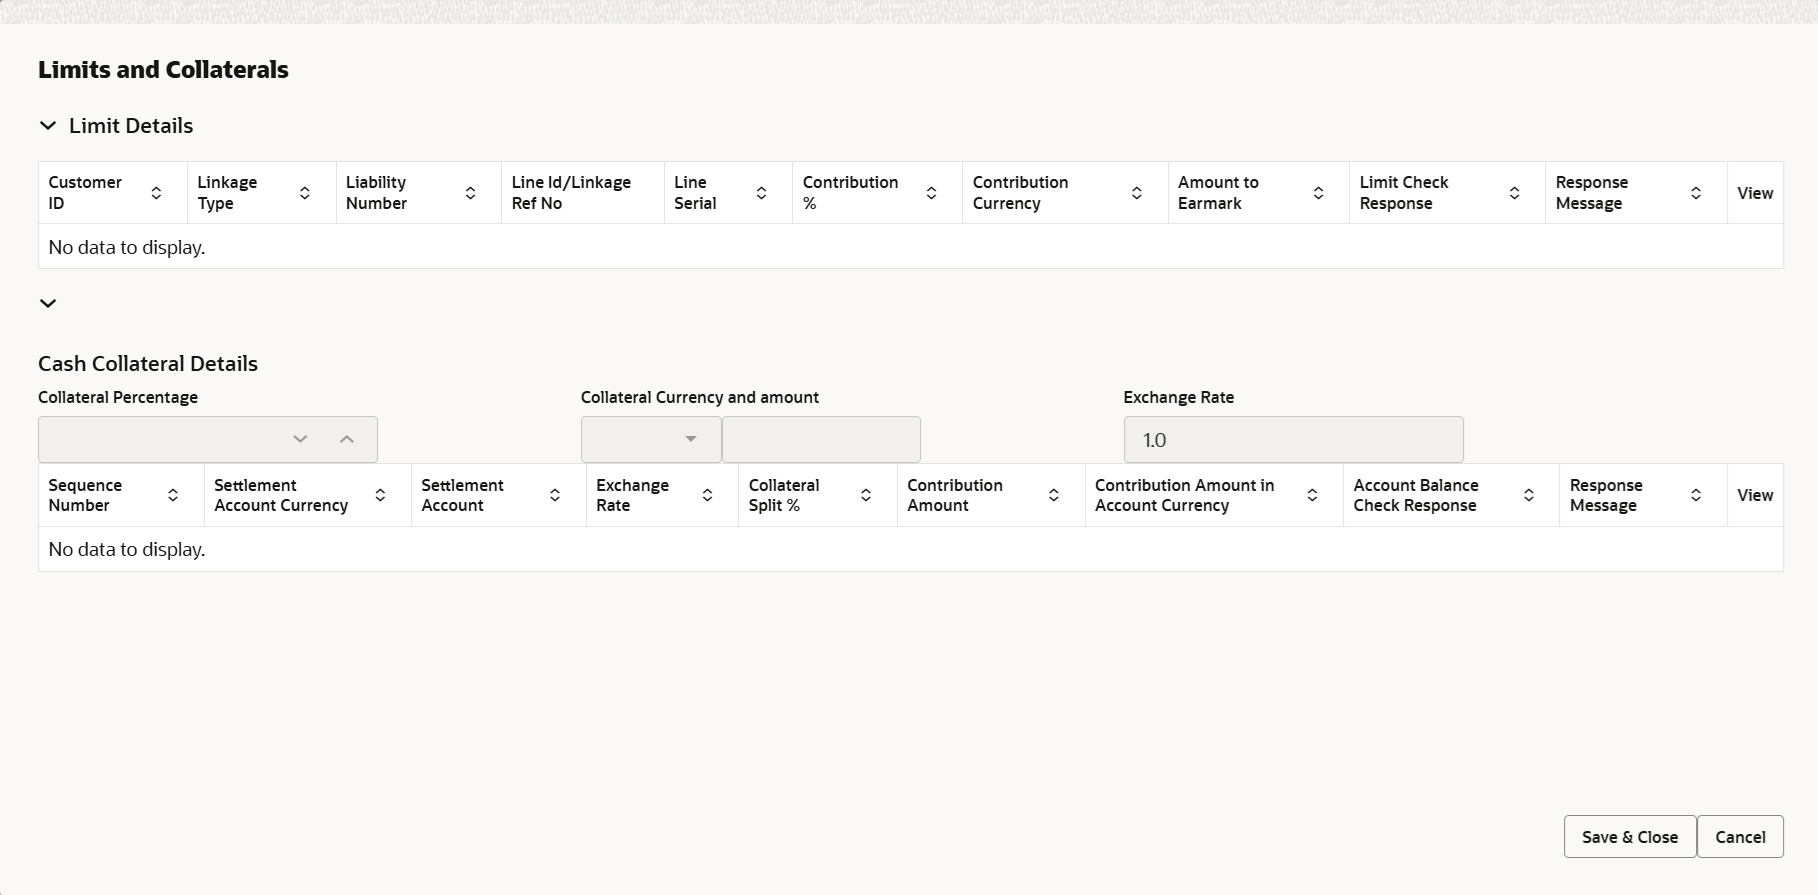
Description of the illustration delimitdetails.png
Figure 2-12 Limit Details
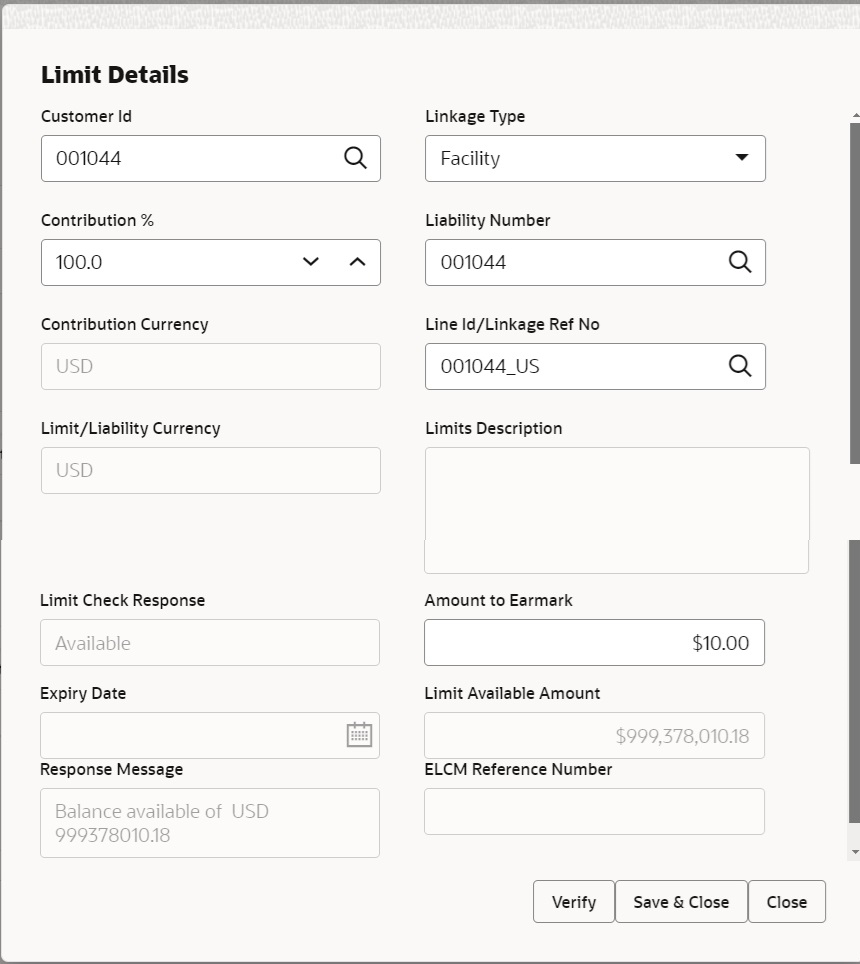
Description of the illustration delimitdetails1.pngFigure 2-13 Collateral Details
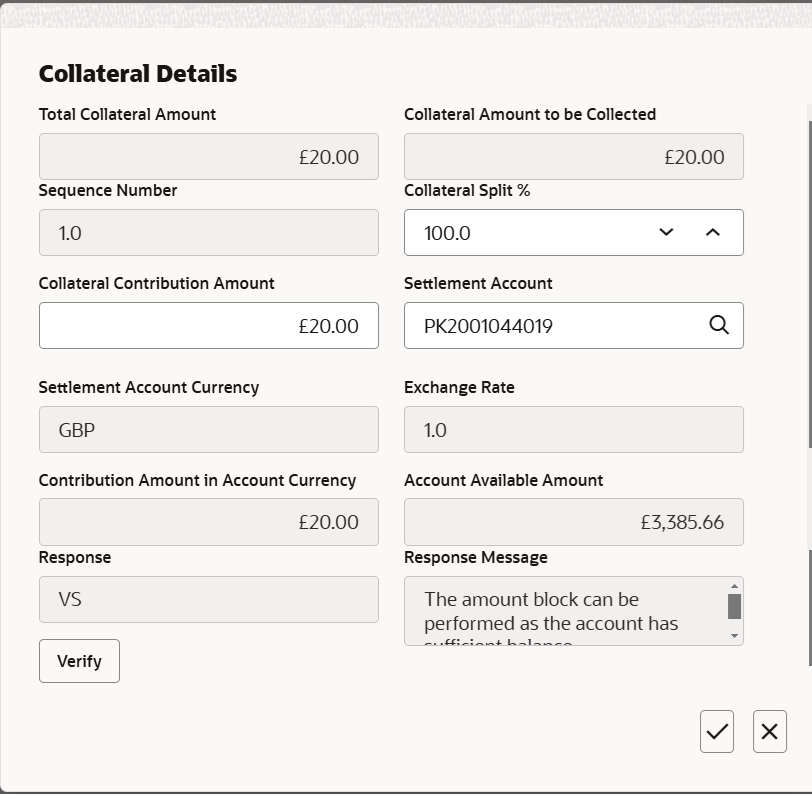
Description of the illustration decollateraldetails1.pngFor more information on fields, refer to the field description table below.
Table 2-15 Limit Details - Field Description
Field Description Limit Details Click View link to view the limit details limit details. Below fields are displayed on the Limit Details pop-up screen.
Customer ID Applicant’s/Applicant Bank customer ID will get defaulted. Linkage Type Select the linkage type. Linkage type can be:- Facility
- Liability
Contribution % System will default this to 100%. User can modify, if contribution is more than 100%. System will display an alert message, if modified. Once contribution % is provided, system will default the amount.
System to validate that if Limit Contribution% plus Collateral% is equal to 100. If the total percentage is not equal to 100 application will display an alert message.Note:
The collateral % maintained for the customer is defaulted into the Collateral Details screen. If collateral % is not maintained for the customer, then system should default the collateral % maintained for the product. User can modify the defaulted collateral percentage, in which case system should display a override message “Defaulted Collateral Percentage modified.Liability Number Click Search to search and select the Liability Number from the look-up. The list has all the Liabilities mapped to the customer.
Contribution Currency Read only field. This field displays the contribution currency.
Line ID/Linkage Ref No Click Search to search and select from the various lines available and mapped under the customer id gets listed in the drop-down. LINE ID-DESCRIPTION will be available for selection along with Line ID. When you click on 'verify', the system will return value if the limit check was successful or Limit not Available. If limit check fails, the outstanding limit after the transaction value will be shown in the limit outstanding amount.
The user can click the Line Id link to view the limit details.Note:
User can also select expired Line ID from the lookup and on clicking the verify button, system should default “The Earmarking cannot be performed as the Line ID is Expired” in the “Response Message” field.This field is disabled and read only, if Linkage Type is Liability.
Limit/Liability Currency Read only field. This field displays the limit currency, when the user select the Liability Number.
Limits Description Read only field. This field displays the limits description.
Limit Check Response This field displays the limit check response. Response can be ‘Success’ or ‘Limit not Available’ based on the limit service call response.
The value in this field appears, if you click the Verify button.
Amount to Earmark This field defaults the amount to earmark. Contribution amount will default based on the contribution %.
User can change the value.
Expiry Date Read only field. This field displays the date up to which the Line is valid.
Limit Available Amount This field displays the value of available limit, i.e., limit available without any earmark. The Limit Available Amount must be greater than the Contribution Amount. The value in this field appears, if you click the Verify button.
Response Message This field displays the detailed response message. The value in this field appears, if you click the Verify button.
ELCM Reference Number This field displays the ELCM reference number. Limit Details grid Below fields appear in the Limit Details grid along with the above fields.
Edit Click the link to edit the Limit Details. Cash Collateral Details Specify the Cash Collateral Details based on the description provided in the following table:. Line Serial Displays the serial of the various lines available and mapped under the customer id. Collateral Percentage Specify the percentage of collateral to be linked to this transaction. Collateral Currency and amount System populates the contract currency as collateral currency by default. User can modify the collateral Currency and amount.
Exchange Rate System populates the exchange rate maintained. User can modify the collateral Currency and amount.
System validates for the Override Limit and the Stop limit if defaulted exchange rate is modified.
Collateral Details pop-up screen Click View link to view the collateral details. Collateral availability needs to be checked if amendment involves increase in amount or tolerance. Provide the collateral details based on the description provided in the following table:
Below fields are displayed on the Collateral Details pop-up screen, if the user clicks plus icon.
Collateral Percentage System populates the Collateral % maintained in the Customer / Product for the counter party of the contract. Collateral Currency and amount System populates the contract currency as collateral currency by default. Exchange Rate System populates the exchange rate maintained. System validates for the Override Limit and the Stop limit if defaulted exchange rate is modified.
Total Collateral Amount Read only field. This field displays the total collateral amount provided by the user.
Collateral Amount to be Collected Read only field. This field displays the collateral amount yet to be collected as part of the collateral split.
Sequence Number Read only field. The sequence number is auto populated with the value, generated by the system.
Collateral Split % Specify the collateral split% to be collected against the selected settlement account. Collateral Contribution Amount Collateral contribution amount will get defaulted in this field.. The collateral % maintained for the customer is defaulted into the Collateral Details screen. If collateral % is not maintained for the customer, then system should default the collateral % maintained for the product. User can modify the defaulted collateral percentage, in which case system should display a override message “Defaulted Collateral Percentage modified.
Settlement Account Click Search to search and select the settlement account for the collateral. Settlement Account Currency Read only field. This field displays the settlement account currency auto-populated based on the Settlement Account selection.
Exchange Rate Read only field. This field displays the exchange rate, if the settlement account currency is different from the collateral currency.
Contribution Amount in Account Currency Read only field. This field displays the contribution amount in the settlement account currency as defaulted by the system.
Account Available Amount Read only field. This field displays the account available amount which will be auto-populated on clicking the Verify button.
Response Read only field. Response can be ‘Success’ or ‘Amount not Available’.
System populates the response on clicking the Verify button.
Response Message Read only field. Detailed Response message.
System populates the response message on clicking the Verify button.
Verify Click to verify the account balance of the Settlement Account. Save & Close Click to to save and close the record. Cancel Click to cancel the entry. Cash Collateral Details grid Below fields appear in the Cash Collateral Details grid along with the above fields. Collateral % Specify the percentage of collateral to be linked to this transaction. If the value is more than 100% system will display an alert message. The collateral % maintained for the customer is defaulted into the Collateral Details screen. If collateral % is not maintained for the customer, then system should default the collateral % maintained for the product. User can modify the defaulted collateral percentage, in which case system should display a override message “Defaulted Collateral Percentage modified.
Contribution Amount This field displays the collateral contribution amount. The collateral % maintained for the customer is defaulted into the Collateral Details screen. If collateral % is not maintained for the customer, then system should default the collateral % maintained for the product. User can modify the defaulted collateral percentage, in which case system should display a override message “Defaulted Collateral Percentage modified.
Account Balance Check Response Read only field. System populates the Account Balance Check Response on clicking the Verify button.
Edit Click edit link to edit the collateral details. - Click Save and Close to save the details and close the
screen.
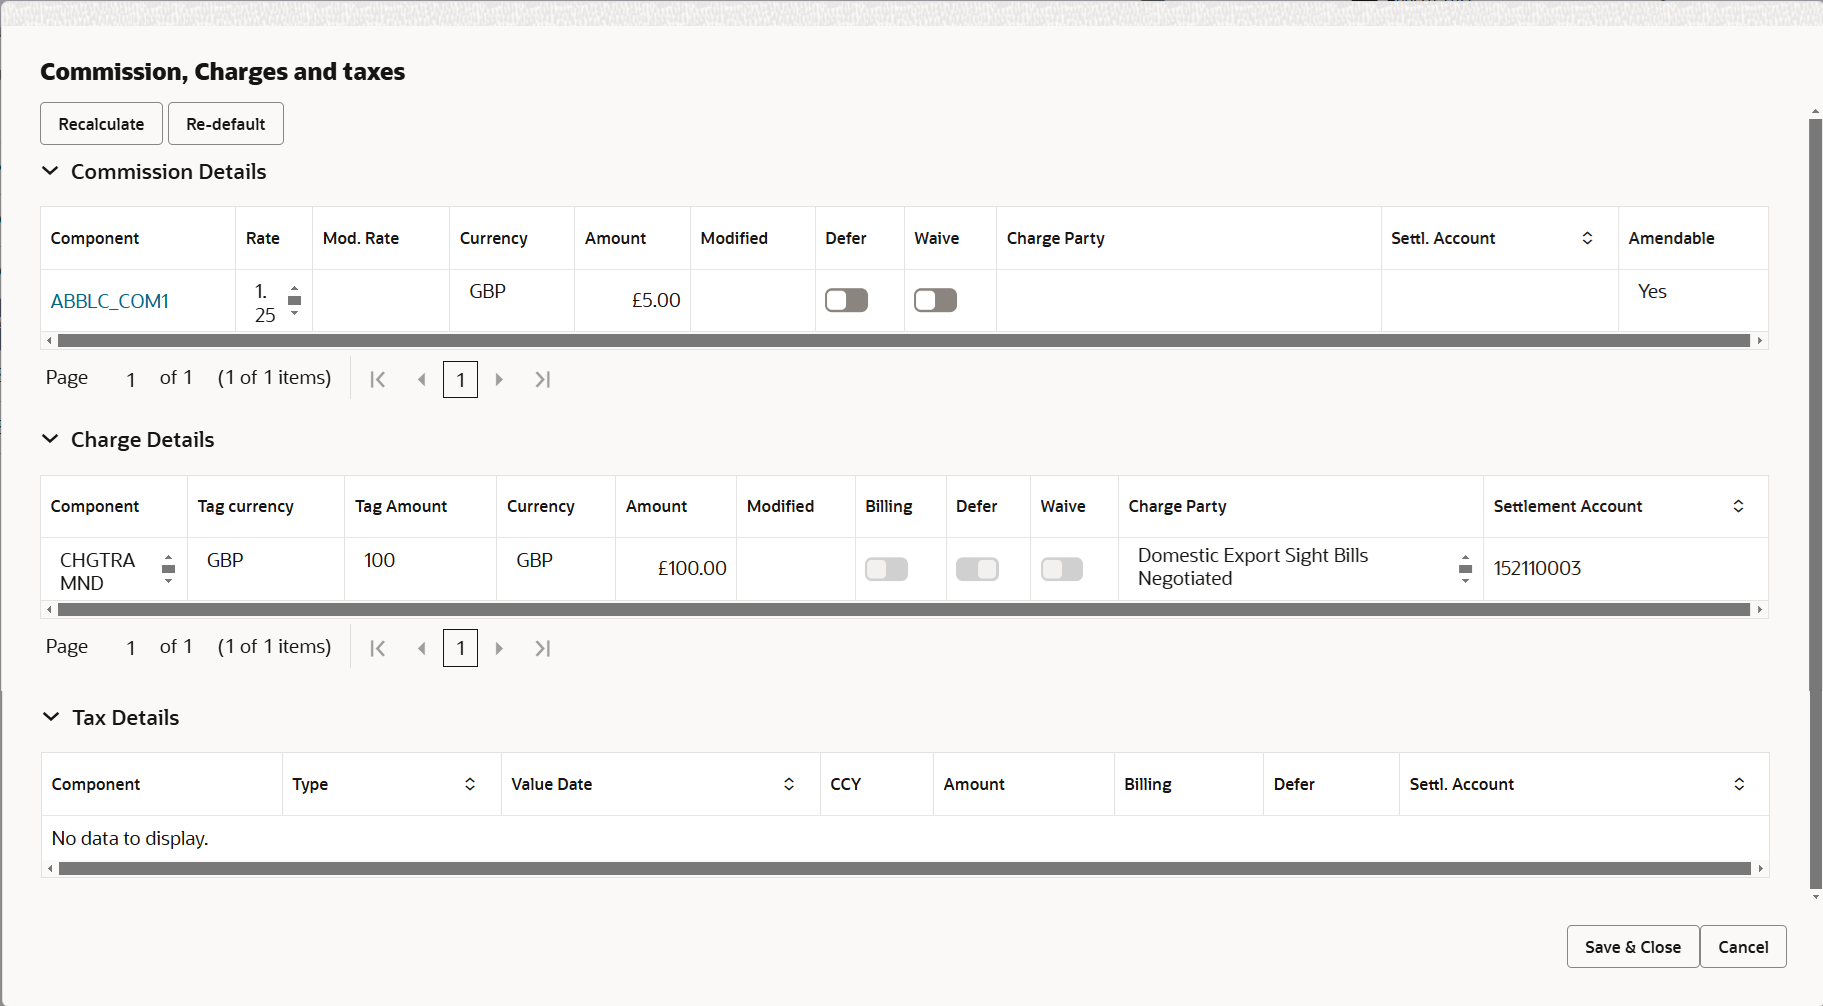
Charge Details
This section displays default commission, charges and tax details. If default charges are available under the product, they should be defaulted here with values. If customer or customer group specific charges are maintained, then the same will be defaulted from back end system.
For more information on fields, refer to the field description table below.
Table 2-16 Charge Details - Field Description
Field Description Commission Details This section displays the Commission Details. Component This field displays the commission component. Rate This field displays the rate that is defaulted from product. The commission rate, if available in Back Office defaults in OBTFPM. The user is able to change the rate.
If flat commission is applicable, then commission amount defaulted from back office is modifiable by the user. Rate field will be blank and the user cannot modify the Rate field.
Modified Rate From the default value, if the rate is changed the value gets updated in this field. Currency This field displays the currency in which the commission have to be collected. Amount This field displays the amount that is maintained under the product code. The commission rate, if available in Back Office defaults in OBTFPM. The user is able to change the rate, but not the commission amount directly. The amount gets modified based on the rate changed and the new amount is calculated in back office based on the new rate and is populated in OBTFPM.
If flat commission is applicable, then commission amount defaulted from back office is modifiable by the user. Rate field will be blank and the user cannot modify the Rate field.
Modified Amount From the default value, if the amount is changed, the value gets updated in the modified amount field. Defer If enabled, charges/commissions has to be deferred and collected at any future step. Waive Based on the customer maintenance, the charges/commission can be marked for Billing or Defer. If the defaulted Commission is changed to defer or billing or waive, system must capture the user details and the modification details in the ‘Remarks’ place holder.
Charge Party Charge party is 'Applicant' by default. User can change the value to Beneficiary. Settlement Account Select the settlement account. Amendable Displays whether the field is amendable or not. Charge Details This section displays theCharge Details. Component This field displays the charge component type. Tag Currency This field displays the tag currency in which the charges have to be collected. Tag Amount This field displays the tag amount that is maintained under the product code. Currency This field displays the currency in which the charges have to be collected. Amount This field displays the amount that is maintained under the product code. Modified From the default value, if the rate is changed or the amount is changed, the value gets updated in the modified amount field. Billing If charges are handled by separate billing engine, then by selecting billing the details to be available for billing engine for further processing. On simulation of charges/commission from Back Office, if any of the Charges/Commission component for the customer is ‘Billing’ enabled, ‘Billing’ toggle for that component should be automatically enabled in OBTFPM.
The user can not enable/disable the option, if it is de-selected by default.
This field is disabled, if ‘Defer’ toggle is enabled.
Defer If charges have to be deferred and collected at any future step, this check box has to be selected. On simulation of charges/commission from Back Office, if any of the Charges/Commission component for the customer is AR-AP tracking enabled, ‘Defer’ toggle for that component should be automatically checked in OBTFPM.
The user can enable/disable the option the check box. On de-selection the user has to click on ‘Recalculate’ charges button for re-simulation.
Waive Enble the toggle, if charges has to be waived. Based on the customer maintenance, the charges should be marked for Billing or for Defer.
This field is disabled, if Defer toggle is enabled.
Charge Party Charge party is applicant by default. User can change the value to beneficiary. Settlement Account Select the settlement account. Tax Details The tax component is calculated based on the commission and defaults if maintained at product level. User cannot update tax details and any change in tax amount on account of modification of charges/ commission will be available on click of Re-Calculate button or on hand off to back-end system. Component This field displays the tax component. Type This field displays the type of tax component. Value Date This field displays the value date of tax component. Currency This field displays the currency in which the tax have to be collected. The tax currency is the same as the commission.
Amount This field displays the tax amount based on the percentage of commission maintained. You can edit the tax amount, if applicable.
Billing If taxes are handled by separate billing engine, then by selecting billing the details to be available for billing engine for further processing. This field is disabled, if ‘Defer’ toggle is enabled.
Defer If taxes have to be deferred and collected at any future step, this option has to be enabled. The user can enable/disable the option the check box. On de-selection the user has to click on ‘Recalculate’ charges button for re-simulation.
Settlement Account System defaults the settlement account. The user can modify the settlement account.
- Click Save and Close to save the details and close the
screen.Preview Mesage
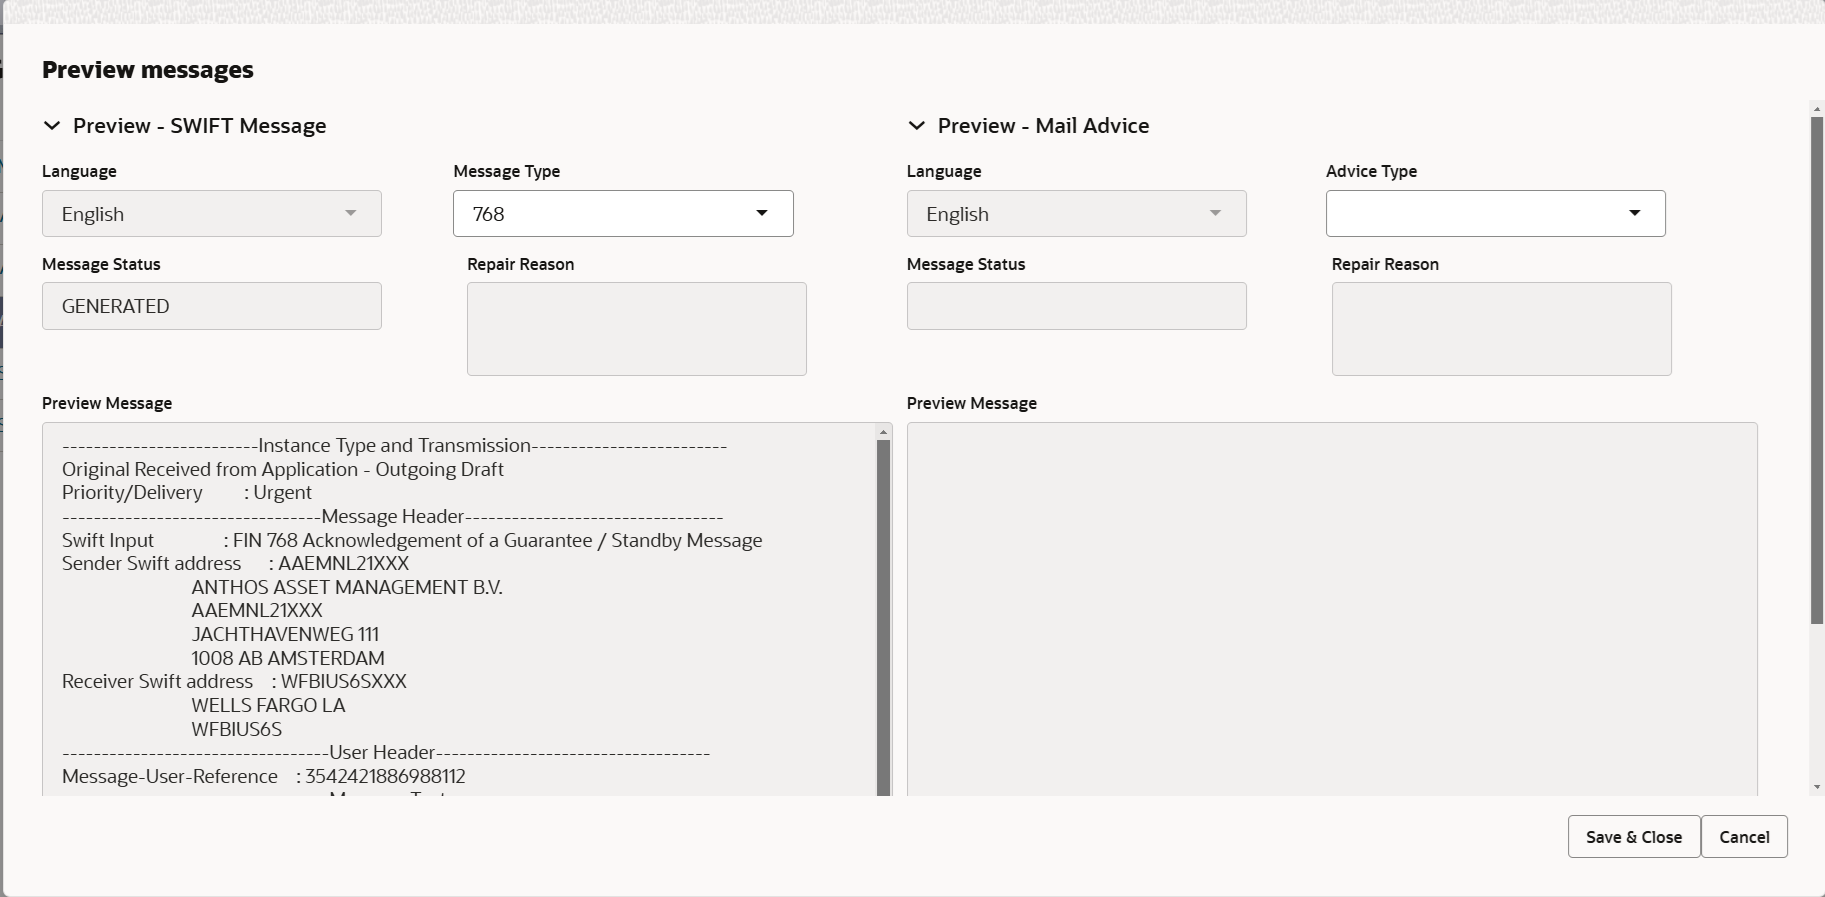
The bank user can view a preview of the outgoing SWIFT message and advise simulated from back office.
For more information on fields, refer to the field description table below.
Table 2-17 Preview Message - Field Description
Field Description Preview SWIFT Message Language Read only field. The language to preview the draft guarantee details.
English is set as default language for the preview.
Message Type Select the message type from the drop down. Message Status Read only field. Display the message status of draft message of guarantee details
Repair Reason Read only field. Display the message repair reason of draft message of guarantee details.
Preview Message This field displays a preview of the draft message. Based on the guarantee text captured in the previous screen, guarantee draft is generated in the back office and is displayed in this screen.
Preview Mail Device Language Read only field. The language for the advice message.
English is set as default language for the preview.
Advice Type Select the advice type. Message Status Read only field. Display the message status of mail advice of guarantee details
Repair Reason Read only field. Display the message repair reason of mail advice of guarantee details.
Preview Message This field displays a preview of advice. - Click Save and Close to save the details and close the screen.
- Click Next.The task will move to next data segment. For more information refer unresolvable-reference.html#GUID-C628A026-A0EB-4C65-BBAF-BE1DEE2CFF9C.
For more information on action buttons, refer to the field description table below.
Table 2-18 Additional Details - Action Buttons - Field Description
Field Description Clarification Details Click to open a detailed screen, user can see the clarification details in the window and the status will be Clarification Requested. Documents Click to View/Upload the required document. Application displays the mandatory and optional documents.
The user can view and input/view application details simultaneously.
When a user clicks on the uploaded document, Document window get opened and on clicking the view icon of the uploaded document, Application screen should get split into two. The one side of the document allows to view and on the other side allows to input/view the details in the applicationRemarks Specify any additional information regarding the guarantee. This information can be viewed by other users processing the request. Content from Remarks field should be handed off to Remarks field in Backend application.
Overrides Click to view the overrides accepted by the user. Customer Instruction Click to view/ input the following - Standard Instructions – In this section, the system will populate the details of Standard Instructions maintained for the customer. User will not be able to edit this.
- Transaction Level Instructions – In this section, OBTFPM user can input any Customer Instructions received as part of transaction processing. This section will be enabled only for customer initiated transactions.
View Undertaking Clicking this button allows the user should to view the undertaking details. View Events Click View Events button to view the snapshot of various events under the Guarantee Advise Amendment Beneficiary Consent. Signatures Click the Signature button to verify the signature of the customer/ bank if required. The user can view the Customer Number and Name of the signatory, Signature image and the applicable operation instructions if any available in the back-office system.
If more than one signature is available, system should display all the signatures.
Request Clarification Click the Request Clarification button to request for an Online clarification from customer. Clicking the button opens a detailed screen to capture the clarification details. Save & Close Save the details provided and holds the task in ‘My Task’ queue for further update. This option will not submit the request. Cancel Cancel the Data ENrichment stage inputs. The details updated in this stage are not saved. The task will be available in 'My Task' queue. Hold The details provided will be saved and status will be on hold. User must update the remarks on the reason for holding the task. This option is used, if there are any pending information yet to be received from applicant.
Reject On click of Reject, user must select a Reject Reason from a list displayed by the system. Reject Codes are:
- R1- Documents missing
- R2- Signature Missing
- R3- Input Error
- R4- Insufficient Balance/Limits
- R5 - Others
Select a Reject code and give a Reject Description.
This reject reason will be available in the remarks window throughout the process.
Refer Select a Refer Reason from the values displayed by the system. Refer Codes are:
- R1- Documents missing
- R2- Signature Missing
- R3- Input Error
- R4- Insufficient Balance/Limits
- R5 - Others
Back On click of Back, system moves the task back to previous data segment. Next On click of Next, system validates if all the mandatory fields have been captured. Necessary error and override messages to be displayed. On successful validation, system moves the task to the next data segment.
Parent topic: Data Enrichment
