- Export LC Liquidation User Guide
- Export LC Liquidation
- Data Enrichment
- Additional Details
2.3.5 Additional Details
This topic provides the systematic instructions to capture the additional details in Data Enrichment stage of Export LC Liquidation process.
- On Additional Details screen, click
 on any Additional Details tile to view the details.
Figure 2-12 Additional Details
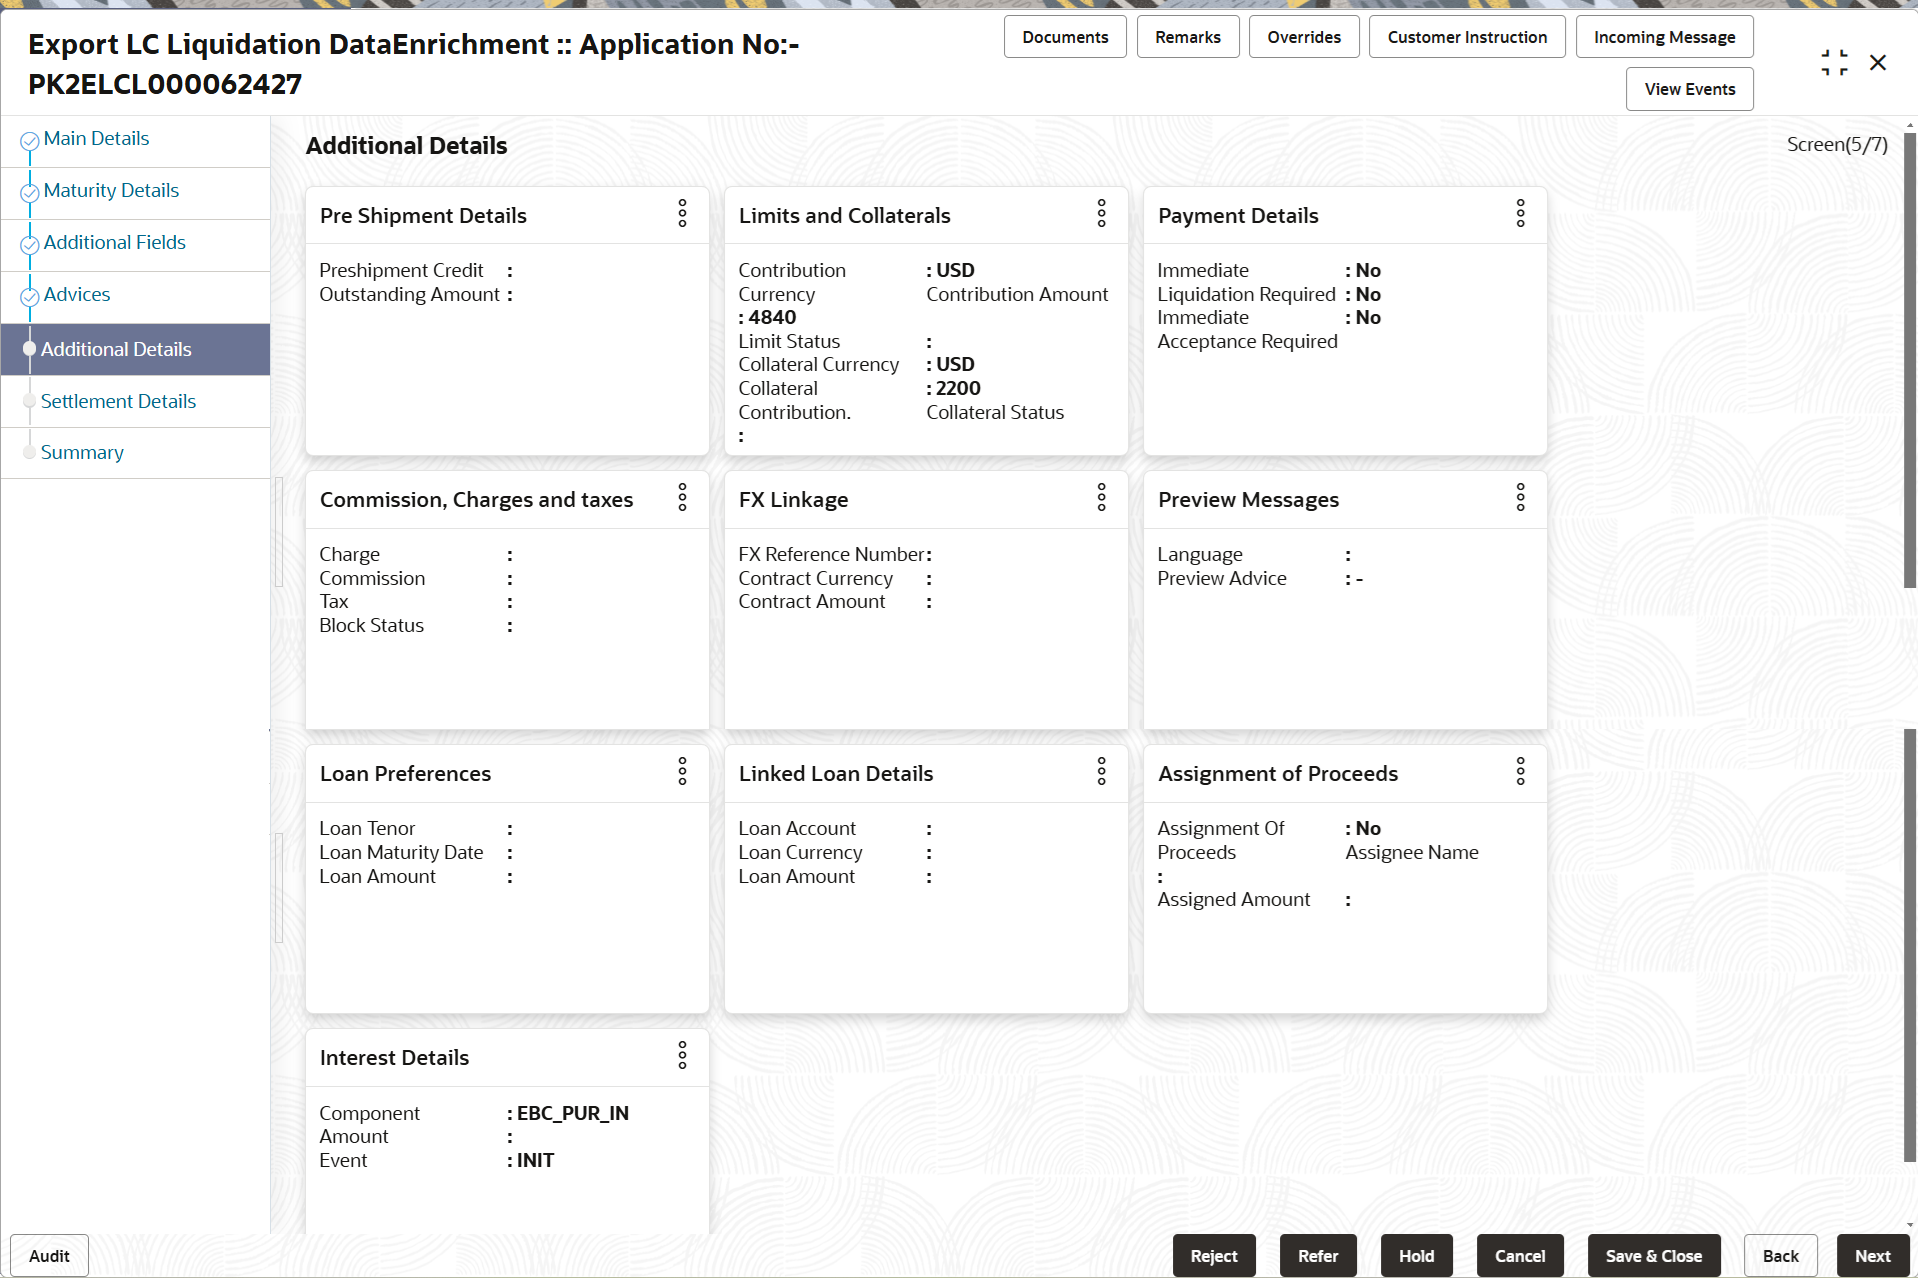
Description of the illustration deadditionaldetails.pngLimits and Collaterals
On Approval, system should not release the Earmarking against each limit line and system should handoff the “Limit Earmark Reference Number “to the back office. On successful handoff, back office will make use of these “Limit Earmark Reference Number” to release the Limit Earmark done in the mid office (OBTFPM) and should Earmark the limit from the Back office.
In case multiple Lines are applicable, Limit Earmark Reference for all lines to be passed to the back office.
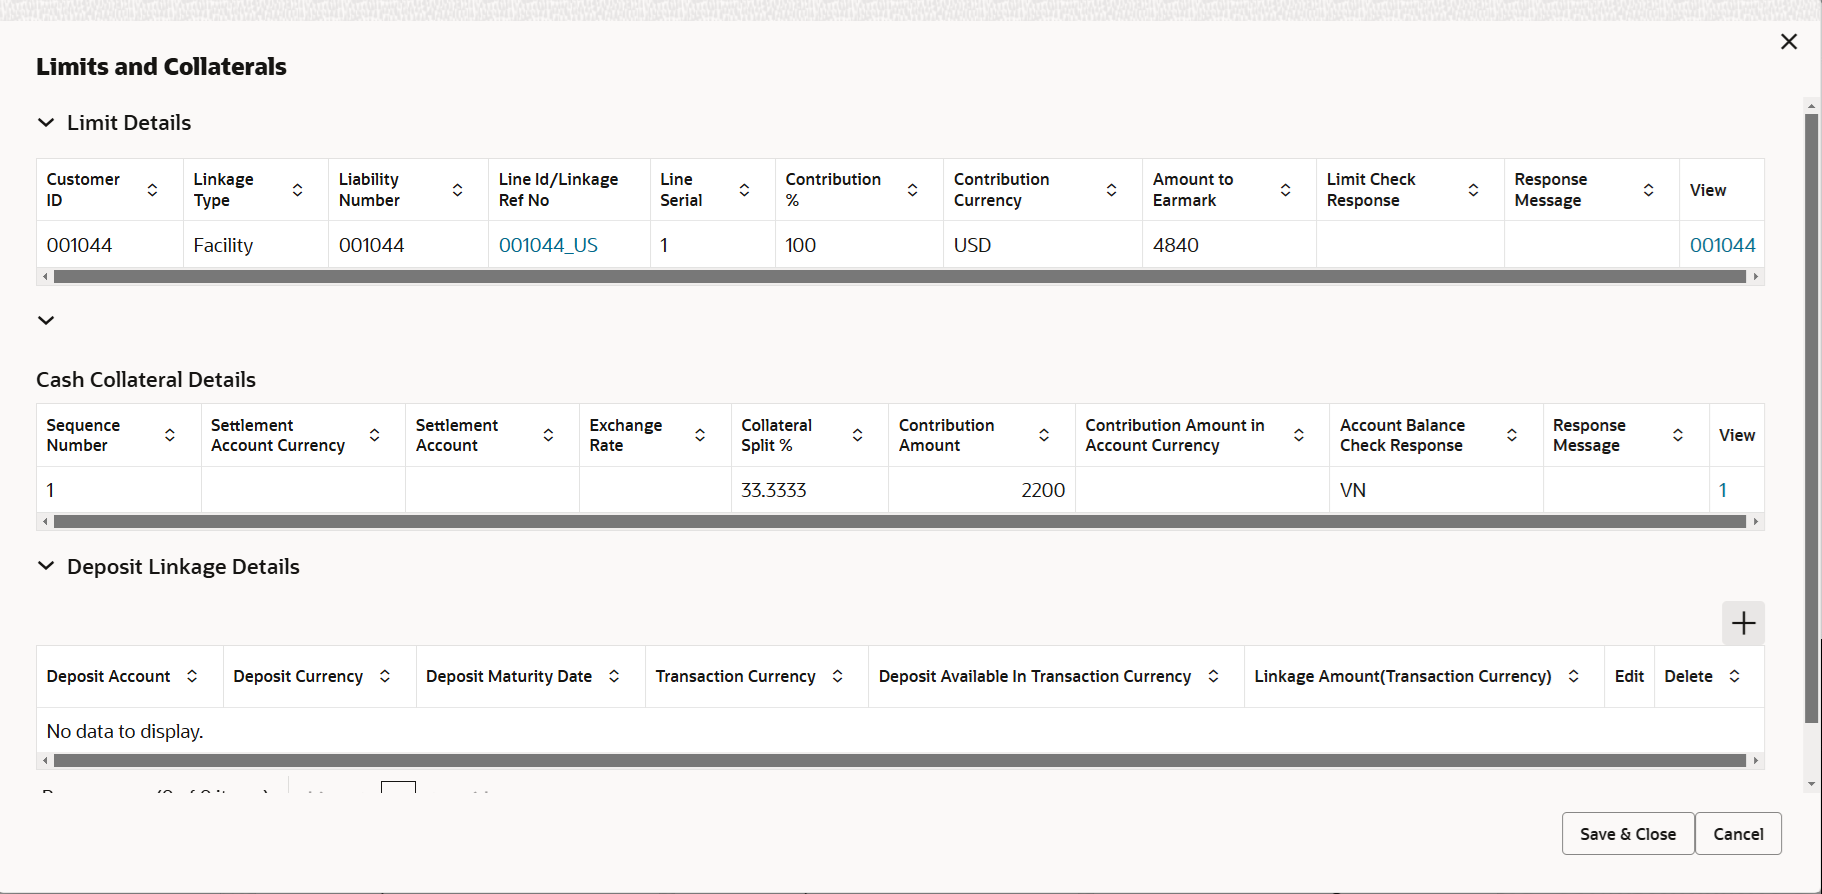
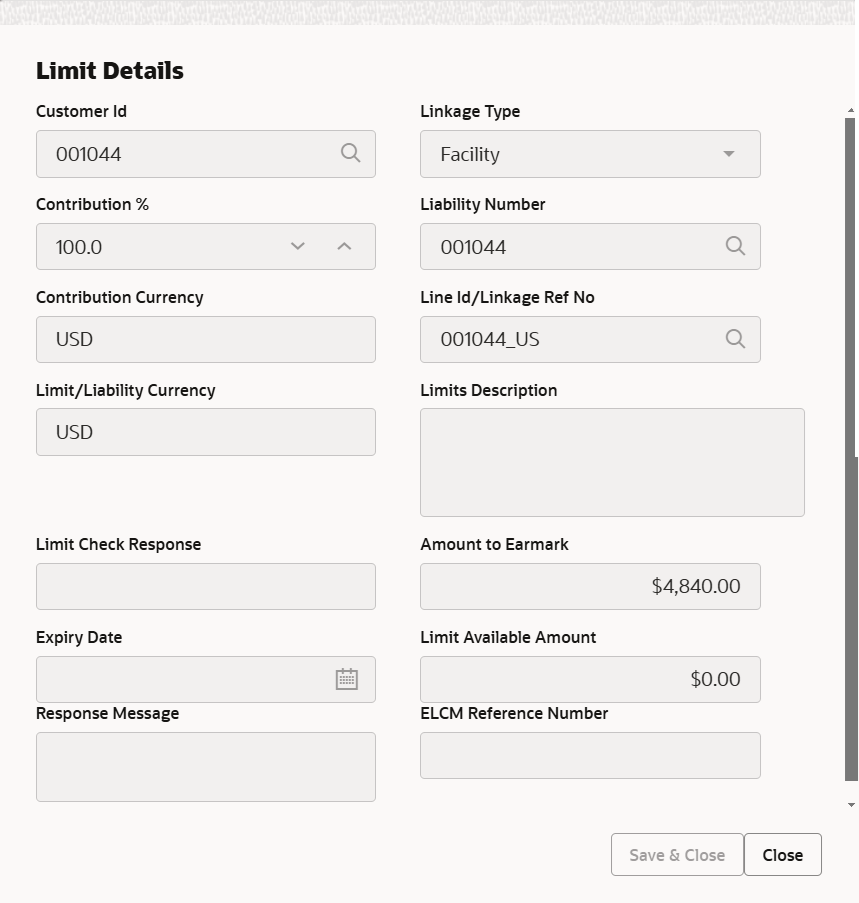
Description of the illustration delimitdetails.png
Figure 2-13 Limit Details
Description of the illustration delimitdetails1.pngFigure 2-15 Deposit Linkage Details
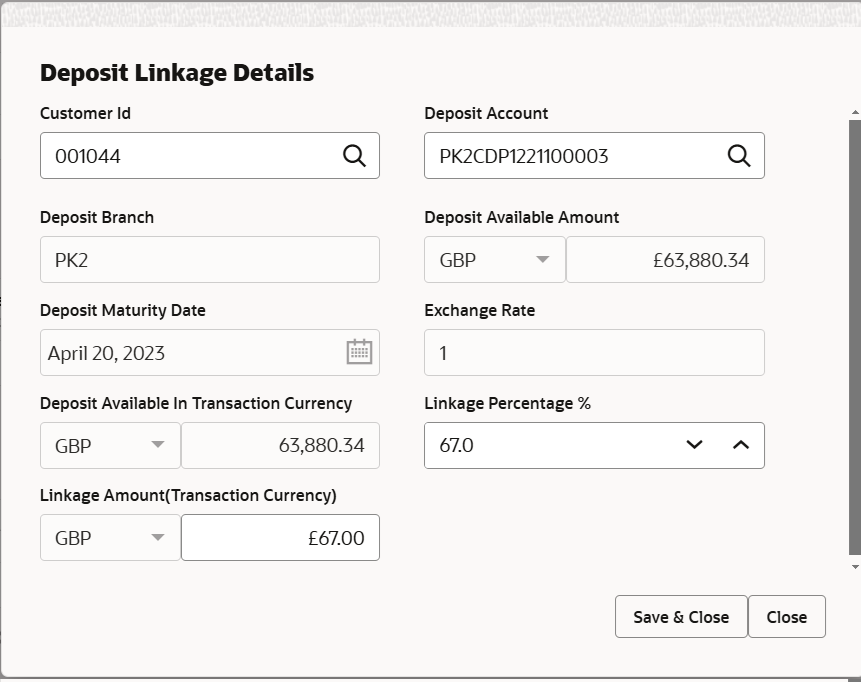
Description of the illustration depositlinkagedetails.pngFor more information on fields, refer to the field description table below.
Table 2-15 Limit Details - Field Description
Field Description Limit Details Click + plus icon to add new limit details.
Below fields are displayed on the Limit Details pop-up screen, if the user clicks plus icon.
Customer ID This field displays the applicant’s/applicant bank customer ID defaulted from the application. Linkage Type Select the linkage type. Linkage type can be:
- Facility
- Liability
By default Linkage Type should be “Facility”.
Contribution % System will default this to 100%. User can modify, if contribution is more than 100%. System will display an alert message, if modified. Once contribution % is provided, system will default the amount.
System to validate that if Limit Contribution% plus Collateral% is equal to 100. If the total percentage is not equal to 100 application will display an alert message.Note:
The collateral % maintained for the customer is defaulted into the Collateral Details screen. If collateral % is not maintained for the customer, then system should default the collateral % maintained for the product. User can modify the defaulted collateral percentage, in which case system should display a override message “Defaulted Collateral Percentage modified.Liability Number Click Search to search and select the Liability Number from the look-up. The list has all the Liabilities mapped to the customer.
Contribution Currency This field displays the contribution currency. Line ID/Linkage Ref No Click Search to search and select from the various lines available and mapped under the customer id gets listed in the drop-down. LINE ID-DESCRIPTION will be available for selection along with Line ID. When you click on 'verify', the system will return value if the limit check was successful or Limit not Available. If limit check fails, the outstanding limit after the transaction value will be shown in the limit outstanding amount.
The user can click the Line Id link to view the limit details.Note:
User can also select expired Line ID from the lookup and on clicking the verify button, system should default “The Earmarking cannot be performed as the Line ID is Expired” in the “Response Message” field.This field is disabled and read only, if Linkage Type is Liability.
Limit/Liability Currency This field displays the limit currency, when the user select the Liability Number. Limits Description This field displays the limits description. Limit Check Response This field displays the limit check response. Response can be ‘Success’ or ‘Limit not Available’ based on the limit service call response.
The value in this field appears, if you click the Verify button.
Amount to Earmark This field defaults the amount to earmark. Contribution amount will default based on the contribution %.
User can change the value.
Expiry Date This field displays the date up to which the Line is valid. Limit Available Amount This field displays the value of available limit, i.e., limit available without any earmark. The Limit Available Amount must be greater than the Contribution Amount. The value in this field appears, if you click the Verify button.
Response Message This field displays the detailed response message. The value in this field appears, if you click the Verify button.
ELCM Reference Number This field displays the ELCM reference number. Limit Details grid Below fields appear in the Limit Details grid along with the above fields. Line Serial Displays the serial of the various lines available and mapped under the customer id. This field appears on the Limits grid.
Edit Click the link to edit the Limit Details. Cash Collateral Details Collateral Percentage System populates the Collateral % maintained in the Customer / Product for the counter party of the contract. User can modify the collateral percentage.
Collateral Currency and amount System populates the contract currency as collateral currency by default. User can modify the collateral Currency and amount.
Exchange Rate System populates the exchange rate maintained. User can modify the collateral Currency and amount.
System validates for the Override Limit and the Stop limit if defaulted exchange rate is modified.
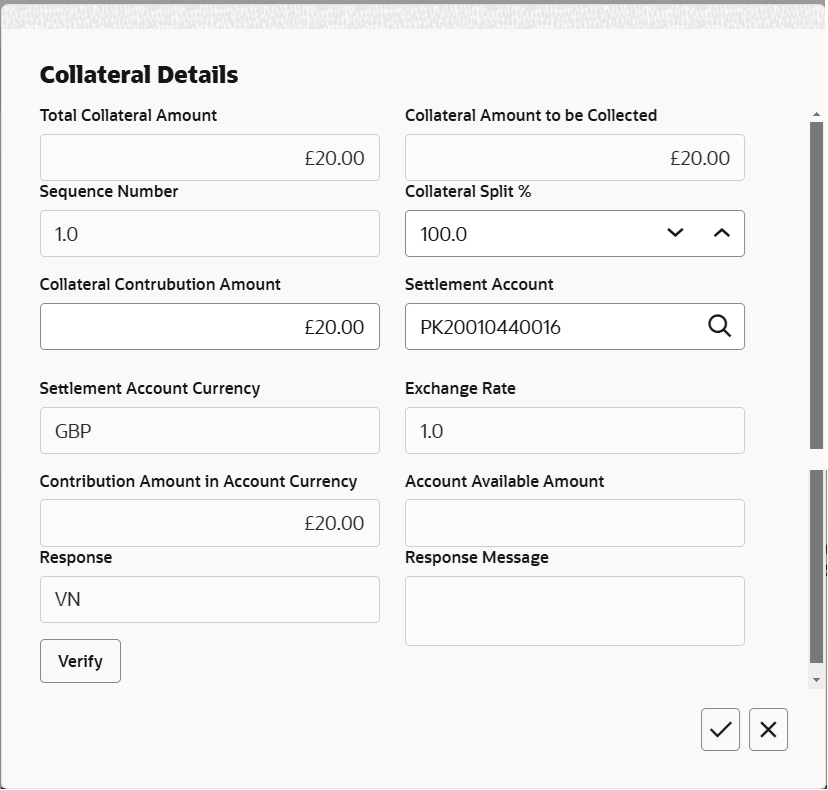
Edit Click edit link to edit the collateral details. Collateral Details pop-up screen Click + plus icon to add new collateral details. Below fields are displayed on the Collateral Details pop-up screen, if the user clicks plus icon.
Total Collateral Amount Read only field. This field displays the total collateral amount provided by the user.
Collateral Amount to be Collected Read only field. This field displays the collateral amount yet to be collected as part of the collateral split.
Sequence Number Read only field. The sequence number is auto populated with the value, generated by the system.
Collateral Split % Specify the collateral split% to be collected against the selected settlement account.
Collateral Contribution Amount Specify the collateral amount to be collected against the selected settlement account. User can either provide the collateral % where the collateral amount will be auto populated or modifying the collateral amount will auto correct the collateral %.
Settlement Account Click Search to search and select the settlement account for the collateral. Settlement Account Currency Read only field. This field displays the settlement account currency defaulted by the system.
Exchange Rate Read only field. This field displays the exchange rate, if the settlement account currency is different from the collateral currency.
Contribution Amount in Account Currency Read only field. This field displays the contribution amount in the settlement account currency as defaulted by the system.
Account Available Amount Read only field. System populates the account available amount on clicking the Verify button.
Response Read only field. System populates the response on clicking the Verify button.
Response Message Read only field. System populates the response message on clicking the Verify button.
Verify Click to verify the account balance of the Settlement Account. Save & Close Click to to save and close the record. Cancel Click to cancel the entry. Cash Collateral Details grid Below fields appear in the Cash Collateral Details grid along with the above fields. Collateral % Specify the percentage of collateral to be linked to this transaction. If the value is more than 100% system will display an alert message. The collateral % maintained for the customer is defaulted into the Collateral Details screen. If collateral % is not maintained for the customer, then system should default the collateral % maintained for the product. User can modify the defaulted collateral percentage, in which case system should display a override message “Defaulted Collateral Percentage modified.
Contribution Amount This field displays the collateral contribution amount. The collateral % maintained for the customer is defaulted into the Collateral Details screen. If collateral % is not maintained for the customer, then system should default the collateral % maintained for the product. User can modify the defaulted collateral percentage, in which case system should display a override message “Defaulted Collateral Percentage modified.
Edit Click edit link to edit the collateral details. Account Available Amount This field displays the account available amount which will be auto-populated based on the settlement account selection. Deposit Linkage Details Click plus icon to add new deposit linkage details. Below fields are displayed on the Deposit Linkage Details pop-up screen, if the user clicks plus icon.
Customer ID This field displays the applicant’s/applicant bank customer ID defaulted from the application. The user can change the customer ID.
Deposit Account Click Search to search and select deposit for linkage from the list of all the customer Deposits. Deposit Branch This field displays the deposit branch which is auto-populated based on the deposit account selection. Deposit Available Amount This field displays the deposit available amount and currency which will be auto-populated based on the deposit account selection. Deposit Maturity Date This field displays the maturity date of deposit. Exchange Rate This field displays the latest exchange rate for deposit linkage. This will be picked up from the exchange rate maintenance from the common core.
Deposit Available In Transaction Currency This field displays the deposit amount available, after exchange rate conversion, if applicable. Linkage Percentage % Specify the value for linkage percentage. Linkage Amount (Transaction Currency) This field displays the transaction amount, user can change the value. Deposit Linkage Details grid Below fields appear in the Deposit Linkage Details grid along with the above fields. Deposit Currency Deposit currency will get defaulted in this field. Transaction Currency Transaction currency will get defaulted in this field from the underlying task. Edit Click edit link to edit the deposit linkage details. - Click Save and Close to save the details and close the
screen.
Commission, Charges and Taxes
This section displays charge details. On landing the additional tab, charges and tax if any will get defaulted from Back end simulation. If default charges are available under the product, they should be defaulted here with values. If customer or customer group specific charges are maintained, then the same will be defaulted from back end system.
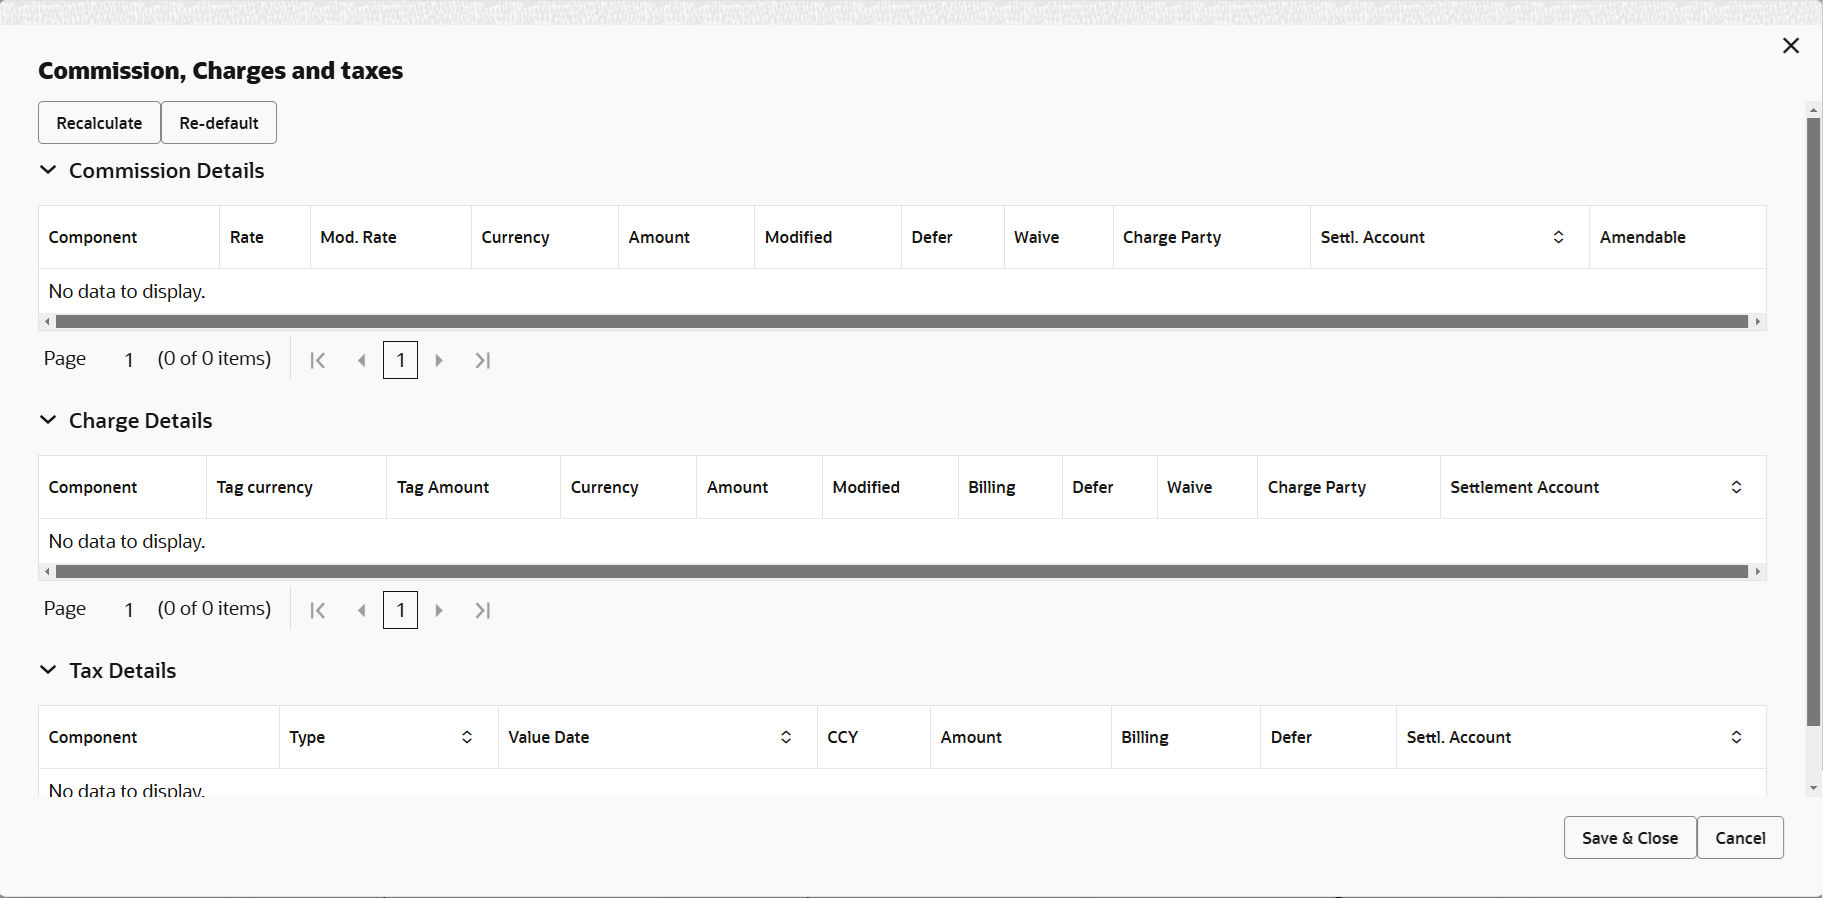
Description of the illustration decommissionchargesandtaxes.png
For more information on fields, refer to the field description table below.
Table 2-16 Charge Details - Field Description
Field Description Commission Details This section displays the Commission Details. Component This field displays the commission component. Rate This field displays the rate that is defaulted from product. The commission rate, if available in Back Office defaults in OBTFPM. The user is able to change the rate.
If flat commission is applicable, then commission amount defaulted from back office is modifiable by the user. Rate field will be blank and the user cannot modify the Rate field.
Modified Rate From the default value, if the rate is changed the value gets updated in this field. Currency This field displays the currency in which the commission have to be collected. Amount This field displays the amount that is maintained under the product code. The commission rate, if available in Back Office defaults in OBTFPM. The user is able to change the rate, but not the commission amount directly. The amount gets modified based on the rate changed and the new amount is calculated in back office based on the new rate and is populated in OBTFPM.
If flat commission is applicable, then commission amount defaulted from back office is modifiable by the user. Rate field will be blank and the user cannot modify the Rate field.
Modified Amount From the default value, if the amount is changed, the value gets updated in the modified amount field. Defer If enabled, charges/commissions has to be deferred and collected at any future step. Waive Based on the customer maintenance, the charges/commission can be marked for Billing or Defer. If the defaulted Commission is changed to defer or billing or waive, system must capture the user details and the modification details in the ‘Remarks’ place holder.
Charge Party Charge party is 'Applicant' by default. User can change the value to Beneficiary. Settlement Account Select the settlement account. Charge Details This section displays the Charge Details. Component This field displays the charge component type. Tag Currency This field displays the tag currency in which the charges have to be collected. Tag Amount This field displays the tag amount that is maintained under the product code. Currency This field displays the currency in which the charges have to be collected. Amount This field displays the amount that is maintained under the product code. Modified From the default value, if the rate is changed or the amount is changed, the value gets updated in the modified amount field. Billing If charges are handled by separate billing engine, then by selecting billing the details to be available for billing engine for further processing. On simulation of charges/commission from Back Office, if any of the Charges/Commission component for the customer is ‘Billing’ enabled, ‘Billing’ toggle for that component should be automatically enabled in OBTFPM.
The user can not enable/disable the option, if it is de-selected by default.
This field is disabled, if ‘Defer’ toggle is enabled.
Defer If charges have to be deferred and collected at any future step, this check box has to be selected. On simulation of charges/commission from Back Office, if any of the Charges/Commission component for the customer is AR-AP tracking enabled, ‘Defer’ toggle for that component should be automatically checked in OBTFPM.
The user can enable/disable the option the check box. On de-selection the user has to click on ‘Recalculate’ charges button for re-simulation.
Waive Enble the toggle, if charges has to be waived. Based on the customer maintenance, the charges should be marked for Billing or for Defer.
This field is disabled, if Defer toggle is enabled.
Charge Party Charge party is applicant by default. User can change the value to beneficiary. Settlement Account Select the settlement account. Tax Details This section displays the Tax Details. The tax component is calculated based on the commission and defaults if maintained at product level. User cannot update tax details and any change in tax amount on account of modification of charges/ commission will be available on click of Re-Calculate button or on hand off to back-end system.
Component This field displays the tax component. Type This field displays the type of tax component. Value Date This field displays the value date of tax component. Currency This field displays the currency in which the tax have to be collected. The tax currency is the same as the commission.
Amount This field displays the tax amount based on the percentage of commission maintained. You can edit the tax amount, if applicable.
Billing If taxes are handled by separate billing engine, then by selecting billing the details to be available for billing engine for further processing. This field is disabled, if ‘Defer’ toggle is enabled.
Defer If taxes have to be deferred and collected at any future step, this option has to be enabled. The user can enable/disable the option the check box. On de-selection the user has to click on ‘Recalculate’ charges button for re-simulation.
Settlement Account System defaults the settlement account. The user can modify the settlement account.
- Click Save and Close to save the details and close the
screen.
Payment Details
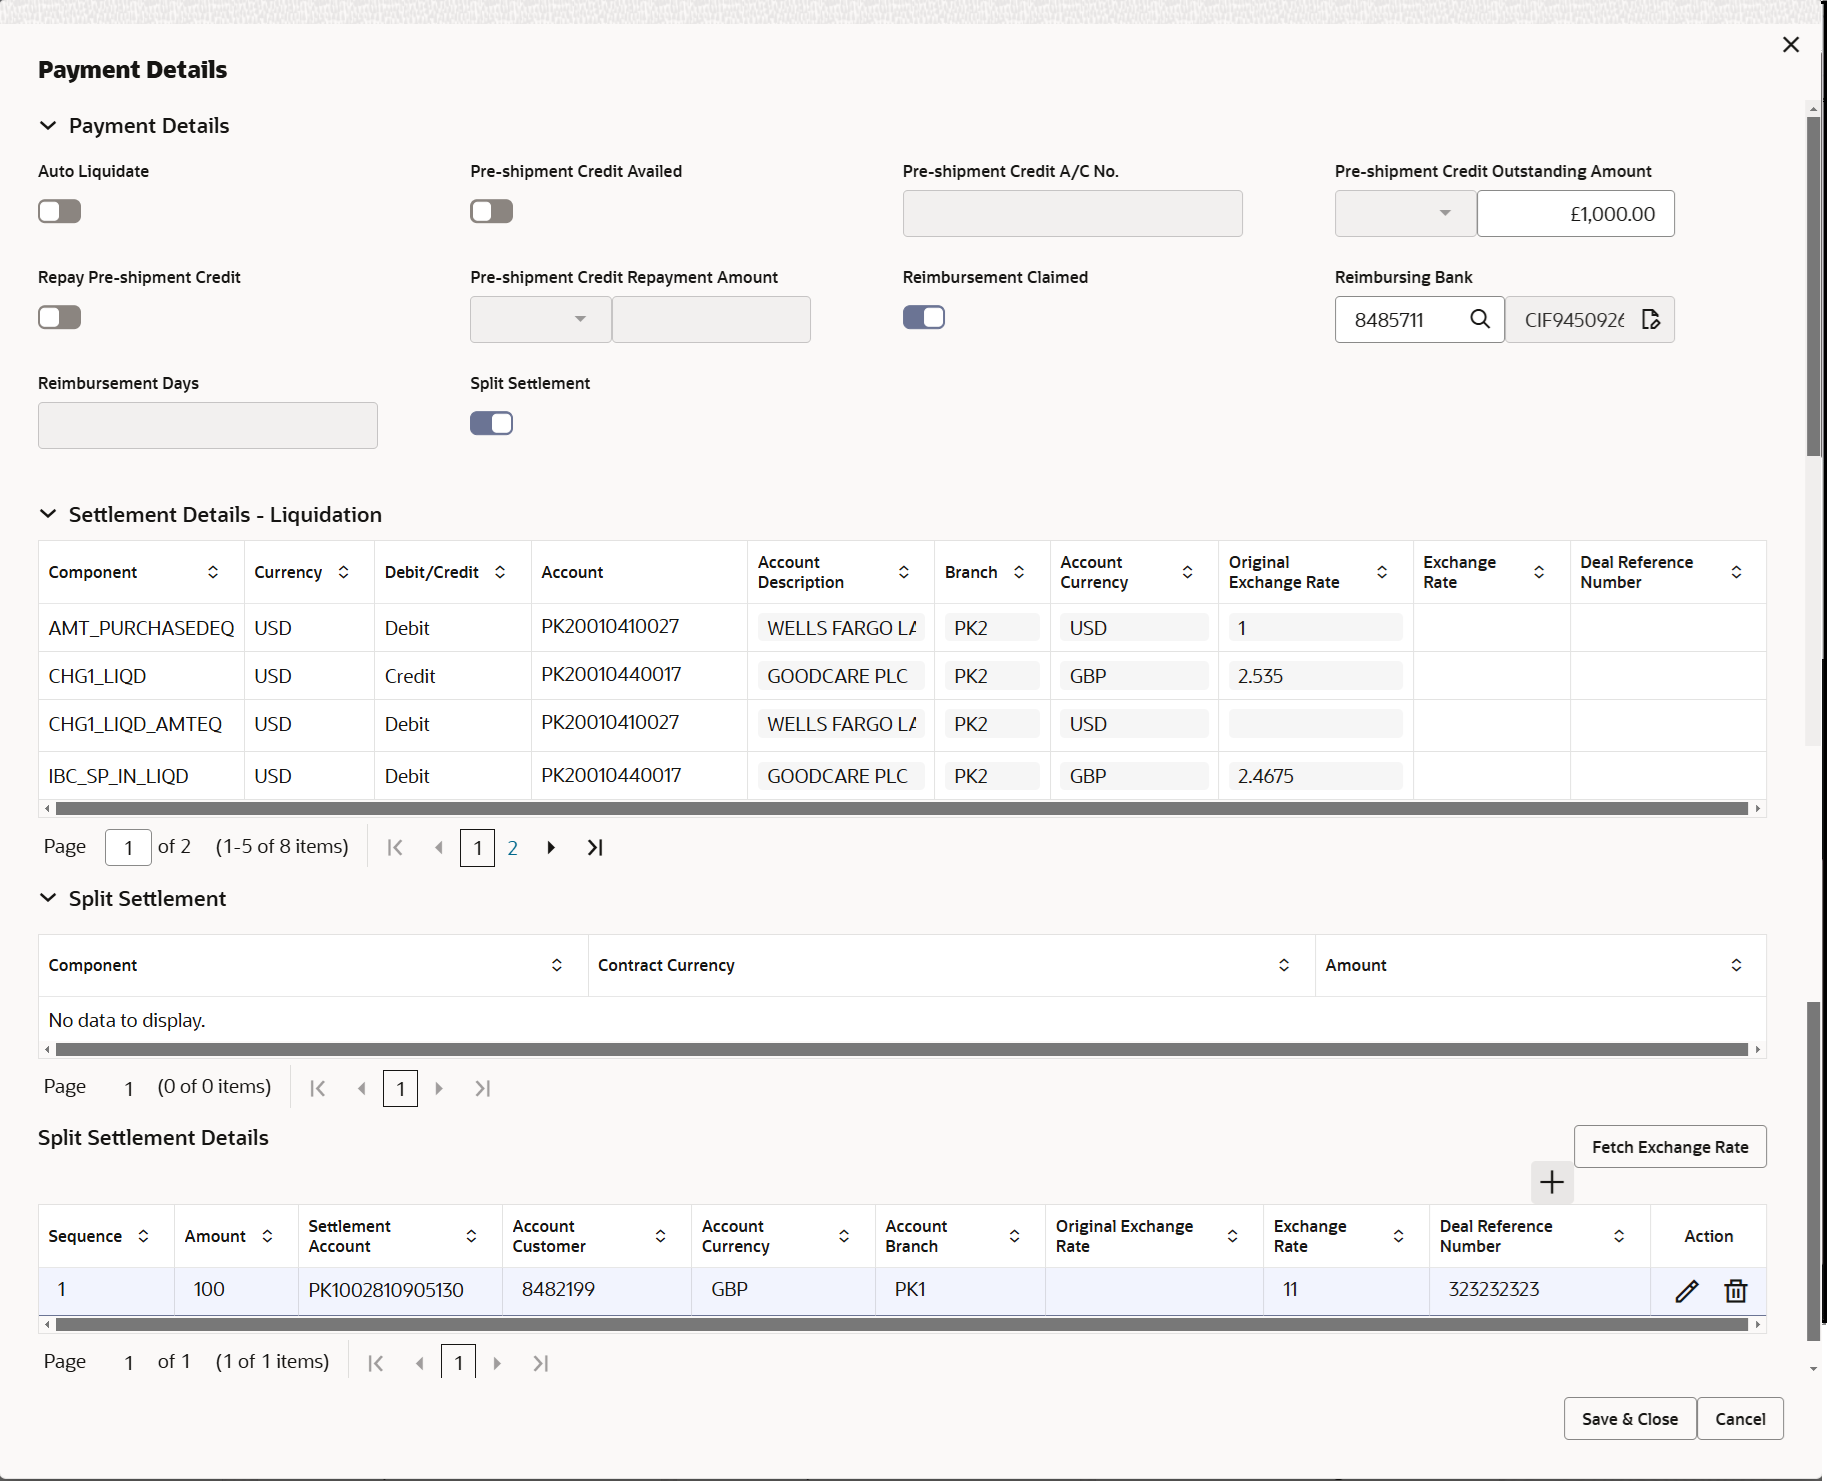
Description of the illustration depaymentdetails.png
For more information on fields, refer to the field description table below.
Table 2-17 Payment Details - Field Description
Field Description Payment Details Auto Liquidate Enable the option as ‘On’, if the auto liquidation is required. It is applicable only if the drawing is without discrepancy. Disable the option as ‘Off’, if the auto liquidation is not required.
Preshipment Credit Availed Read only field. Enable the option as ‘On', if pre-shipment credit is availed.
Disable the option as ‘Off’, if pre-shipment credit is not availed.
Pre-shipment Credit A/C No. Read only field. This field displays the pre-shipment credit account number.
Preshipment Credit Outstanding Amount This field displays the pre-shipment credit outstanding amount. Repay Preshipment Credit Enable the option as ‘On', if pre-shipment credit to be repaid. Disable the option as ‘Off’, if there is no pre-shipment credit to be repaid.
Preshipment Credit Repayment Amount Read only field. This field displays the pre-shipment credit repayment amount.
Reimbursement Claimed Enable the option as ‘On', if the reimbursement is already claimed. This field is applicable only if reimbursement is applicable and LC has reimbursement bank details.
Reimbursing Bank Read only field. This field displays the reimbursing bank details defaulted from the LC.Note:
If the user selects another bank and in case the selected Bank is not RMA Compliant, the system displays error message “RMA arrangement not available”.Reimbursement Days This field displays the number of days before the maturity date on which the reimbursement claim needs to be triggered. Reimbursement Date Select the reimbursement date. If reimbursement date is later than the branch date, system will display an error.
This field is enabled, if Reimbursement Claimed toggle is ‘Yes’.
Liquidate using Collateral Enable the option as ‘On', if liquidation is done using collateral. Split Settlement Enable the option as ‘On’ to select more than one account for settlement (Split Settlement) for the liquidation of an import or export drawing or collection bill. Disable the option as ‘Off’ Disables the user to select more than one account for settlement (Split Settlement) for the liquidation of an import or export drawing or collection bill.
Settlement Details - Liquidation Component This field displays the component based on the product selected. Currency This field displays the currency for the component. Debit/Credit This field displays the debit/credit indicators for the components. Account This field displays the account details for the components. Account Description This field displays the description of the selected account. Branch This field displays the branch of the selected account. Account Currency This field displays the currency for all the items based on the account number. Original Exchange Rate System displays the Original Exchange Rate as simulated in settlement details section from OBTF. Exchange Rate The exchange rate for the settlement. Deal Reference Number The exchange deal reference number. Split Settlement Component This field displays the component based on the product selected. Contract Currency This field displays the default currency for the component. Amount This field displays the amount for each component. This is populated from the transaction details of the drawing. Split Settlement Details The user can click + to add multiple Split Settlement Details.
Sequence Indicates the sequence of the settlement details. Amount Specify the amount for the split settlement. Settlement Account Click Search to search and select the settlement account. Account Customer This field displays customer account based on the selected settlement account. Account Currency This field displays currency of the account. Account Branch This field displays branch of the customer’s account Original Exchange Rate System displays the Original Exchange Rate as simulated in settlement details section from OBTF. Exchange Rate Click the Fetch Exchange Rate button, the field displays the exchange rate for the split settlement. Deal Reference Number The exchange deal reference number. Action Click Edit icon to edit the Split Settlement. Click Delete icon to delete the Split Settlement.
- Click Save and Close to save the details and close the
screen.FX Linkage
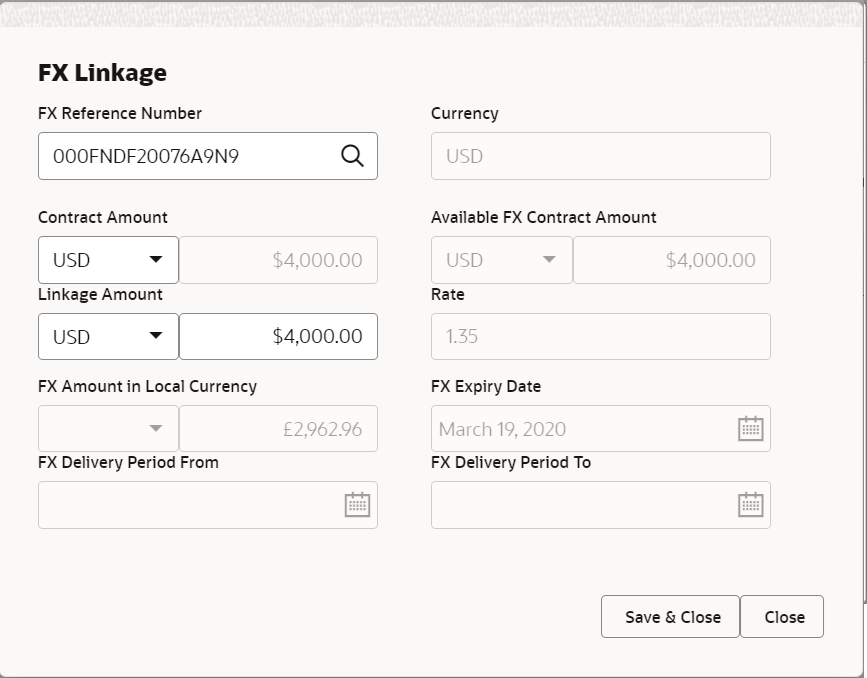
This section enables the user to link the existing FX contract(s) to the LC transactions. User can link multiple forward FX contracts.
FX contract linkage with the Bill booking can happen only for immediate liquidation of sight payment or for Usance. For manual sight payment, the user needs to link the FX contract on the date of liquidation of the Bill.
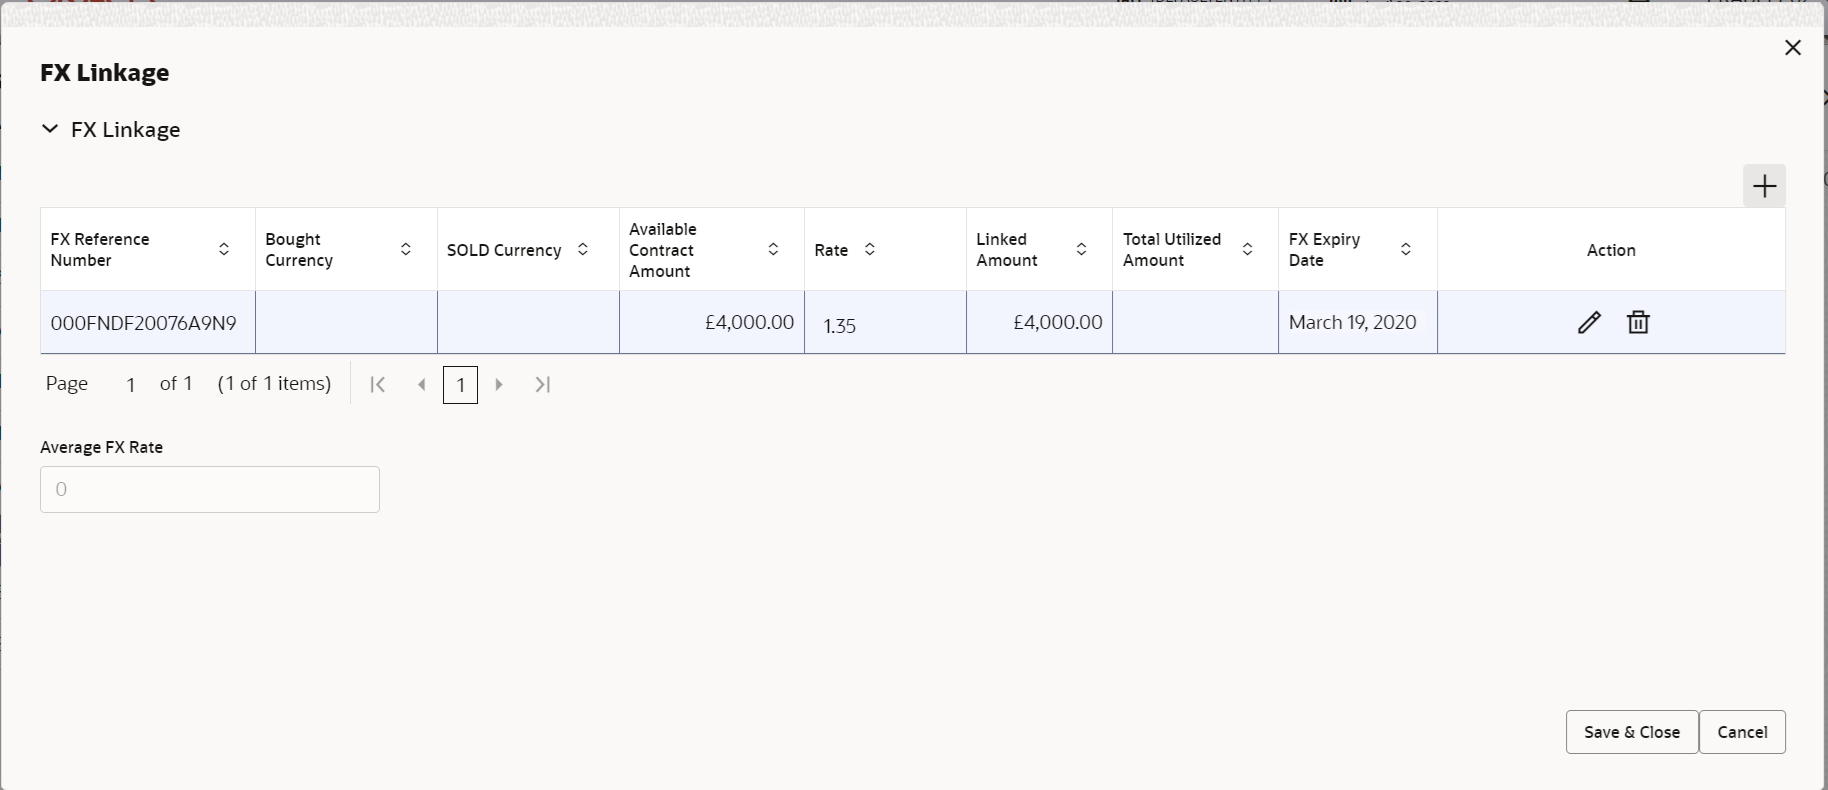
Description of the illustration fxlinkagedetails.pngFor more information on fields, refer to the field description table below.
Table 2-18 FX Linkage - Field Description
Field Description The user can click + to add multiple FX Details. FX Reference Number Click Search to search and select the FX contract reference number. On select and save and close, system defaults the available amount, bot currency, sold currency and rate. Forward FX Linkage available for selection at bill would be as follows,- Counterparty of the FX contract should be the counterparty of the Bill contract.
- Active Forward FX transactions authorized not marked for auto liquidation.
Bill contract currency should be BOT currency of the FX transaction in case of an export Bill or the SOLD currency in case of an Import Bill.
The user can click + to add multiple FX Details. Bought Currency This field displays the currency from the linked FX contract. Sold Currency This field displays the currency from the linked FX contract. Available Contract Amount Available amount will be FX contract amount minus the linked amount. Available amount for linkage should be greater than Zero. Rate This field displays the rate at which the contract is booked. Linked Amount Sum of Linked amount will not be greater than LC contract amount. Linked amount will not be greater than the available amount for linkage.
Current Utilized amount This field displays the liquidated /purchased /discounted /negotiated amount of BC contract. It cannot go beyond the linked FX amount. Total Utilized Amount This field displays the total amount utilized against the corresponding linked FX. On query, both Utilized and Total Utilized amount holds the amount of latest version.
Amount in Contract Currency This field displays the amount in contract currency converted from FX currency. FX Expiry Date This field displays the expiry date from the linked FX contract. FX Delivery Period - From This field displays the date from which the contract is valid for utilization. FX Delivery Period - To This field displays the date to which the contract is valid for utilization. Action Click Edit icon to edit the FX details. Click Delete icon to delete the FX details.
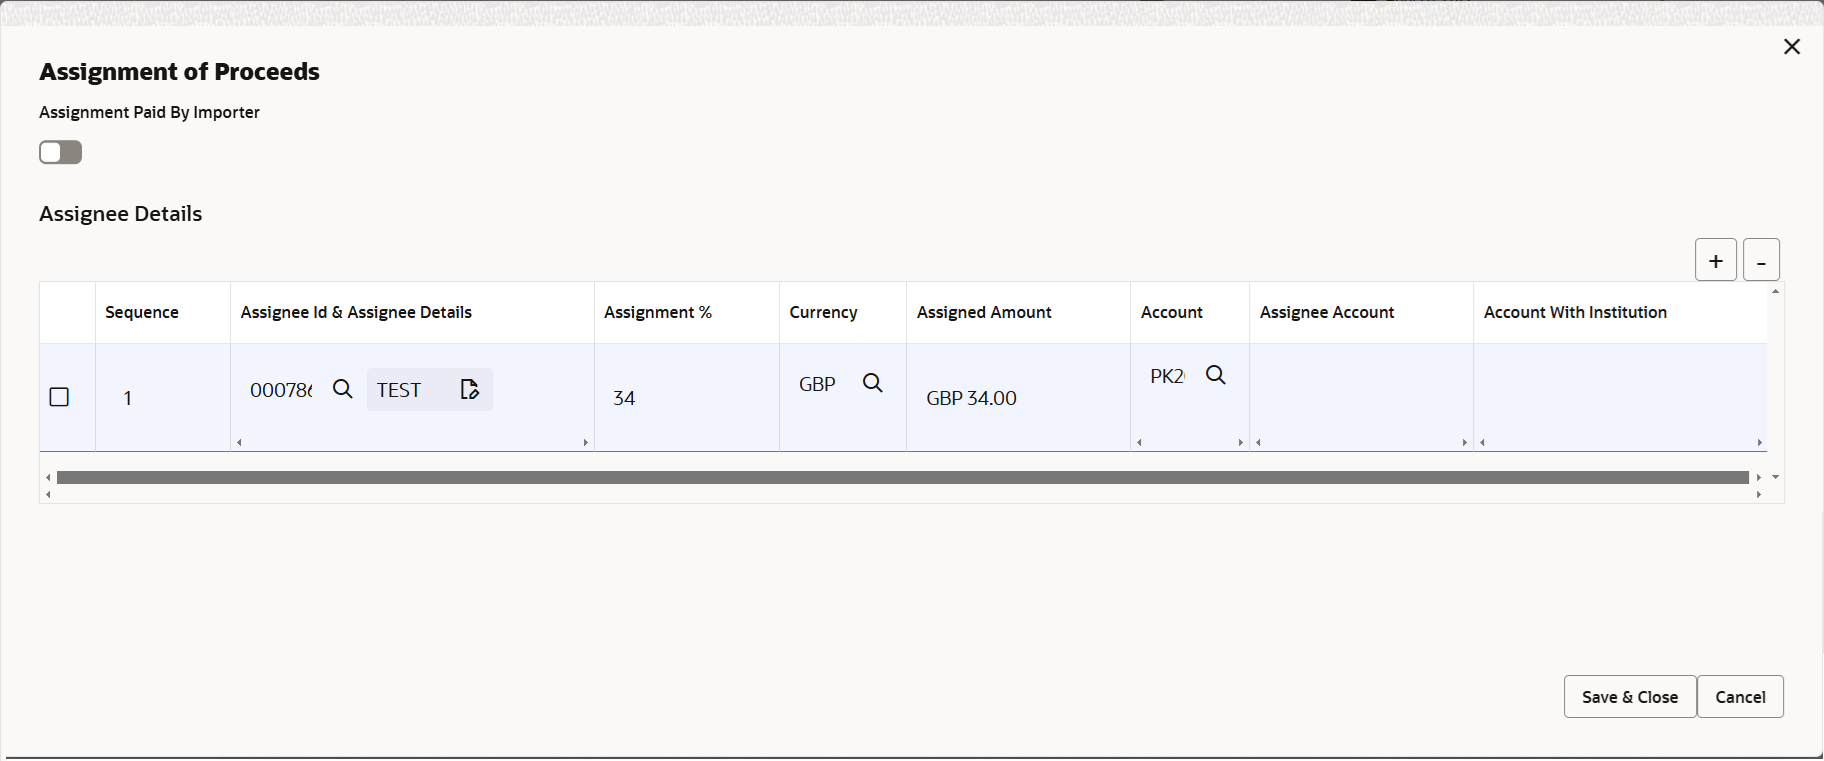
Average FX Rate Multiple forward FX contract could be linked,and exchange rate of FX contract vary from each. Hence, effective exchange rate for bill would be arrived using weighted average method and it is utilized during purchase/negotiation/discount or liquidation of the bill. This will be populated in the Average FX Rate. Assignment of ProceedsIn this tile, assignment details for the applicable processes is displayed. Proceeds can be assigned only if the parties have been assigned during drawing or update drawing process.
For more information on fields, refer to the field description table below.
Table 2-19 Assignment of Proceeds - Field Description
Field Description The user can click + to add multiple Assignment of Proceeds. Assignment Paid By Importer Enable the option, if assignment is paid by importer. Sequence Specify the sequence number. Assignee ID & Assignee Details Click Search to search and select the assignee id. Assignee details appear based on selected assignee ID. User can add multiple assignees to a single Bill under LC with the assignment amount or assignment percentage of parent LC.
Note:
WALKIN customers is allowed as assignee.Assignment % Specify the percentage of LC amount that has be assigned to the assignee. Once the user updates the rate, the system calculates the amount as per assigned rate and default in the assigned amount field. If the user directly captures the assigned amount then the assigned percentage has to calculate the percentage and the same to be populated in the screen. If contribution is more than 100%, system to display an alert message. Once contribution % is input system will default the amount. System to validate that Limit Contribution percentage plus Collateral percentage is equal to 100. Otherwise system to provide override.The assignment percentage should be rounded to two decimal places.
Currency Click Search to search and select the account currency of the settlement account of the assignee. Only the currencies for which the settlement account is available, only those currency will be displayed. Assigned Amount Specify the amount that has to be assigned to the assignee. If the user has already entered the assignment percentage, system to calculate the amount and populate the value.
Assignee Bank Details Click Search to search and select the assignee bank. Account with Institution Click Search to search and select the account number of the Account with Institution. - Click Save and Close to save the details and close the
screen.Loan Preferences
This section enables the user to request for a loan to liquidate the drawing under the LC. This section will be enabled based on the product selected for booking the drawing under the LC.
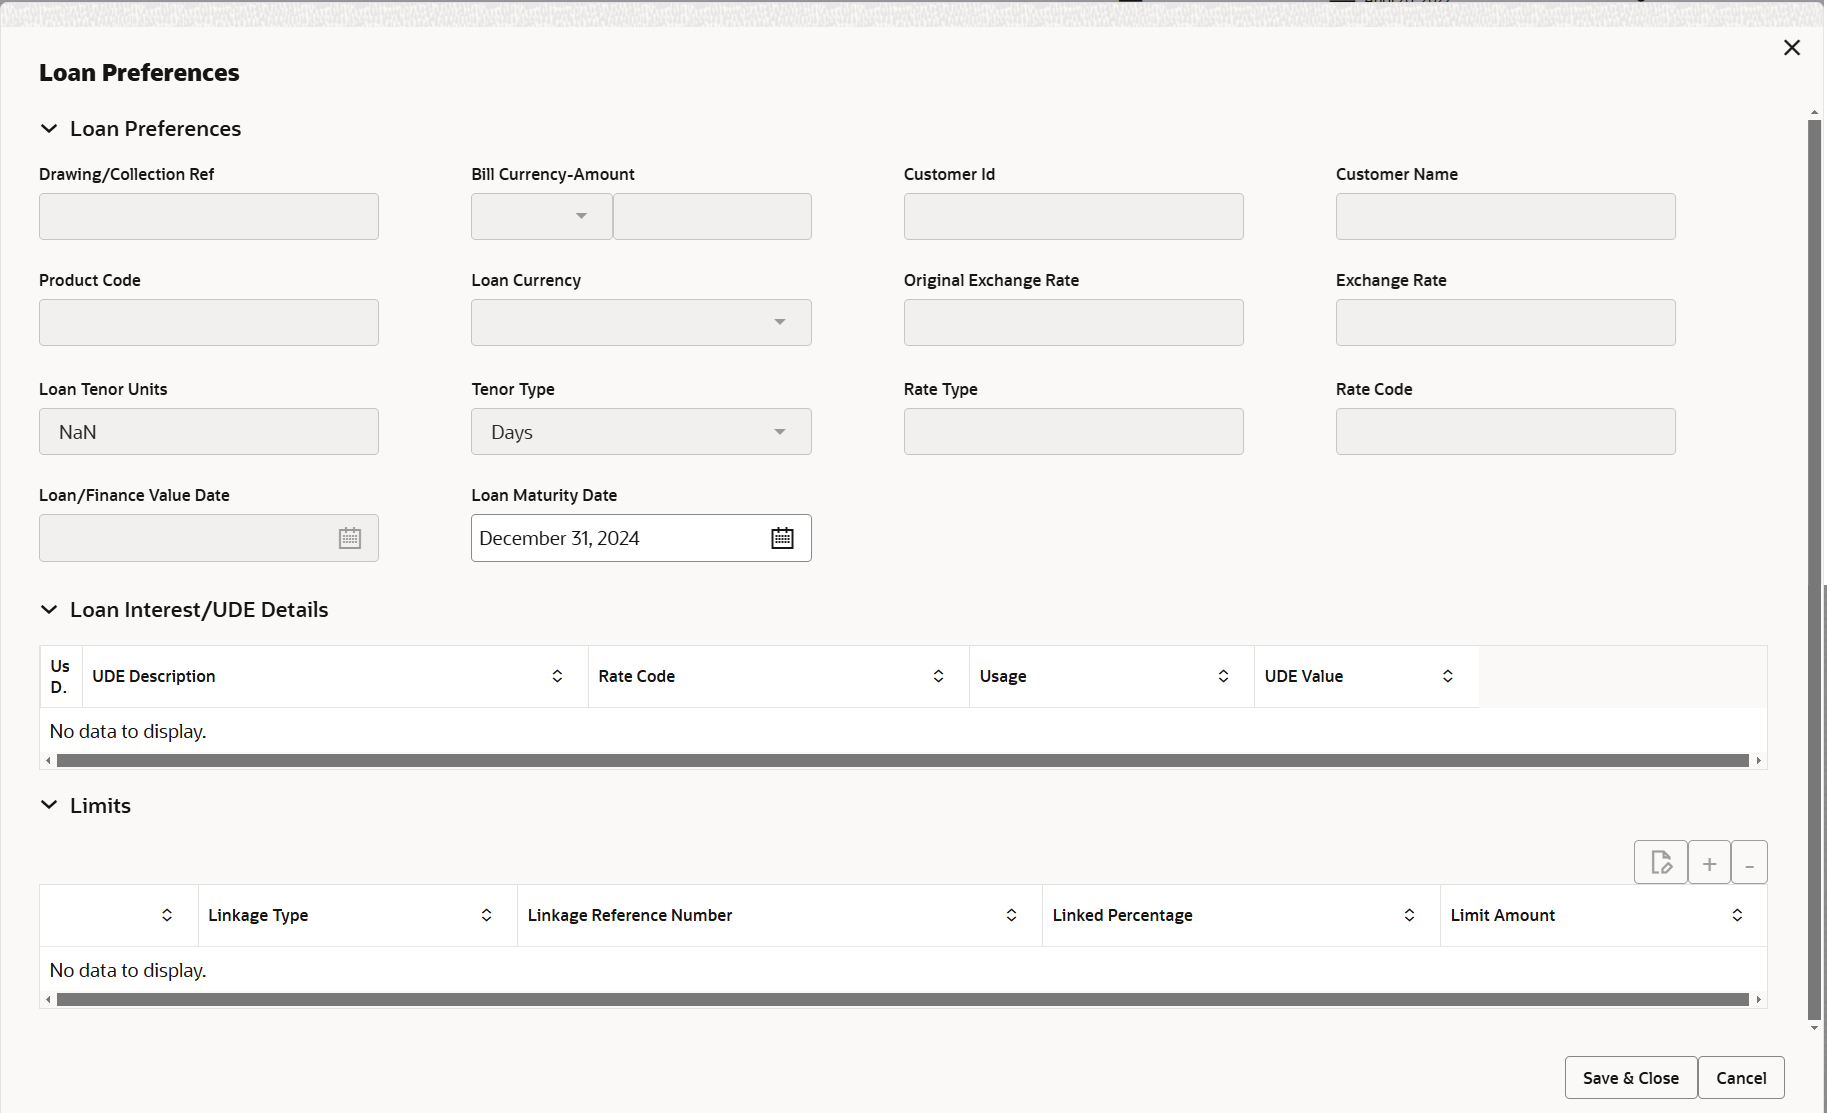
Description of the illustration deloanpreference.pngFor more information on fields, refer to the field description table below.
Table 2-20 Loan Preference - Field Description
Field Description Loan Preferences Drawing/Collection Ref Read only field. Indicates the loan product linked to the drawing product.
Bill Currency-Amount Read only field. This field is defaulted from the underlying task.
Indicates the outstanding drawing/ collection currency and amount.
Customer Id Read only field. Indicates the customer ID of the applicant/applicant bank.
Customer Name Read only field. Indicates the applicant/applicant bank name.
Product Code Read only field. Indicates the loan product linked to the drawing product.
Loan Currency-Amount Read only field. Loan currency is defaulted from the bill currency.
Original Exchange Rate Read only field. System defaults the original exchange rate
Exchange Rate Specify the exchange rate applicable for local currency. System validates the exchange rate is within the allowed range.
Loan Tenor Units Read only field. System defaults the loan tenor units based on the product.
Tenor Type Read only field. System defaults the value. Values are Days, Months and Years.
The numerical value for Days or months or Years is applicable.
Rate Type Read only field. System defaults the rate type.
Rate Code Read only field. System populates the rate code as part of simulation.
Loan/Finance Value Date Read only field. System defaults the branch date as Value date.
Loan Maturity Date Read only field. System defaults the date based on the Loan value date and Loan tenor.
Loan Interest/UDE Details User Defined Element ID System populates the UDE Element ID as part of simulation. User can change the selection through lookup.
UDE Description System populates the UDE description as part of simulation. If a user changes the UDE ID, system should populate the description.
Rate Code System populates the rate code as part of simulation. Usage System populates the usage details as part of simulation. UDE Value System populates the UDE value as part of simulation. Limits Linkage Type System defaults the linkage type as “Facility” from back office. Linkage Reference Number System defaults the Linkage reference as part of simulation. User can change the value. Linkages available for the customer should be displayed for selection. Linked Percentage Specify the value for linked percentage. Maximum value that can be enterd is 100. User cannot enter negative values.
Limit Amount System defaults the value. System should populate the value based on the contribution percentage. - Click Save and Close to save the details and close the
screen.Linked Loan Details
The bank user can view the details of linked loan accounts.

Description of the illustration delinkedloandetails.pngFor more information on fields, refer to the field description table below.
Table 2-21 Linked Loan Details - Field Description
Field Description Linked Loan Details Loan Account This field displays the details of the linked loan account. Loan Currency This field displays the currency of the linked loan account. Loan Amount This field displays the linked loan amount. - Click Save and Close to save the details and close the
screen.Interest Details
The user can view and modify the Interest details simulated from the back office system. On update of the Interest rate user has to click on Recalculate button. System will trigger a simulation call to the back office and the updated Interest details will be reflected in this section.
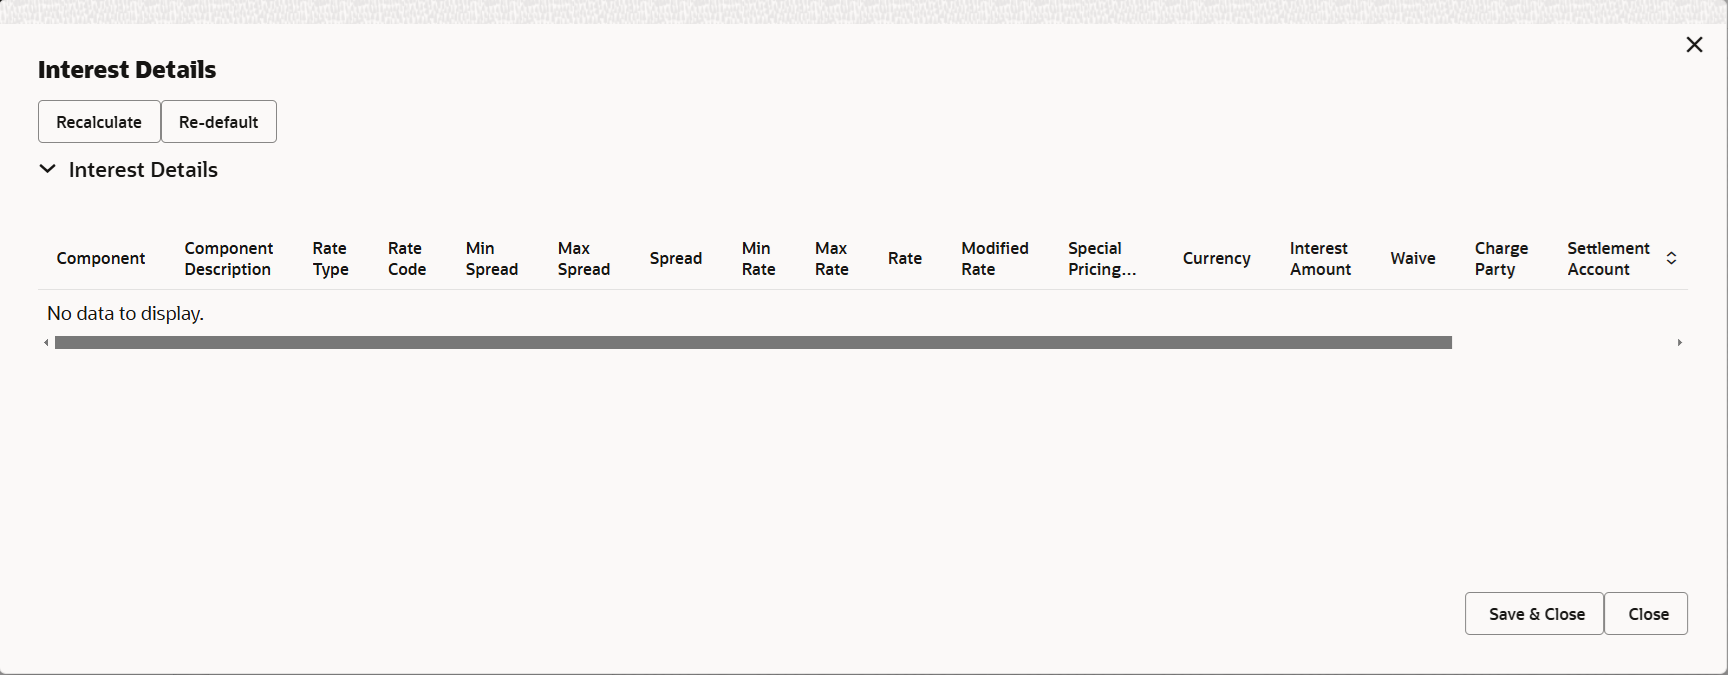
Description of the illustration intrestdetails.pngFor more information on fields, refer to the field description table below.
Table 2-22 Interest Details - Field Description
Field Description Component This field displays the component maintained in the back office. Component Description This field displays the description of the component. Rate Type This field displays the rate type maintained for the component in back office. - Fixed Floating
- Special
Rate Code This field displays the rate code applicable for the component. Min Spread This field displays the minimum spread applicable for the Rate Code. This field have value, if the Rate Type is Floating.
Max Spread This field displays the maximum spread applicable for the Rate Code. This field have value, if the Rate Type is Floating.
Spread This field displays the spread applicable for the Component in case of Floating Rate Component. User can change the defaulted value. System validates whether the spread input is within the Minimum to Maximum Spread.
Min Rate This field displays the minimum rate applicable for the Rate Code. Max Rate This field displays the maximum rate applicable for the Rate Code. Rate This field displays the value applicable for the Rate Code. You can modify the value, if the Rate Type is Fixed. System validates whether the Rate input is between the Minimum and Maximum Rate.
Modified Rate This field displays the modified rate. Special Pricing Reference Number Specify the Special Pricing Reference Number, when there is a special Interest rate to be provided for that customer against the interest component (Main Component). Special Pricing Reference is not applicable for Penal Interest components.
For transactions initiated from OBDX, the Special Pricing Reference Number will be populated from OBDX and user cannot edit the same.Note:
System displays an override as “Special Pricing Applicable”, on clicking “Save” in the Interest Details screen, if Special Pricing Reference number has been provided.Currency This field displays the interest currency. Amount Specify the interest amount, if the Rate Type is Special. In other cases , the amount will be calculated by back office immediately only if the Interest is collected in Advance or if Back Dated Interest is collected. In that scenario, the Amount will be populated on Re-simulation from back office. Otherwise Interest will be calculated only in the batch as maintained.
Waive User can waive the Interest applicable. System displays an override, if the user has waived the Interest. Charge Party This field displays the Charge Party based on the type of transaction. In case of Export Transactions, Drawer should be the defaulted Charge Party for Collection Bills and Beneficiary for the LC Bills. In case of Import Transactions, Drawee should be the Charge Party for Collection and Applicant for the LC Bills.
Settlement Account This field displays the settlement account of the Charge Party for debit of Interest. User can change the value. System displays an error if a different customer is chosen. If different account of the Charge Party is selected, system should display a override. In case the user modifies the Interest Rate, the user should click on Recalculate button to get the modified amount from the back office and display the new Amount.(Recalculation is done in back office and not in OBTFPM).
Settlement Curreny This field displays the settlement account curreny. Settlement Branch This field displays the settlement account branch. - Click Save and Close to save the details and close the
screen.Preview Messages
User can view the draft message (outgoing MT754 and MT742/MT750/MT742 SWIFT message format) being displayed on the preview message text box.
User can preview the MT999 messages for the applicable MT7XX messages generated by the Back office system in the Preview Message.
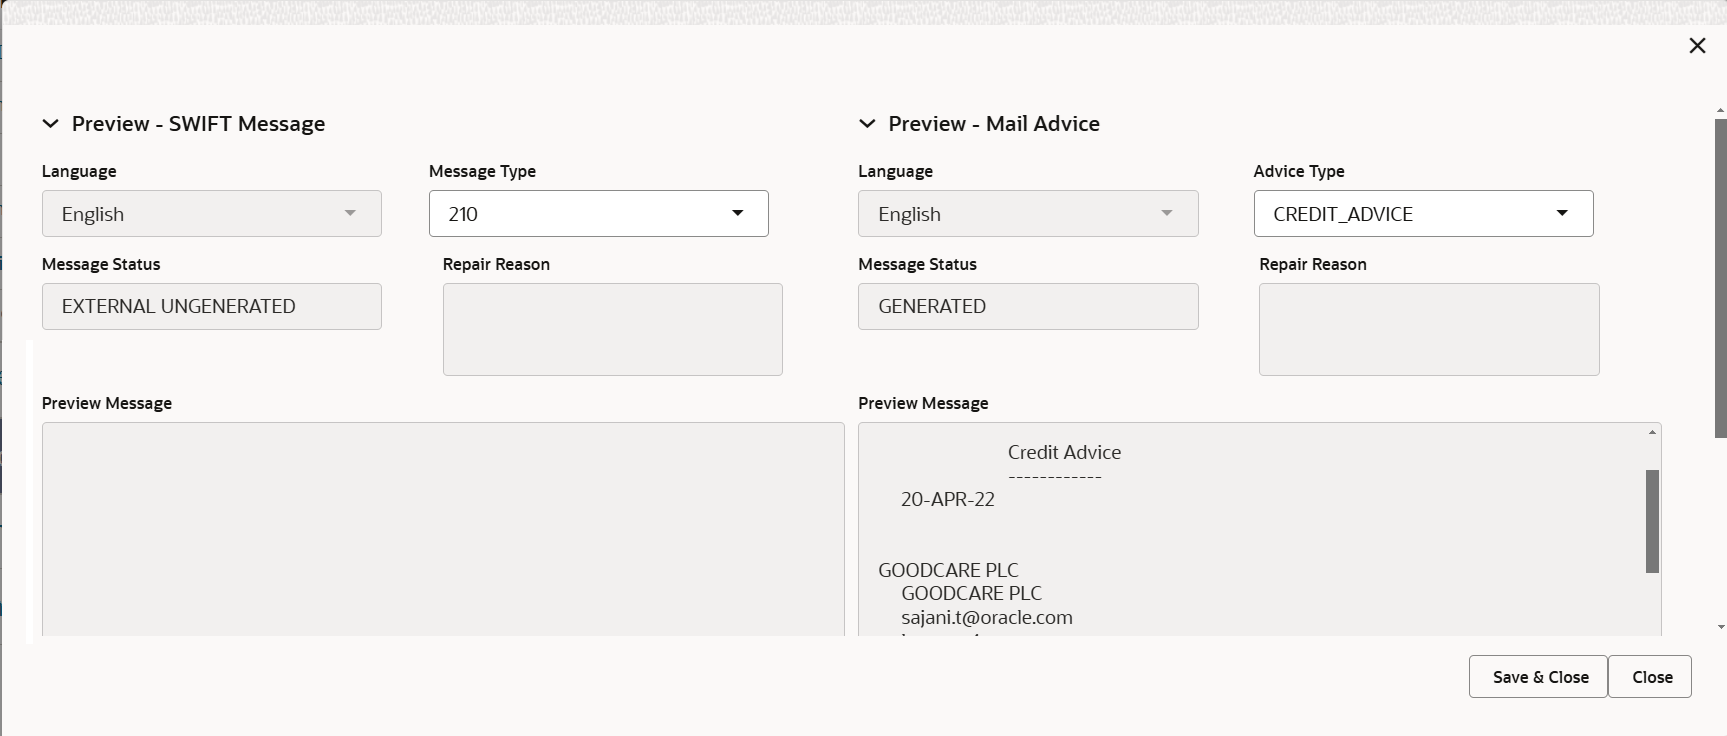
Description of the illustration deadditionaldetailspreview.pngFor more information on fields, refer to the field description table below.
Table 2-23 Preview Messages - Field Description
Field Description Preview SWIFT Message Language Select the language for the SWIFT message. Message Type Select the message type. Message Status Read only field. Display the message status of draft message of liquidation details.
Repair Reason Read only field. Display the message repair reason of draft message of liquidation details.
Preview Message This field displays a preview of the draft message. Preview Mail Device Language Select the language for the advice message. Advice Type Select the advice type. Message Status Read only field. Display the message status of draft message of liquidation details.
Repair Reason Read only field. Display the message repair reason of draft message of liquidation details.
Preview Message This field displays a preview of the draft message. - Click Save and Close to save the details and close the screen.
- Click Next.The task will move to next data segment. For more information refer Settlement Details.
For more information on action buttons, refer to the field description table below.
Table 2-24 Additional Details - Action Buttons - Field Description
Field Description Documents Click to View/Upload the required document. Application displays the mandatory and optional documents.
The user can view and input/view application details simultaneously.
When a user clicks on the uploaded document, Document window get opened and on clicking the view icon of the uploaded document, Application screen should get split into two. The one side of the document allows to view and on the other side allows to input/view the details in the applicationNote:
Not applicable for STP of SWIFT MT 765.Remarks Specify any additional information regarding the Export LC Liquidation. This information can be viewed by other users processing the request. Content from Remarks field should be handed off to Remarks field in Backend application.
Overrides Click to view the overrides accepted by the user. Customer Instruction Click to view/ input the following - Standard Instructions – In this section, the system will populate the details of Standard Instructions maintained for the customer. User will not be able to edit this.
- Transaction Level Instructions – In this section, OBTFPM user can input any Customer Instructions received as part of transaction processing. This section will be enabled only for customer initiated transactions.
Reject On click of Reject, user must select a Reject Reason from a list displayed by the system. Reject Codes are:
- R1- Documents missing
- R2- Signature Missing
- R3- Input Error
- R4- Insufficient Balance/Limits
- R5 - Others
Select a Reject code and give a Reject Description.
This reject reason will be available in the remarks window throughout the process.
Refer Select a Refer Reason from the values displayed by the system. Refer Codes are:
- R1- Documents missing
- R2- Signature Missing
- R3- Input Error
- R4- Insufficient Balance/Limits
- R5 - Others
Hold The details provided will be saved and status will be on hold.User must update the remarks on the reason for holding the task. This option is used, if there are any pending information yet to be received from applicant.
Cancel Cancel the Scrutiny stage inputs. The details updated in this stage are not saved. The task will be available in 'My Task' queue. Save & Close Save the details provided and holds the task in ‘My Task’ queue for further update. This option will not submit the request. Back Clicking on Back button, takes the user to the previous screen. Next On click of Next, system validates if all the mandatory fields have been captured. Necessary error and override messages to be displayed. On successful validation, system moves the task to the next data segment.
Parent topic: Data Enrichment
