2.3.1 Main Details
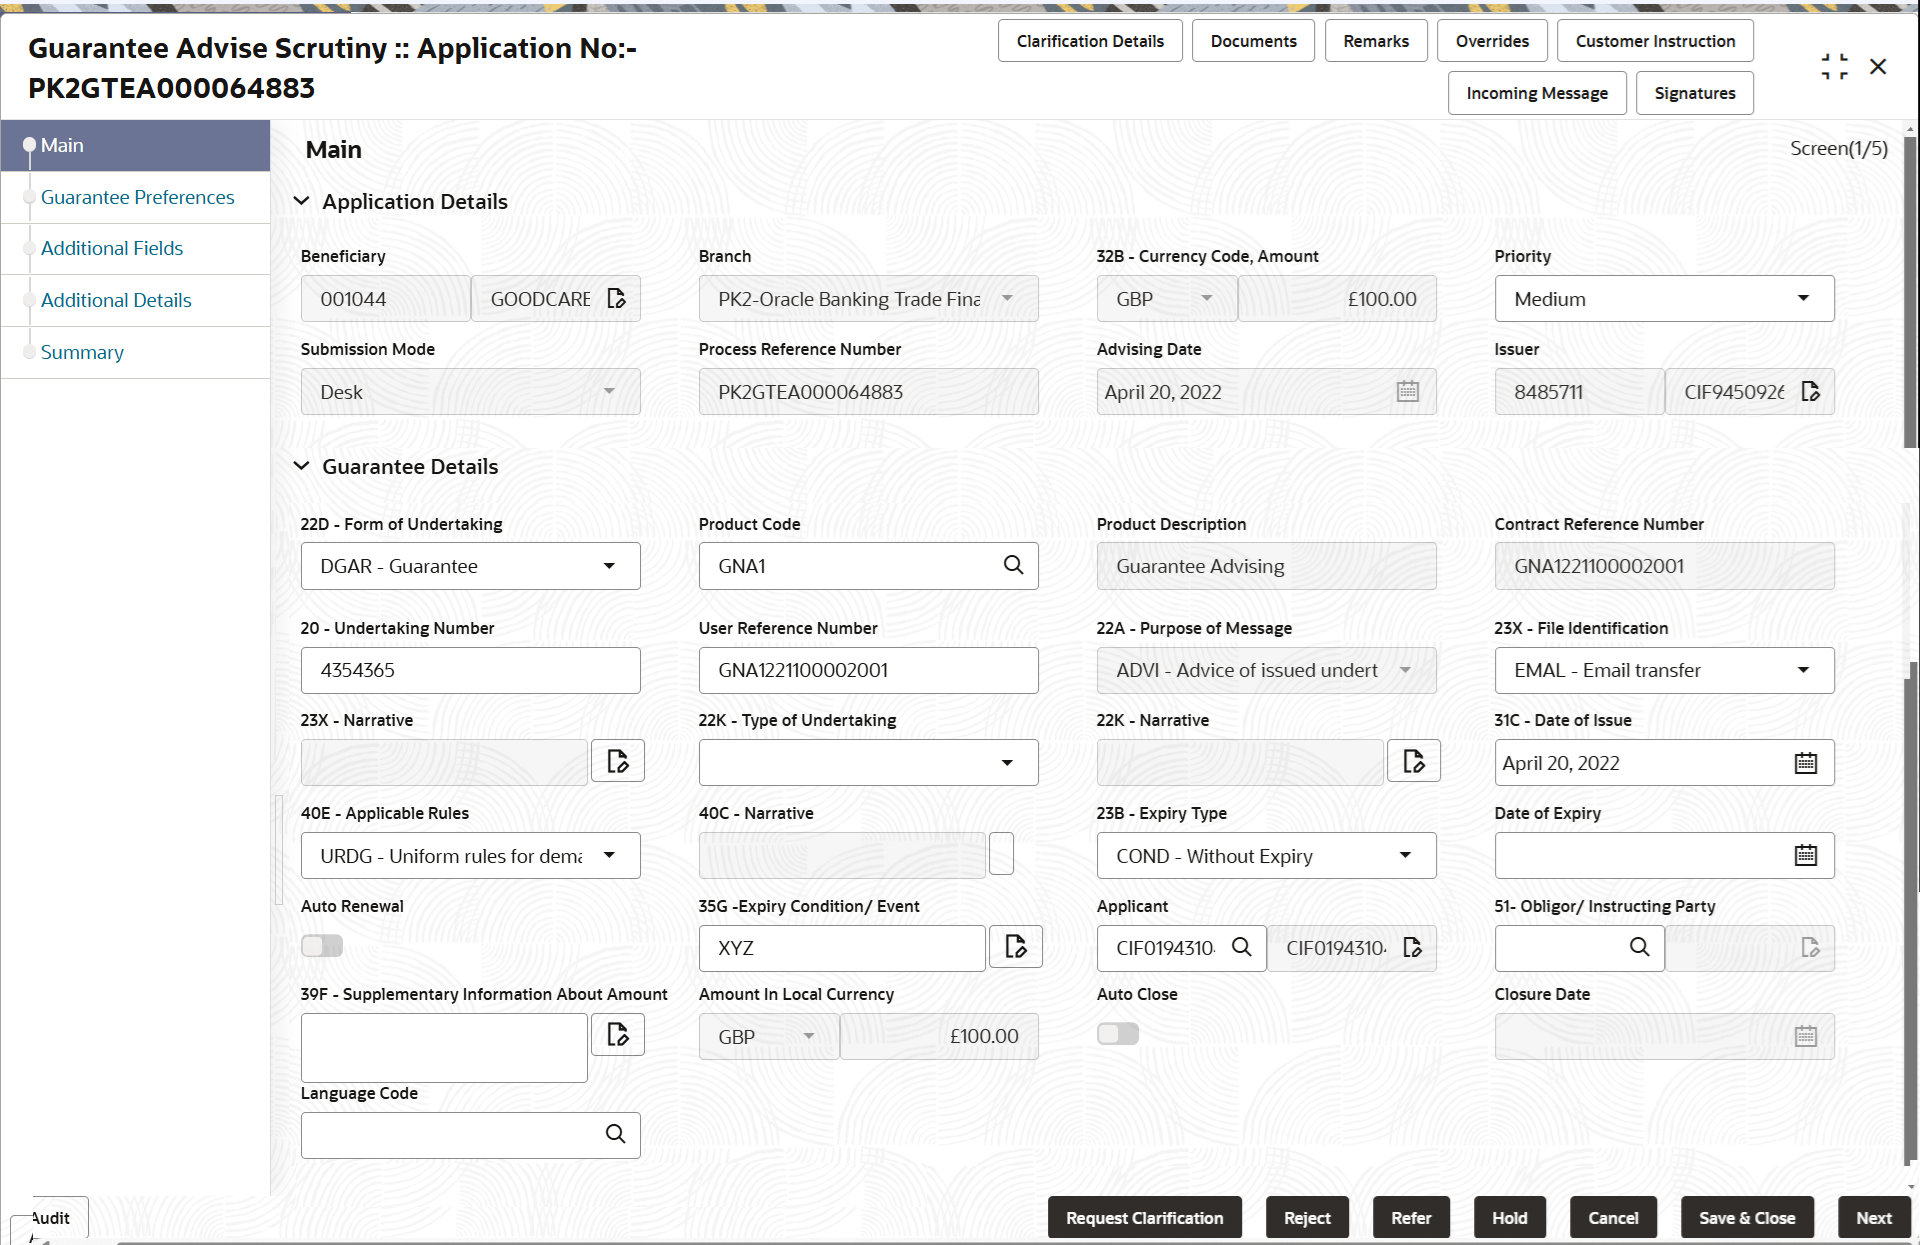
This topic provides the systematic instructions to initiate the main details of Scrutiny stage of Guarantee Advise request.
- Application Details
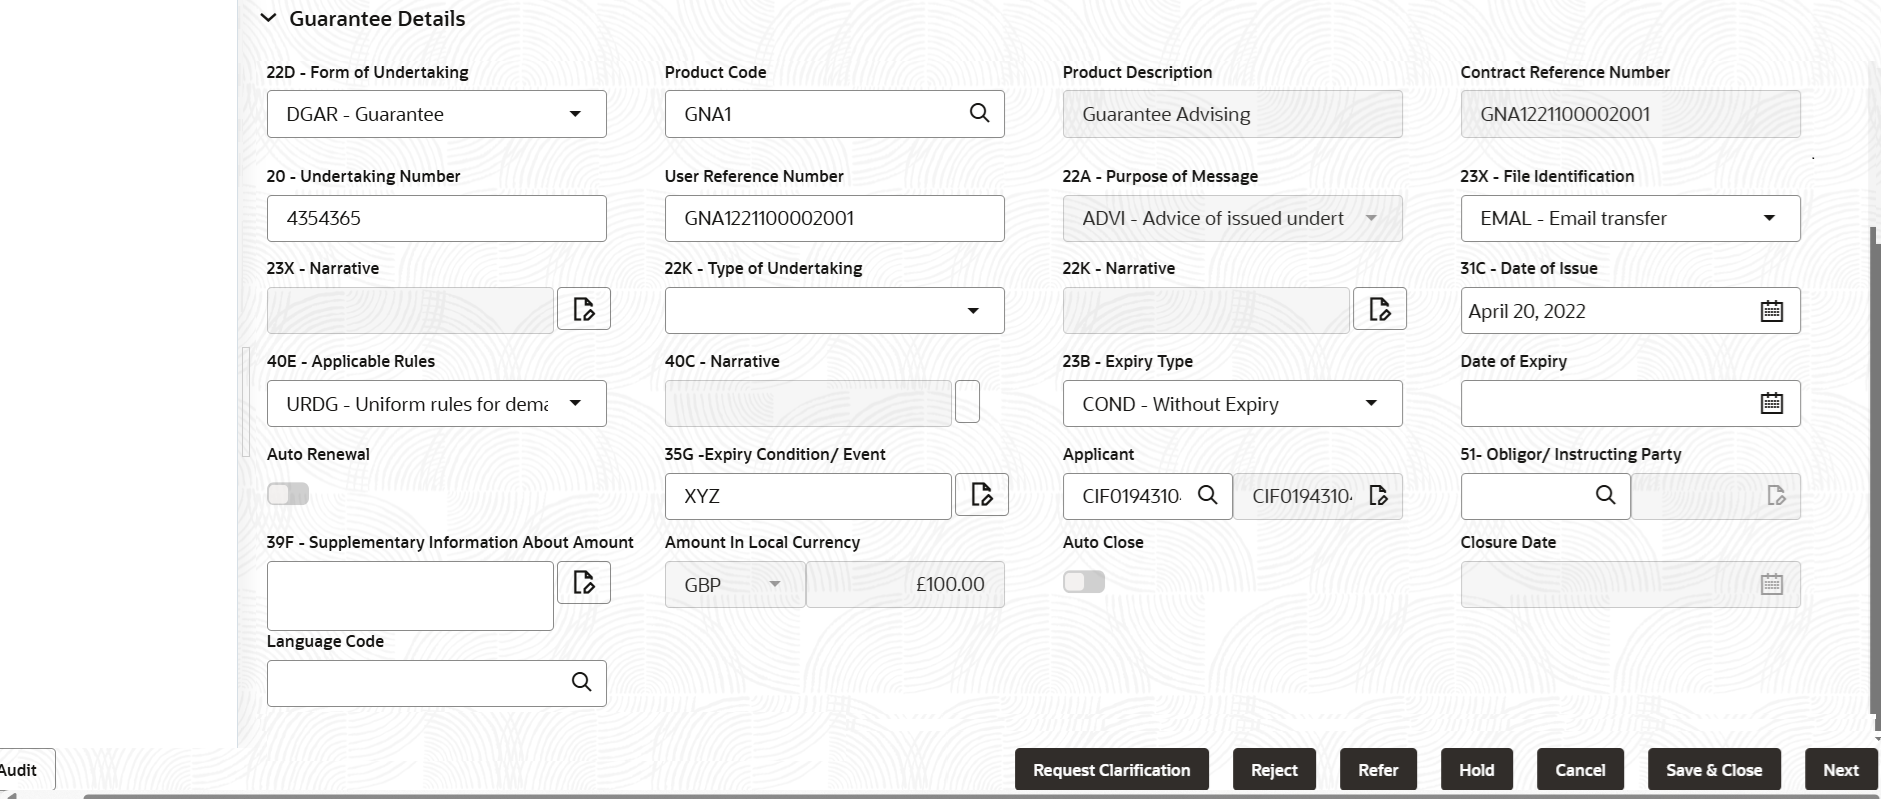
- Guarantee Details.
All fields displayed under Application details section, would be read only except for the Priority field.
- On Scrutiny - Main Details screen, specify the fields
that were not entered at Registration stage.
Figure 2-8 Scrutiny - Main Details

Description of the illustration scrutinymainapplicationdetails.pngFor more information on fields, refer to the field description table below.Table 2-6 Guarantee Advise - Main - Application Details - Field Description
Field Description Beneficiary Read-only field. Displays the beneficiary.
Branch Read-only field. customer. Displays the customer’s home branch based on the customer ID.
Currency Code, Amount Read-only field. Displays the currency code of guarantee (with decimal places) as per currency type.
Priority Set the priority of the Guarantee issuance request as Essential/Critical/Low/Medium/High. If priority is not maintained for the customer, system will populate 'Medium' as the default priority. User can change the priority populated any time before submit of Registration stage as per the requirement. If priority is not maintained for a customer, ‘Medium' priority will be defaulted. For Guarantee Advising MT760, the field is defaulted and user can change its value.
Submission Mode Read-only field. Displays the submission mode of Guarantee Advise request. By default the submission mode will have the value as ‘Desk’.
- Desk - Request received through Desk
- Courier - Request received through Courier
Process Reference Number Read-only field. Unique OBTFPMCS task reference number for the transaction.This is auto generated by the system based on process name and branch code.
For Guarantee Advising MT760, the Process Reference Number is read only and generated by the system.
Advising Date Read-only field. Displays the branch’s current date by default. If approved on a subsequent date, that date will be populated here.
Issuer Read-only field. Displays the issuing bank name.
Guarantee DetailsThe fields listed under this section are same as the fields listed under the Guarantee Details section in Registration stage. During Registration, if user has not captured input, then user can capture the details in this section.
Figure 2-9 Guarantee Details

Description of the illustration scrutinymainguaranteedetails.pngFor more information on action buttons, refer to the field description table below.
Table 2-7 Guarantee Advise - Main - Guarantee Details - Field Description
Field Description Form of Undertaking Select the type of LC (Documentary Credit) as per the requirement. By default LC type is Irrevocable. - DGAR - Guarantee
- STBY - Standby LC
Product Code Specify the product code and on tab out system will validate and populate the selected product description. The product codes will be listed based on the selected value in Form of Undertaking. Alternatively, click Search to search and select the product code with code or product description.
Product Description Read only field. This field displays the description of the product as per the product code.
Contract Reference Number Read only field. Auto-generated by back end application. Number will be populated on the selection of Product Code.
Undertaking Number Specify the undertaking number available in the guarantee/SBLC. User Reference Number This field displays the user reference number, simulated from the back office. Number will be populated on the selection of Product Code.
User can change the User Reference Number.
Purpose of Message Select the purpose of message from the drop-down. The values are:- ACNF - Advice and confirmation of issued undertaking
- ADVI - Advice of issued undertaking.
For Guarantee Advising MT760, the Purpose of message is read only and populated from Incoming MT 760.
Values are:This field is read only if Form of Undertaking value is DGAR - Guarantee.
- ACNF - Advice and confirm (Limits required)
- ADVI - Advice
File Identification Select the type of delivery channel and its associated file name or reference from the available values. The options are:- COUR - Courier delivery
- EMAL - Email transfer
- FACT - SWIFTNet FileAct
- FAXT - Fax transfer
- HOST - Host-to-Host
- MAIL - Postal Delivery
- OTHR - Other delivery channel
Narrative Specify the description in this field, if File Identification field values are COUR or OTHR . Type of Undertaking Select the guarantee type from the following available options: - Advance Payment Guarantee
- BILL - Bill of Lading
- CUST - Customs
- DPAY - Direct Pay
- INSU - Insurance
- JUDI - Judicial
- LEAS - Lease
- PAYM - Payment
- PERF - Performance
- RETN - Retention
- SHIP - Shipping - For shipping guarantee
- TEND - Tender or Bid
- WARR - Warranty/ maintenance
- OTHR - Any other local undertaking type.
Narrative Specify the details of any other type of local undertaking. This field is enabled if the Type of Undertaking has value as OTHR .
Date of Issue Displays the branch’s current date as date of issue defaulted from the application. User cannot change the defaulted date. Application will populate the Date of Issue field with branch date on approval if date of approval is later than date of Registration.
Applicable Rules Select the applicable rules for guarantee issuance. The options are:- URDG - Uniform rules for demand guarantees
- UCPR - Uniform customs and Practices
- ISPR - International standby Practices
- NONE - Not subject to any rules
Narrative Specify the description in this field, if Applicable Rules field values is NONE . Expiry Type Select the expiry type for guarantee advise. This field indicates whether undertaking has specified expiry date or is open-ended.
The options are:- COND- Without Expiry
- COND- With Expiry
- FIXD - Specified expiry date (with/without automatic expansion)
- OPEN - No specific date of expiry
Date of Expiry Select the expiry date of the LC. The expiry date can be equal or greater than the issue date. If the Expiry Date is earlier than the issue date, system will provide an error and if the ‘Expiry Date is equal to the Issue Date’, system will provide a alert message.
The field is enabled, if Expiry Type is COND - With Expiry or COND - Without Expiry and FIXD.Auto Renewal Enable the option for auto renewal of guarantee advise. The field is enabled, if Expiry Type is OPEN.
Expiry Condition/Event Specifies the documentary condition/event that indicates when the local undertaking will cease to be available. The field is enabled, if Expiry Type is COND - With Expiry or COND - Without Expiry.
Applicant Specify the applicant or alternatively, click Search to search and select the applicant from the look-up. If the request is received from Applicant bank, select the applicant from the List of Values.
Obligor/ Instructor Party Specify the party obligated to reimburse the issuer or click Search to search and select the name of the obligor from the lookup. Supplementary Information About Amount Specify the additional information about amount related to undertaking. Amount In Local Currency Read only field. After the tab out of ‘Currency Code, Amount’ field, system populates the Local currency and amount value in this field. System fetches the local currency equivalent value for the transaction amount from back office (with decimal places).
Auto Close Enable the option, if Auto close is required for that transactions. Disable the option, if Auto close is not required for that transactions.
The field is disabled, if Expiry Type is OPEN.
Closure Date Displays the “Closure Date”defaulted by the system, with the value “Expiry Date” + No of Closure days maintained in the respective Product in which the contract has been created. System automatically close the contract on the specified “Closure Date” if “Auto Close” is selected as “Yes” for the specific contract.
User can modify the system defaulted “Closure Date” and system should validate the same for the below conditions,- Closure Date must be after the Issue Date.
- Closure Date must be after the Expiry Date.
- Closure Date cannot be blank, when the “Auto Close” is checked.
The field is disabled, if Expiry Type is OPEN.
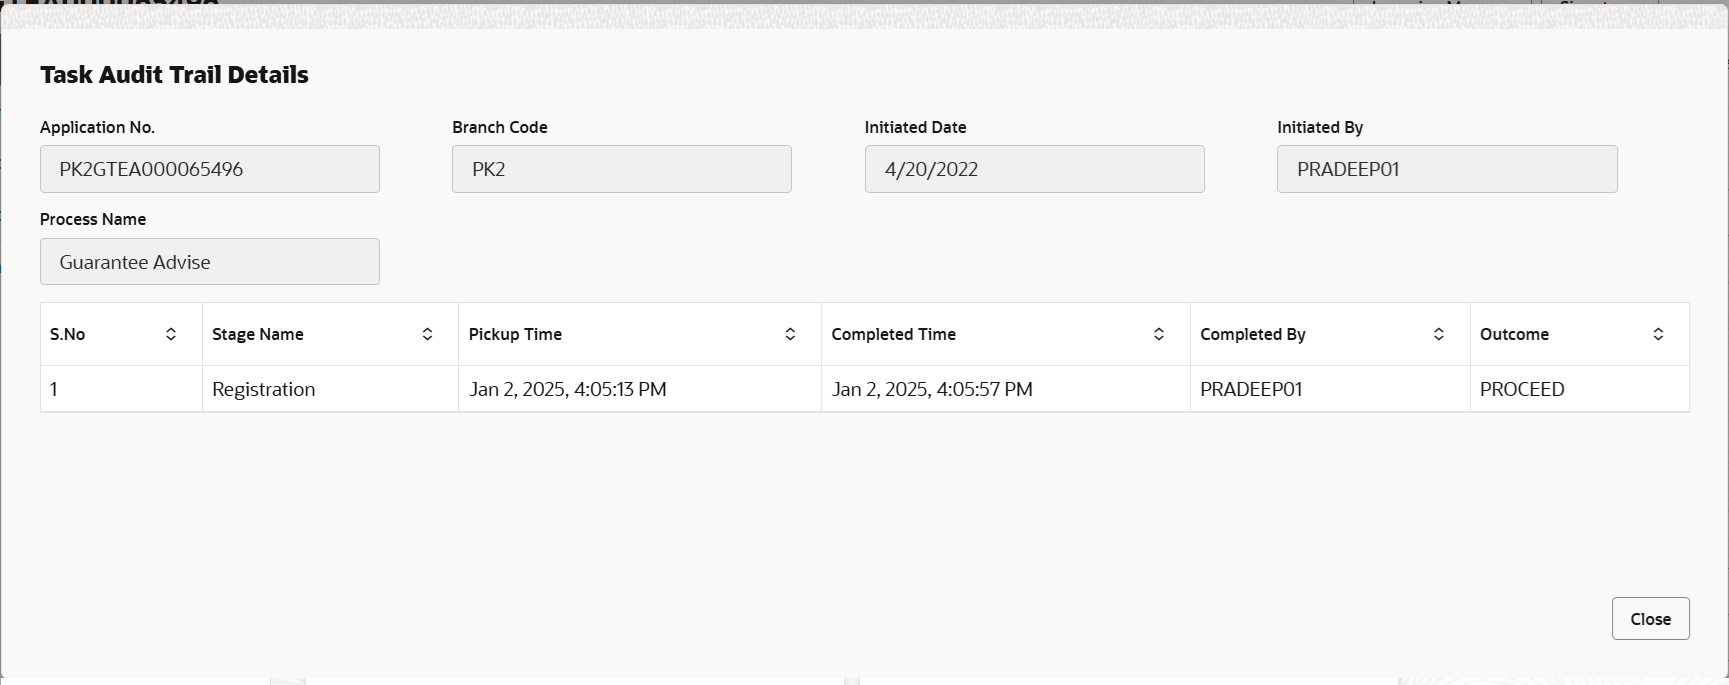
Language Code Click Search to search and select the language code from the look-up. AuditThis button provides information about user initiated the transaction, initiated date, stage wise detail etc.
For more information on audit, refer to the field description table below.Table 2-8 Audit - Field Description
Field Description Application No. This field displays the appliation number of the process. Branch Code This field displays the branch code. Initiated Date This field displays the date on which process is initiated. Initiated By This field displays the user ID of the user who had initiated the process. Process Name This field displays the name of the process which is initiated. S. No This field displays the serial number of the audit record. Stage Name This field displays the current stage of the process. Completed Time This field displays the time on which the audit of the current stage is completed. Completed By This field displays the user ID of the user who had completed the audit. Outcome This field displays the outcome of the audit. - Click Next.The task will move to next data segment.
Table 2-9 Main Details - Action Buttons - Field Description
Field Description Clarification Details Clicking the button opens a detailed screen, user can see the clarification details in the window and the status will be 'Clarification Requested'. Documents Click to View/Upload the required document. Application displays the mandatory and optional documents.
The user can view and input/view application details simultaneously.
When a user clicks on the uploaded document, Document window get opened and on clicking the view icon of the uploaded document, Application screen should get split into two. The one side of the document allows to view and on the other side allows to input/view the details in the applicationRemarks Specify any additional information regarding the Guarantee issuance. This information can be viewed by other users processing the request. Content from Remarks field should be handed off to Remarks field in Backend application.
Overrides Click to view the overrides accepted by the user. Customer Instructions Click to view/ input the following - Standard Instructions – In this section, the system will populate the details of Standard Instructions maintained for the customer. User will not be able to edit this.
- Transaction Level Instructions – In this section, OBTFPMCS user can input any Customer Instructions received as part of transaction processing. This section will be enabled only for customer initiated transactions.
Incoming Messages This button displays the multiple messages (MT760 + up to 7 MT761. Click to allow parsing of MT 760 along with MT761(up to 7) messages together to create a Guarantee Advise.
In case of MT798, the User can click and view the MT798 message(784,760/761).
In case of MT798-MT726-MT759 request, user can view MT798 message(726-759) in this placeholder in Header of the task.
In case of MT798_MT788-MT799 request, user can view MT798 message (788-799) in this placeholder in Header of the process-task.
Signatures Click the Signature button to verify the signature of the customer/ bank if required. The user can view the Customer Number and Name of the signatory, Signature image and the applicable operation instructions if any available in the back-office system.
If more than one signature is available, system should display all the signatures.
Request Clarification User can submit the request for clarification to the “Trade Finance Portal” User for the transactions initiated offline Save & Close Save the details provided and holds the task in ‘My Task’ queue for further update. This option will not submit the request. Cancel Cancel the Scrutiny stage inputs. The details updated in this stage are not saved. The task will be available in 'My Task' queue. Hold The details provided will be saved and status will be on hold. User must update the remarks on the reason for holding the task. This option is used, if there are any pending information yet to be received from applicant.
Reject On click of Reject, user must select a Reject Reason from a list displayed by the system. Reject Codes are:
- R1- Documents missing
- R2- Signature Missing
- R3- Input Error
- R4- Insufficient Balance/Limits
- R5 - Others
Select a Reject code and give a Reject Description.
This reject reason will be available in the remarks window throughout the process.Refer Select a Refer Reason from the values displayed by the system. Refer Codes are:
- R1- Documents missing
- R2- Signature Missing
- R3- Input Error
- R4- Insufficient Balance/Limits
- R5 - Others
Next On click of Next, system validates if all the mandatory fields have been captured. Necessary error and override messages to be displayed. On successful validation, system moves the task to the next data segment.
Parent topic: Scrutiny
