- Receivables and Payables User Guide
- Maintenance for Receivables and Payables
- Smart Maintenance
3.11 Smart Maintenance
This topic describes the systematic instructions to extract data from the loan agreement, or sales contract to create/update the relationship and program.
Note:
This is an optional feature and is not enabled by default. To enable the Smart Maintenance menu, refer to Oracle Banking Supply Chain Finance Services Installation Guide.Upload Document - New Record
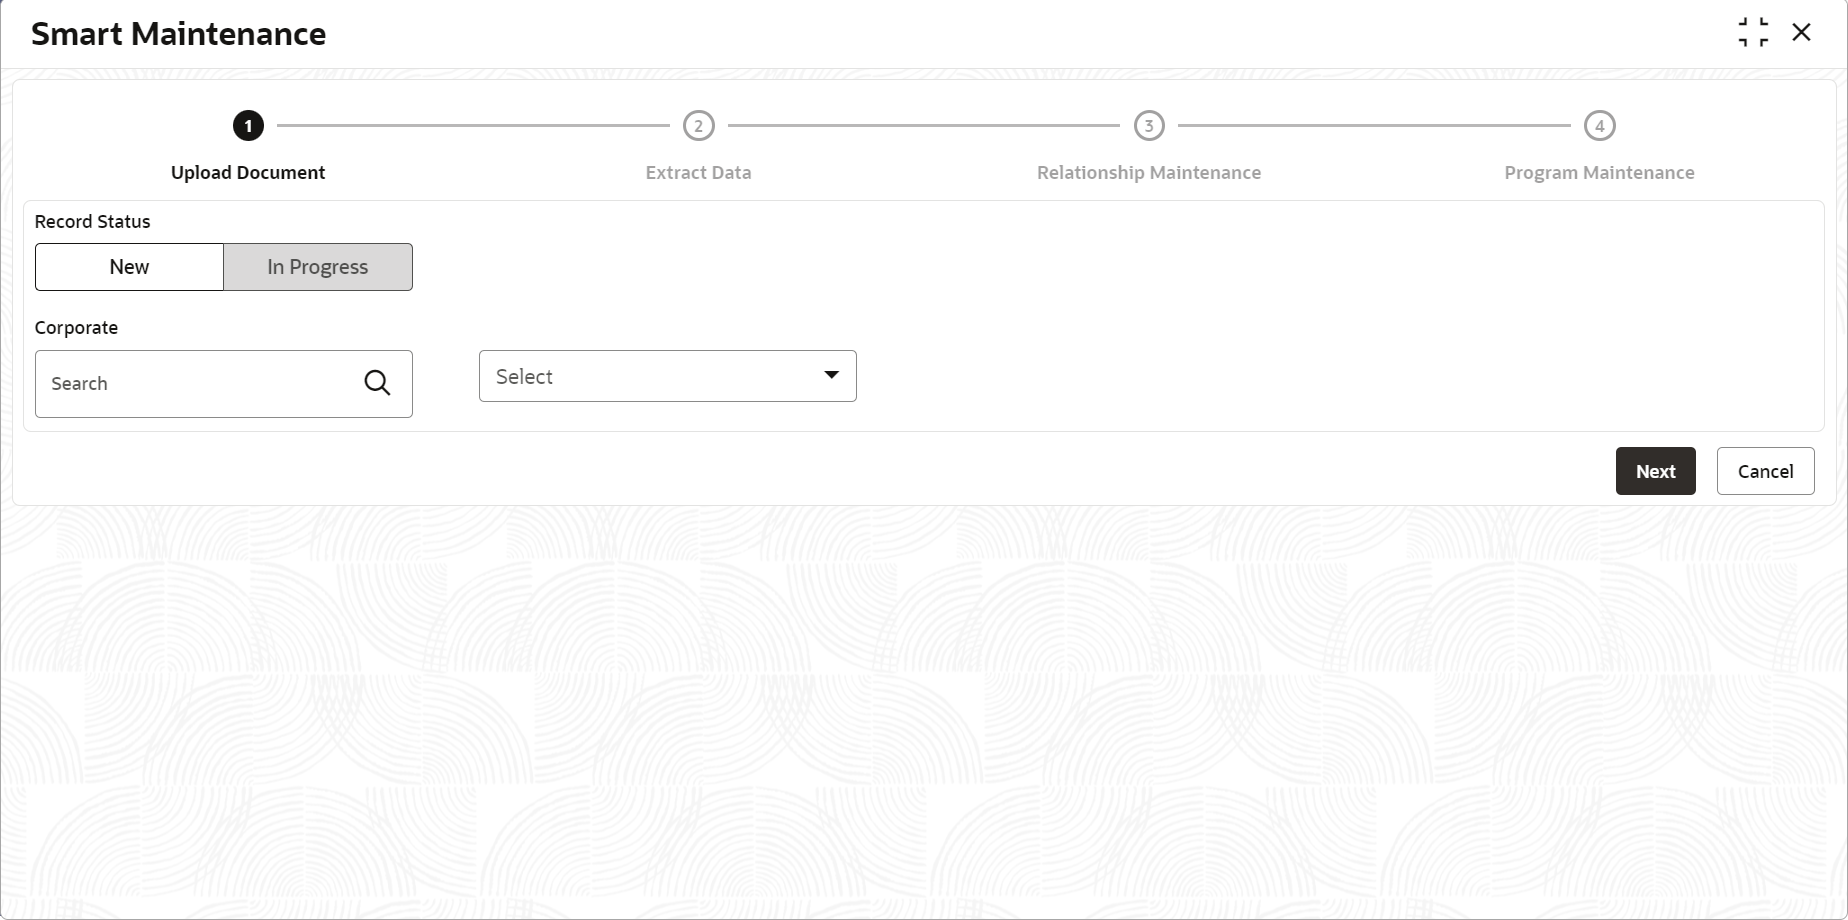
- On Home screen, click Receivables And Payables. Under Receivables And Payables, click Smart Maintenance.The Upload Document step in the Smart Maintenance screen displays.
- Specify the fields on Upload Document step and upload a
new record.For more information on fields, refer to the field description table.
Note:
The fields marked as Required are mandatory.Table 3-28 Upload Document - New Record - Field Description
Field Name Description Corporate Click the search icon and select the corporate party.
Buyer/Supplier Select the role of the corporate party. Document Upload This section displays the document status, add document, etc., Document Status Click the search icon and select the supplier party. Add Click the Add button to upload new document. Document screen appears.
Specify the required details and Click Upload to upload the document.
Action Displays the following options to view, edit, download, or delete the document.- Click the Search icon to view the document.
- Click the Edit icon to edit the document.
- Click the Download icon to download the document.
- Click the Delete icon to delete the document.
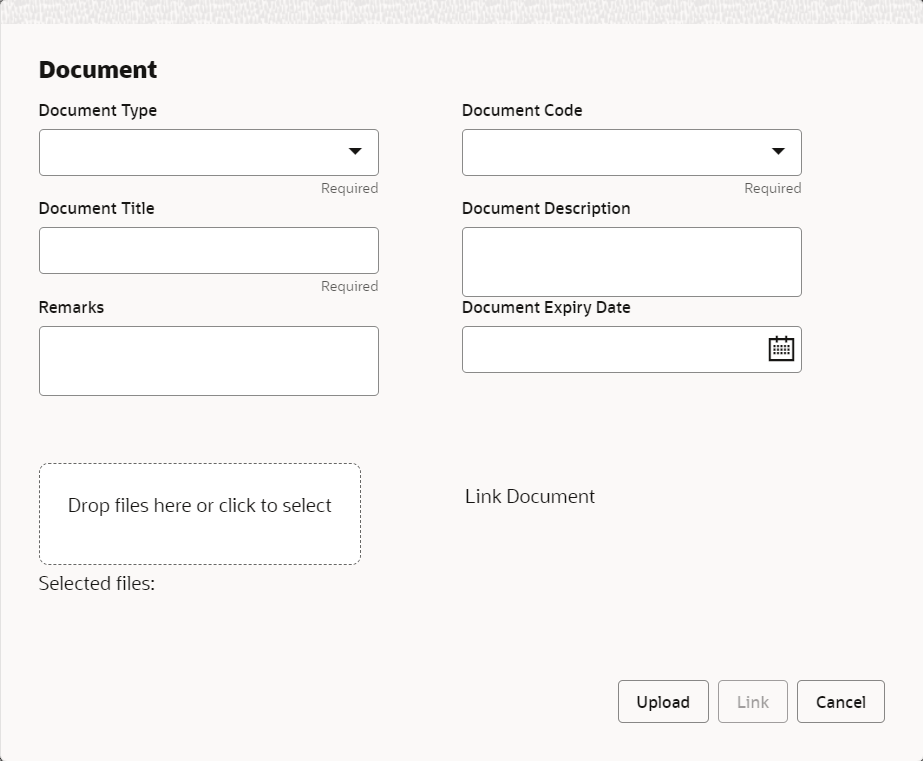
- Click Add to upload new documentsThe Document pop-up screen displays.
- Specify the fields on Document screen to upload the
document.For more information on fields, refer to the field description table.
Note:
The fields marked as Required are mandatory.Table 3-29 Document pop-up screen - Field Description
Field Name Description Document Type Select the type of document to be uploaded. Document Code Select the type of document code to be uploaded. Document Title Specify the title for the document to be uploaded. Document Description Specify the description for the document to be uploaded. Remarks Specify any additional remarks, if required. Document Expiry Date Click the calendar icon to select the expiry date for the document to be uploaded. Link Document Click Link Document to link the uploaded document to other documents of the same customer. - Click Upload to upload the new document.
- Click Link to link the uploaded document to an existing document Id.
- Click Cancel to cancel the task.
Upload Document - In Progress Record
- Click In Progress tab to continue with an in progress
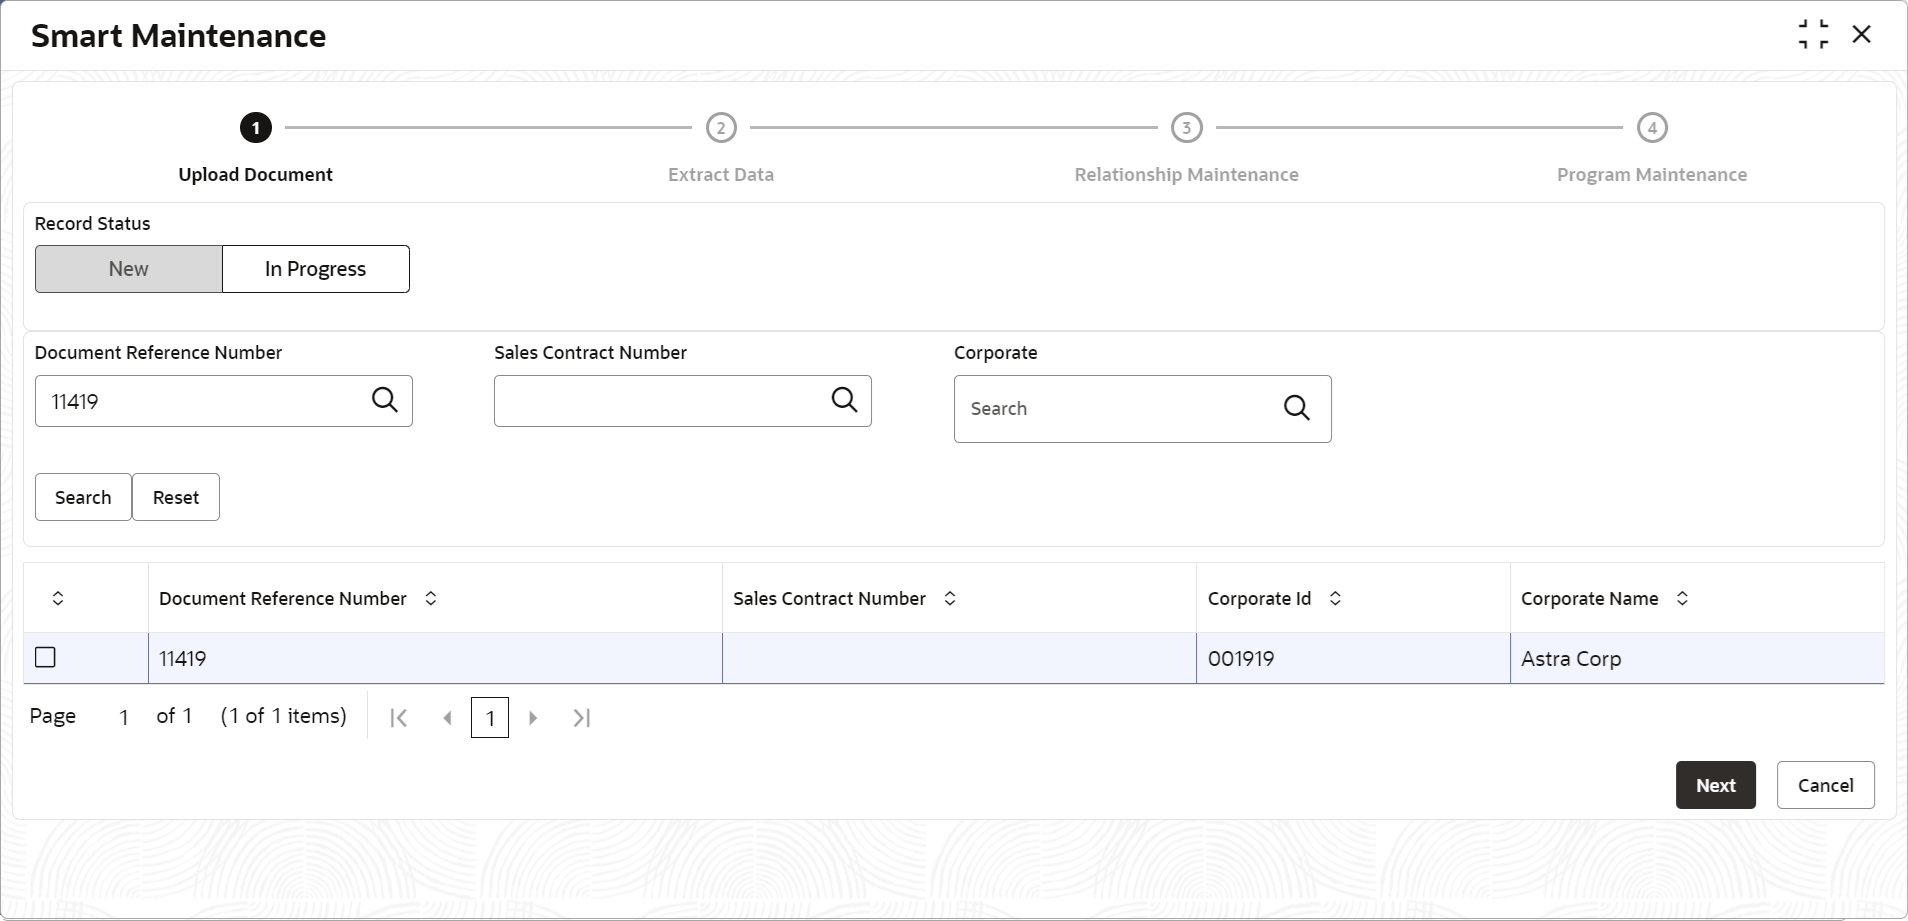
transaction of document upload.The Upload Document - In Progress screen displays.
Figure 3-64 Upload Document - In Progress Record
- Specify the fields on In Progress tab to search for the
uploaded record.For more information on fields, refer to the field description table.
Note:
The fields marked as Required are mandatory.Table 3-30 Upload Document - In Progress Record - Field Description
Field Name Description Document Reference Number Click the search icon and select the document reference number of the uploaded document. Sales Contract Number Click the search icon and select the sales contract number of the uploaded document. Corporate Click the search icon and select corporate who uploaded the document. - Click Search to search the records, or click Reset to reset the filter criteria.
- Select the record(s) and perform any of the below action from the
Upload Document step.
- Click Next to go to the Extract Data step.
- Click Cancel to cancel the task.
Extract Data
- Click Next on Upload Document
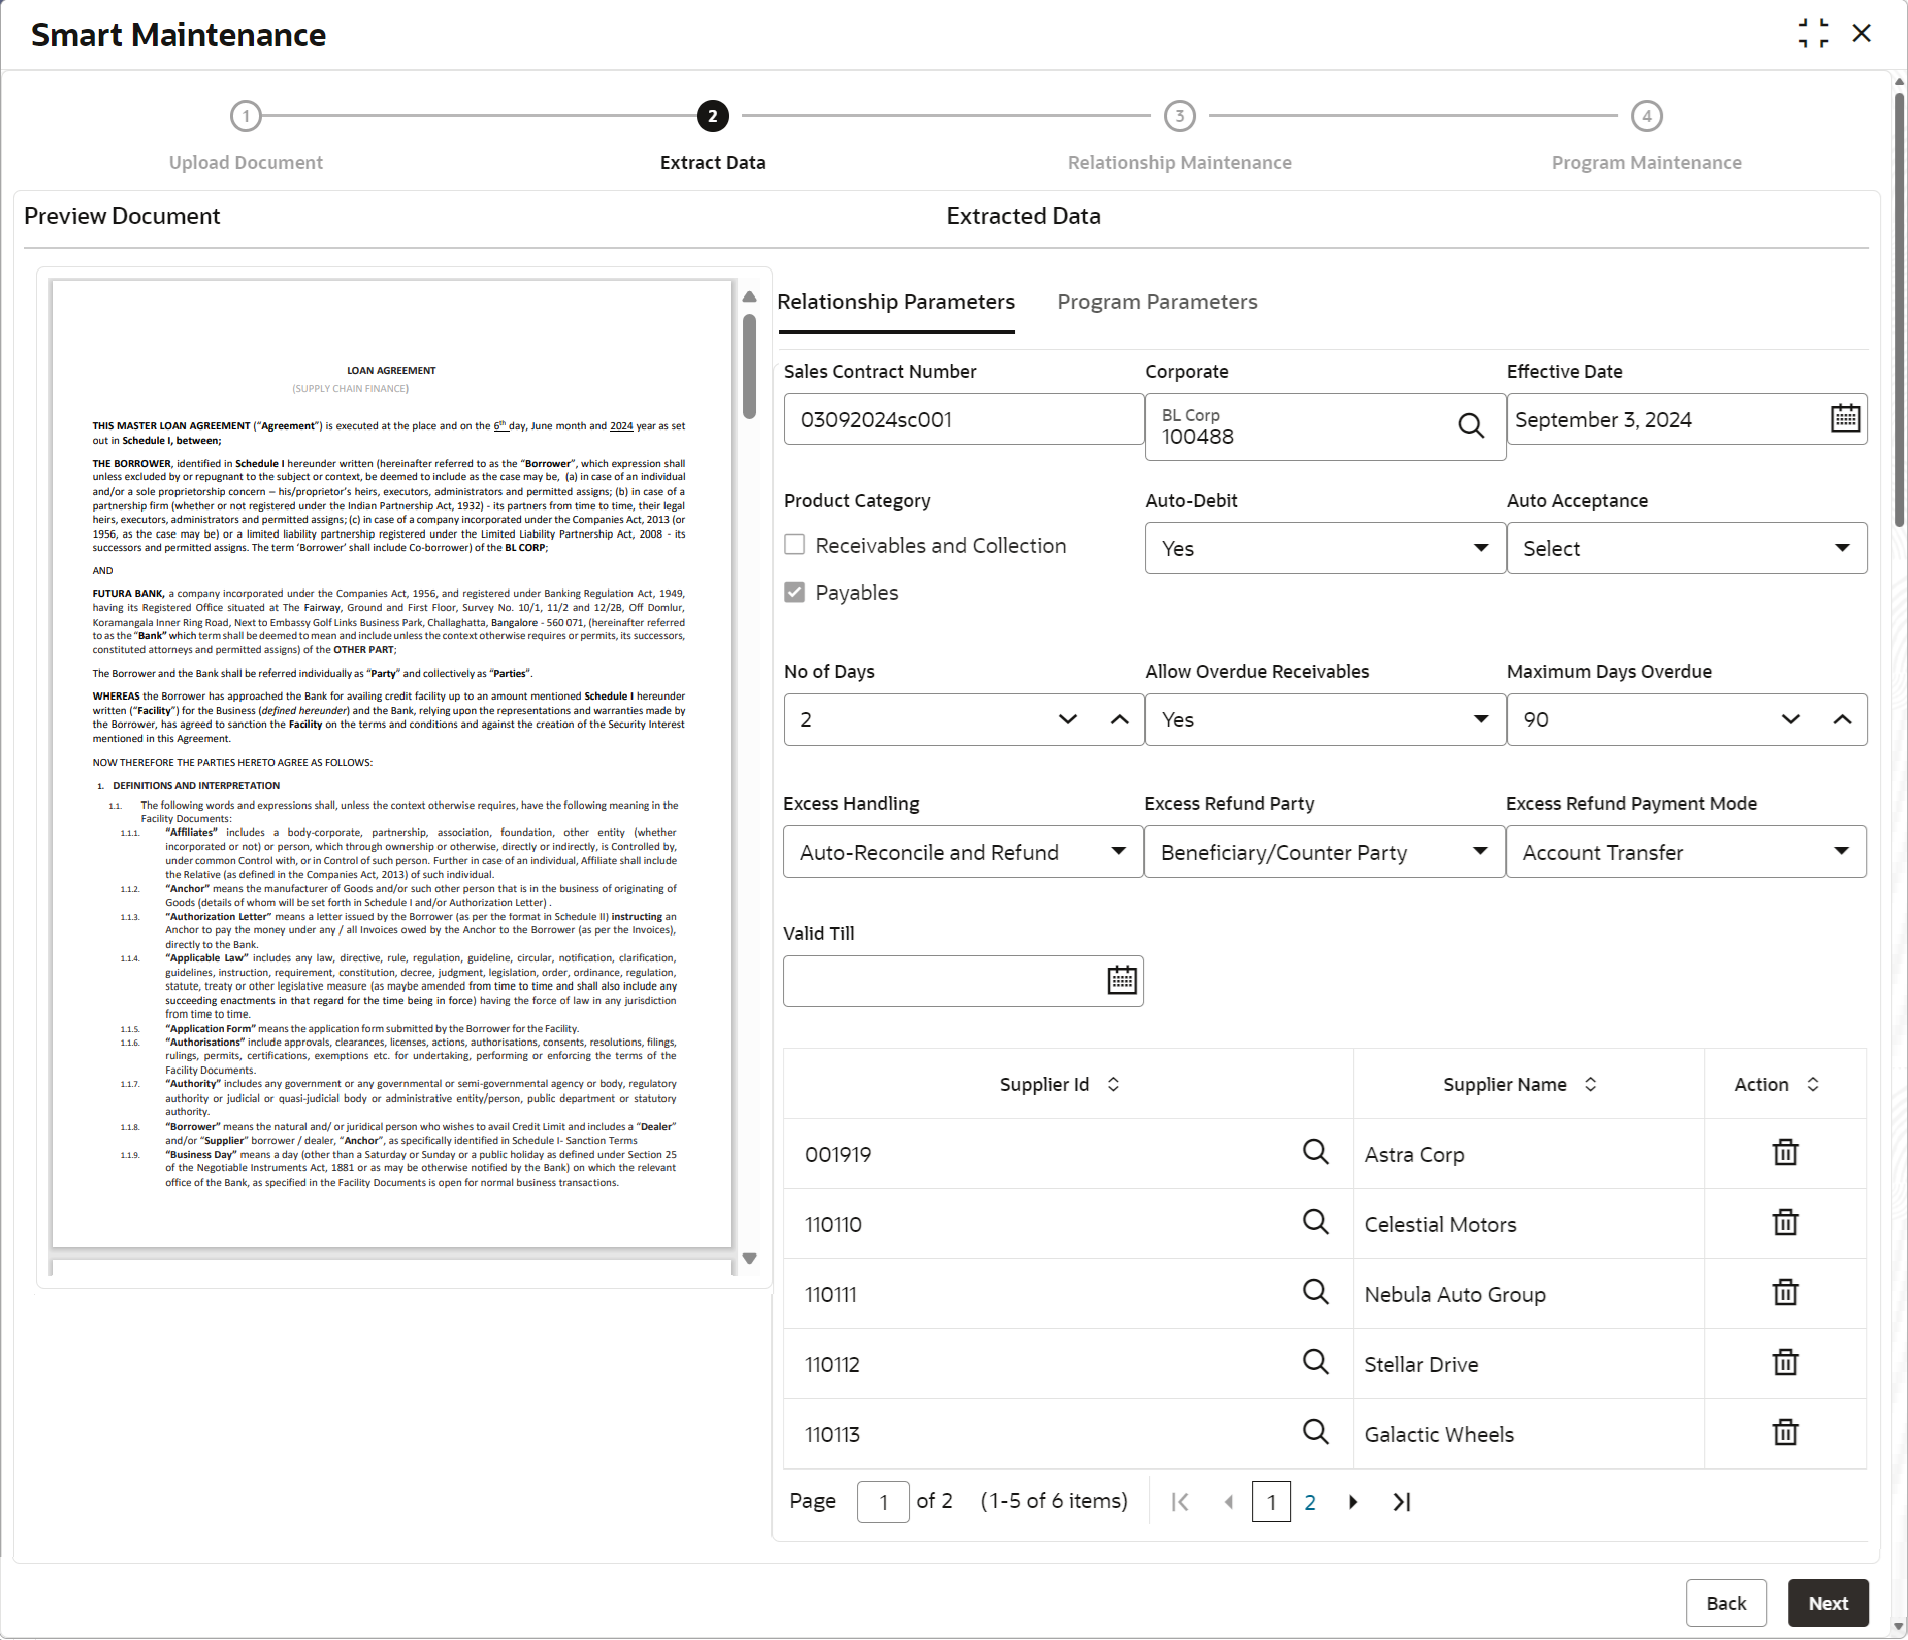
step.The Extract Data - Relationship Parameters step displays.
Figure 3-65 Extract Data - Relationship Parameters
- Review the fields on Extract Data step populated for
Relationship Parameters tab. You can modify the details, if required.For more information on fields, refer to the field description table.
Note:
The fields marked as Required are mandatory.Table 3-31 Extract Data - Relationship Parameters - Field Description
Field Name Description Sales Conract Number Displays the sales contract number as per the uploaded document. Corporate Displays the corporate party as selected for whom the linkage to counterparty is required. Effective Date Displays the effective date from when the relationship is active. Product Category Displays the applicable product category.
Receivables and Collection is selected by default, if the Anchor Corporate party and the Supplier party are same.
Payables is selected by default, if the Corporate party and the Buyer party are same.
Auto-Debit Displays Yes if the automatic debit facility is applicable for the Receivables and Collection / Payables at the relationship level. Else, No. Auto Acceptance Displays Yes if the auto acceptance is applicable for the Receivables and Collection / Payables at the relationship level. Else, No. No of Days Displays the no. of day(s) post which the auto-acceptance is triggered for the Receivables and Collection / Payables. Allow Overdue Receivables Displays Yes if the creation of overdue invoices and debit notes is allowed for the relationship. Else, No. Maximum Days Overdue Displays the maximum number of days post the invoice/debit-note due date (if maintained), until when the creation of the receivable is allowed. Excess Handling Displays how the excess payment should be handled post reconciliation of outstanding invoice/finance. Excess Refund Party Displays the party to refund the excess amounts post reconciliation of outstanding invoice/finance. Valid Till Displays the date till when the relationship is valid. Counterparty Details The grid table displays the counterparty details populated from the uploaded document. Multiple rows for buyer/supplier are added basis the no. of counterparties. You can validate/enrich the data extracted from the uploaded document in the table. Buyer/Supplier Id Displays the party Id of the buyer/supplier. Buyer/Supplier Name Displays the party name of the buyer/supplier. Action Click Delete icon to delete the counterparty. - Click the Program Parameters tab.The Extract Data - Program Parameters tab displays.
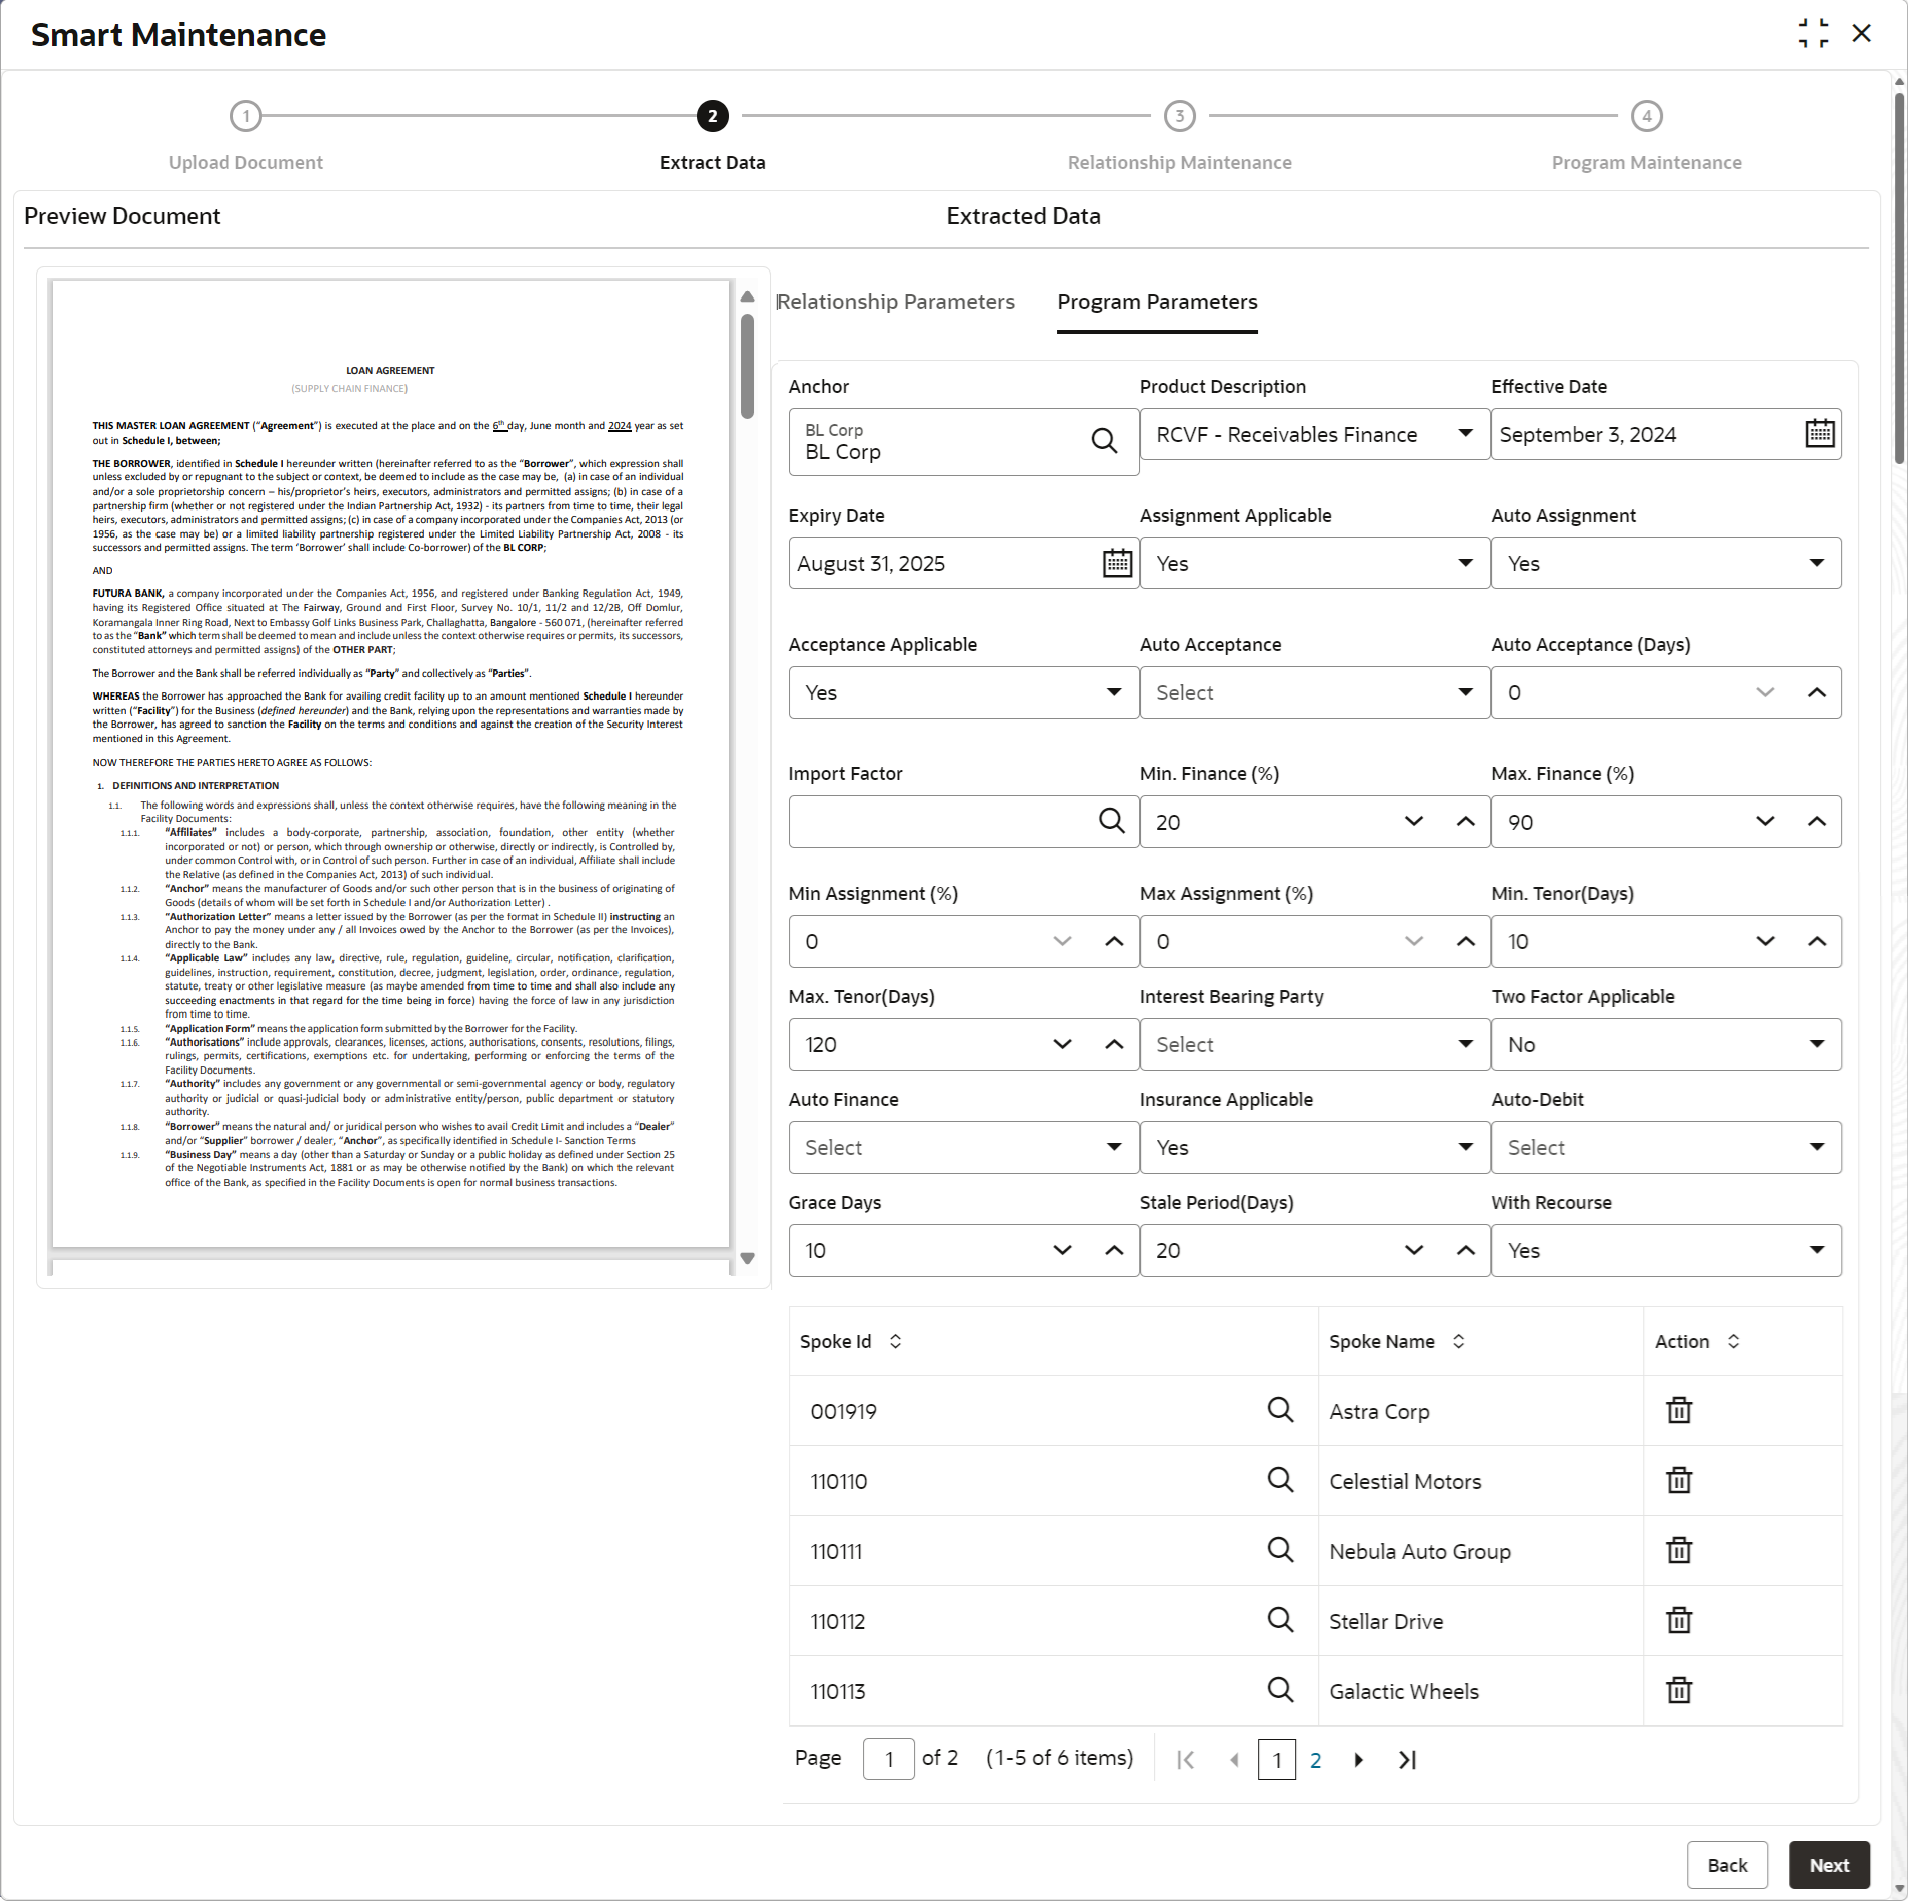
Figure 3-66 Extract Data - Program Parameters
- Review the fields on Extract Data step populated for
Program Parameters tab. You can modify the details, if requiredFor more information on fields, refer to the field description table.
Note:
The fields marked as Required are mandatory.Table 3-32 Extract Data - Program Parameters - Field Description
Field Name Description Anchor Displays the sales contract number as per the uploaded document. Product Description Displays the underlying finance product to be associated with the program. Effective Date Displays the effective date from when the program is active. Expiry Date Displays the expiry date until when the program is valid. Assignment Applicable Displays Yes if the assignment on invoice is applicable for financing. Else, No. Auto Assignment Displays Yes if the auto assignment is applicable post invoice upload. Else, No. Acceptance Applicable Displays Yes if the acceptance for invoice is applicable for financing. Else, No. Auto Acceptance Displays Yes if automatic acceptance is applicable for an instrument of the program. Else, No. Auto Acceptance (Days) Displays the number of days after which the instrument is automatically deemed as accepted under this program. Import Factor Displays the import factor to be linked to the spoke. Min. Finance (%) Displays the minimum finance percentage allowed for financing a transaction of this program. Max. Finance (%) Displays the maximum finance percentage allowed for financing a transaction of this program. Min Assignment (%) Displays the minimum percentage of the assignment amount allowed for financing a transaction of this program. Max Assignment (%) Displays the maximum percentage of the assignment amount allowed for financing a transaction of this program. Min. Tenor (Days) Displays the minimum tenor allowed for financing a transaction of this program. Max. Tenor (Days) Displays the maximum tenor allowed for financing a transaction of this program. Interest Bearing Party Displays the party that bears the interest.
Two Factor Applicable Displays Yes if a two-factor system is applicable for the program in case the anchor is trading with foreign buyers/suppliers. Else, No. Auto Finance Displays Yes if auto financing is applicable under this program. Else, No. Insurance Applicable Displays Yes if insurance is applicable under this program. Else, No. Auto-Debit Displays Yes if auto debit is applicable to recover the outstanding finance due from the borrower for this spoke. Else, No. Grace Days Displays the number of grace days post the finance due date, within which the finance can be settled without penalty. Stale Period (Days) Displays the number of stale days post the invoice date, after which the invoice becomes stale and will not be financed automatically any more for this program. With Recourse Displays Yes if the finance is allowed with recourse. Else, No. Spoke Details The grid table displays the spoke details populated from the uploaded document. Multiple rows are added basis the no. of spokes. You can validate/enrich the data extracted from the uploaded document in the table. Spoke Id Displays the Id of the spoke. Spoke Name Displays the name of the spoke. Action Click Delete icon to delete the spoke. - Once you validate/enrich the extracted data, perform any of the below action
from the Extract Data step.
- Click Next to go to the Relationship Maintenance step.
- Click Back to go to the Upload Document step.
Relationship Maintenance
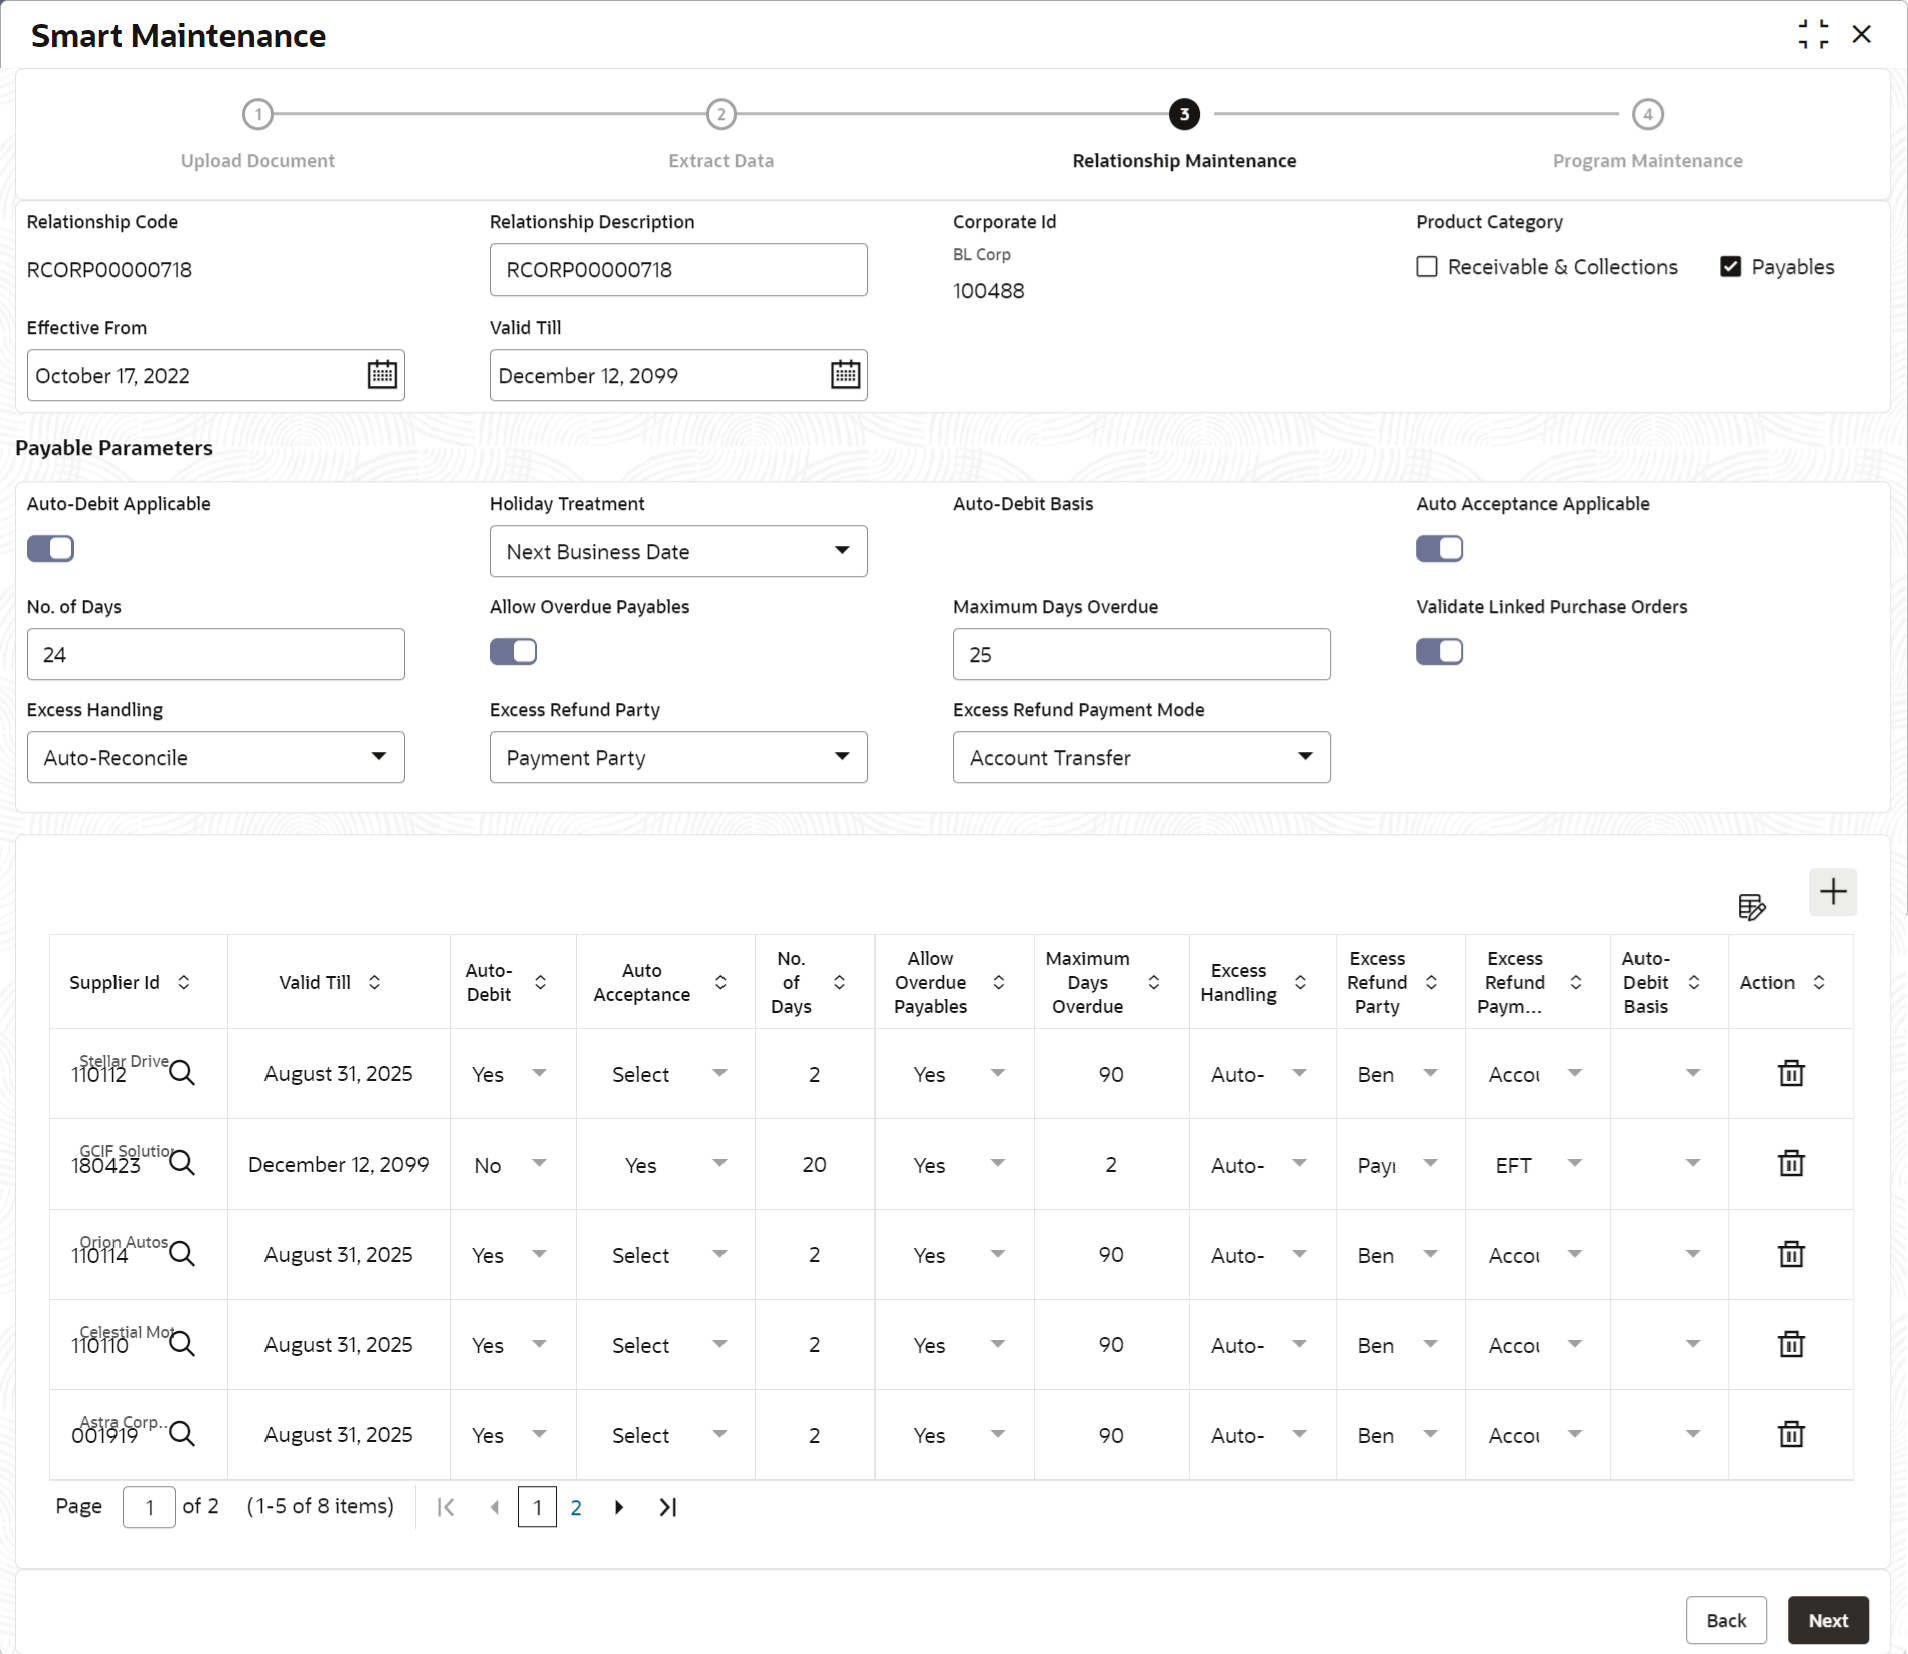
- Click next on Extract Data step.The Relationship Maintenance screen displays.
- Review the relationship details populated from the extracted data and validate/enrich them in the Relationship Maintenance step. For more information on the relationship maintenance, refer to Create Relationship section.
Program Maintenance
- Click next on Relationship Maintenance step to save the
relationship details. Click Confirm in the
Save pop-up screen to submit it for
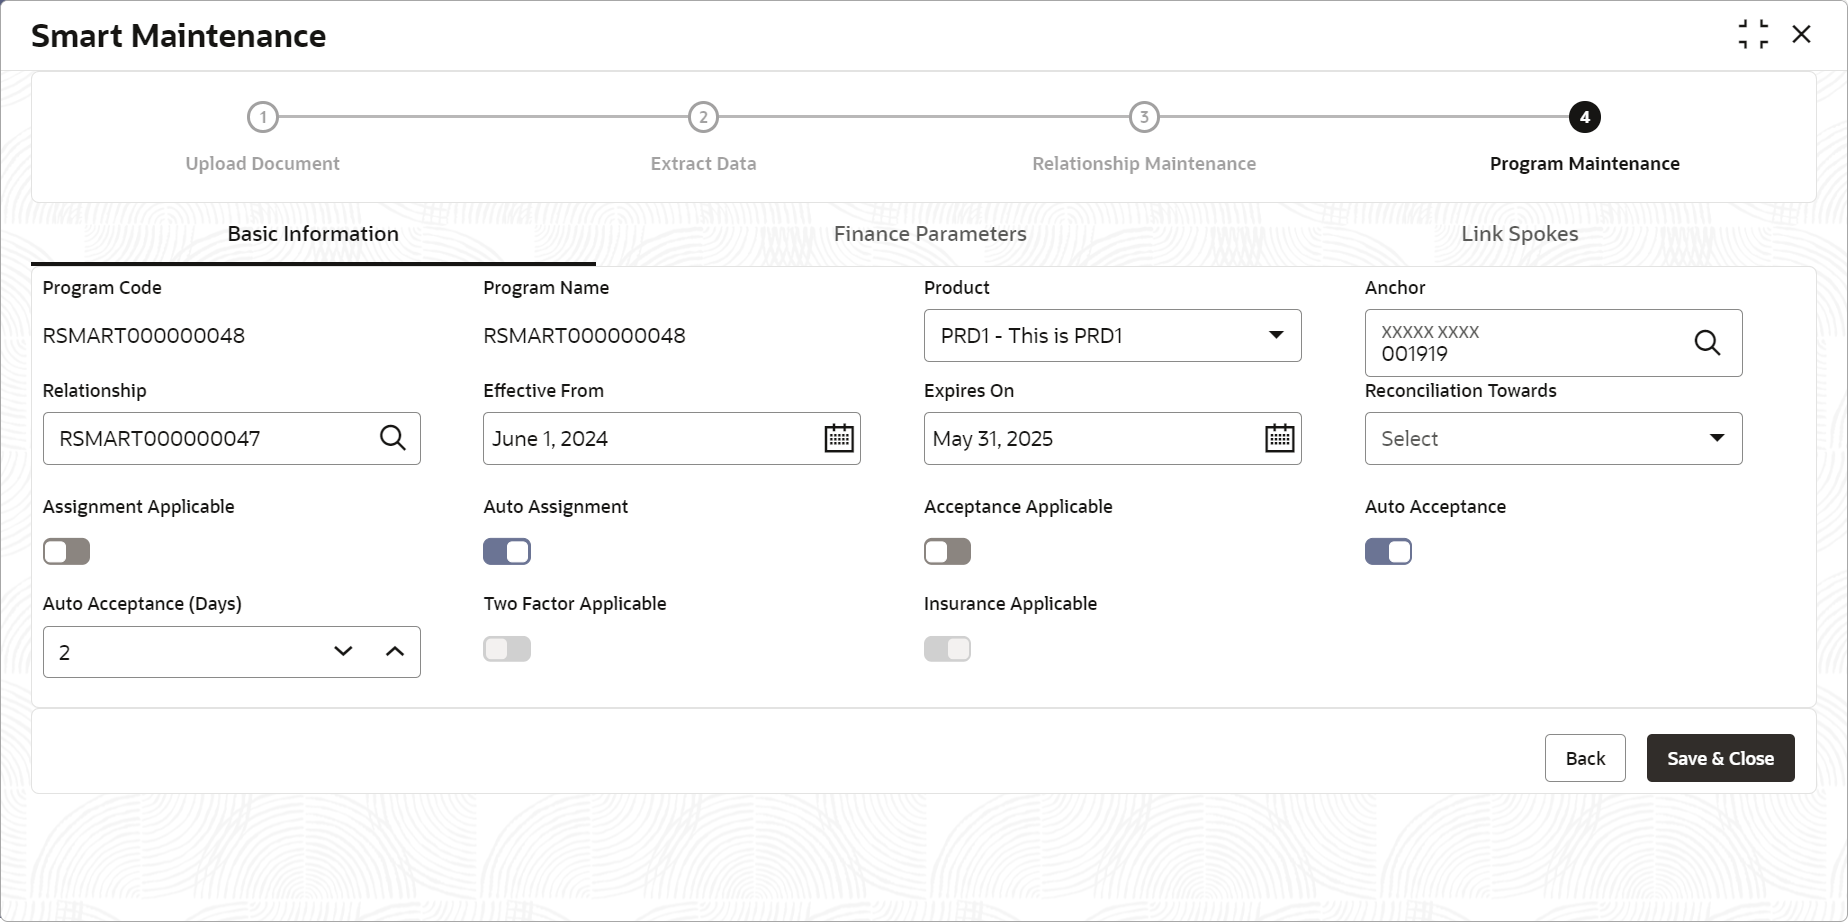
authorization.The Program Maintenance screen displays.
- Review the program details populated from the extracted data and validate/enrich them in the Program Maintenance step. For more information on the program maintenance, refer to Create Program Parameters section in the Supply Chain Finance User Guide.
- Perform any of the following actions in the Program
Maintenance step.
- Click Save & Close to save the program details. Click Confirm in the Save pop-up screen to submit it for authorization.
- Click Back to go to the Relationship Maintenance screen.
Parent topic: Maintenance for Receivables and Payables
