- Supply Chain Finance User Guide
- Maintenance for Supply Chain Finance
- Limits Structure Maintenance
- Create Limits Structure
2.9.1 Create Limits Structure
This topic describes the systematic instruction to create limit structures.
- On Home screen, click Supply Chain Finance. Under Supply Chain Finance, click Maintenance.
- Under Maintenance, click Limits
Structure. Under Limits Structure, click
Create Limits.The Create Limits screen displays.
- Specify the fields on Create Limits screen.For more information on fields, refer to the field description table.
Note:
The fields marked as Required are mandatory.Table 2-33 Create Limits - Field Description
Field Name Description Structure Description Specify the description for the limits structure being created. Limit Type Select the type of limit to map with the entity.
The available options are:- Advance Payment
- Assignment
- Concentrate
- Credit Cover
- Finance
- Invoice
- Main
- Recourse
- Non-Recourse
- Committed
- Uncommitted
Entity Select the entity for which limits should be set.
The available options are:- Buyer
- Import Factor
- Insurance Company
- Pool
- Product
- Program
- Supplier
Buyer Click the search icon to select the buyer for whom the limit needs to be defined. Import Factor Click the search icon to select the import factor for whom the limit needs to be defined. Insurance Company Click the search icon to select the insurance company for whom the limit needs to be defined. Pool Id Click the search icon to select the pool id for whom the limit needs to be defined. Pool Description Specify the description for the pool id selected. Product Click the search icon to select the product for whom the limit needs to be defined. Program Click the search icon to select the program for whom the limit needs to be defined. Supplier Click the search icon to select the supplier for whom the limit needs to be defined. - Click Add to add the selected entity to the structure
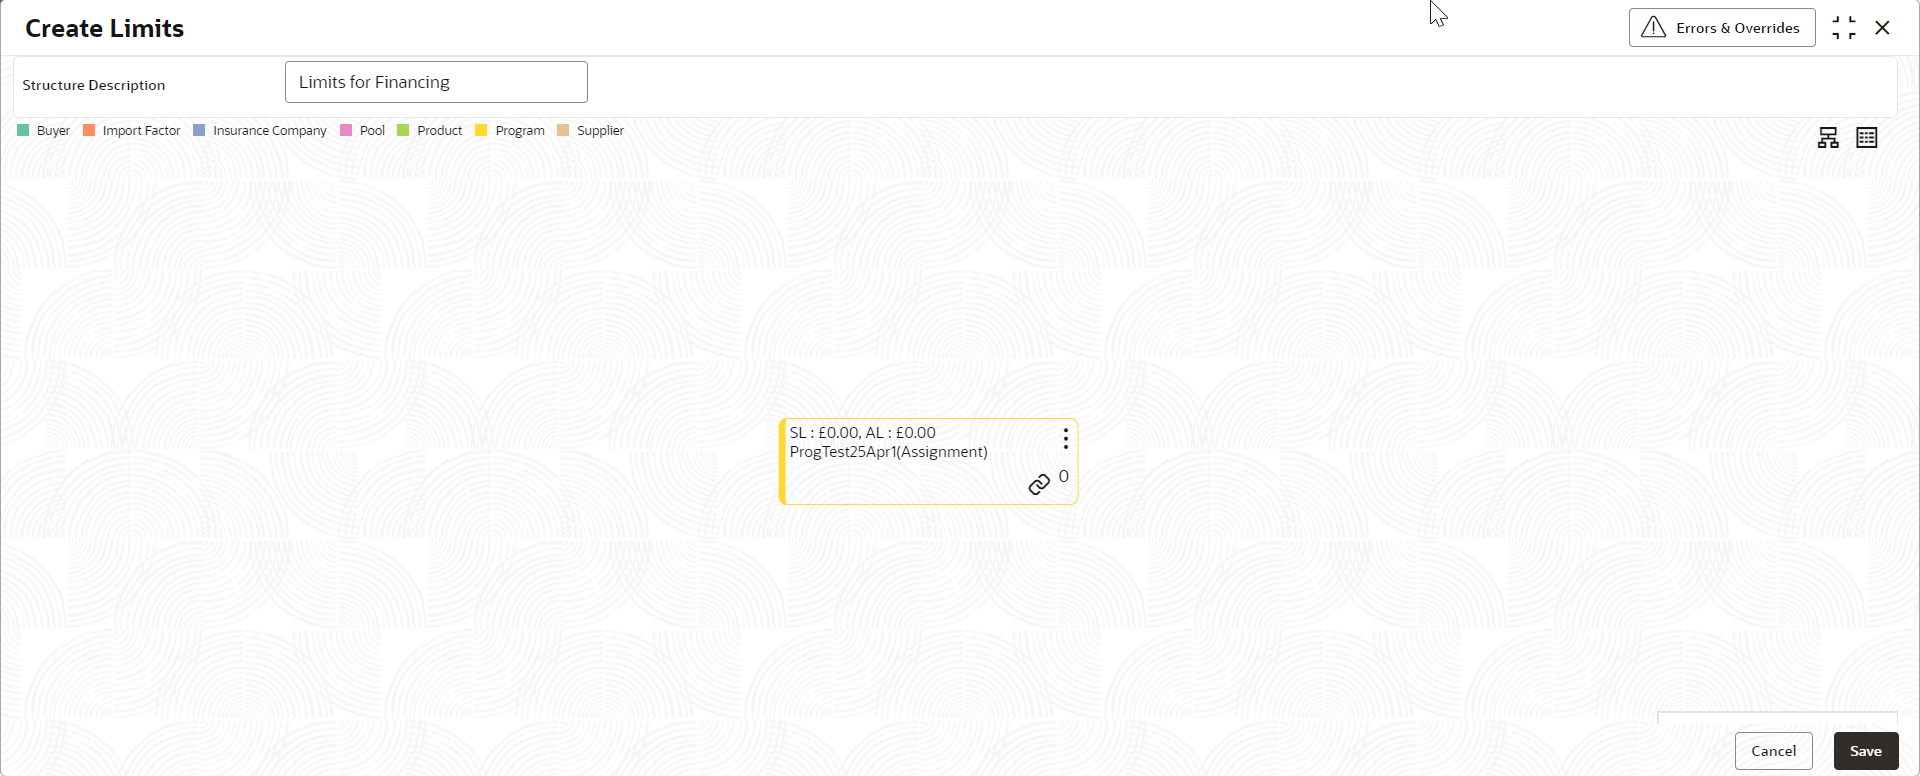
pane.A tile or a node for the entity is created in the structure pane.
Figure 2-56 Entity added to Structure Pane
- Click the
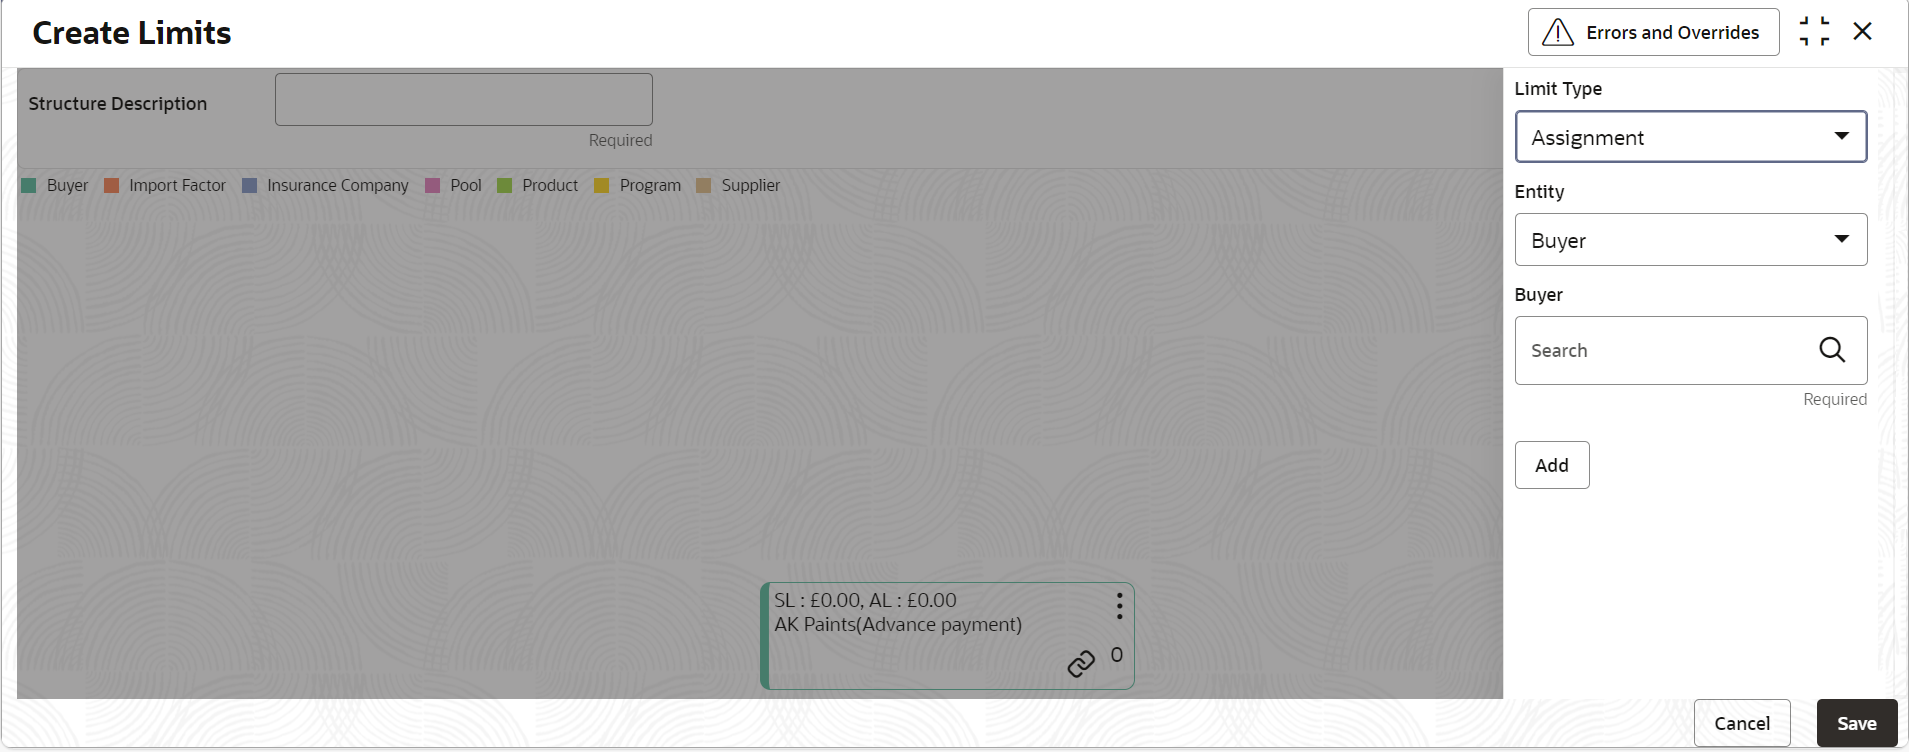
 icon in the main node to create a child node.An overlay window displays. Select the limit type, entity and the entity details to add a child node under the main node.
Figure 2-57 Create Limits - Child Node Overlay
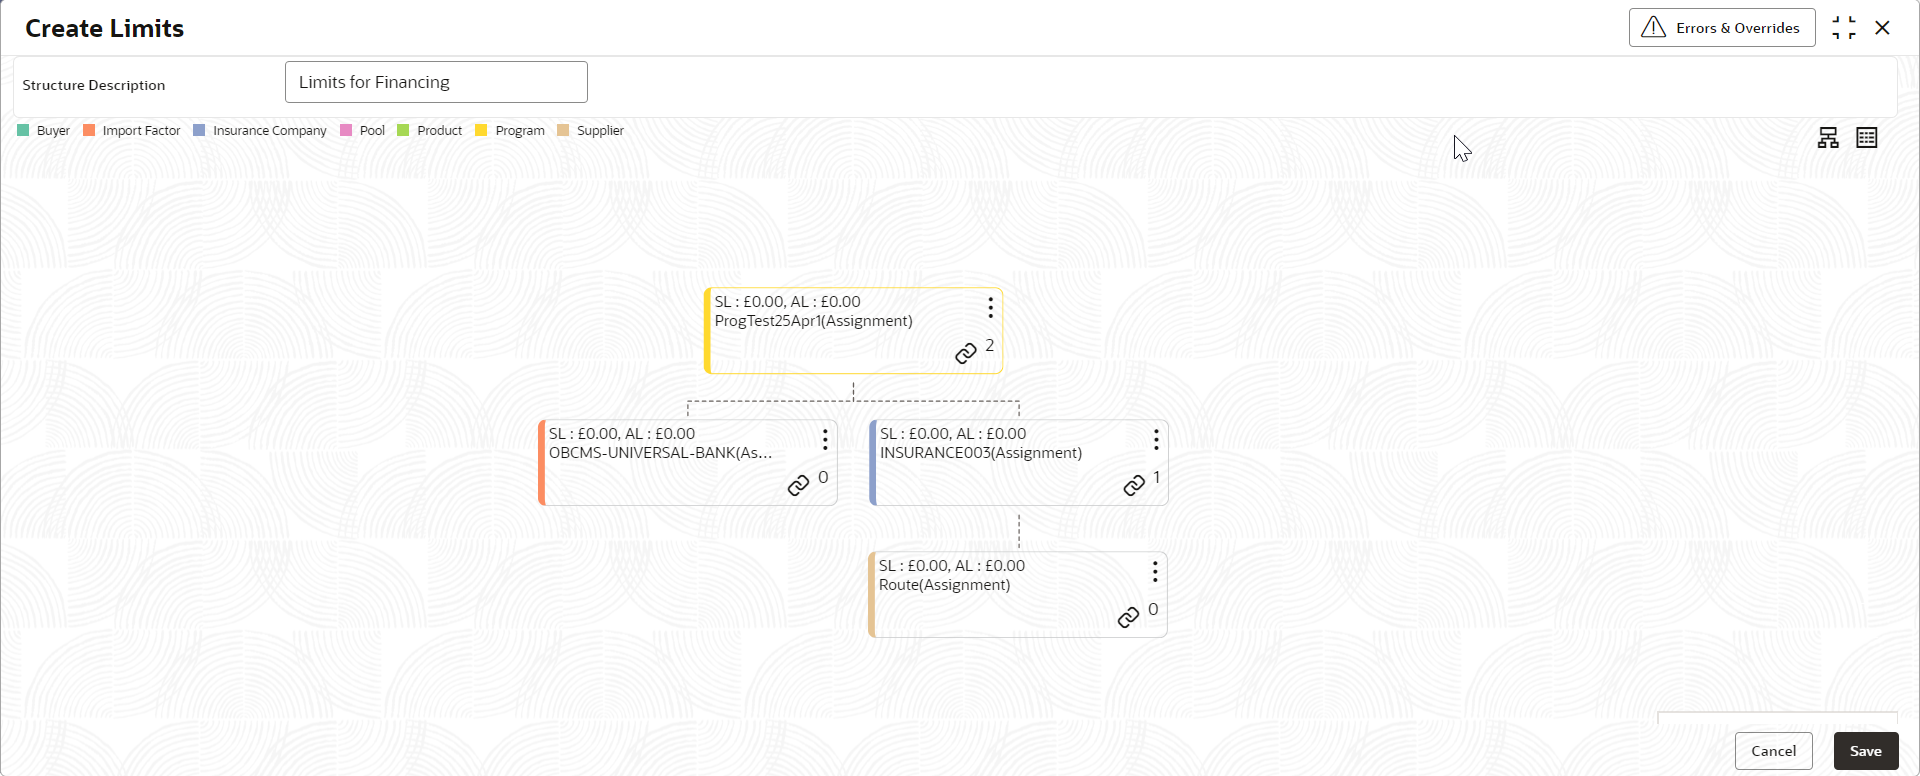
- Repeat the above step to create the entire limits structure. The number of
immediate child nodes of a parent node appears in the tile of that parent
node.
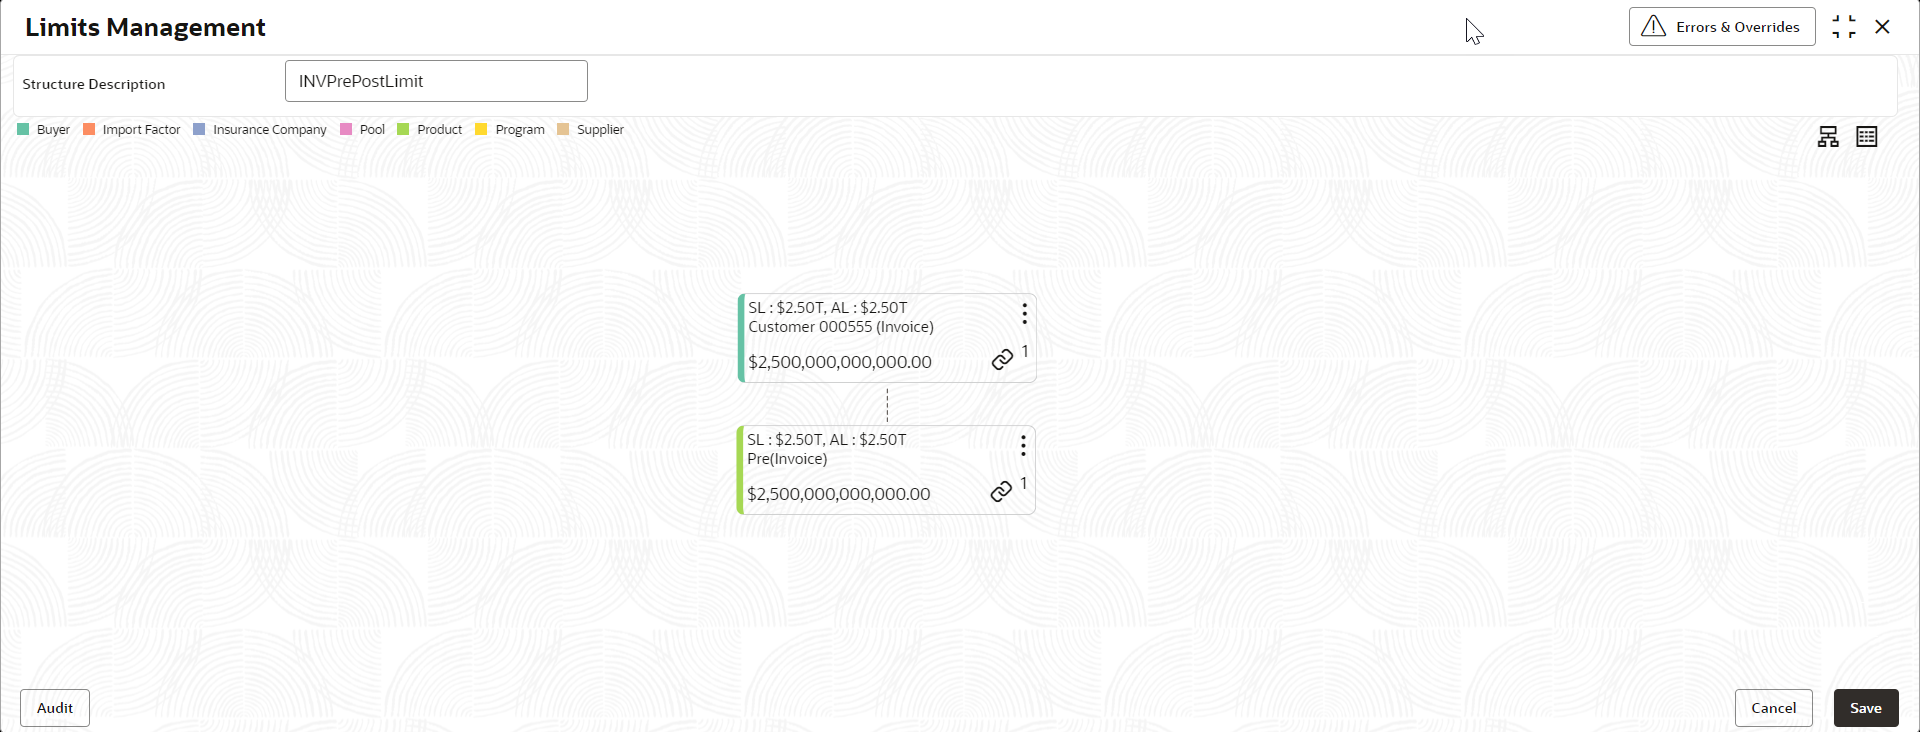
Figure 2-58 Child Node added to main entity in the Structure pane
- Click the Tree View icon to view the limits structure in a hierarchical format.
- Click the Table View icon to view the limits structure in a tabular format.
- Use the mini navigation window in the bottom right corner to pan across the limits structure.
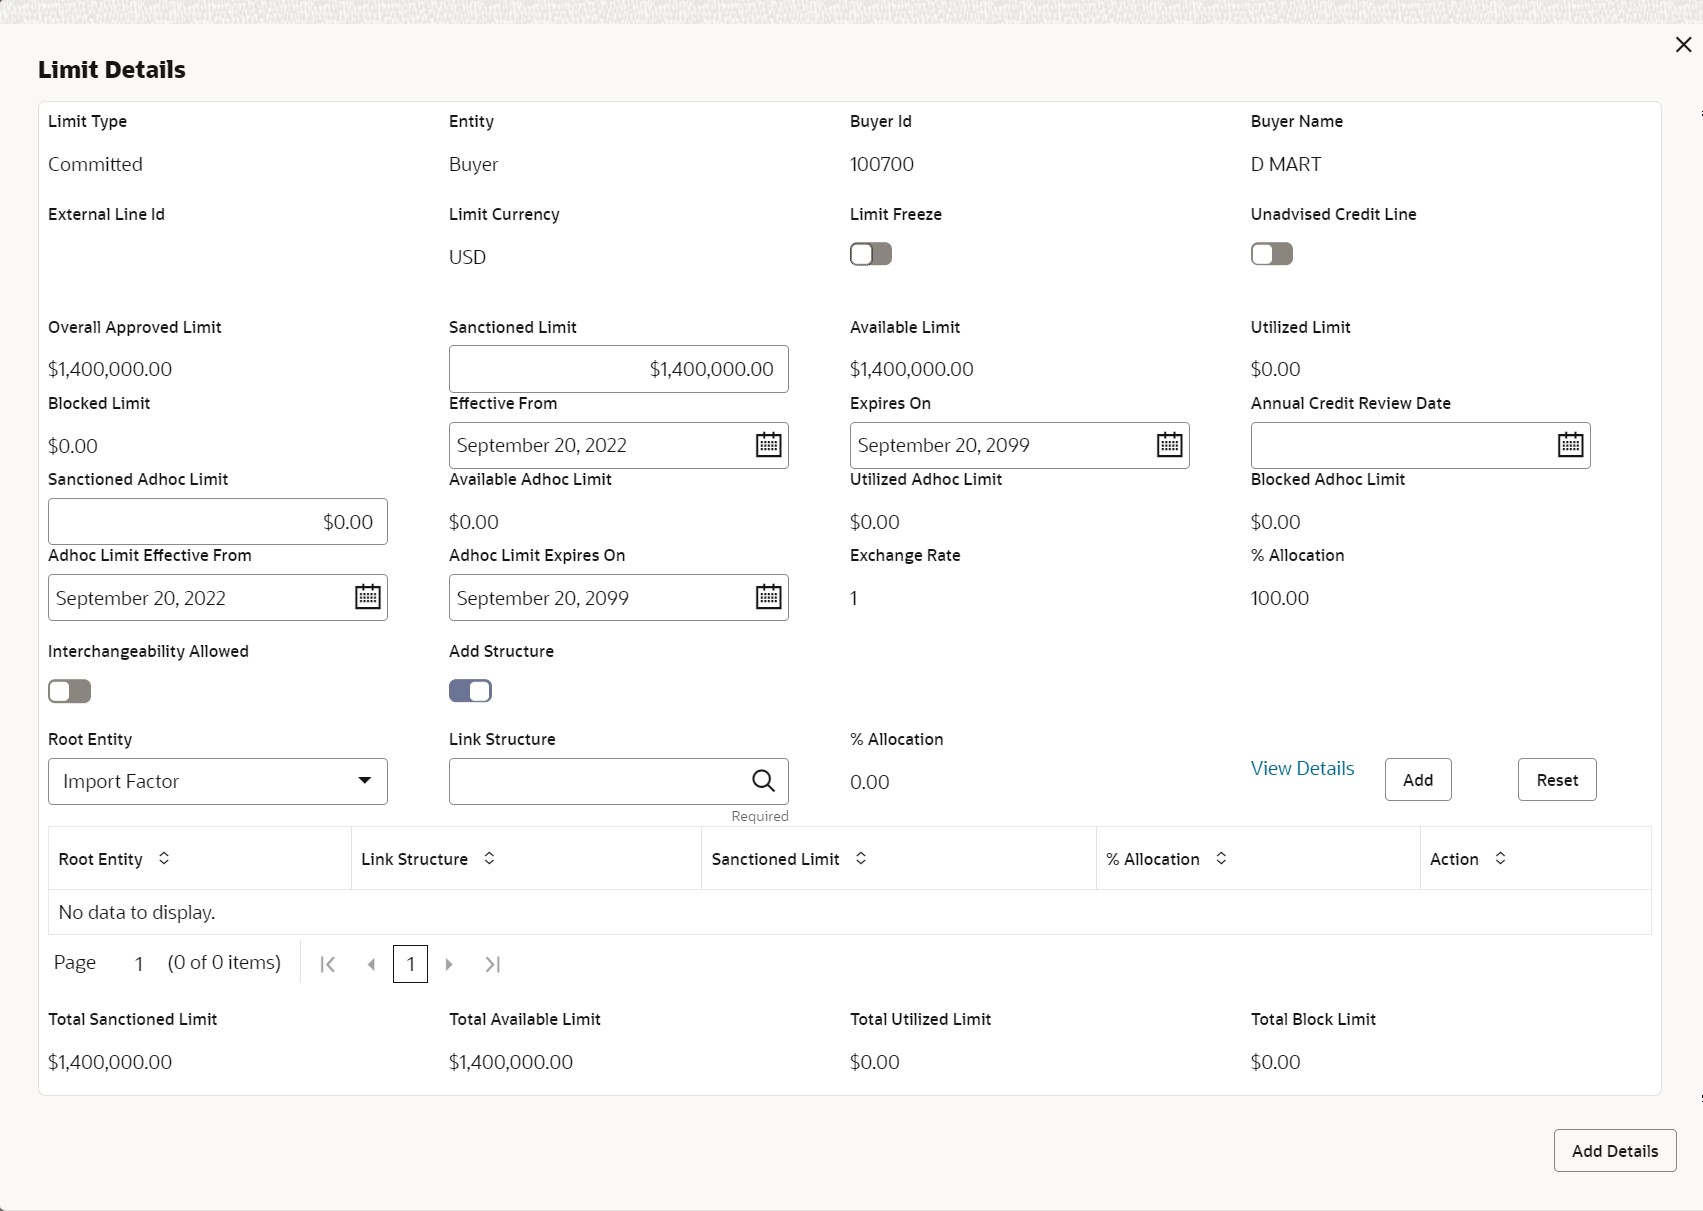
- To define the limit parameters for a particular node/entity, click
Options and click Edit.The Limit Details screen for the selected entity node displays.
- Specify the fields on Create Limits screen.For more information on fields, refer to the field description table.
Note:
The fields marked as Required are mandatory.Table 2-34 Limit Details - Field Description
Field Name Description Limit Type Displays the type of limit selected. Entity Displays the entity for which the limit is being defined. Entity Id / Code Displays the unique ID or code of the selected entity. Entity Name Displays the name of the selected entity. External Line Id Click the search icon to select the limit line ID in case the limits are to be retrieved from an external system. The sanctioned limit is fetched from the external system and populated in Sanctioned Limit, which then cannot be edited. Limit Currency Select the currency in which the limits are to be defined. Limit Freeze Switch this toggle ON to stop all limit-booking transactions in which the entity is involved, with respect to the limit structure. The transactions can be finance disbursement for invoices, purchase orders, or debit notes.
Releasing of limits are however not affected by this toggle. Therefore, transactions such as settlements, continue to be processed even if this toggle is switched ON.
Add Policy Switch this toggle ON to link an insurance policy to the entity.
This toggle appears only for a Buyer or Supplier entity type, when the main node is Insurance Company.
Link Policy Click the search icon to select the required insurance policy to link. This field is displayed only if the Add Policy toggle is enabled.
Policy Allocation Amount Specify the amount to be allocated from the policy. By default, the actual policy amount is displayed. This field is displayed only if the Add Policy toggle is enabled.
Add Click this button to add the selected policy to the grid. Reset Click this button to clear the selected values in the fields. Overall Approved Limit Displays the overall approved limit for the selected entity. Sanctioned Limit Specify the limit amount to be allotted to the entity for the selected limit type.
If an external limits system is linked, this field displays the limit value fetched from the system and the field becomes non-editable.
Available Limit Displays the limit amount that is available to the entity. Utilized Limit Displays the limit amount that has been utilized. Blocked Limit Displays the limit amount that has been blocked or reserved for in progress transactions. Effective From Click the calendar icon and select the date from when the limit is effective. Expires On Click the calendar icon and select the date when the limit expires. Adhoc Limit Specify the adhoc amount to be allotted if the available limit falls short of the required amount for a specific transaction. Available Adhoc Limit Displays the adhoc limit that is available to the entity. Utilized Adhoc Limit Displays the adhoc limit amount that has been utilized. Blocked Adhoc Limit Displays the adhoc limit amount that has been blocked or reserved for in progress transactions. Adhoc Limit Effective Date Click the calendar icon and select the date from when the adhoc limit is effective. Adhoc Limit Expiry Date Click the calendar icon and select the date when the adhoc limit expires. Exchange Rate Displays the exchange rate between the parent entity’s limit currency and the child entity’s limit currency. Interchangeability Allowed Switch this toggle ON to set the sanctioned limit of each child entity to the same value as that of the parent entity.
If this toggle is switched off, then the sum of sanctioned limits of all child entities cannot exceed (must be less than or equal) that of the parent entity.
Add Structure Switch the toggle ON to link an existing limit structure to the entity. This linking can only be done for Buyer or Supplier entity types. This feature is used for linking the insurance or import factor limits to the buyer/supplier. Root Entity Select the root entity to be added.
This field is displayed only if Add Structure toggle is enabled.
Link Structure Click the search icon to select the required structure to link.
This field is displayed only if Add Structure toggle is enabled.
% Allocation Displays the allocated limit percentage for the entity. This field displays the following value: (Sanctioned Limit + Adhoc Limit)/Total Sanctioned Limit.
This field is displayed only if Add Structure toggle is enabled.
View Details Click this hyperlink to view the details of the linked structure.
This field is displayed only if Add Structure toggle is enabled.
Add Click this button to add the limit structure to the grid.
This field is displayed only if Add Structure toggle is enabled.
Reset Click this button to clear the selected values.
This field is displayed only if Add Structure toggle is enabled.
Total Sanctioned Limit Displays the total sanctioned limit.
This field is displayed only if Add Structure toggle is enabled.
Total Available Limit Displays the total available limit.
This field is displayed only if Add Structure toggle is enabled.
Total Utilized Limit Displays the total utilized limit.
This field is displayed only if Add Structure toggle is enabled.
Total Block Limit Displays the total blocked limit.
This field is displayed only if Add Structure toggle is enabled.
Add Earmark Limits Switch this toggle ON to block the limits for the child node under the parent node's limit. By default, this switch is OFF.
This toggle switch is displayed only in the Create Limits screen of the child nodes, if the following conditions are satisfied.- Entity of the parent node is selected as Supplier, and the child node is selected as Buyer.
- External Line Id is selected for the parent node.
Earmark Limit Specify the limit to be earmarked for the child node within the approved limit of the parent node.
This field is displayed only if Add Earmark Limits toggle switch is enabled.
Earmark Available Limit Displays the earmarked limit currently available.
This field is displayed only if Add Earmark Limits toggle switch is enabled.
Earmark Effective From Click the calendar icon and select the date from when the earmarked limit is effective.
This field is displayed only if Add Earmark Limits toggle switch is enabled.
Earmark Expires On Click the calendar icon and select the date when the earmarked limit expires.
This field is displayed only if Add Earmark Limits toggle switch is enabled.
Earmark Reference No. Displays the reference number of the earmarked limit fetched from the external system.
This field is displayed only if Add Earmark Limits toggle switch is enabled.
- Click Add Details to save the limit details for the
entity.The sum of the sanctioned and adhoc limits appears in the node tile.
Figure 2-60 Post Addition of Limit Details
Note:
If the Limits Freeze toggle is enabled for a specific node, then it is displayed in the node tile. - Perform the following steps to take action on the entity nodes.
- Click Options in any node and click Edit to modify the limit details, if required.
- Click Options in the main entity node and click Delete Hierarchy to delete all the nodes created.
- Click Options in the child entity node and click Delete to delete the particular node.
- Click Save to save the record and send it for authorization.
Parent topic: Limits Structure Maintenance

