2.12.1 Create Data File Definitions
This topic describes the systematic procedure for creating the data file definitions. The system uses the Data Files definitions screen to outline the file layouts of each data file produced within the system, including the length and data type of each column name.
This allow the user to configure data files.
- From Home screen, click Retail Lending. Under Retail Lending, click Maintenance.
- Under Maintenance, click Data File
Definitions, then click Create Data File
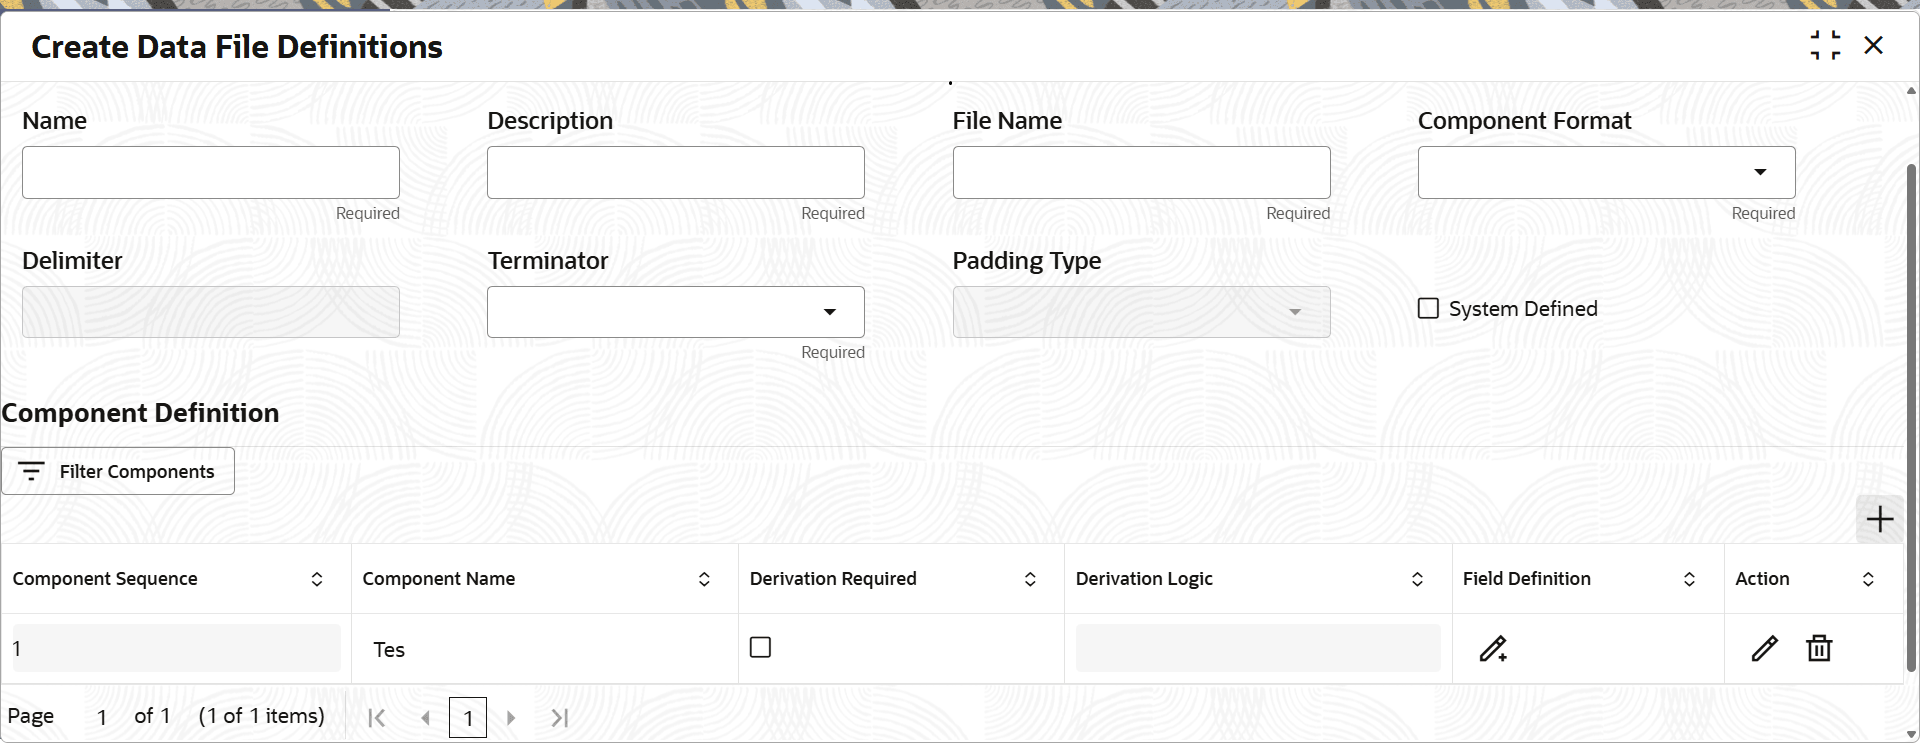
Definitions.The Create Data File Definitions screen is displayed.
- Specify the fields on Create Data File Definitions
screen.For more information on fields, refer to the field description table.
Note:
The fields marked as Required are mandatory.Table 2-70 Create Data File Definitions - Field Description
Field Description Name Name of data file definition Description Data file description File Name Specify data file name. Prefix used for files generated for this Data File. This is the only field on the Data File Definitions screen that can or should be modified by your Administrator. Note: The generated file name will be in the form of <FILE NAME>_<BRANCH ID>_<PROCESS DATE FORMAT>_<PROCESS ID>.DAT.The inclusion of<BRANCH ID> depends entirely on the associated batch process.
Component Format Select the format of output data (FIXED, VARIABLE and FIXEDDELIMITED) from the drop-down list. The available options are:- FIXED - For files with a FIXED type, no line terminator is added. Instead, the lines are padded with empty spaces to ensure a fixed length, as specified in the configuration. This guarantees that each line conforms to the required length without any additional line-ending characters.
- VARIABLE - For files with a VARIABLE type, a line terminator is appended at the end of each line. The specific terminator—CRLF, LF, or CR—is determined based on the configuration settings.
- FIXEDDELIMITED - For files with a FIXEDDELIMITED type, at first the lines are padded with empty spaces to ensure a fixed length, as specified in the configuration. A line terminator is appended at the end of each line.
Delimiter Specify the delimiter (column separator used with VARIABLE format). Terminator Select the Terminator from the drop-down list. The available options are:- UNDEFINED
- CARRIAGE RETURN
- LINE FEED
- CARRIAGE RETURN AND LINE FEED
Note: This is not applicable for FIXED of the Component Format.
Padding Type Select the padding type from the drop-down list. The available options are:- Right
- Left
Note: This is applicable only for FIXED and FIXEDDELIMITED of the Component Format.
System Defined Select the checkbox if user wish to maintain the data file definition as system defined. System defined entries cannot be modified. If the entry is not system defined, then it can be modified.
Component Definition This section provides the definition for multiple Component types available in a data file. Component Sequence Sequence in which the Component processed in file. Component Name Name of the Component. Derivation Required This will indicate if the Component is a derived value or a direct value from the selected field. Derivation Logic User can derive the Component, if it's not a direct. Field Definition Define Field Description. Action Displays the action. The user can edit or delete. - Click on the Field Definition icon to provide the
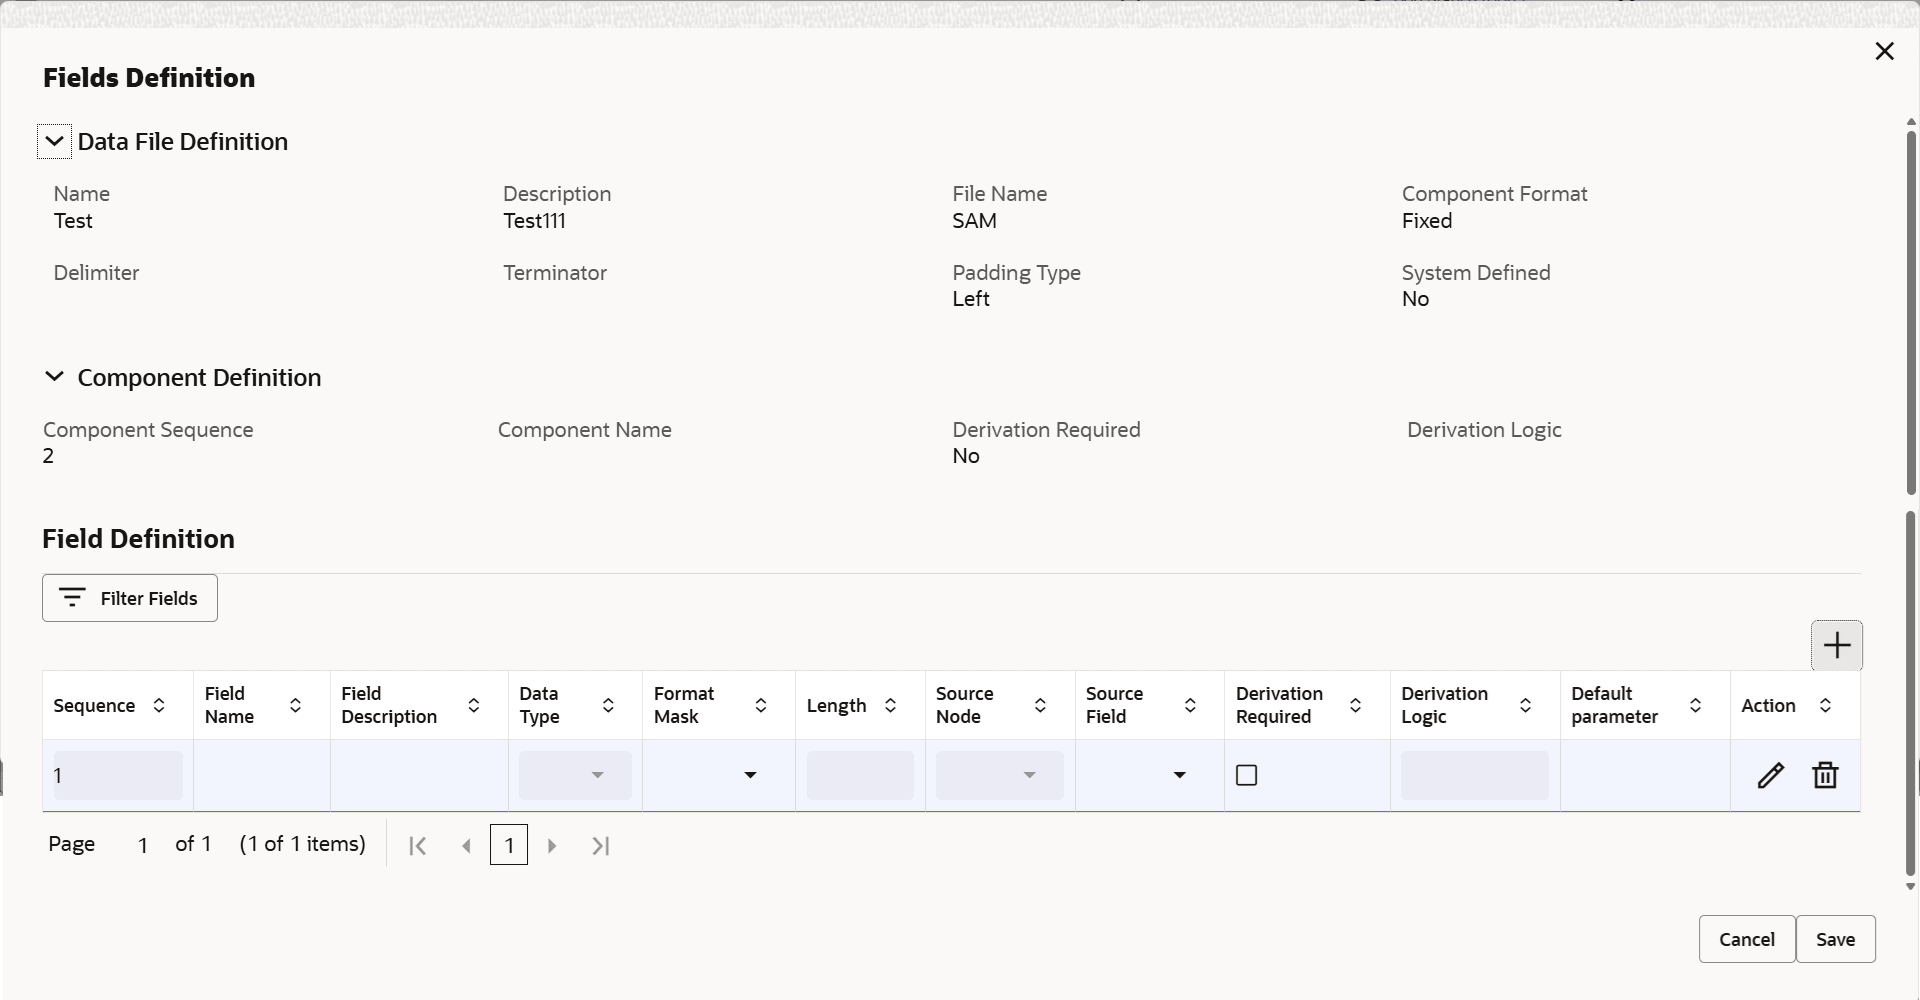
definition for the list of fields under each Component type.The Field Definition screen is displayed .
The Field Definitions is a the child section for Component Definitions and and consist of the following fields. This section provides the definition for the list of fields under each Component type, with Length of the field and Format mask.
- Click on the + icon, and enter details in the Field
Definitions section.
Figure 2-75 Create Data File Definitions - Field Definition
For more information on fields, refer to the field description table.Note:
The fields marked as Required are mandatory.Table 2-71 Field Definitions- Field Description
Field Description Field Name Define Field Name. Field Description Define Field Description. Data Type This is the Data type (CHARACTER, DATE, NUMBER and INTEGER) of the field. Format Mask Create a New Lookup for Format Mask and use the Sub code to filter out the applicable format masks for the data type. The options are:- Data Type
- CHARACTER - Not Applicable
- DATE - Following list of format
Masks
- YYMMDD
- HH24MI
- YYYYDDDD
- YYDDD
- DDD
- MM/DD/YYYY
- MM/DD/YYYY HH24:MI:SS
- YYYYMMDDHH24MI
- YYYYMMDD
- MMDDYY
- CCYYMMDD
- YYYY
- MM/YYYY
- NUMBER: Following list of formats
Masks
- ZERO FILL 2 DIGITS
- ZERO FILL 4 DIGITS
- ZERO FILL 3 DIGITS
- ZERO FILL 5 DIGITS
- ZERO FILL 6 DIGITS
- ZERO FILL 7 DIGITS
- ZERO FILL 8 DIGITS
- ZERO FILL 9 DIGITS
- ZERO FILL 10 DIGITS
- ZERO FILL 12 DIGITS
- (9, 2) 999999999.90
- (10, 2) 9999999999.99
- (4, 6) 9999.999990
- (4,4) 9999.9990
- BLANK FILL 10 DIGITS
- (AMT 5,2) $99,999.90
- (AMT 7,2) $9,999,999.90
- (AMT 8,2) $99,999,999.90
- INTEGER: Following list of formats
Masks
- ZERO FILL 1 DIGIT
Length The field Length. Source Node The Source Node from which the source field gets selected. Source Field The Source Field. There should be an "NOT APPLICABLE" option should available if there is no Source field associated. Derivation Required Indicate if the field is a derived value or a direct value from the selected field. Derivation Logic It derive the field value, if it's not a direct value. - Click Save to save the details. The Create Data File Definitions screen is displayed.
- Click on the + icon, and enter details in the Field
Definitions section.
- Click Save to save the details.The Data File Definitions is successfully created and can be viewed using the View Data File Definitions screen.
Parent topic: Data Files Definitions

