2.2 Quick Assessment
This topic describes the systematic instructions of Quick Assessment.
To enable a Quick Assessmentprocess, select the Quick Assessment toggle in the Business Product Details data segment of the Business Product Configuration screen.
The applicants information that were captured during loan simulation will be carry forwarded in the quick assessment as part of same loan simulation ID. User has to capture only the additional set of fields during Quick Assessment.
- In Loan Simulation screen, Click Quick Assessment.
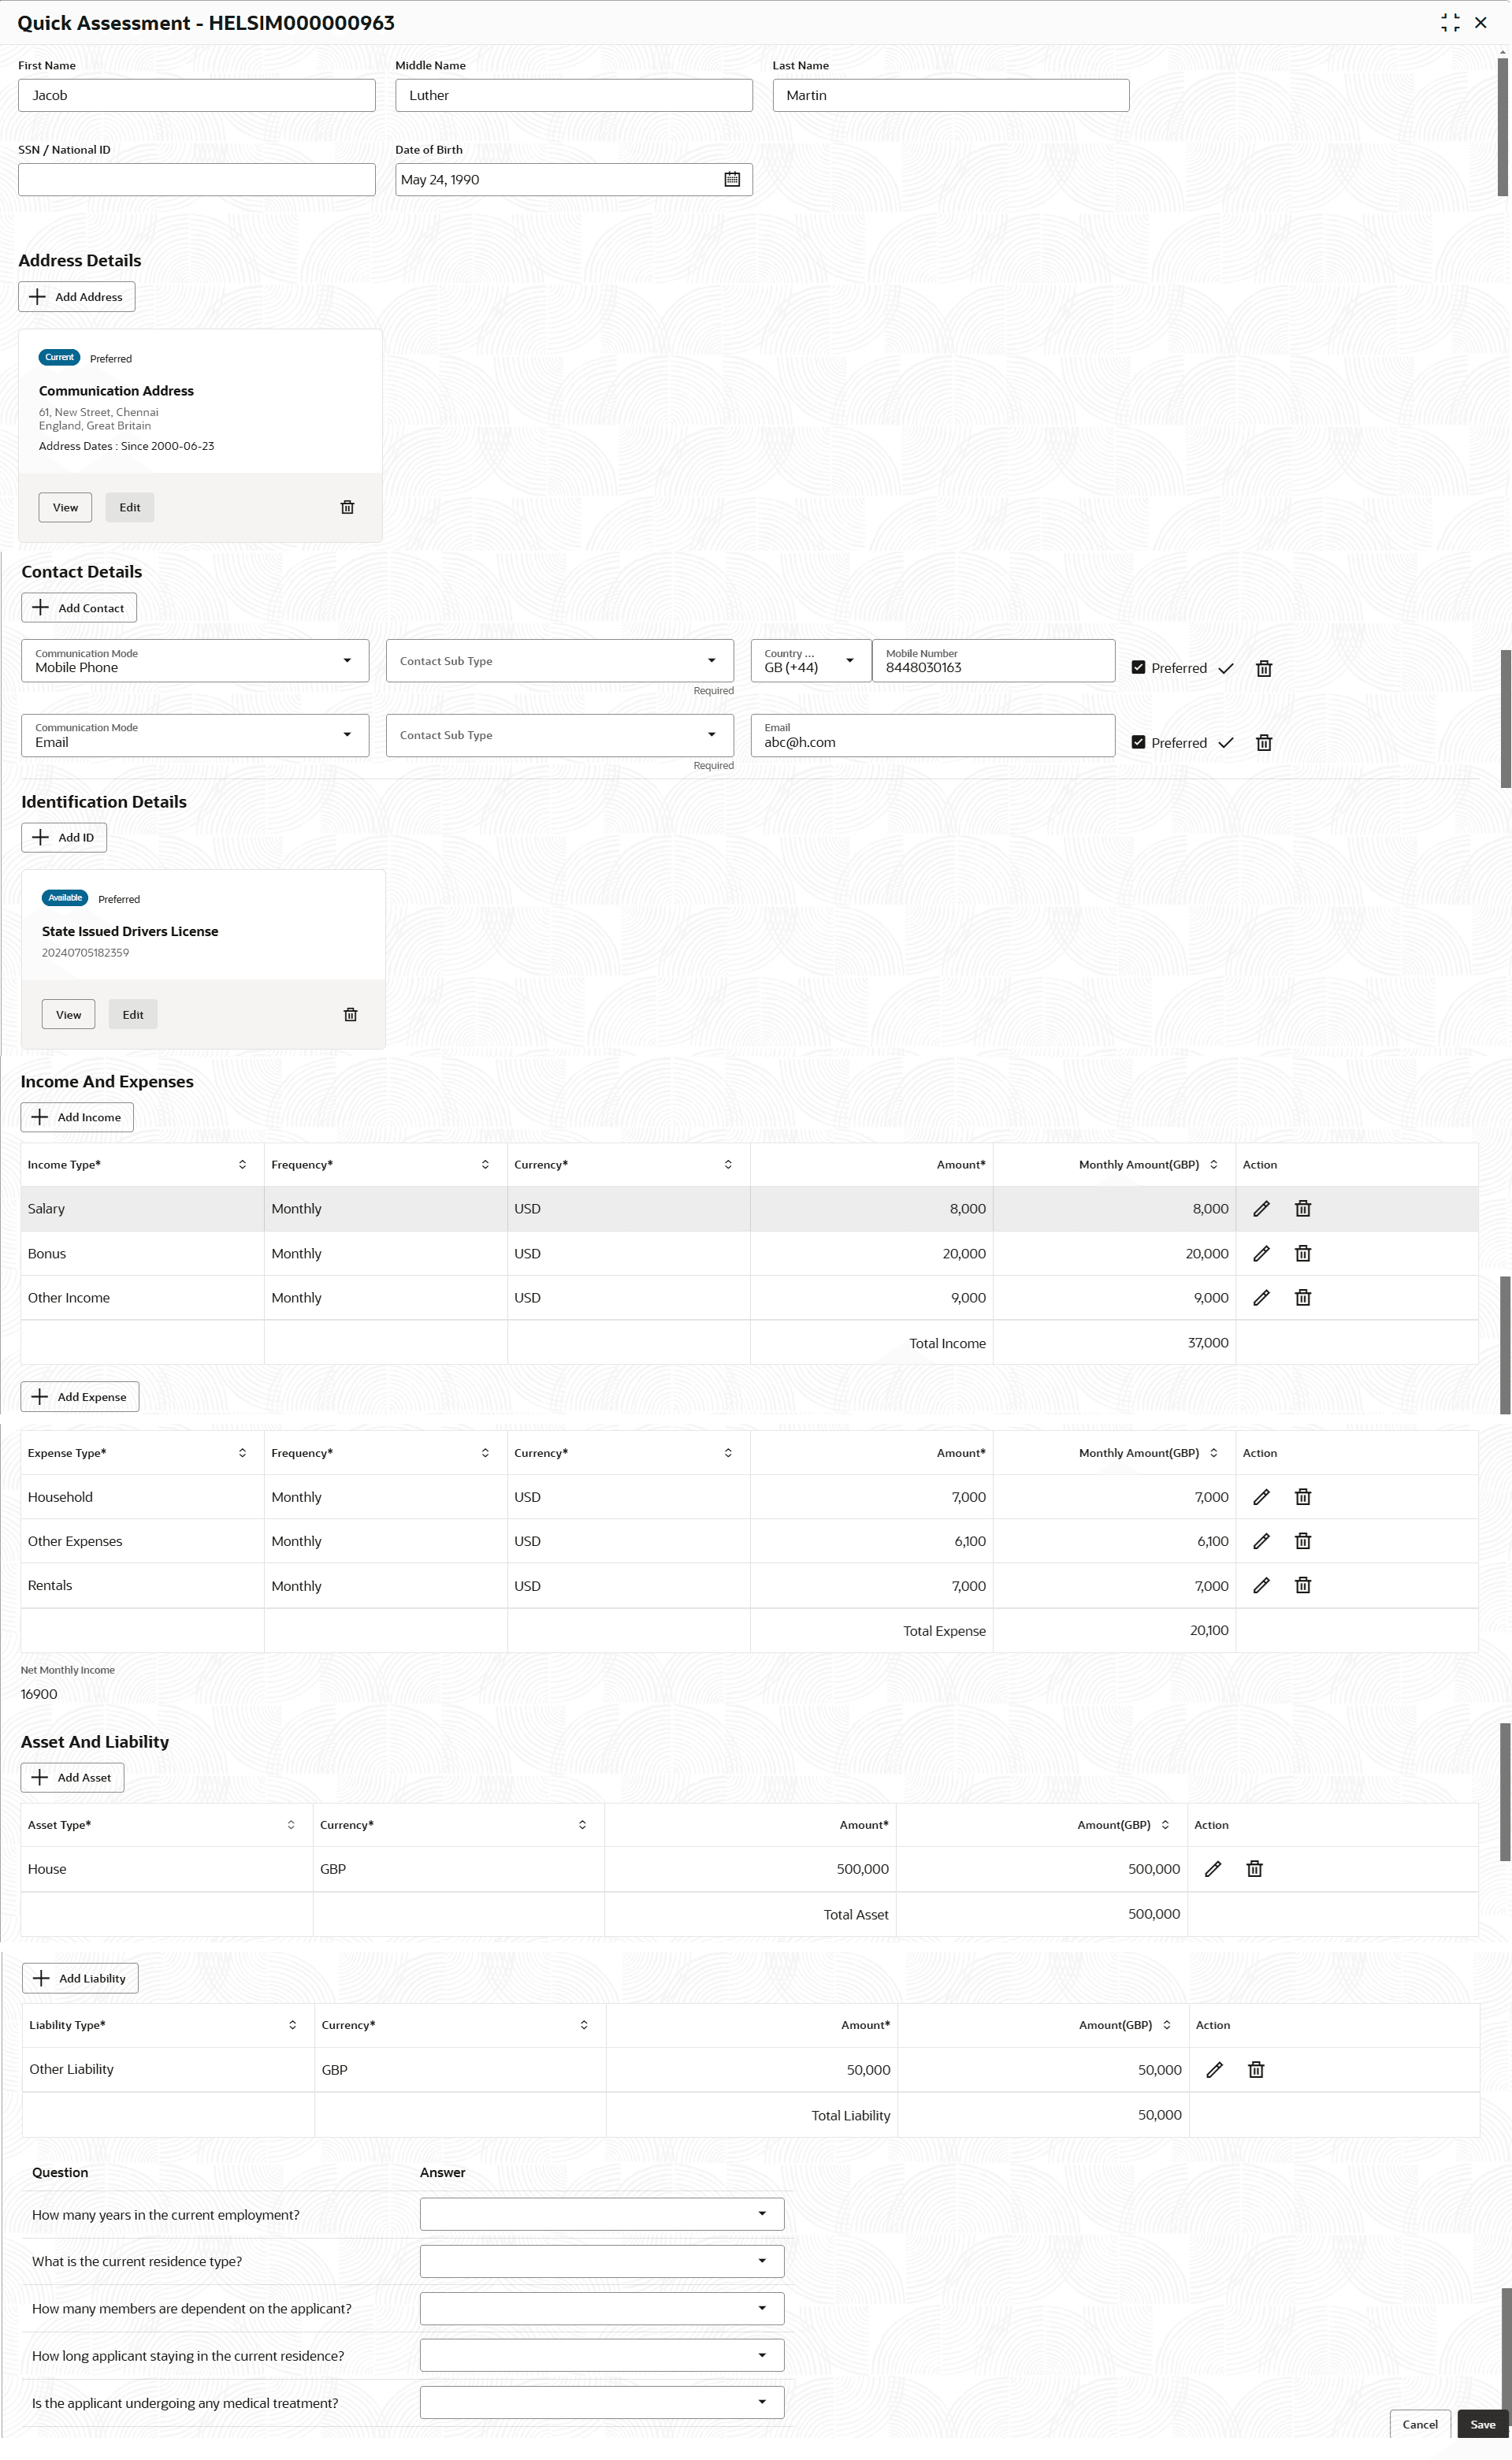
The Quick Assessment Screen displays.
- Specify the relevant details in data fields. The fields which are marked as Required are mandatory. For more information on fields, refer to the field description table below:For more information on the fields, refer to the field description table below:
Table 2-4 Quick Assessment
Field Description First Name Specify the first name of the applicant. Middle Name Specify the middle name of the applicant. Last Name Specify the last name of the applicant. SSN/National ID Displays the SSN/National ID of the applicant. Date of Birth Select the date of birth of the applicant. Address Details This section displays the address details of the applicant. Add Details Add the address of the applicant. Address Type Select the address type from the drop-down list. The available options are:
- Communication Address
- Residential Address
Location Specify the location of the applicant. Current Address Select the current from the drop-down list. The available options are:- Yes
- No
Preferred Address Select the preferred address. The available options are: - Yes
- No
Address Since Select the date when the applicant began residing at the specified address. Address From Select the date when the applicant began residing at the specified address. This field appears if the No option is selected in the Current Address field.
Address To Select the date when the applicant last lived at the specified address. This field appears if the No option is selected in the Current Address field.
Address Specify the address to search for the already captured address. Based on the configuration, on entering a few letters, the system fetches the related address that is already captured.
Based on the selection, the fields are fetched in the address section.
Address Line 1 Specify the building name. Note: The maximum length is 35 characters.
Address Line 2 Specify the street name. Note: The maximum length is 35 characters.
Address Line 3 Specify the city or town name. Note: The maximum length is 35 characters.
Country Select and search the country code. State / Country Sub Division Specify the state or country sub division. This field appears based on the selected country code. Zip Code/Pin Code Specify the zip or post code of the address. Contact Details This section displays the contact details. Add Contact Add the contact details of the applicant. Communication Mode Select the communication mode from the drop-down list. The available options are:- Mobile Phone
Contact Sub Type Select the contact type from the drop-down list. The available options are:- Residence
- Business
- Mobile
- Others
Mobile Number Specify the mobile number. Preferred Select to indicate if the given record is the preferred one. Action Tab Click delete to delete the contact details. Identification Details This section displays the identification details. Add ID Add the ID details of the applicant. ID Type Select the ID type from the drop-down list. ID Status Select the ID status from the drop-down list. The available options are:- Available
- Applied For
Unique ID Specify the unique identification code of the selected type. Place of Issue Specify the place where the ID is issued to the user. Issue Date Specify the date from which the ID is valid. Expiry Date Specify the date till which the ID is valid. Remarks Specify the remarks. Click the Save button to save the entered ID details.
Preferred ID Select the preferred ID from the drop-down list. The available options are:- Yes
- No
Income and Expenses Displays the total Income and Expenses of the applicant. Add Income Add the income details of the applicant. Add Expense Add the expense details of the applicant. Asset and Liability Displays the total Asset and Liability of the applicant. Add Asset Add the asset details of the applicant. Add Liability Add the liability details of the applicant. Question Displays the question configured for the question code. Answer Select the answer from the drop-down values available. The answers are populated based on the Answers configured in the questionnaire code. Cancel Click Cancel to cancel the application. - Click Save to save the applicant details.
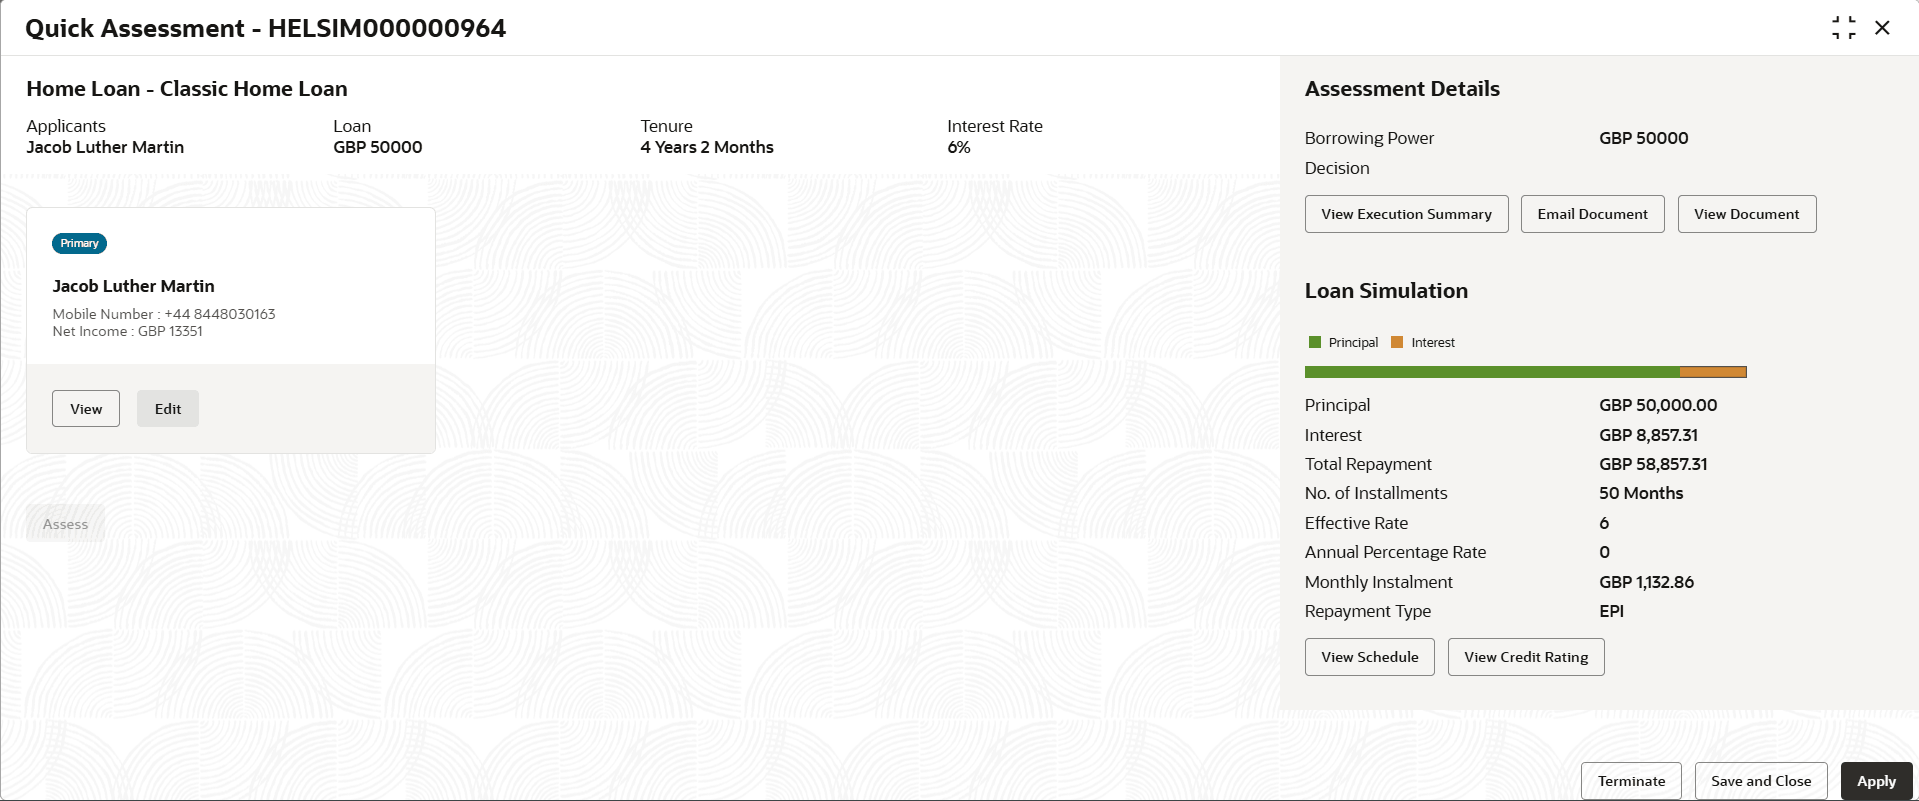
- Click Assess, the following screen displays.
Figure 2-12 Quick Assessment -Applicant Details
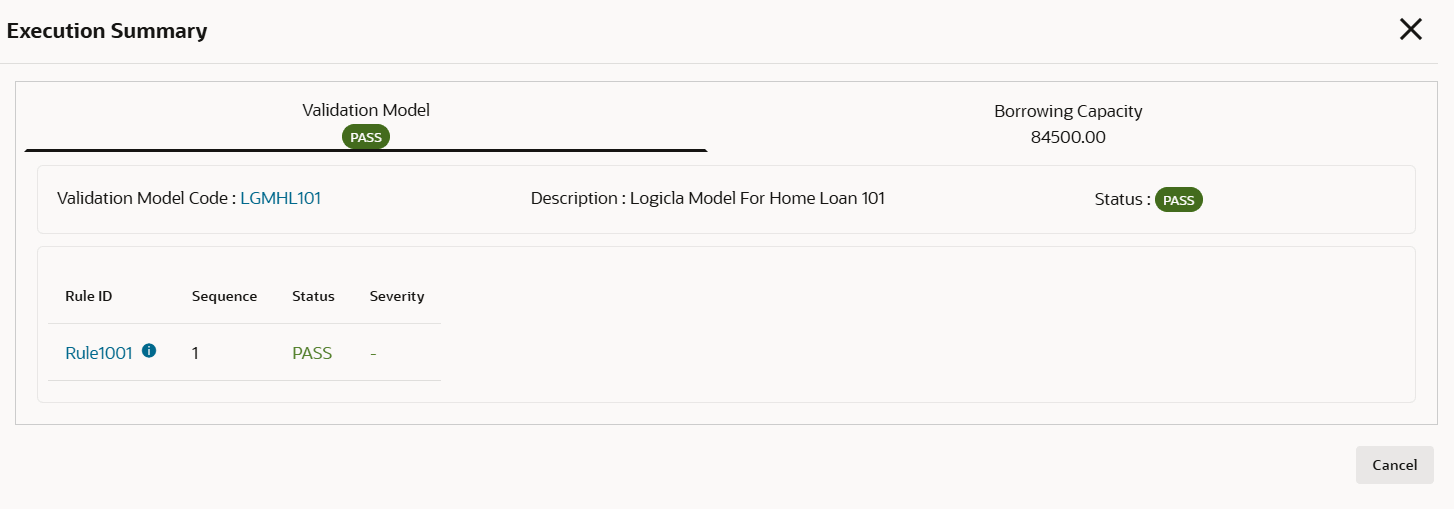
Using validation model, validations such as gender-based or minor-related eligibility checks are performed during Quick Assessment.
- Click View Execution Summary. The summary screen window appears.
The selective PDS components such as Score or Decision or Pricing or All to call Pricing and Decision service can be controlled as per the configuration in the Business product configuration for the loan business product.
- Click Email Document. The pop-up window appears.
- Click Apply, to save the Loan Simulation and Quick Assessment application.
The system automatically expires inactive quick assessments and updates them to Expired status based on the number of inactive days set in the Origination Preference screen. For more information, refer to the Origination Preference topic in the Configuration Guide.
Parent topic: Loan Simulation and Quick Assessment


