2.1 Loan Simulation
This topic describes the systematic instructions to initiate the loan simulation application.
To enable a loan simulation process, select the Loan Simulation toggle in the Business Product Details data segment of the Business Product Configuration screen.
To capture loan simulation applicant process:
- From the Menu, select the Retail Origination. The Retail Origination menu appears.
- From the Retail Origination, select the Loan Simulation. The Loan Simulation page appears.The Loan Simulation screen displays.
- On Loan Simulation screen, specify the required fields.For more information on the fields, refer to the field description table below:
Table 2-1 Loan Simulation
Field Description New Simulation Click to add a new simulation. Simulation ID Displays the simulation ID of older entries. Customer name Displays the customer name. Mobile Number Displays the mobile number of the applicant. SSN/National ID Displays the SSN/National ID of the applicant. Status Displays the loan status of the applicant. Action Click Edit to edit the loan application of the applicant. Click View to view the loan application of the applicant.
- Click on New Simulation to add new applicant.
The New Simulation screen displays.
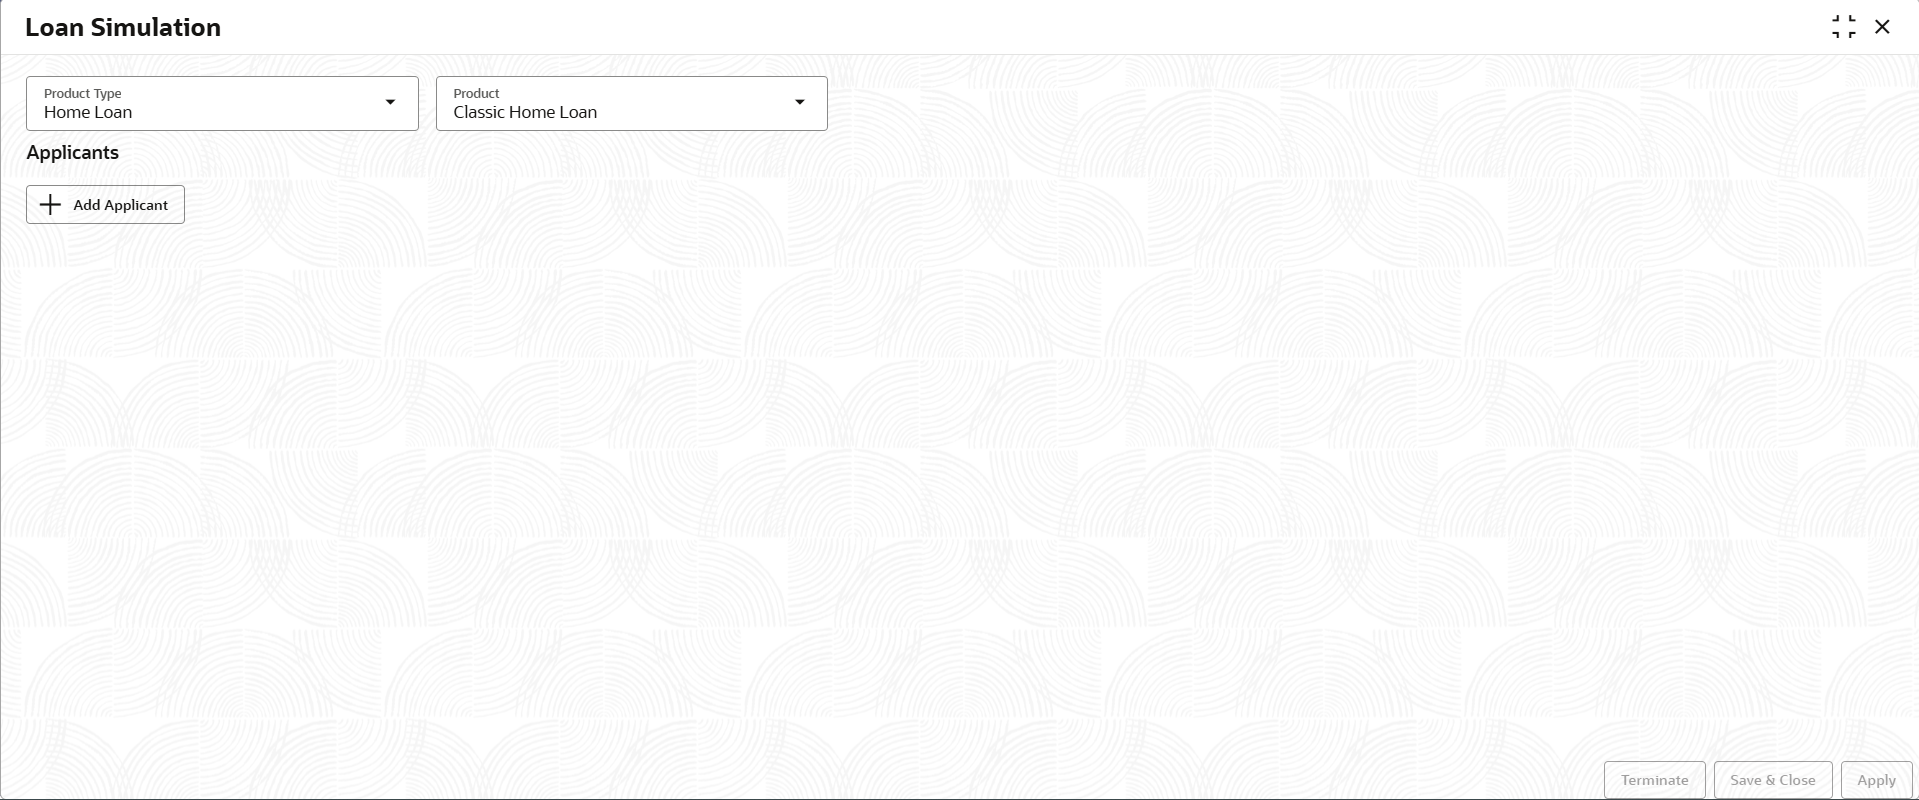
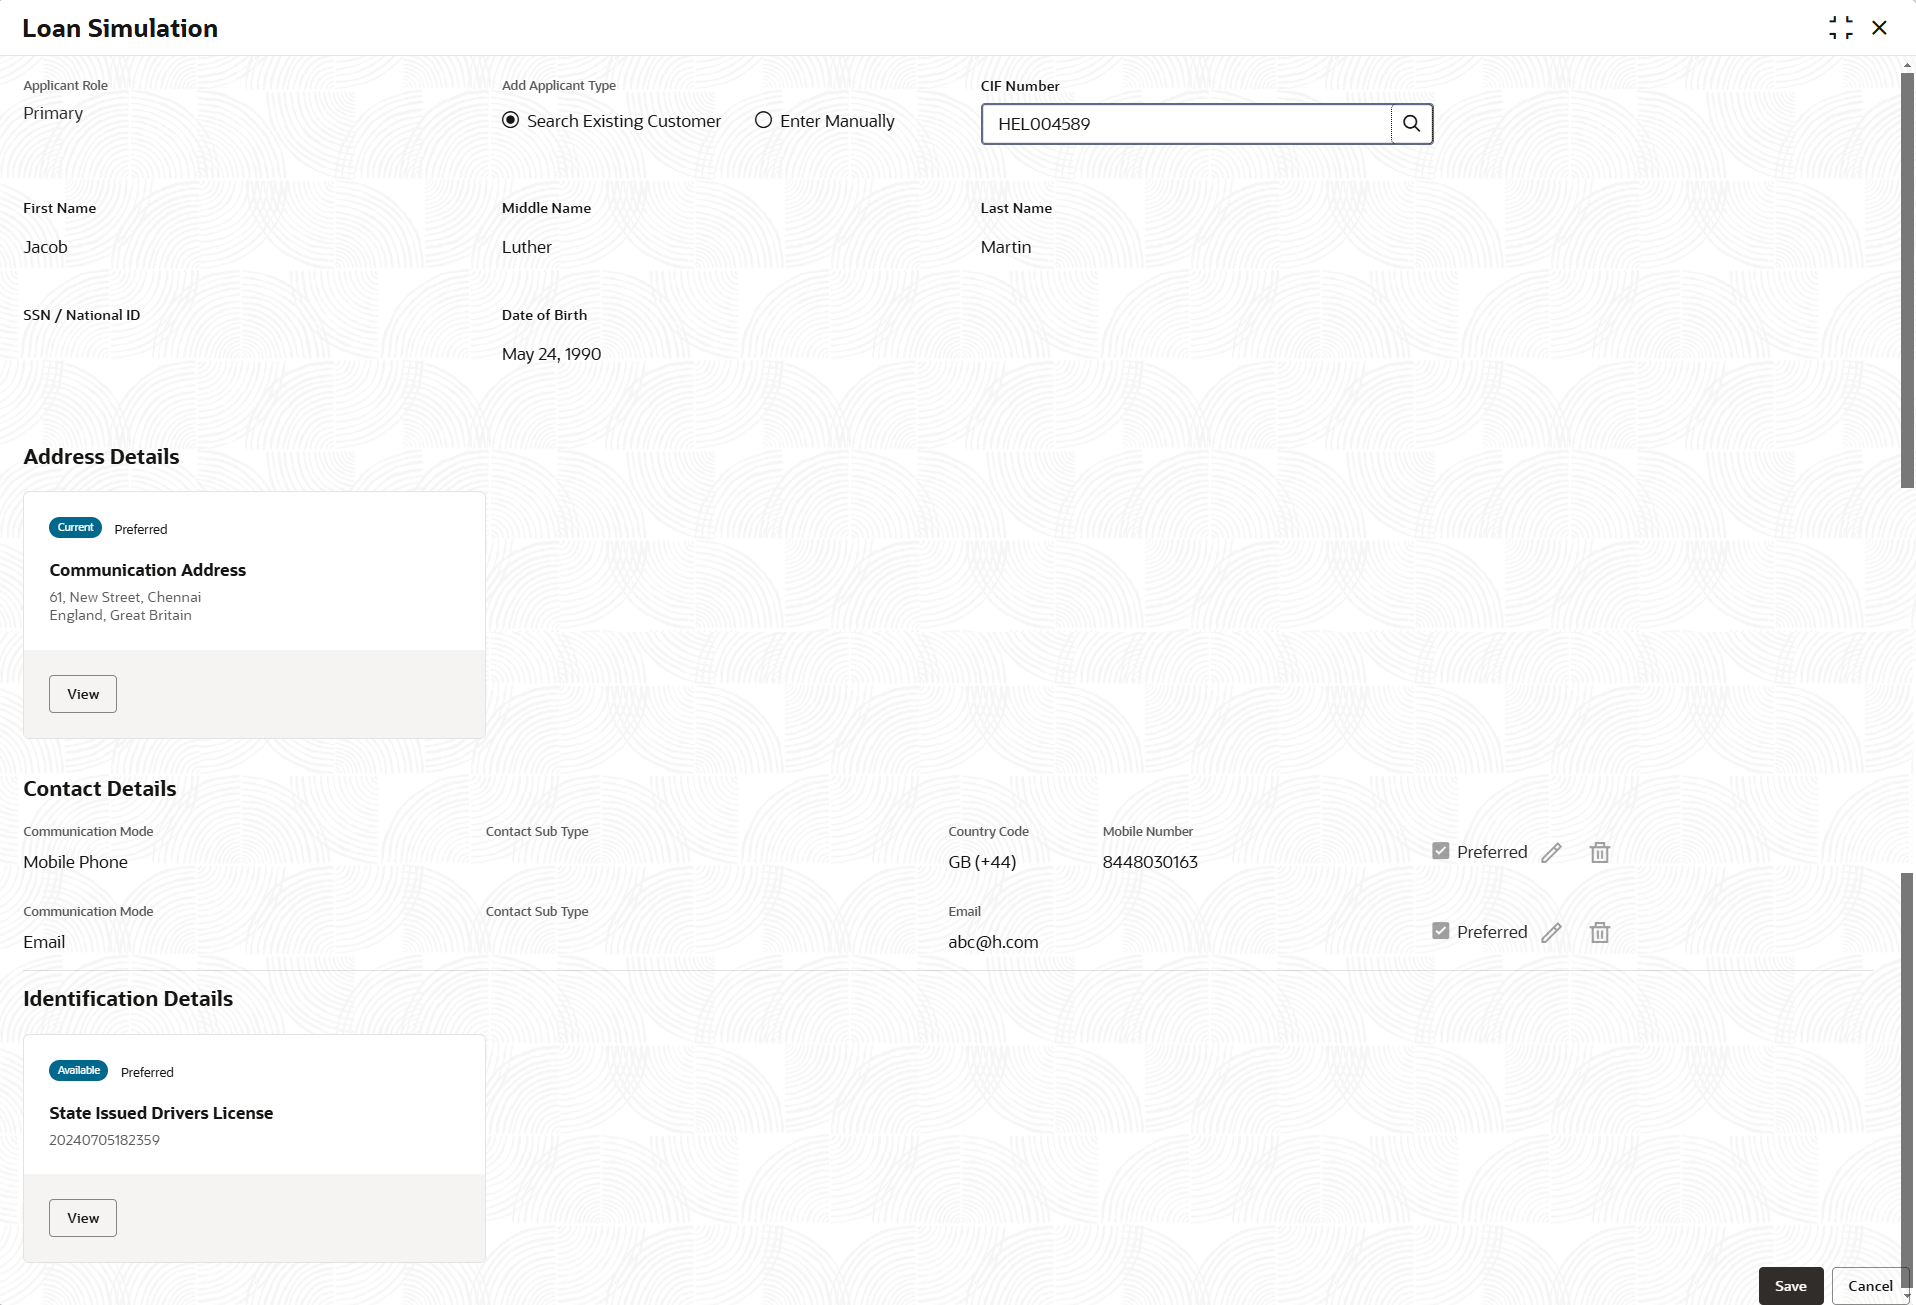
- Click on Add Applicant, to add the applicant details. The following screen displays
Figure 2-3 Loan Simulation - Applicant Details
Table 2-2 Add Applicants
Field Descriptions Product Type Select the product type of the applicant from the drop-down list. The available options are:- Home Loan
- Education Loan
- Personal Loan
- Vehicle Loan
Product Select the product from the drop-down list based on the product type. Add Applicant Click add applicant to add the new applicant. Applicant Role Displays the applicant role. The available options are:- Primary
- Joint
Add Applicant By Select the mode from which the user need to add new applicant. The available options are:- Search Existing Customer - This option is used if the applicant is an existing customer of the bank. When a customer is selected, their details appear in the corresponding sections.
- Enter Manually- This option allows the user to manually enter all of the applicant's information.
CIF Number Search and select the CIF number. This field appears if the Search Existing Customer option is selected from the Add Applicant By drop down list.
The system verifies whether the selected CIF number is valid or not . If the response is invalid CIF, an error message will indicate that the chosen CIF belongs to an Invalid Customer Status. The account opening process is not initiated by the customer.
First Name Specify the first name of the applicant. Middle Name Specify the middle name of the applicant. Last Name Specify the last name of the applicant. SSN/National ID Specify the SSN/National ID. Date of Birth Select the date of birth of the applicant. Address Details This section displays the address details of the applicant. Add Address Add the address of the applicant. Address Type Select the address type from the drop-down list. The available options are:
- Communication Address
- Residential Address
Location Specify the location of the applicant. Current Address Select the current from the drop-down list. The available options are:- Yes
- No
Preferred Address Select the preferred address. The available options are: - Yes
- No
Address Since Select the date from when you are connected with the given address. Address Till Select the date till when you were connected with the given address. This field appears if the No option is selected in the Current Address field. Address Line 1 Specify the building name. Address Line 2 Specify the street name. Address Line 3 Specify the city or town name. Country Select the country from the drop-down list. State Select the state from the drop-down list. Zip Code/ Pin Code Specify the zip or post code of the address. Contact Details This section displays the contact details. Add Contact Add the contact details of the applicant. Communication Mode Select the communication mode from the drop-down list. The available options are:- Mobile Phone
Contact Sub Type Select the contact type from the drop-down list. The available options are:- Residence
- Business
- Mobile
- Others
Preferred Select to indicate if the given record is the preferred one. Action Click delete to delete the contact details. Identification Details This section displays the identification details. Add ID Add the ID details of the applicant. ID Type Select the ID type from the drop-down list. ID Status Select the ID status from the drop-down list. The available options are:- Available
- Applied For
Unique ID Specify the unique identification code of the selected type. Place of Issue Specify the place where the ID is issued to the user. Issue Date Specify the date from which the ID is valid. Expiry Date Specify the date till which the ID is valid. Remarks Specify the remarks. Click the Save button to save the entered ID details.
Preferred ID Select the preferred ID from the drop-down list. The available options are:- Yes
- No
Save Click save to save the application. Cancel Click cancel to cancel the application. - Click Save to define the loan requirements. The following screen displays
Table 2-3 Loan Requirements
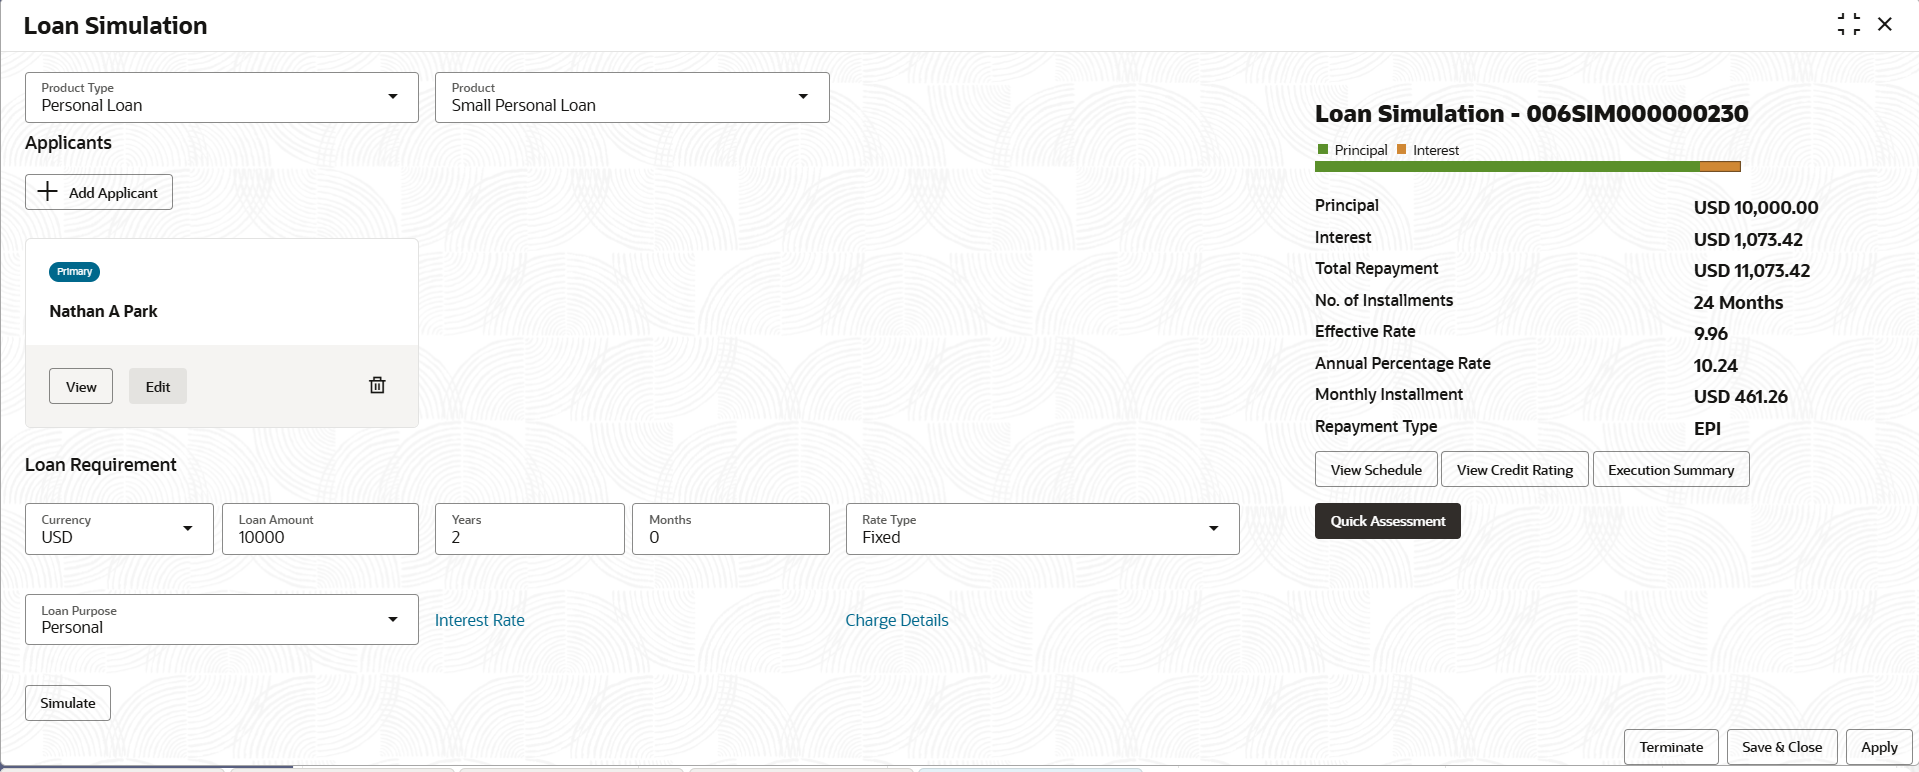
Field Description Loan Requirements Displays the loan requirements details. Currency Select preferred currency from the drop-down list. Loan Amount Specify the loan amount. Years Specify the loan tenure years. Months Specify the loan tenure in months Rate Type Displays the rate type. The system fetches the rate type from host back end product to which this loan account is mapped via the Business Product configuration. Loan Purpose Select the purpose of the loan from the drop-down list. Simulate Click simulate to simulate the loan application. During simulate the system will lockup in the Origination preferences configuration for the default Stage that needs to be considered for Loan Simulation (e.g. EPI,, POI etc.) - Click Simulate. The applicant loan details screen will dispalys.
- Click Interest Rate. The Interest Details section displays the interest applicable for the account.
- Click Charge details. The Charge Details section enables the user to display the charges applicable for this loan application.
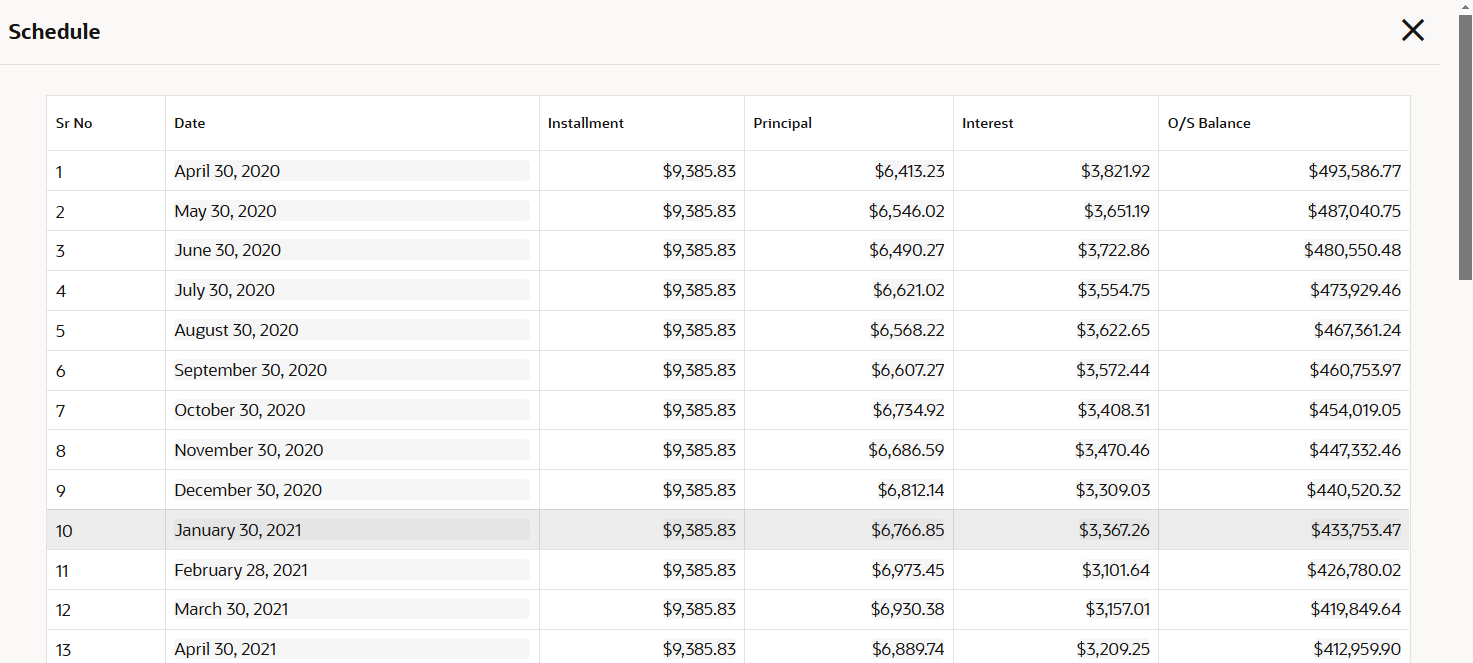
- Click View Schedule. The schedule window appears based on the selected interest rate.The below screen shot refers the View Schedule screen.
- Click View Credit Rating. The view credit rating window appears based on the selected applicant credit details.The below screenshot refers the View Credit Rating screen.
- Click Execution Summary. The Execution Summary screen displays.
- Click Terminate to terminate the application. Or Click Save and Close to save the application. Or Click Apply to apply for the loan application.
Parent topic: Loan Simulation and Quick Assessment


