1.1 My Applications
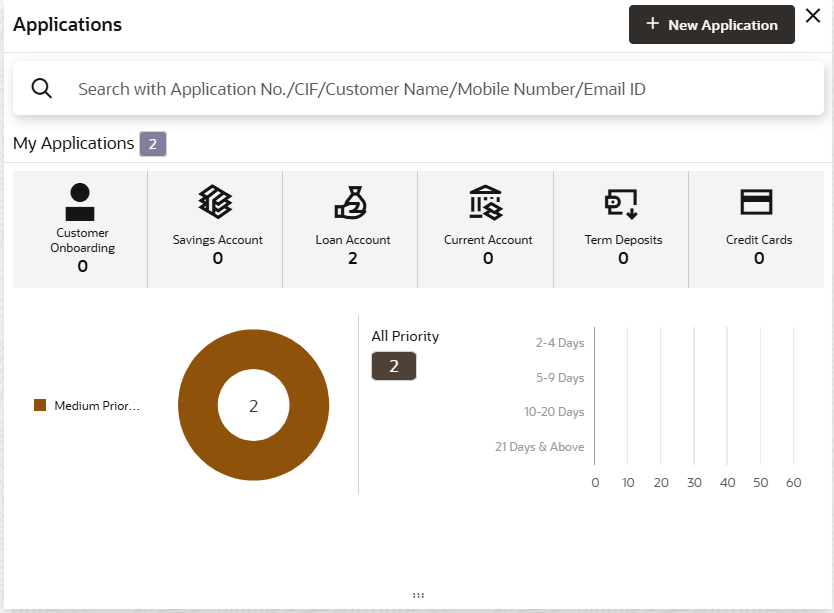
This topic describes systematic instructions to view My Applications dashboard.
- On Home screen, click Dashboard.The Applications dashboard displays in Dashboard screen. For more information on fields, refer to the field description table.
Table 1-1 My Applications – Field Description
Field Description Customer Onboarding The application displays the total number of new customer onboarding requests initiated. Savings Account The application displays the total number of Savings Account requests initiated. Loans The application displays the total number of loan requests initiated. Current Account The application displays the total number of Current Account requests initiated. Term Deposits The application displays the total number of Term Deposits requests initiated. Credit Cards The application displays the total number of Credit Card requests initiated. The donut view presents the overall count of applications started by the user, organized according to the priority assigned to each application at the time of initiation.
The available priorities are:- High
- Medium
- Low
- Hover on the donut split for the specific priority and click it.The right side screen displays the number for the specified selected priority, with applications split into various age buckets as described below.
- Less than 5 Days
- 5-10 Days
- 10-20 Days
- 21 Days and Above
User can drill down and view the application list by clicking the hyperlinks on the displayed numbers.
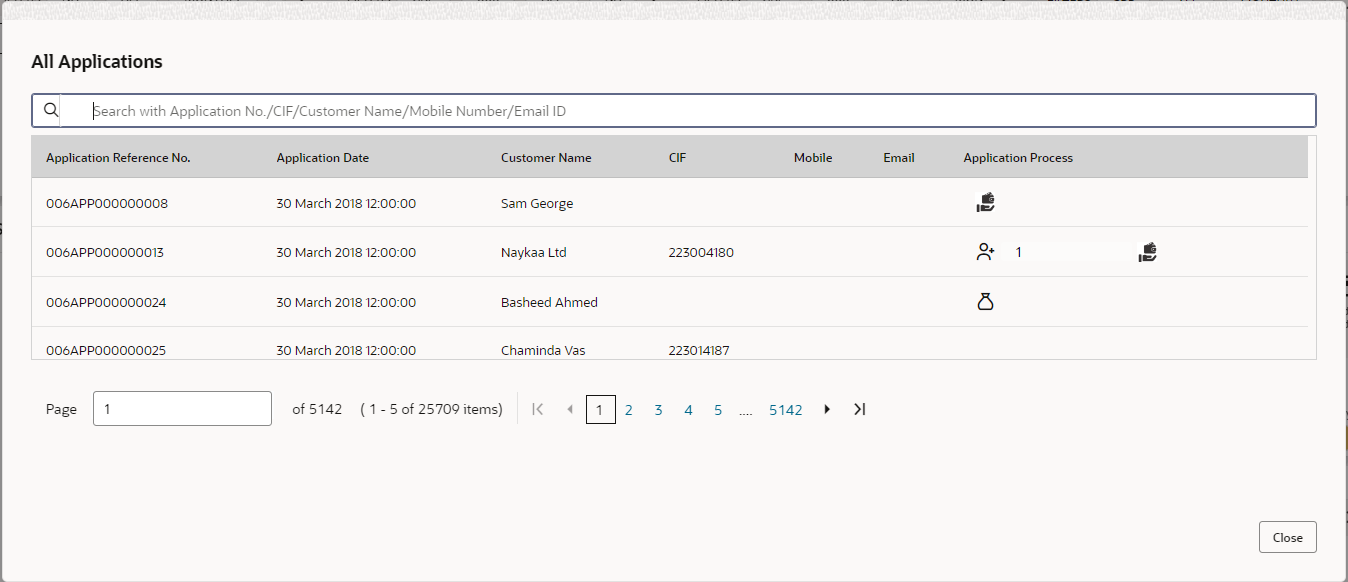
- Click on hyperlinked number.The All Applications screen displays.
The All Applications screen displays the list of various applications.
For more information on fields, refer to the field description table.Table 1-2 All Applications – Field Description
Field Description Application Reference Number Displays the application reference number. Application Date Displays the application date. Customer Name Displays the customer name. CIF Displays the CIF. Mobile Number Displays the mobile number. Email Displays the e-mail ID. Application Process Displays the icons representing the Product or Application process. The user can further search a specific application by entering one of the following:- Application Number
- CIF
- Customer Name
- Mobile Number
- Email ID
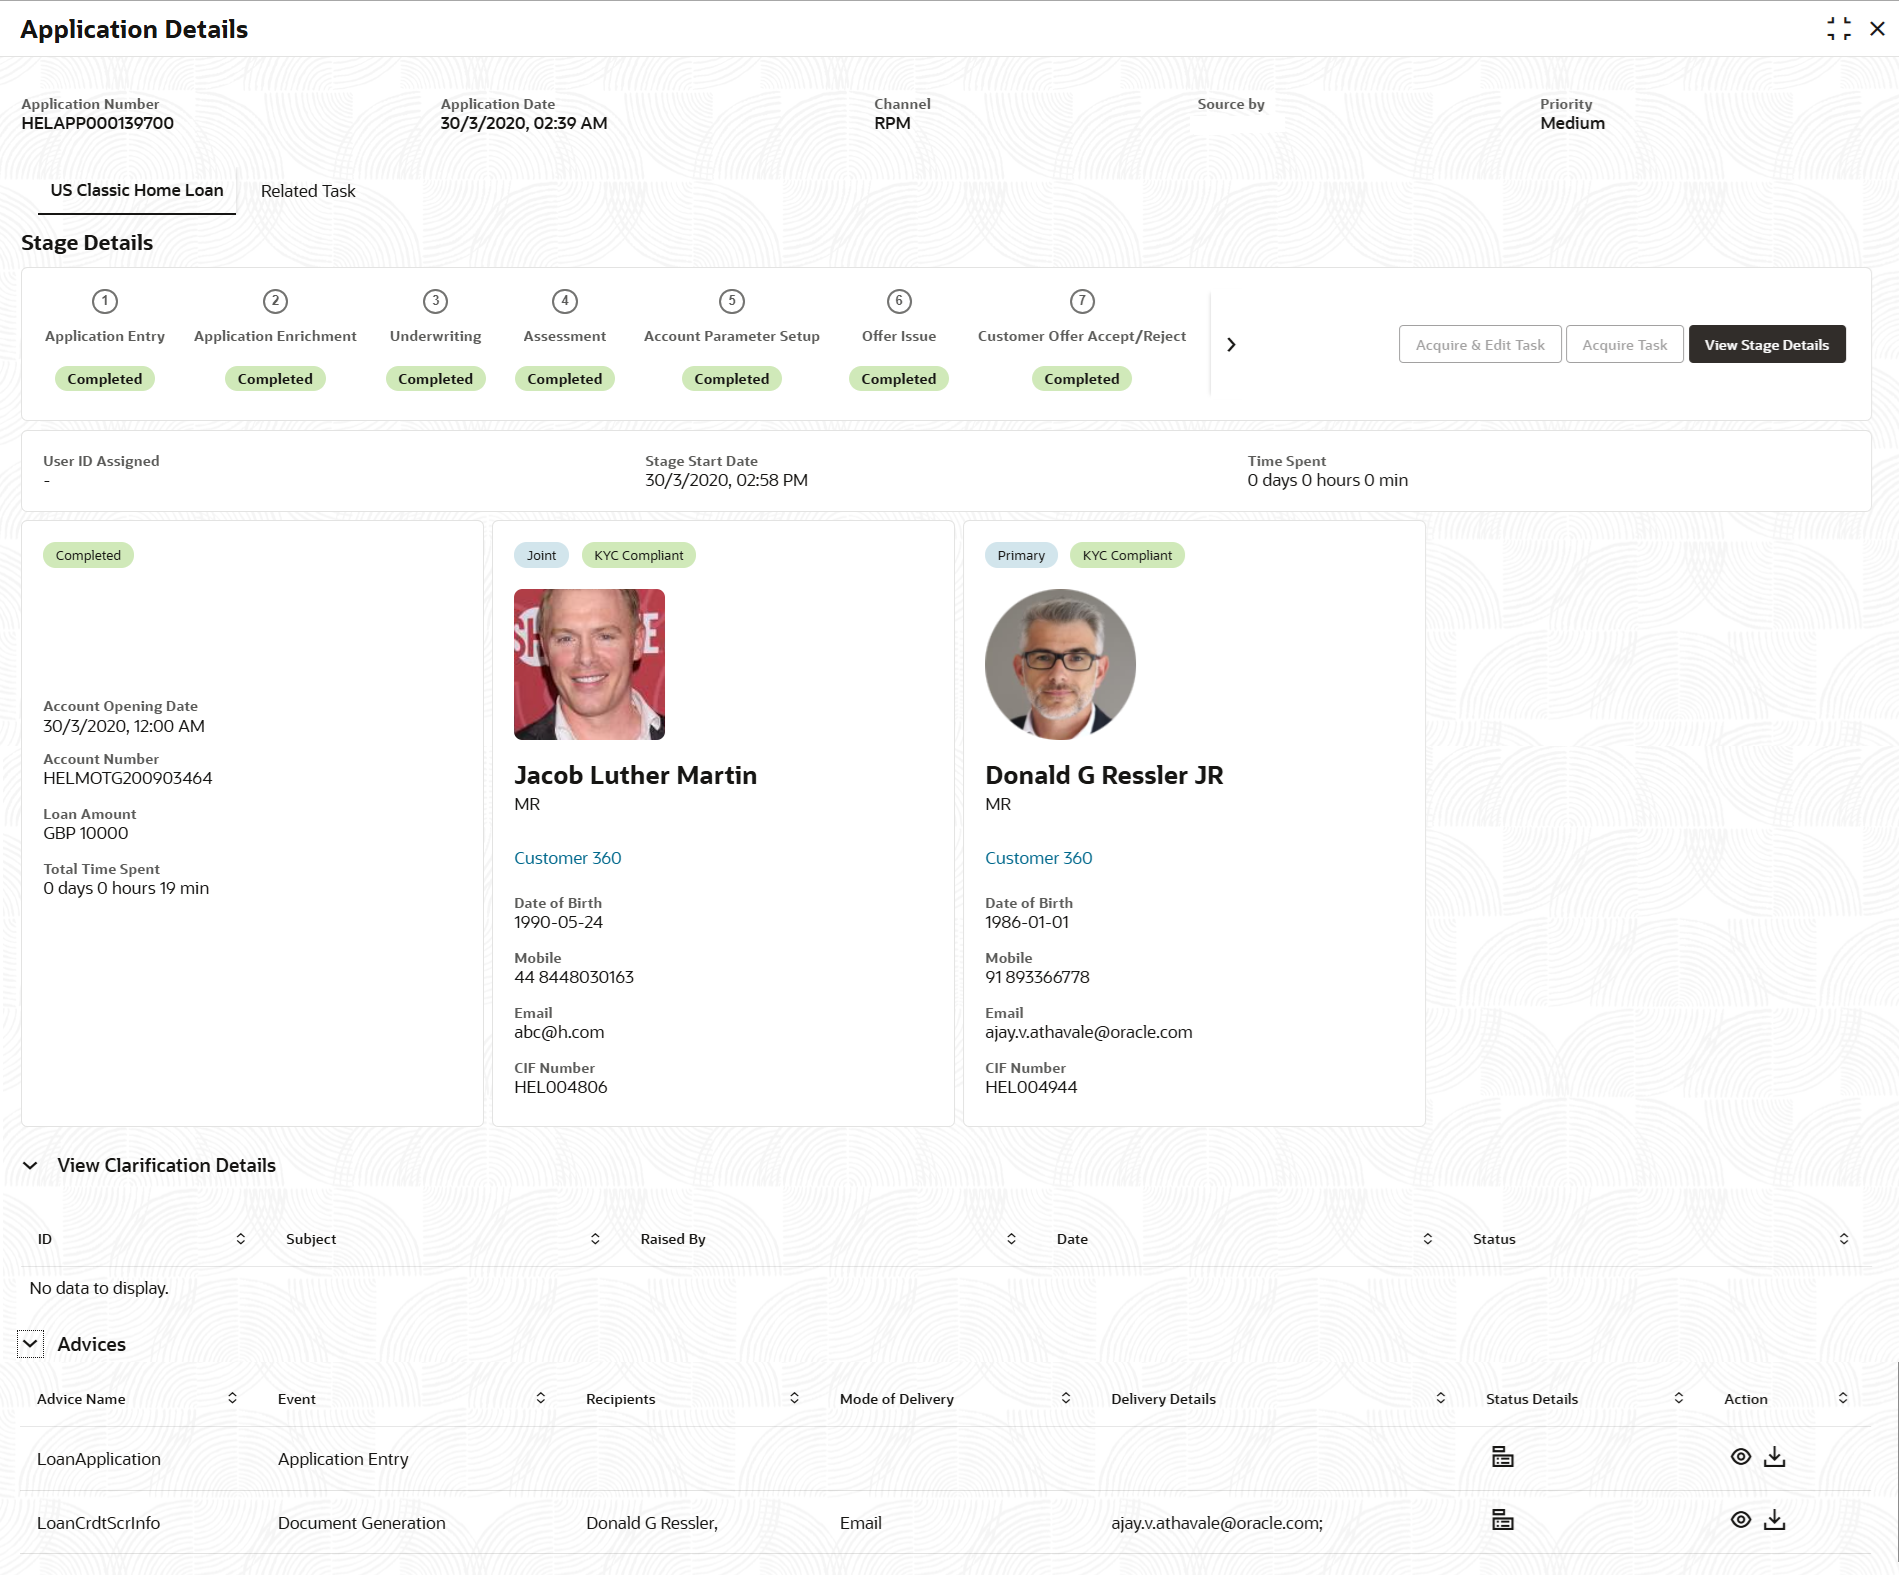
- Click on an application row to view more details about the application.The Application Details Drill-Down screen displays.
The Application Information screen displays separate cards for various products initiated as part of the application.
For more information on fields, refer to the field description table.Table 1-3 Application Information – Field Description
Field Description Application Date Displays the application date. Phone Displays the phone number. Email Displays the e-mail ID. Source By Displays the username who has sourced the application. Channel Displays the channel name. Priority Displays the priority of the application.
- High
- Medium
- Low
Product Name Displays the product name of the application. Stage Bar Indicates the current stage of the application. Account Number Displays the HOST account number.
Note: The application is displayed once all stages are completed and the account is created in Host.
Total time spent Displays the time spent for the product process since initiation of the application. User ID Assigned Displays the User ID of the user currently working on the product process.
NOTE: This is blank in case the product process task is not acquired by any user.
Time spent Displays the days spent in the current phase/stage. Current Stage Displays the stage in which the product process is currently in.
NOTE: If the phase is configured for the product, the current stage is displayed as current phase.
Stage Start Date Displays the stage in which the product process is currently in.
NOTE: If the phase is configured for the product, the stage start date is displayed as phase start date.
Account Opening Date Displays the account opening date. Expected Account Opening Date Displays the expected account opening date. Actions Tab Displays the information on the features considered to predict the expected account opening date.
More Info Click More Info hyperlink to view more details about the customer clarification raised. Application Number Displays the application number. - Click
 icon to launch the Data Points pop-up screen.The Data Points pop-up displays.
 - Click on More Info hyperlink.The More Info pop-up displays.
For more information on fields, refer to the field description table.
Table 1-4 Clarification Details – Field Description
Field Description Clarification Displays the subject of the requested clarification. Raised By Displays the user id of the user who raised the clarification request. Clarification Date Displays the clarification date on which the request was raised. Response Type Displays the response type. Clarification Status Displays the status of clarification. The available options are:- Clarification Requested
- Clarification Withdrawn
- Clarification Completed
Status Update Date Displays the date on which status was updated. New Clarification Click New Clarification to raise a new clarification request. - Select any specific clarification request row.The Clarification Details for the selected clarification request displays.
The Clarification Details screen displays details about the specific customer clarification request raised.
For more information on fields, refer to the field description table.Table 1-5 Clarification Details – Field Description
Field Description Clarification ID Displays the unique clarification ID. Clarification Subject Displays the subject of clarification request. Raised By Displays the user id of the user who has raised the clarification request. Clarification Date Displays the clarification date. Status Displays the status of clarification. Status Update Date Displays the date on which status was updated. New Conversation Click New Conversation to raise conversation for the selected clarification request. User can access and modify the conversation through the My Applications and Application Search dashboard by selecting the More Info hyperlink located on the Product card.If any user other than the one who originally submitted the clarification request updates the new conversation, a bell notification will be dispatched to the individual who made the request.
The available options are:- Save and Close: Click Save and Close to save the conversation.
- Cancel: Click Cancel to cancel the conversation update.
Withdraw Clarification To withdraw and finalize the selected clarification request, please click on Withdraw Clarification. It is essential to update the clarification details before proceeding with the withdrawal. Users have the ability to modify the reason for withdrawing the clarification and may also upload any necessary documents. The available options are:- Save and Close: Click Save and Close to withdraw the clarification.
- Cancel: Click Cancel to withdraw the clarification action.
Note : Remove the Clarification display if the request for clarification was submitted by the same user. For others, New Conversation is available, which can be used to update conversations on the specified Clarification ID.
Accept Clarification To finalize the raised clarification, please click on Accept Clarification. It is essential to update the clarification details before proceeding with the acceptance. Users have the ability to modify the reasons for accepting the clarification and may also upload any necessary documents.Upon acceptance of the clarification request, no additional discussions may occur regarding the Clarification ID. Furthermore, the application status will be updated to My Task. The available options are:- Save and Close: Click Save and Close to accept the clarification.
- Cancel: Click Cancel to cancel the withdrawal clarification action.
Note:The Accept Clarification indicates whether the Clarification request originated from the same user. For some users, only the New Conversation option is accessible, allowing them to update conversations associated with the designated Clarification ID.
Note:
- System sends an e-mail notification to the customer for clarification requests raised for an application.
- Additionally, Bell Notification is sent to the user who had raised the request, whenever a conversation is raised for the Clarification Request.
Parent topic: Dashboards


