1.3.2.1 Applicants
This topic provides the systematic instructions to capture the customer-related information for the application.
- On Home screen, click Retail Banking.
- Under Retails Banking, click In-Principle
Approval. Under In-Principle Approval,
click New Request.The New Request screen displays.
- Select the product type and select the product.
- Click Proceed.The Applicant screen displays.
- Click Save and Close to save the data captured. The captured data is available in the My Task list for the user to continue later.
- Click Cancel to terminate the application and the status of the application. Such applications cannot be revived later by the user.
- Click Upload Document to fetch the customer information from the uploaded documents.The Applicants - Upload Document screen displays.
Figure 1-27 Applicant- Upload Document
- Specify the relevant details in data fields. The fields which are marked as
Required are mandatory. For more information on fields, refer to the field
description table below: For more information on the fields, refer to the field description table below:
Table 1-16 Applicant- Individual – Field Description
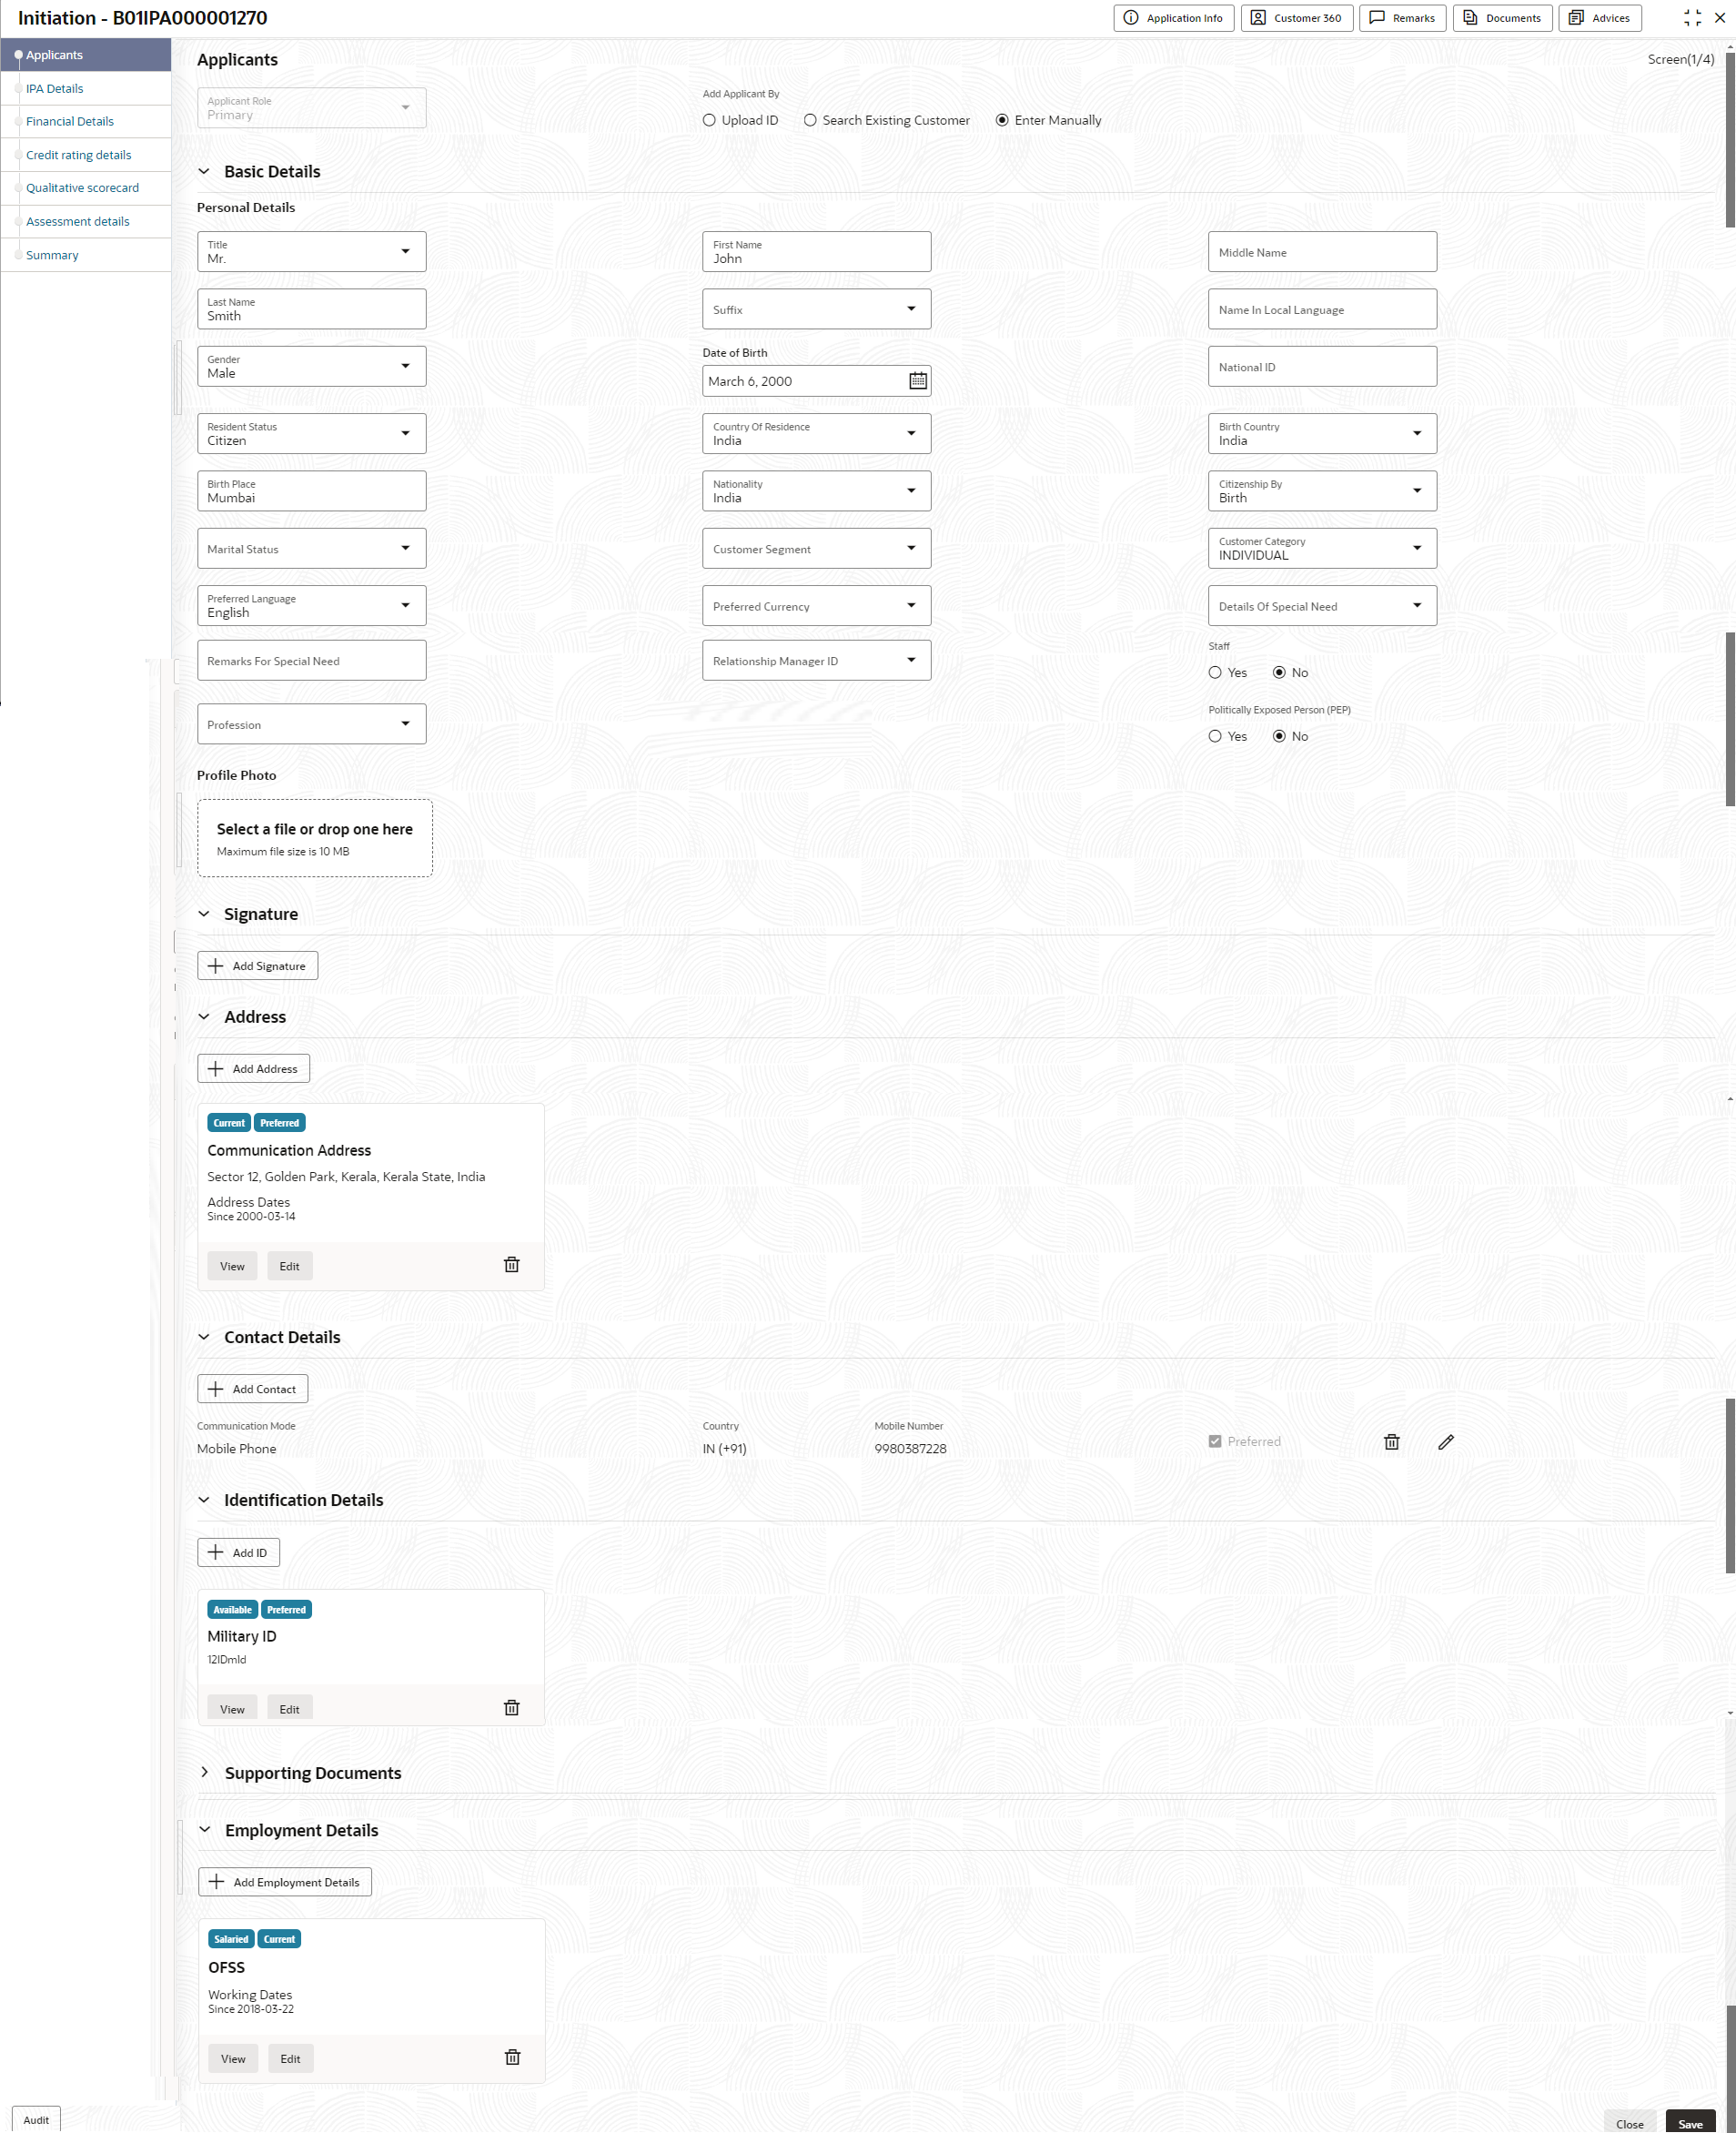
Field Description Applicant Role Displays the applicant role. By default the Primary role appears in this field.
Select the applicant role incase user add multiple applicant in single application.
Add Applicant By Select the mode from which the user need to add new applicant. The available options are:- Upload ID - Using this option user can upload identification document of the applicant to extract the details.
- Search Existing Customer - This option is used if the applicant is an existing customer of the bank. On selecting the existing customer, the details appears in the respective sections which are already stored.
- Enter Manually - This option is used if user wish to enter all the applicant details manually.
Document Name Select the document which is used from extracting applicant details. The available options are:
- State Issued Drivers License
- Passport
This field appears if the Upload ID option is selected from the Add Applicant By drop down list.
Country of Issue Select the country in which the document is issued. This field appears if the Upload ID option is selected from the Add Applicant By drop down list.
Select and Drop here Drag and drop the document file or click on Select or drop files here to browse and upload the document from the local system.
PNG & JPEG file formats are supported.
10MB maximum file size is allowed.
This field appears if the Upload ID option is selected from the Add Applicant By drop down list.
CIF Number Search and select the CIF number.
This field appears if the Search Existing Customer option is selected from the Add Applicant By drop down list.
Advanced Search Click this button to perform party search using advance parameters. For more information on advance search, refer the Advanced Search section below.
This field appears if the Search Existing Customer option is selected from the Add Applicant By drop down list.
Basic Details In this section the user can manually capture the basic details of applicant. This section appears if the Enter Manually option is selected from the Add Applicant By drop down list.
Title Select the title of the applicant from the drop-down list. First Name Specify the first name of the applicant. Middle Name Specify the middle name of the applicant. Last Name Specify the last name of the applicant. Suffix Specify the suffix for the applicant. This options in this list appears based on the configured entity code in the Oracle Banking Party product.
Name In Local Language Specify the applicant's name in their local language. Gender Specify the Gender of the applicant from the drop-down list. Date of Birth Select the date of birth of the applicant. National ID Specify the national identification code of the applicant. Resident Status Select the residential status of the applicant from the drop-down list. Available options are:
- Non-Resident Alien
- Resident Alien
- Citizen
County of Residence Search and select the country code of which the applicant is a resident. Birth Country Specify the birth country of the applicant. Birth Place Specify the birth place where the applicant has born. Nationality Search and select the country code where the applicant has nationality. Citizenship By Search and select the country code for which applicant has citizenship. Marital Status Select the marital status of the customer from the drop-down list. Available options are:
- Married
- Unmarried
- Legally Separated
- Widow
This field appears mandatory based on the product configuration.
Customer Segment Select the segment of the customer. Available options are:
- Emerging Affluent
- High Net worth Individuals
- Mass Affluent
- Ultra HNI
Customer Category Select the category of the customer. Preferred Language Select the preferred language. Preferred Currency Select the preferred currency. Details Of Special Need Select the special need details. Available options are:
- Blindness
- Cerebral Palsy
- Low vision
- Locomotor disability
- Leprosy-cured
- Mental retardation
- Mental illness
- Hearing Impairment
Remarks For Special Need Specify the remarks for the special need selected. Relationship Manager ID Search and select the Relationship Manager ID for the applicant. Staff Select the toggle to indicate if the customer is employee of the bank. Profession Select the profession of the customer. Politically Exposed Person Select to indicate if the customer are politically exposed person. Profile Photo Drag and drop the document file or click on Select or drop files here to browse and upload the document from the local system.
PNG & JPEG file formats are supported.
10MB maximum file size is allowed.
Signatures In this section you can add new signature and view the already added signature of the customer.
Click the Add Signature button to select the file to upload signature.
Click Cancel button to discard the added details.
On Submit, signature will be handed off to Oracle Banking Party.
Upload Signature Drag and drop the signature file or click on Select or drop files here to browse and upload the signature from the local system.
PNG & JPEG file formats are supported.
10MB maximum file size is allowed.
Uploaded Signature Displays the uploaded signature. Remarks Specify the remarks related to the signature. Click Save to save the uploaded file.
Signature ID Displays the Signature ID for the added signature along with the image and remark. Action Click Edit to edit the added signatures
Click
 to delete the added signatures.
Address This section displays the added address of the applicant. It is mandatory to add communication address of the applicant.
Click the Add Address button to add address details.
Click
 to perform below actions on the added address details,
- To view the address details, click View.
- To edit the address details, click Edit.
- To delete the address details, click Delete.
Address Type Select the address type for the applicant from the drop-down list.
- Residential Address
- Communication Address
Location Select and search the location. Current Address Select to indicate if you want to mark entered address as current address type. Preferred Address Select to indicate if you want the selected address type as preferred address type. This field is non editable if the No option is selected in the Current Address field.
Address Since Select the date from when you are connected with the given address. Address Till Select the date till when you were connected with the given address. This field appears if the No option is selected in the Current Address field.
Address Specify the address to search for the already captured address.
Based on the configuration, on entering a few letters, the system fetches the related address that is already captured.
Based on the selection, the fields are fetched in the address section.
Address Line 1 Specify the building name. Address Line 2 Specify the street name. Address Line 3 Specify the city or town name. Country Select and search the country code. State / Country Sub Division Specify the state or country sub division. This field appears based on the selected country code. Zip Code / Post Code Specify the zip or post code of the address. Addition Info In this section you can provide addition information. Sub Department Specify the sub department. Department Specify the department. Building Number Specify the building number. Post Box Specify the post box code. District Name Specify the district name. Floor Specify the floor number. Room Specify the room number. Locality Specify the locality. Landmark Specify the landmark. Contact Name / Narrative Specify the name of the contact person. <Added record tile> In this tile you can view the added address details. Below details appears in the tile:- <Current status> this flag appears only if Yes option is selected.
- <Preferred ID status> this flag appears only if Yes option is selected.
- Address Type
- Address dates
- Adress line 1,2,3
- Country
- State
Click the Edit to edit the added adress details.
Click the View to view the added adress details.
Click
 to delete the added address details.
Contact Details In this section you can provide digital contact details. Communication Mode Select the communication mode from the drop-down list. The available options are:- Mobile Phone
Country Select the country along with international subscriber dialing code of the mobile phone from the drop-down list. The drop-down list option consist of countrycode, country name and subscriber dialing code.
This field appears only if you select the Mobile Phone option as communication mode.
Mobile Number Specify the mobile number. Email Id Specify the email ID. This field appears only if you select the Email option as communication mode.
Preferred Select to indicate if the given record is the preferred one. Action You can edit or delete the added mobile details. Identification Details You can add, view and edit the identification details in this section.
Click the Add ID button to add Identification details.
ID Type Specify the ID type.
The available options are:
- Military ID
- Birth Certificate
- SIN
- Permanent Resident Card ()
- SIN
- Passport
- SSN
ID Status Specify the status of the selected ID type.
The available options are:
- Verification Pending
- Applied For
- Available
- Notice Received
Unique ID Specify the unique identification code of the selected type. You can enter the unique ID only if the ID Status is Available. Place Of Issue Specify the place where the ID is issued to the user. Issue Date Specify the date from which the ID is valid. Expiry Date Specify the date till which the ID is valid. Preferred Select to indicate whether added ID details are preferred among all others.
In case of multiple ID details, it is mandatory to mark any one of the ID details as Preferred.
Remark Specify the remark. Click the Save button to save the entered ID details.
<Added record tile> In this tile you can view the added ID details. Below details appears in the tile:- ID Status
- <Preferred ID status> this flag appears only if Yes option is selected.
- ID Type
- Unique ID
Click the Edit to edit the added ID details.
Click the View to view the added ID details.
Click
 to delete the added ID details.
Supporting Document This section displays the status of the supporting documents that customer provides to get onboard. You can view,
- Total Documents – Counts of total documents
- Document Submitted – Count of the document that are submitted
- Document Pending – Count of the document that are pending
In case of exiting party, already captured documents fetched in this section. User can add, edit or delete the documents.
Clickto add the document. The Document popup appears. Below fields appears in the popup.
Document Name Specify the name of the document. Document Number Specify the unique number of the selected document. Document Issue Date Specify the date from which the document is valid. Document Expiry Date Specify the date on which the document is expired. Upload Documents Drag and drop the document file or click the Select or drop files here link to browse and upload the document. Uploaded Documents The name along with extension of the uploaded document is displayed. You can view or delete document.
Click Save to upload the document.
Employment Details In thi section user can capture the employment details of the applicant. Employment Type Select the employment type. The available options are:- Salaried
- Self Employed
Salaried Below field appears if the Salariedoption is selected from the Employment Type list. In this section user can capture salaried employment details.
The below fields appears if salaried employment details are already captured.
- Employer Code
- Employer Name
- Employer Description
- Employee Type
- Industry Type
- Organization Category
- Demographics
- Current Employer
- Working Since
- Working Till
- Employee ID
- Designation
- Level or Grade
User can edit, view or delete already added details.
Employer Code Specify the employer code.
OR
Click to search the employer code. The pop-up appears to fetch the employer code. Specify Employer Code or Employer Name to fetch the details.
Employer Name Displays the employer name of the selected employee code. Employer Description Specify the employer description. Employee Type Select the employee type from the drop-down list. Available options are:
- Full Time
- Part Time
- Contract
- Permanent
Industry Type Select the Industry Type from the drop-down list. Available options are:
- IT
- Bank
- Services
- Manufacturing
- Legal
- Medical
- Engineering
- School/College
- Others
Organization Category Select the organization type from the drop-down list. Available options are:
- Government
- NGO
- Private Limited
Demographics Select the demographics from the drop-down list. Available options are:
- Global
- Domestic
Current Employer Select whether the applicant works currently in this role.
Available options are:
- Yes
- No
Working Since Select the employment start date. Working Till Select the employment last date. Employee ID Specify the employee ID. Grade Specify the grade. Designation Specify the designation. Self Employed Below field appears if the Self Employed option is selected from the Employment Type list. In this section user can capture self-employment or professional details of customer.
Below fields appears if self-employment or professional details are already captured.
- Professional Name
- Professional Description
- Professional Email ID
- Company /Firm Name
- Registration Number of Company
- Start Date
- End Date
User can edit, view or delete already added details.
Professional Name Specify the professional name. Professional Description Displays the professional description. Professional Email ID Specify the professional email ID. Company /Firm Name Specify the company or firm name. Registration Numberof Company Specify the registration number. Start Date Specify or select the start date of company. End Date Specify or select the end date of company. <Added record tile> In this tile you can view the added employment details. Below details appears in the tile:- Employement Type
- <Current Employer> this flag appears only if Yes option is selected.
- Employer Name
- Working Dates
Click the Edit to edit the added ID details.
Click the View to view the added ID details.
Click
 to delete the added ID details.
Advanced Search
to delete the added ID details.
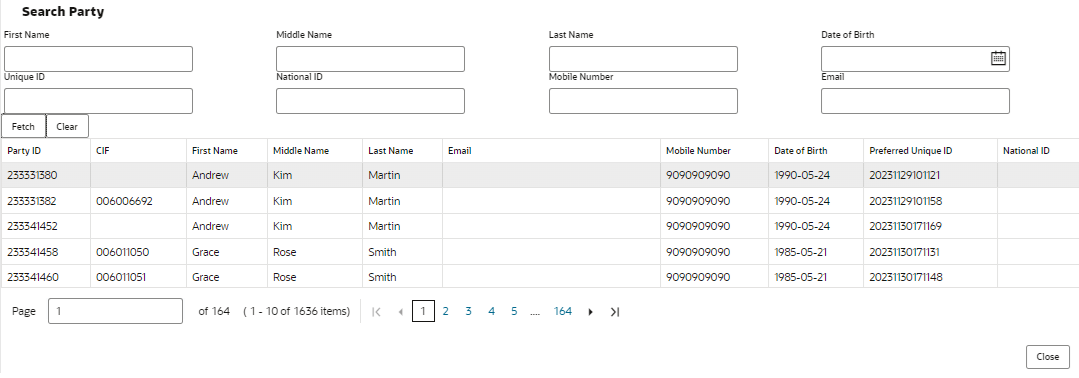
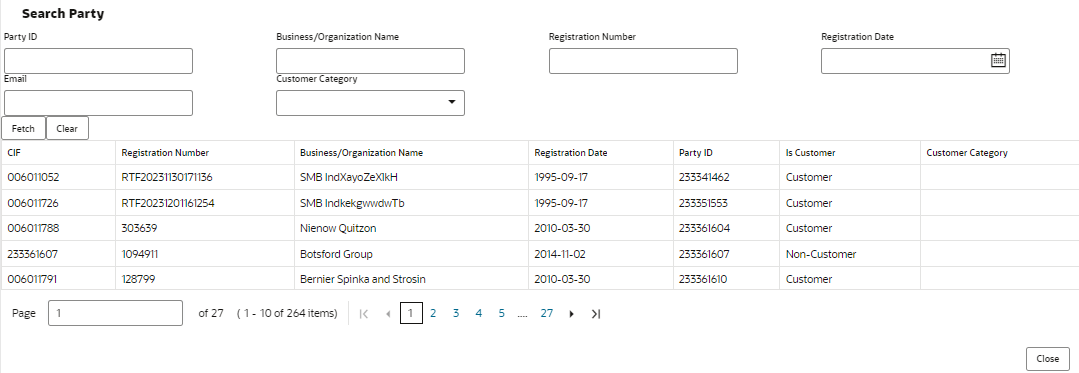
Advanced SearchYou can perform an advanced search for the party by providing additional information.
You can perform search on below party types:
For Individual- First Name
- Middle Name
- Last Name
- Date of Birth
- Preferred Unique ID
- National ID
- Mobile Number
For Non- Individual- Party ID
- Business or Organization Name
- Registration Number
- Registration Date
- Customer Category
To search for a party using the advanced search:
- Click the Advanced Search.The Search Party window appears based
on the selected party type.
Below screenshot refers the
Figure 1-29 Advance Search -Small Medium Business Products
- Click Fetch to search all the parties. All the parties in system appears in
the table.
OR
Enter the specific search criteria in the respective field and click Fetch. The search result appears based on the search criteria.
- Click Save. The applicant details tile appears with the captured data. The tile comprises of below fields:
- <Applicant Role>
- <KYC Status>
- <Applicant Photo>
- <First Name, Middle Name, Last Name>
- <Title>
- CIF Number
- Date of Birth
- Initiate: This button appears if the Early KYC is selected while configuring the product in the Business Product Configuration screen.
- Click Initiate to initiate the Know Your Customer (KYC) process of the added applicant. It is mandatory to complete the KYC process successfully to proceed.
- Click Next to navigate to the next data segment, after successfully capturing the data. The system validates for all mandatory data segments and data fields. If mandatory details are not provided, the system displays an error message for the user to take an action. The User cannot to proceed to the next data segment, without capturing the mandatory data.
Parent topic: IPA Initiation


