- Savings Account Origination User Guide (US Regionalization)
- Savings Account Origination
- Application Documents
- Document Generation
2.2.1 Document Generation
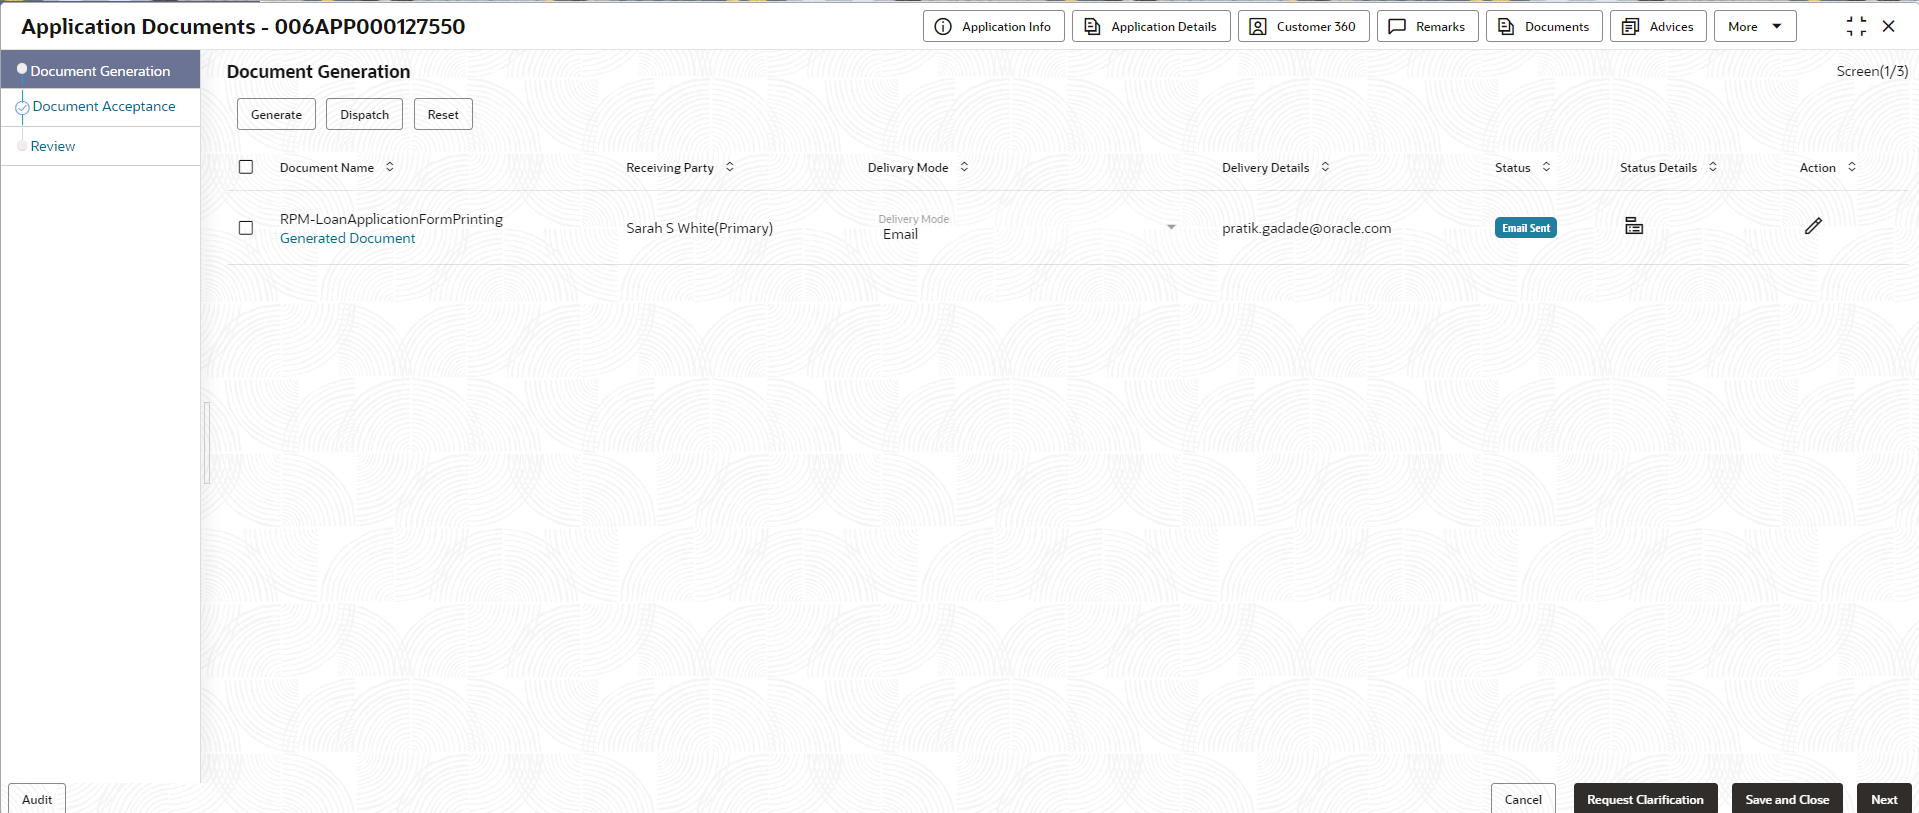
In this data segment you can generate and dispatch the documents that are configured.
To generate and dispatch the document:
- On acquiring the Application Document task, the Document Generation
stage is displayed.
- In the Document Generation section, select the check box to select the
document from the list. It is mandatory to select atleast one documentYou can perform below actions on the seletced document:
- Generate: You can click this button to generate the selected document. On clicking this button the system invokes a call to the report generation service which generates a PDF output for the advice onfigured in the Advice Maintenance screen. Once the output is generated the documents are stored in the document managed service (DMS) along with the reference ID. This reference ID fetches the document on click the Generate Docoument link in the Documen column.
- Dispatch: You can click this button to dispatch the selected generated documents. You can only dispatch those documents which are not already disptached. On clicking this button the system validates whether the document is already generated. Once the validation is successful the system dispatch the document to the default setting defined in the Advice Maintenance screen.
- Reset: You can click this button to reset the action performed on the document.
For more information on fields, refer to the field description table.Table 2-8 Document Generation – Field Description
Field Description Document Name Displays the name of document. Click the link to fetch the document from the stored service and view the PDF output of the document. This link appears only if the document is generated.
Receiving Party Displays the name of the applicant along with the role. The document is generated and dispatched to the applicants mentioned in this column. The name appears as captured in the Applicant data segment.
Delivery Mode Displays the default mode of delivery of the documents. This default mode of delivery is defined in the Advice Maintenance screen. Delivery Details Displays the delivery details of the generated documents based on the default delivery mode. - If the delivery mode is Email or e-Sign Remote then the preferred email address of every recipient is displayed.
- If the delivery mode is Post then the preferred address of every recipient is displayed.
- If the delivery mode is e-Sign In-Person then the link is shared with every recipients and in this case the status appears as Pending For Link Generation. Once the dispatch event is executed successfully, the status appears as Link Generated.
- If the delivery mode is Print then the Not Applicable text appears.
Status Displays the status of the documents based on the actions performed on clicking Generate or Dispatch button. Once the dispatch process is initiated for the generated documents, the status appears based on the selected default mode of delivery.- If the mode of delivery is Email then on the successful trigger the status appears as Email Sent.
- If the mode of delivery is E-Sign Remote or E-Sign In-Person then on the successful trigger the status appears as E-Signing Initiated.
- If the mode of delivery is Post then on the successful trigger the status appears as Dispatched.
- If the mode of delivery is Print then on the successful trigger the status appears as Ready for Print.
- In case the dispatch process fails due to technical error then the status appears as Failed.
Status Details Displays the status details of the document. Click the icon to view the generation and dispatched details of document along with the date and time.
Action Select the appropriate icon to perform respective action. - Click
 to edit the delivery mode.
- Click
 to save the edited delivery mode. This
icon appears once you are edit mode.
- Click Next to navigate to the next data segment, after successfully capturing the data. The system will validate all mandatory data segments and data fields. If mandatory details are not provided, the system displays an error message for the user to take action. User will not be able to proceed to the next data segment, without capturing the mandatory data.
Parent topic: Application Documents
