- Term Deposit Origination User Guide (US Regionalization)
- Term Deposit Origination
- Application Entry
- Account Details
2.1.2 Account Details
This topic provides the systematic instructions to capture the account related information for the application.
The Account Details data segment displays the account details.
- Click Next in previous data segment screen to proceed
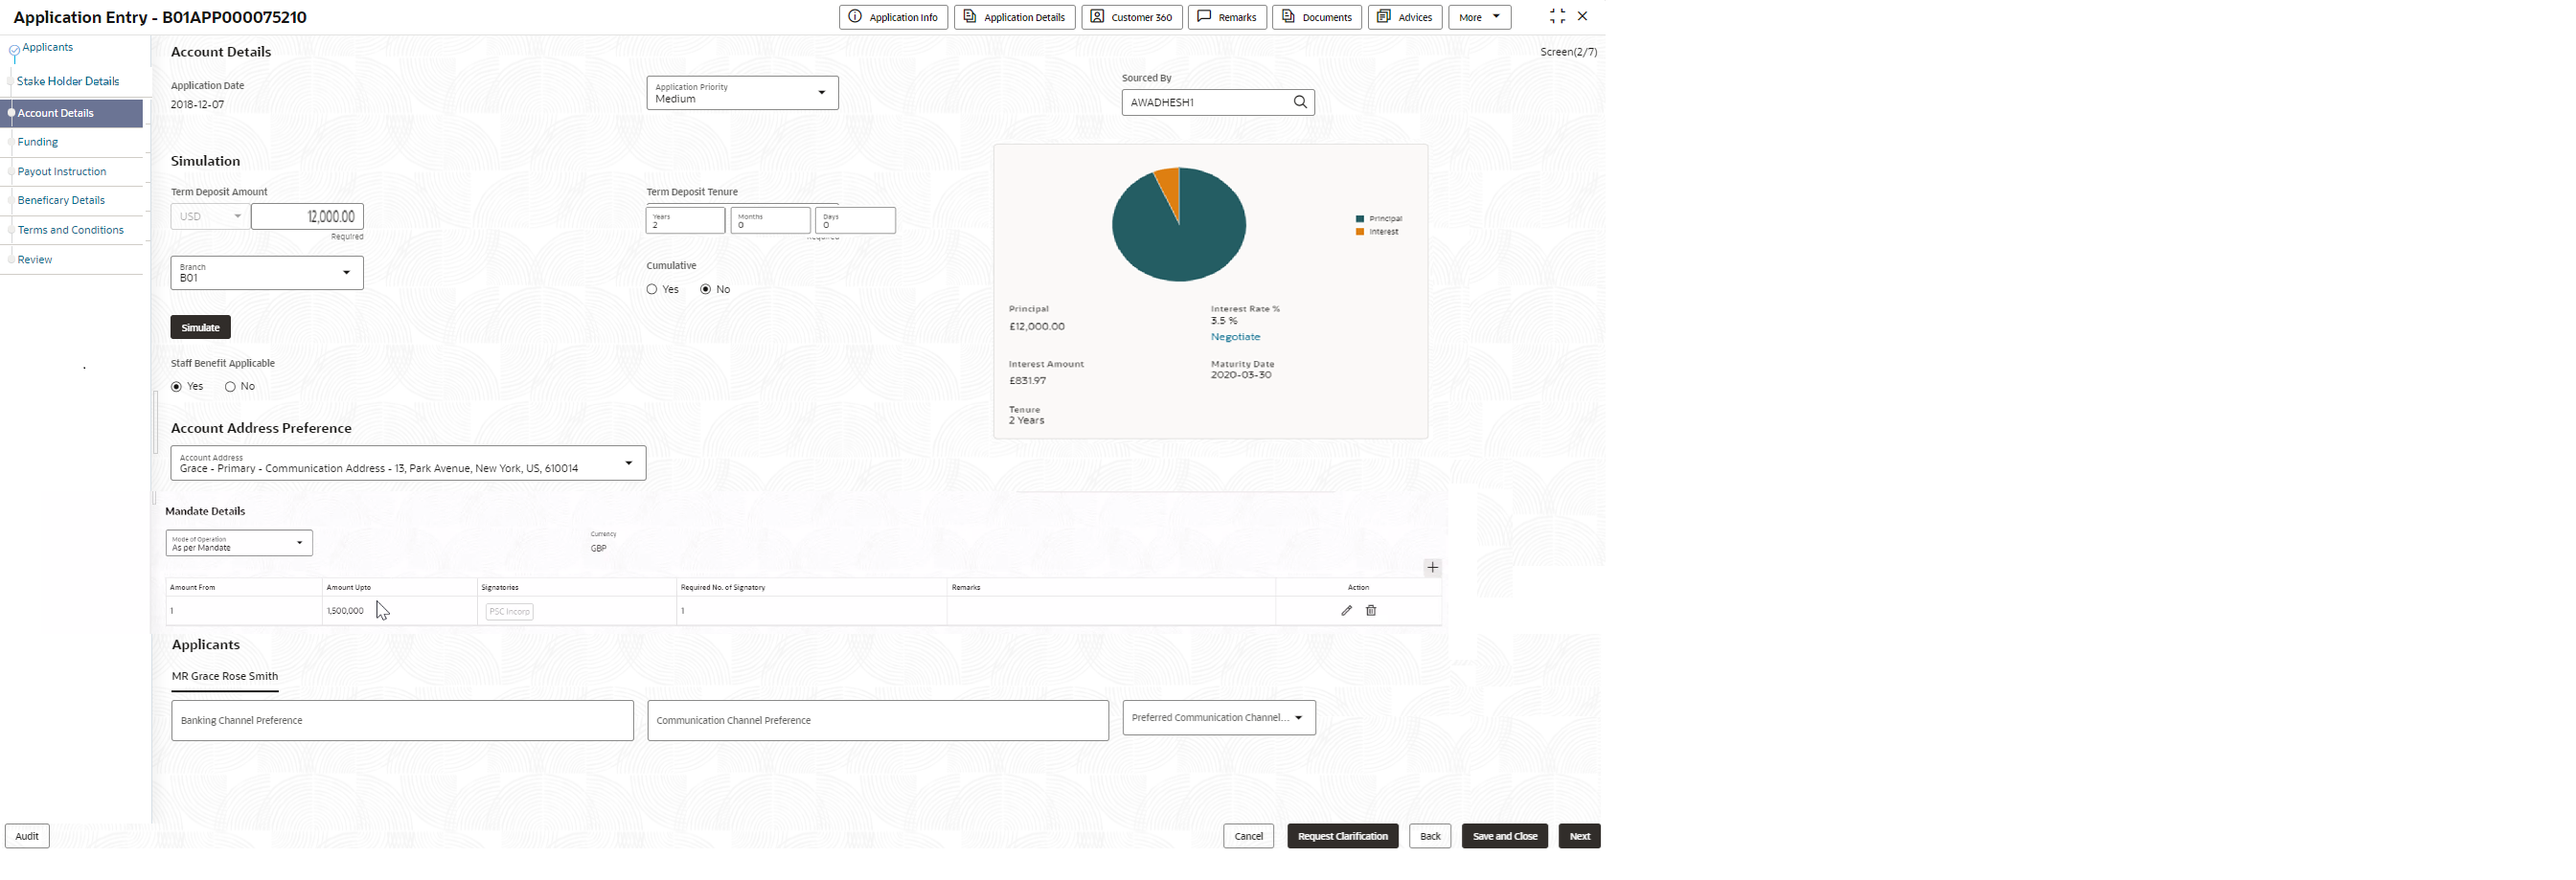
with the next data segment, after successfully capturing the data.The Account Details screen displays.Refer below screenshot if the customer type is selected as Indivdual:Refer below screenshot if the customer type is selected as Small and Medium Business (SMB):
- Specify the fields on Account Details screen.For more information on fields, refer to the field description table.
Note:
The fields, which mentioned as Required, are mandatory.Table 2-4 Account Details
Field Name Description Application Date Displays the date on which the application was initiated. Application Priority Specify the application priority level. The available options are:- Low
- Medium
- High
Based on the selected option the applications appears in list of the logged in user
Sourced By Specify or select the user ID who initiate this account opening application. Simulation In this section you simulate the term deposit amount. Term Deposit Amount Select the currency and the specify term amount. By default the currency selected from the Currency list will appears.
Term Deposit Tenure Specify the term deposit tenure in year, months and days. The user is allowed to select the tenure configured in the maped host. This mapping is define in the Business Product Host data sgement of the Business Product Configuration screen.
For example, If the mapped Host Product is Oracle Banking Accounts then the user can select the Term Deposit Tenure from the drop-down list.
Branch Specify the branch code of this account opening opening application. Cumulative Select to indicate whether the amount is cumulative. The available options are:- Yes
- No
A cumulative term deposit accrues interest over time and pays it out at maturity, while a non-cumulative term deposit pays out interest at regular intervals throughout the term.
Simulate Click Simulate button to compute the value based on the entered details. The section appears with visual representation and the fields with the computed details:
- Pie Chart: The value of principal and interest is represented visually. The user can hover to view the amount.
- Principal
- Interest Rate %
- Negotiate : Click the link to
view the negotiated interest rates. The section
for negotiated interest rates appears with the
following fields:
- Interest Description
- Interest Rate %
- Margin
- Effective Rate %
- Interest Amount : This amount is calculated based on the applied Effective Rate and Term Deposit Amount.
- Maturity Date
- Tenure
- APY %
Staff Benefits Applicable Select to indicate whether staff benefits are applicable. The available options are:- Yes : Select this option to avail the staff benefits.
- No : Select this option for not making use of any staff benefits.
If the Yes option is selected in the Staff field of the Applicant data segment, this field will appear.
This field will not appears if the No option is selected in the Staff field of the Applicant data segment.
Account Address Preference Select the address which is indicated as account address. All captured addresses in the Applicant data segment appears for selection. The drop-down list displays the address in the following format:
<First Name>-<Applicant Role>-<Address Type> - <Address (Complete address sepearted by ,)>
After the account address is selected:- If the user deletes an address from the Applicant data segment then the system removes that address from this data segment and the user must then select another address as the account address.
- If the Applicant data segment is edited with a new address then the updated address is reflected in this segment.
Mandate Details In this section the user can capture the mode of operation for the account.
Mode of Operations Select the appropriate option from the mode of operations list. In the Mandate Details section, below fields appear if the application is initiated with the customer type as Small and Medium Business. Click
 to add the operations as per mandate.
Currency Displays the account currency. Amount From Specify the amount from which the applicant is allowed to operate. Amount To Specify the amount till which the applicant is allowed to operate. Signatories Specify the applicants as signatory. You can select multiple applicants. All the applicants thata re involved in the application appears for selction.
Required No. of Signatory Specify the priority of the signatory for this mandate operation. The priorty can be changed based on the number of applicants added in the appliction.
Remark Specify the remarks. Action Select the option to perform actions on the addedd record. The available options are: - to edit the added record.
 - To delete the added record.
Applicants In this section you can set the communication preferences of the applicants involved in an account opening application. The seperate tabs appears for each applicants involved in the application.
Banking Channel Preferences Select the preferences for the banking channel.
The channel options appears based on the Business Product Configuration.
Communication Channel Preferences Select the preference of the communication channel. The channel options appears based on the Business Product Configuration.
The available options are:- POST
- SMS
Preferred Communication Channel Select the preferred communication channel. The options in this drop down appears based on the selected options in the Commumncation Channel Preferences fields.
- Click Next to navigate to the next data segment, after successfully capturing the data. The user is required to provide all mandatory data segments and data fields for the system to validate. If any mandatory details are missing, the system displays an error message for the user to correct the information. Users must capture the mandatory data before they can proceed to the next data segment.
Parent topic: Application Entry

