12.1 Move Money
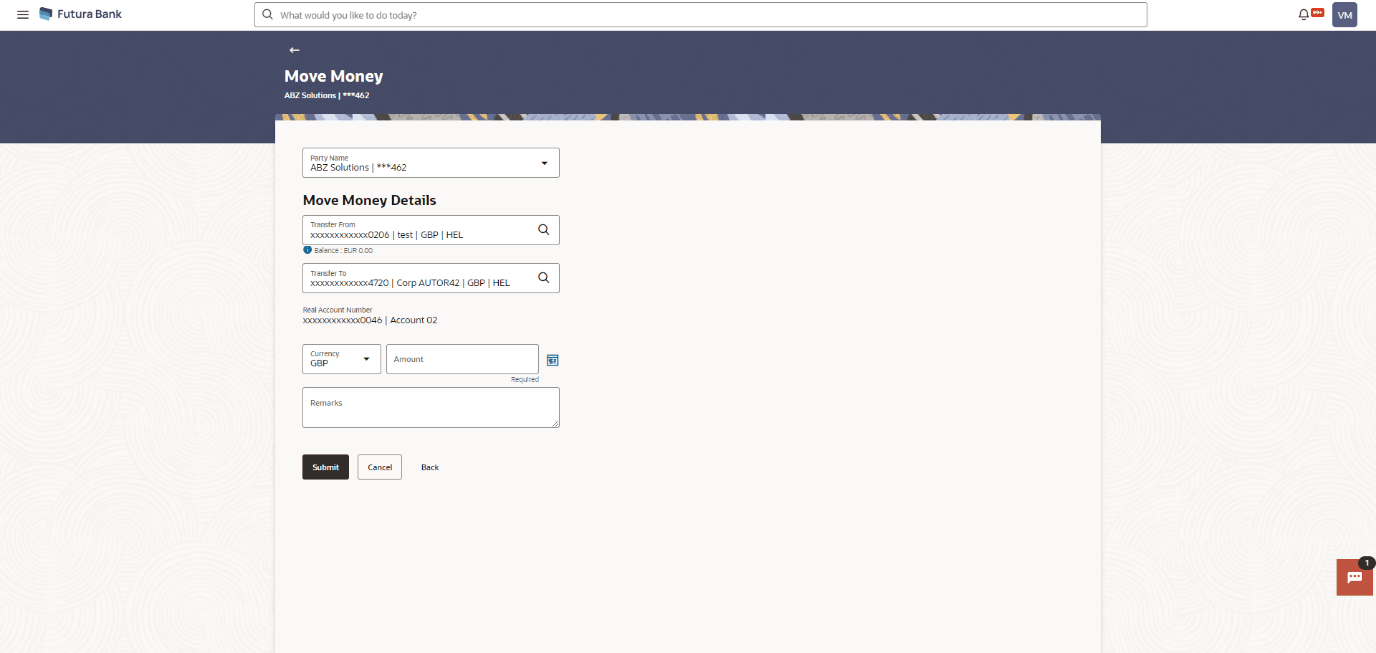
Move money allows you to transfer money from one Virtual Account to another Virtual Account that are mapped to the same real account. Each transaction is sent to the checker, approver, and releaser for the approval as per the configuration maintained.
To move money:
- User can Perform any of the following navigation to access the screen:
- From the Dashboard, click Toggle menu, click Virtual Account Management, then click Move Money.
- From the Dashboard, click Toggle menu, click Virtual Account Management, then click Overview. From Overview, Click Move Money
The Move Money Screen appears. For more information on fields, refer to the field description table.Table 12-1 Move Money - Field Description
Field Description Party Name Select the party name and ID from the drop-down list to view the special rates of the applicable Virtual Accounts. By default, the primary party of the logged-in user is selected.
Note:
Based on the party name selection, the mapped Virtual Accounts are displayed.Move Money details This section displays the Move Money details related fields. Balance Displays the balance in the source account is displayed. Transfer To Click Search icon and select the Virtual Account Number or name from which the amount is to be transferred. Note:
This field is enabled only after selecting the Transfer From.Real Account Number Displays the real account number that is linked to the selected From Virtual Account. Note:
This read only field appears after selecting the Transfer From field.Amount Specify the currency and amount to be transferred. Note:
Funds Transfer can be initiated only between Virtual Accounts belonging to the same real account.Remarks Specify the remarks on the transaction. - In the Party Name field, select the party name and ID from the drop-down list.
- In the Transfer From field, Click Search icon to Select
the Virtual Account from the list.
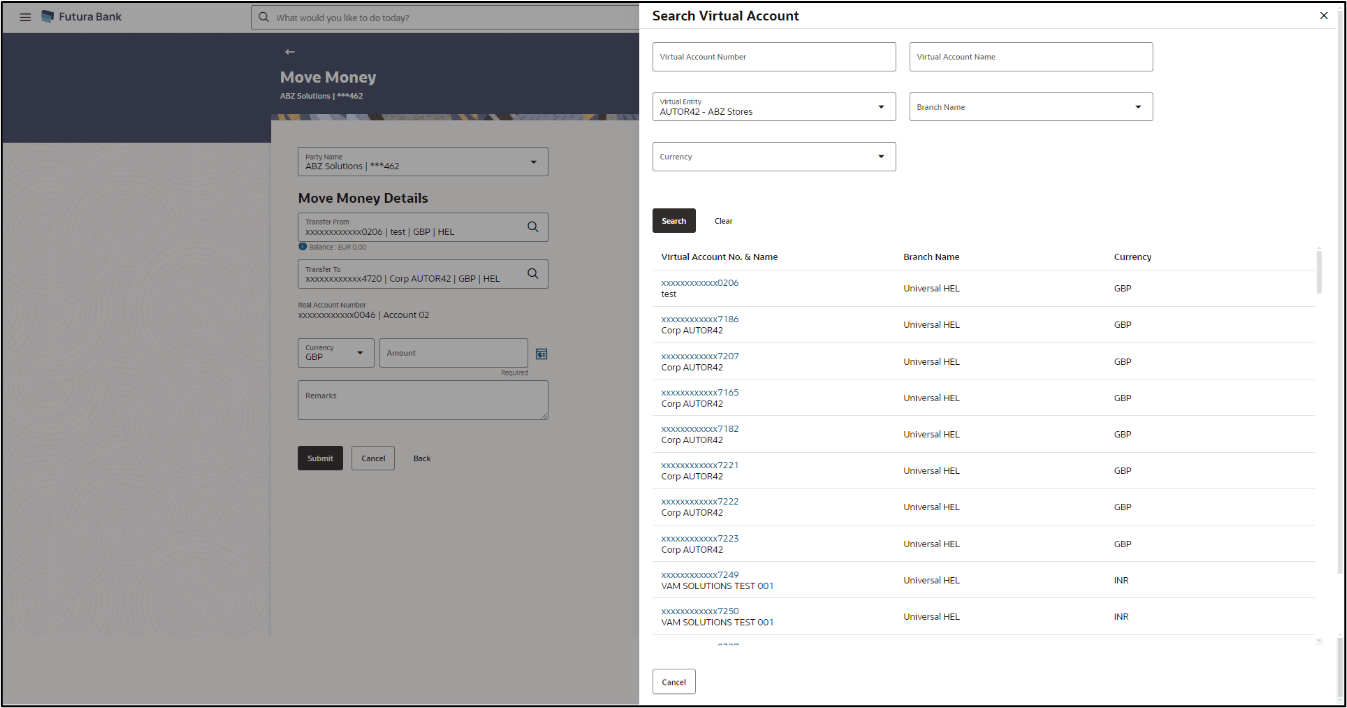
Search Virtual Account overlay appears.
- In the Transfer To field, click Search icon to search the Virtual
Account.Search Virtual Account overlay appears.For more information on fields, refer to the field description table.
Figure 12-2 Search Virtual account overlay screen
Table 12-2 Search Virtual Account Overlay Screen - Field Description
Field Description Virtual Account Number Specify the Virtual Account number. By default, the primary party of the logged-in user is selected.
Note:
Based on the party name selection, the mapped Virtual Accounts are displayed.Virtual Account Name Specify the Virtual Account name. Virtual Entity Select the Virtual Entity. Branch Name Select the branch of the account. Currency Select the currency of the account. Search Results
Note:
User can view only the configured number of Virtual Account Number in the search resultsTable 12-3 Search Results Field Description
Field Description Virtual Account No & Name Displays the Virtual Account number and name. Branch Name Displays the Virtual Account name. Currency Displays the currency of the account. - In the Amount field, select the currency and enter the amount to be transferred.
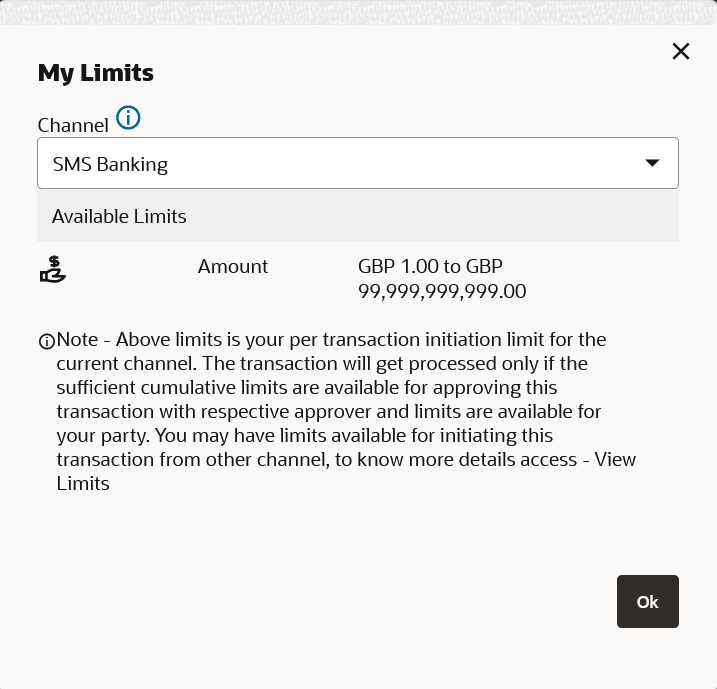
- Click icon to view the transaction limit for the selected channel.
The My Limits pop-up screen appears.
Table 12-4 My Limits Field Description
Field Description Channel Select the channel for which the transaction limits must be displayed from the list. Available Limits Displays the available limits for the selected channel. - In the Remarks field, specify the remarks on the transaction.
- User can perform an one of the following action :
- Click Submit.
- Click Cancel to cancel the transaction.
- The Review screen appears. Verify the details and click
Confirm.
User can also Perform any one of the following action:
- Click Cancel to cancel the transaction.
- Click Back to navigate back to the previous screen.
The user is directed to Other Details screen with values in editable form.
- The success message of money moved appears along with the reference number. User can also perform the following action:
Click Home to navigate to the dashboard.
Parent topic: Payments Using Virtual Accounts


