30.5 Linkages
This topic provides the systematic instructions to capture the Linkages details in the application.
This tab allows the user to link a deposit account while initiating a transaction.
- Specify the Linkages details.
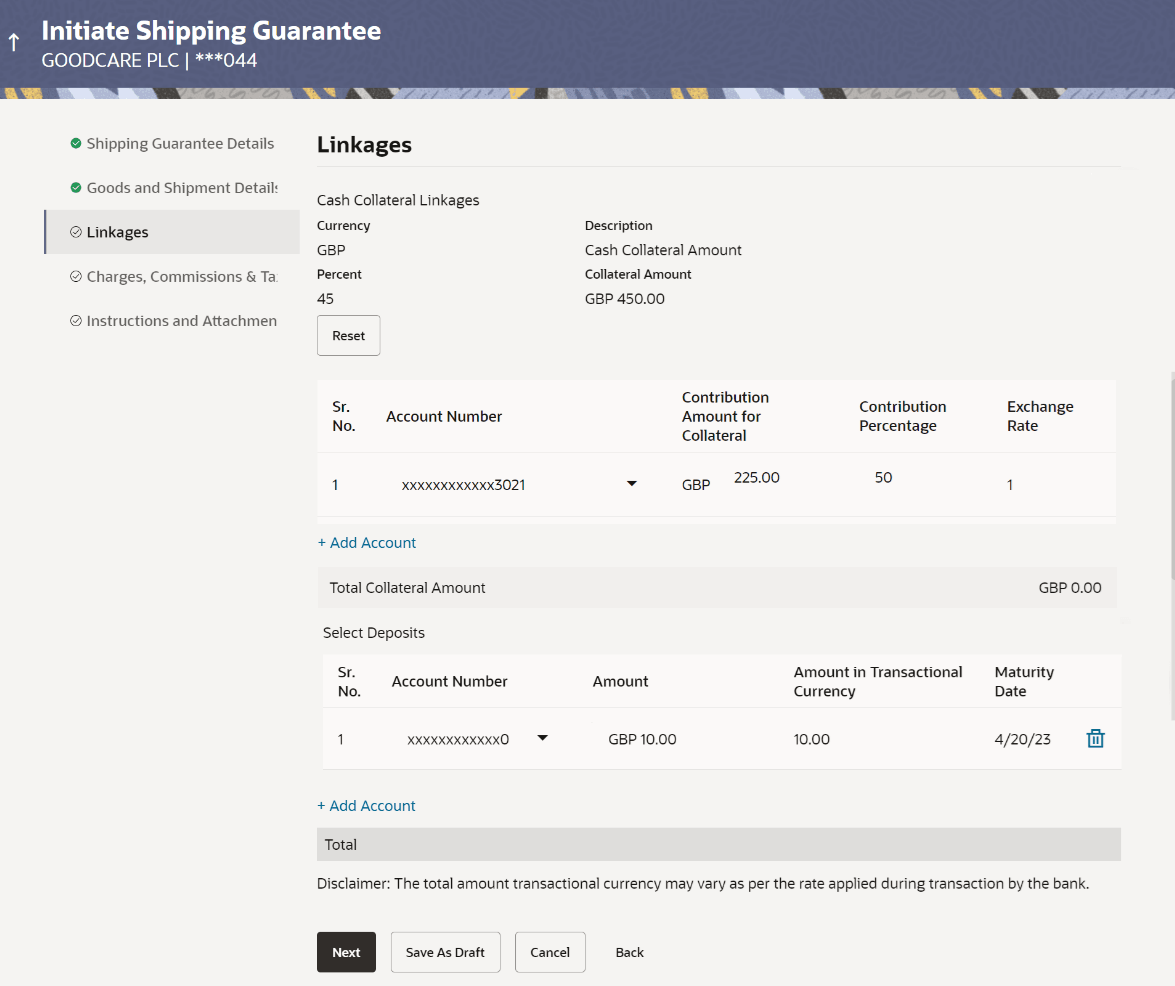
Figure 30-6 Initiate Shipping Guarantee - Linkages tab
Note:
The fields which are marked as Required are manadatory.For more information refer to the field description table below:
Table 30-6 Initiate Shipping Guarantee - Linkages - Field Description
Field Name Description Cash Collateral Linkages Specify the Cash Collateral Linkages details based on the following table: Note:
Multiple lines for Collateral details to be supported as multiple Collateral accounts can be used.Currency Displays the contract currency of cash collateral as maintained at back office. Description Displays the description of collateral linkage. Percent Displays the percentage of LC to be used as collateral – as maintained under the Shipping Guarantee. Collateral Amount Displays the amount to be used as Collateral for LC. The Collateral Amount gets calculated by the system, when the user enters the value in Percent field.
Sr. No. Displays the serial number of the record. Account Number Select the account number from the list of accounts that are mapped to the user. Contribution Amount for Collateral Specify the amount to be used from the selected account towards the collateral. The Contribution Amount for Collateral gets calculated by the system, when the user enters the value in Contribution Percentage field.
Contribution Percentage Displays the percentage of the total collateral to be taken from the selected account. Percentage of contribution gets calculated by the system, when the user enters the value in Contribution Amount for Collateral field.
Exchange Rate If the selected account is in another currency from that of contract’s currency the exchange rate between them is to be displayed. Contribution amount in Account currency Displays the amount to be contributed from selected account in the account’s currency. Total Collateral Amount Displays the total collateral amount is the sum of all the Contribution Amount for Collateral.. Select Deposits Specify the deposit account details based on the following table: Sr. No. Displays the serial number of the record. Account Number Select the deposit account that has to be mapped to the transaction. Amount Specify the amount that is to be linked for the transaction, and partial linkages to be supported. Amount in Transactional Currency Displays the tentative equivalent amount in transactional currency. Maturity Date Displays the maturity date of the deposit. Total Deposit Amount Displays the total Deposit AmountThe total deposit amount. - In the Cash Collateral Linkages section, specify the value for Percent.
The system fetches the value in Collateral Amount field.
- Click Reset if you want to change the value.
- Click the Add Account link to add the new account.
- From the Account Number list, select the appropriate account that has to be mapped to the transaction.
- Specify the contribution collateral amount in the Contribution Amount for Collateral field.
- In the Deposit Linkage section, elect the appropriate deposit account from the Account Number list.
- Specify the amount in the Amount field.
- Perform any one of the following actions:
- Click the Add Account link to add multiple cash collateral linkage.
- Click Delete to delete the cash collateral linkage.
- Perform any one of the following actions:
- Click Next to save the entered details and proceed to the next
level.
The Charges, Commissions and Taxes tab appears in the Initiate Shipping Guarantee screen.
- Click Save As Draft, system allows transaction details to be saved as a template or draft. (For more details, refer Save As Template or Save As Draft sections.)
- Click Cancel to cancel the
transaction.
The Dashboard appears.
- Click Back to go back to previous screen.
- Click Next to save the entered details and proceed to the next
level.
Parent topic: Initiate Shipping Guarantee
