4.1 User Management – Search/ View User
This topic provides the systematic instructions to corporate administrators for searching and viewing the details of existing users.
Administrator can search only those users who are associated with the same party ID mapped to them. Corporate administrators can also change the user status or the channel access permission for a user using this screen.
Default search is available with User Name, whereas user can be searched by providing other details also.
To search and view details of the existing users
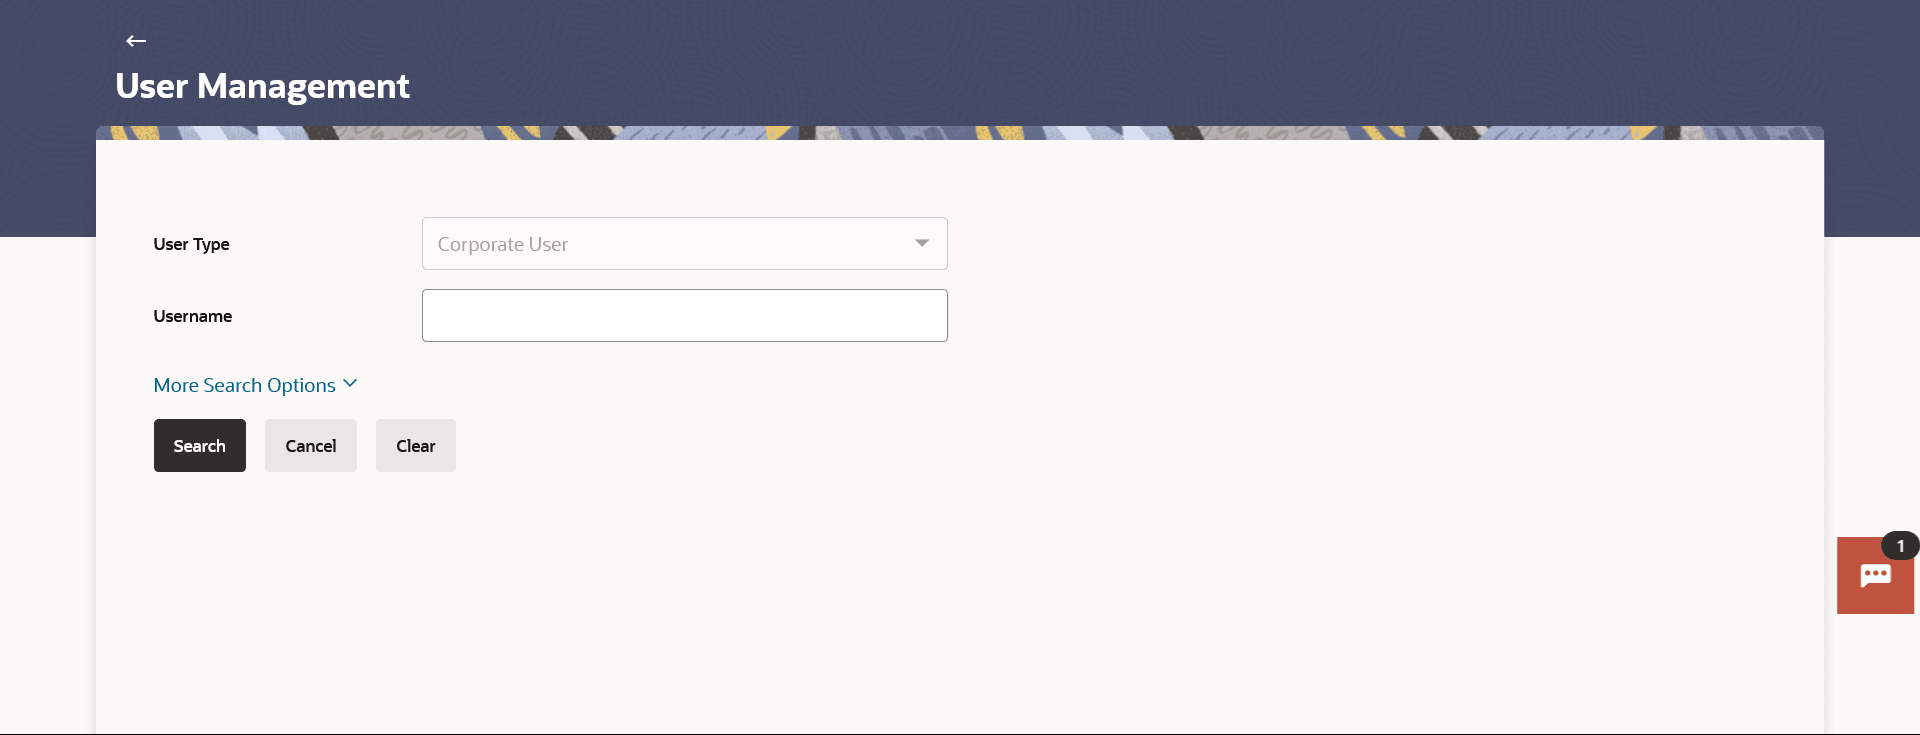
- Navigate to the User Management screen.
Note:
The fields which are marked as Required are mandatory.For more information on fields, refer to the field description table.
Table 4-1 Field Description
Field Name Description User Type User type is always defaulted to ‘Corporate User’. Party Name Enter the user ID /User name. Partial search is allowed.
- Click Search User, then click the More Search
Options link.
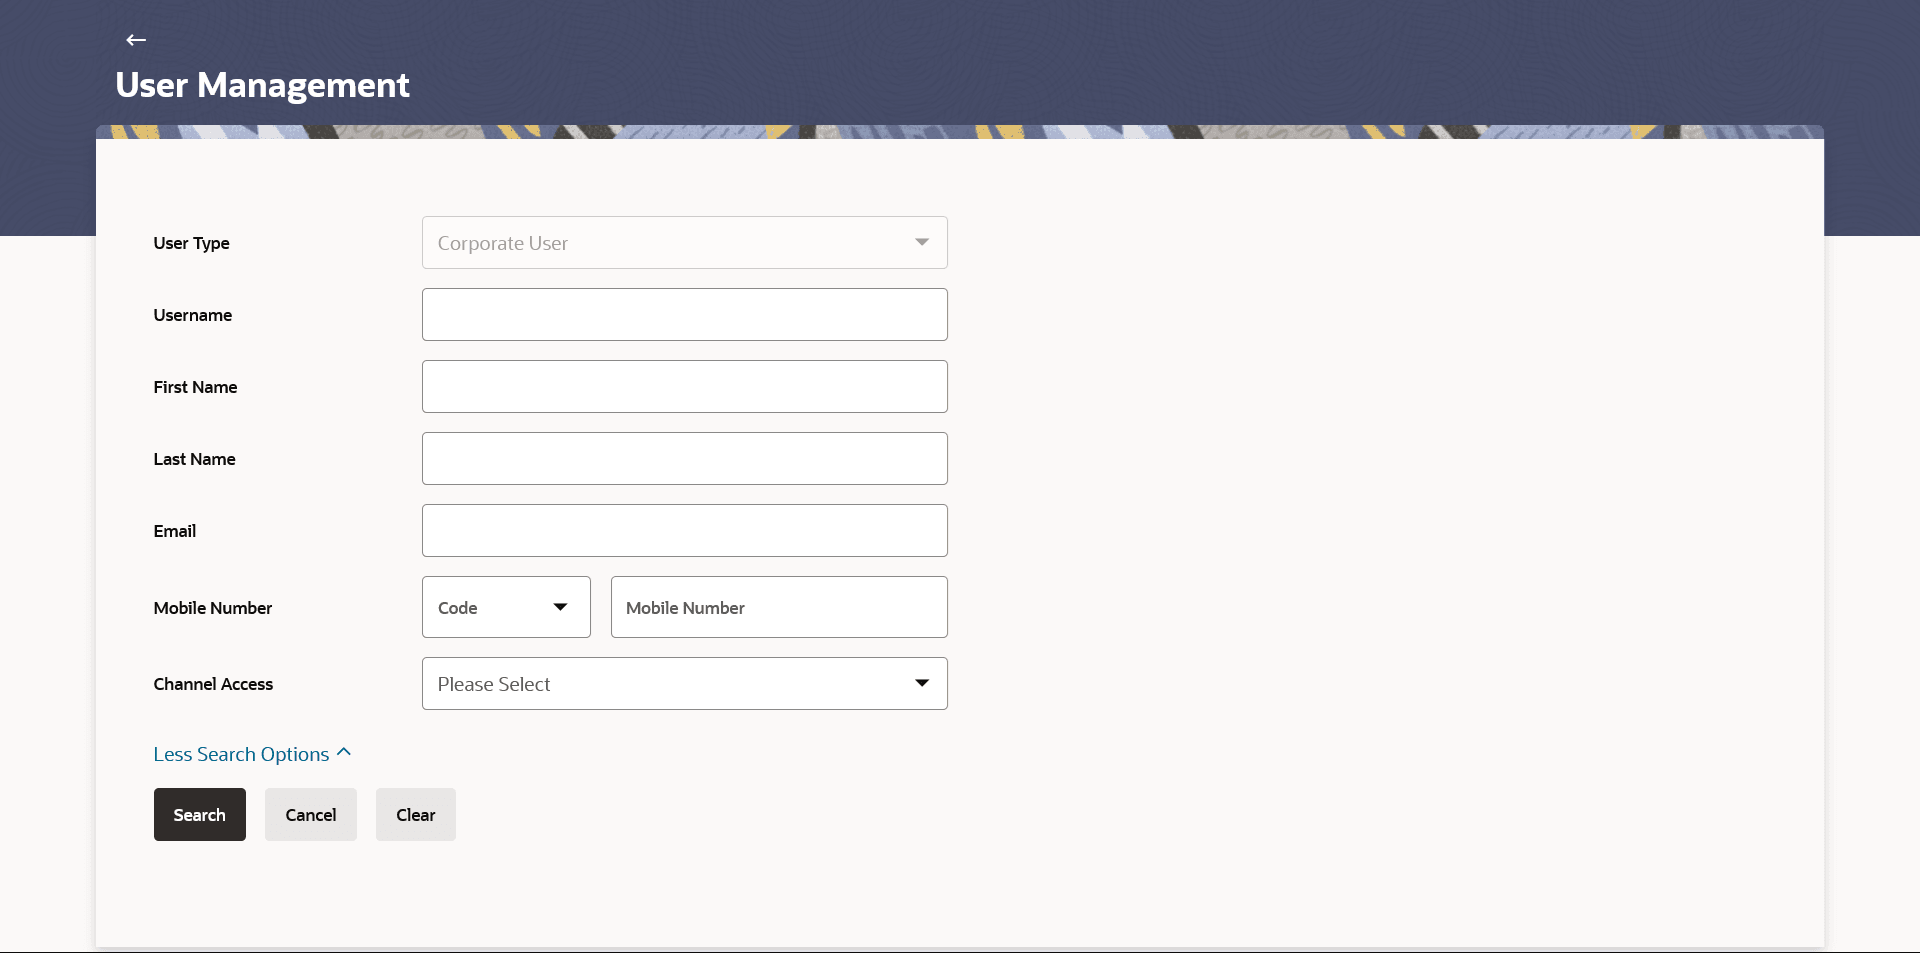
The screen will be displayed with additional user search criteria.
Figure 4-2 User Management – Search User - More Search Options
Note:
The fields which are marked as Required are mandatory.For more information on fields, refer to the field description table.
Table 4-2 User Management – Search User - More Search Options - Field Description
Field Name Description User Type User type is always defaulted to ‘Corporate User’. User Name To search the user with the user name/user ID. Partial search is allowed.
First Name Allows to search based on first name of the user. Last Name Allows to search based on last name of the user. Email Allows to search based on email id of the user. Mobile Number Allows to search based on mobile number of the user. Note:
User can select international subscriber dialing (ISD) code (country code) while selecting mobile number.User Type User type is always defaulted to Corporate User. - Perform one of the following actions:
- Enter the search criteria, click
Search.
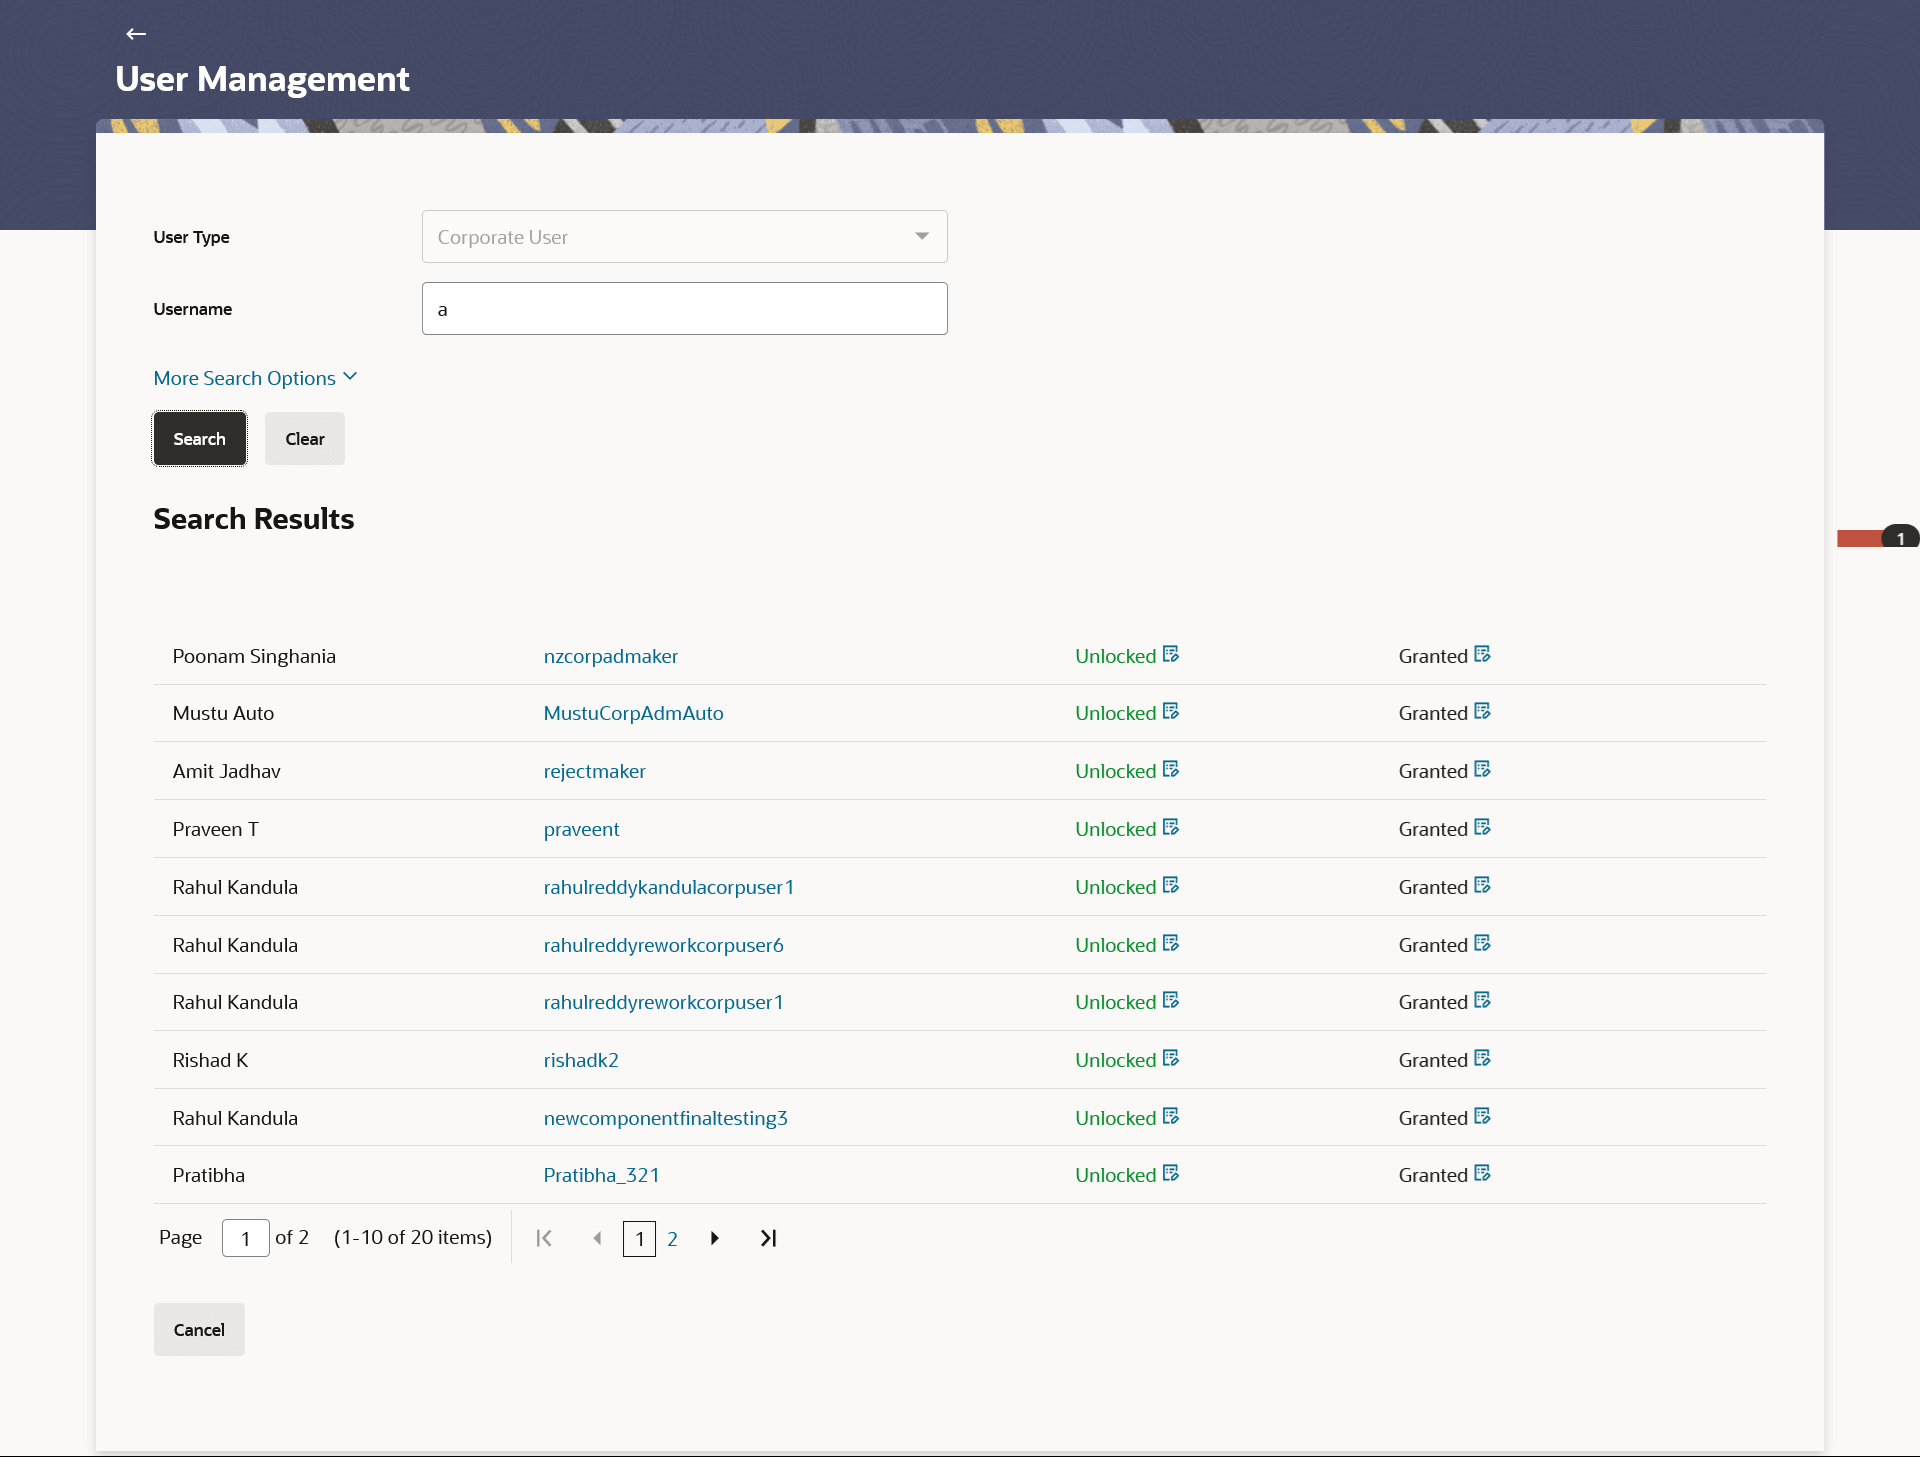
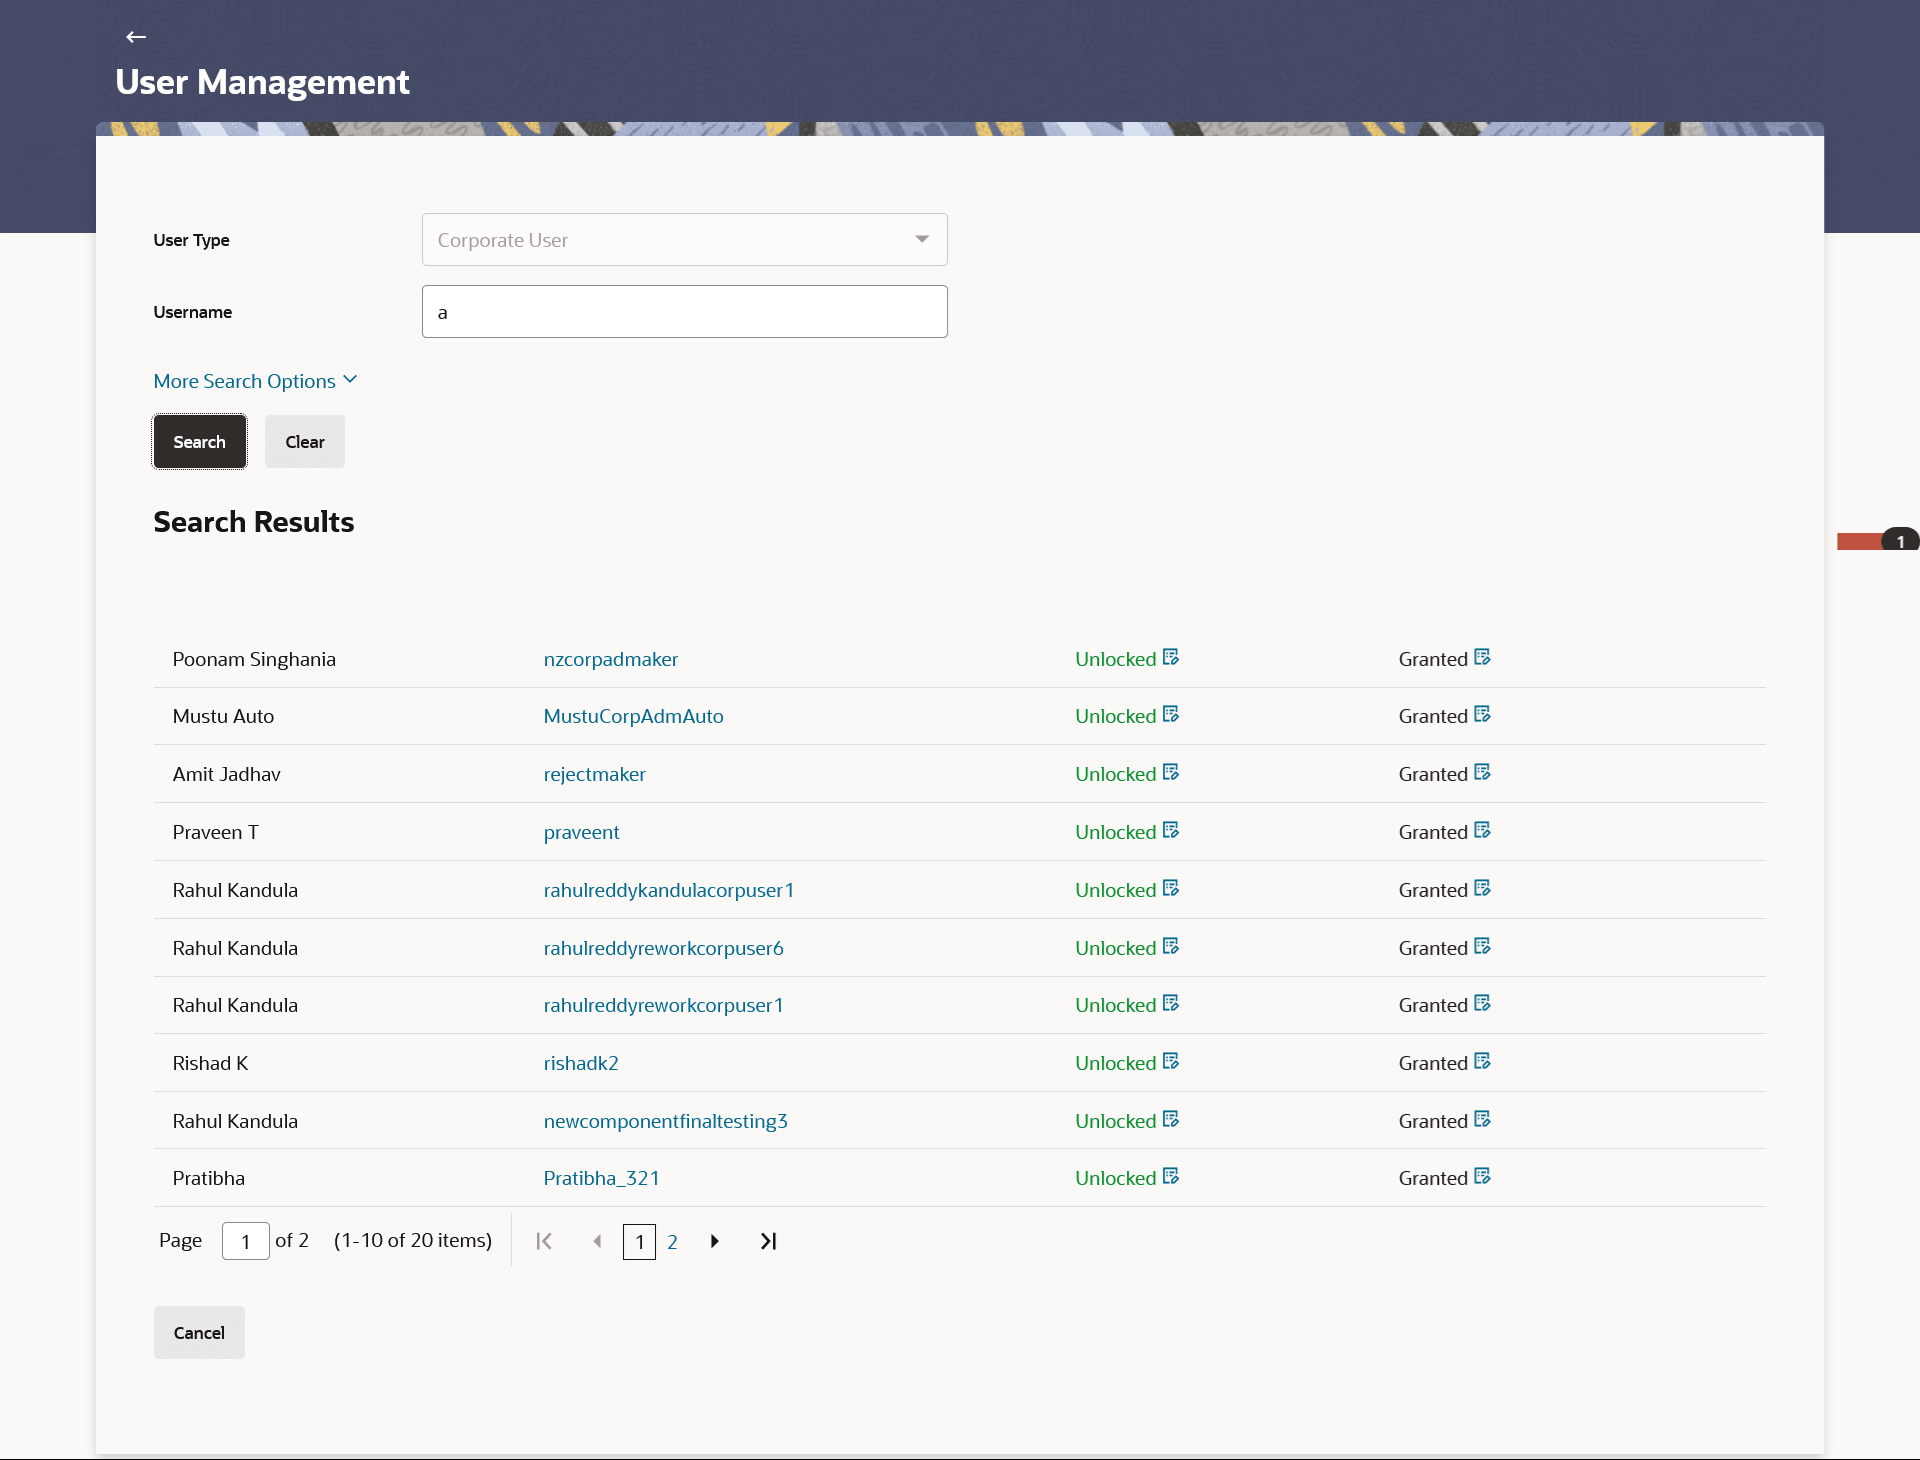
The search results appear on the User Management screen based on the search parameters.
- Click Cancel to cancel the operation and navigate back to Dashboard.
- Click Clear to clear the input search parameters.
Figure 4-3 User Management - Search Results
Note:
The fields which are marked as Required are mandatory.For more information on fields, refer to the field description table.
Table 4-3 User Management - Search Results- Field Description
Field Name Description Search ResultsFull Name Full Name First name and last name of the user. User Name User Name of the user. Status Status of the user, Locked or Unlocked. Channel Access Indicates whether channel access is granted. Click to grant / revoke access rights. Note:
Channel access feature will only be available with DB authenticator as Identity Management System.If the search results are more than five, pagination will be enabled.
- Enter the search criteria, click
Search.
- Click the User Name link to view the user details.
To view the user details:
- In The User Management - Search Results section, click
the User Name link of the record for which you want to
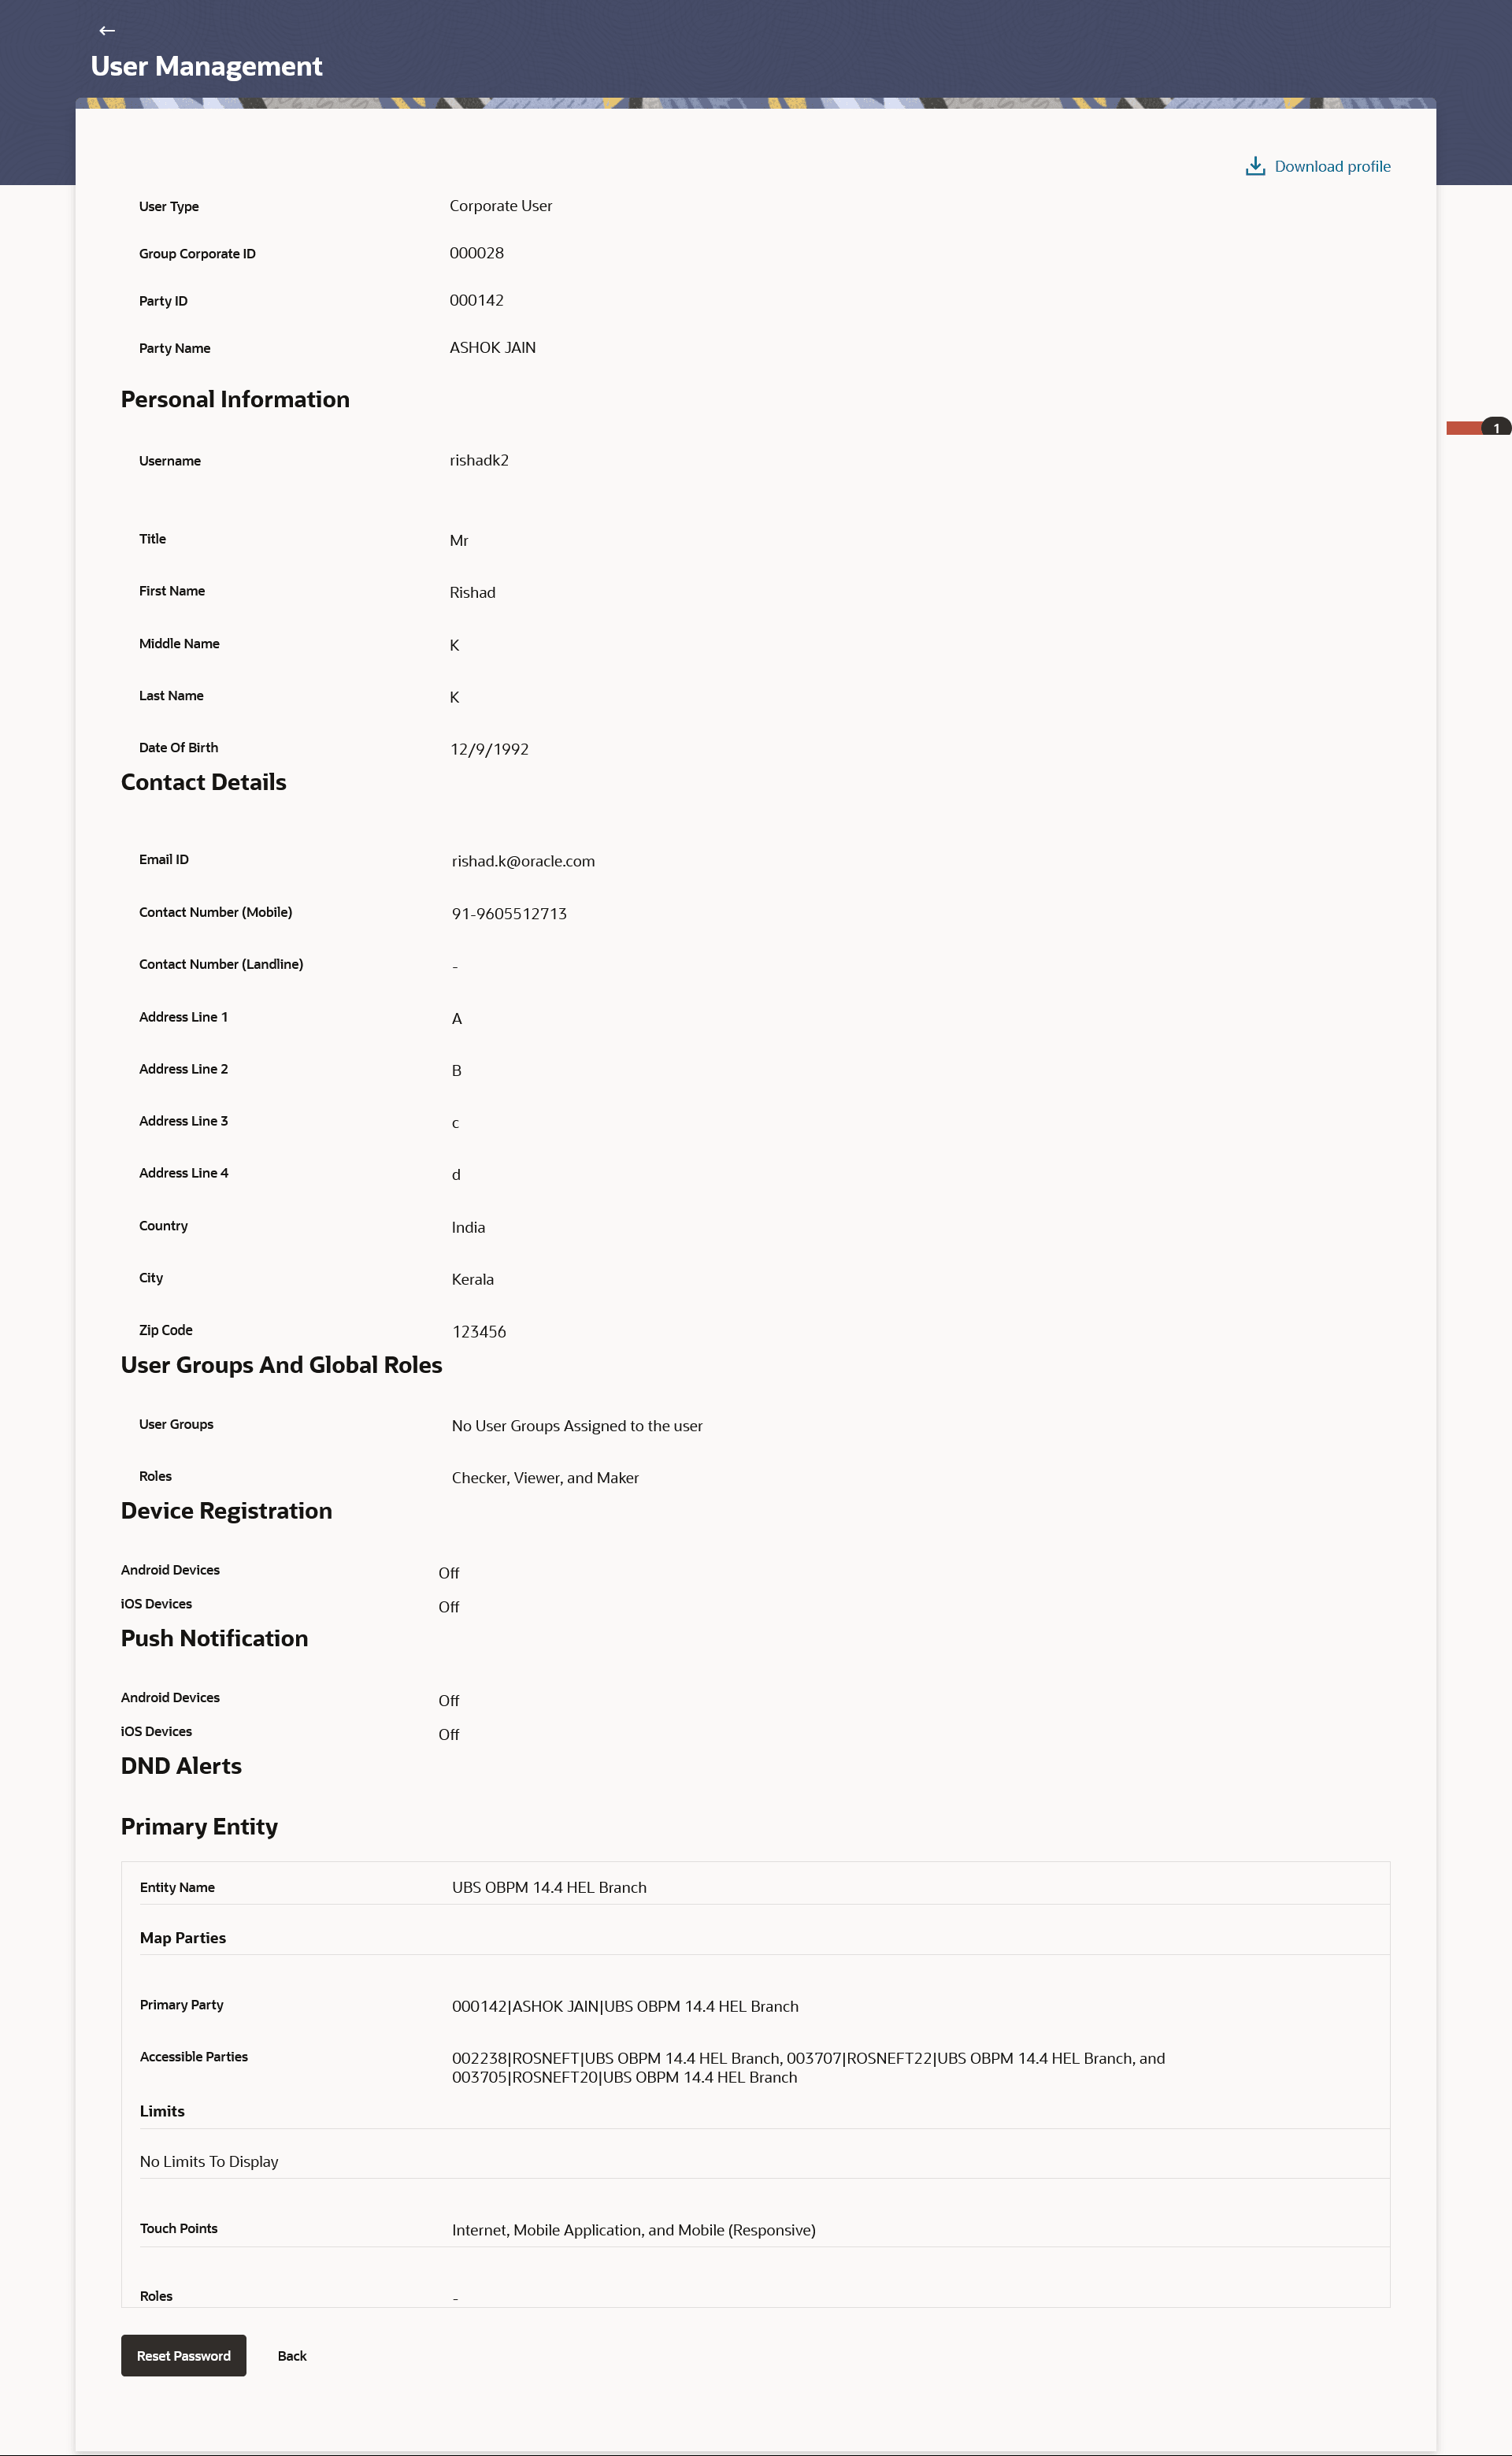
view the details.The User Management - View screen appears.
Note:
The fields which are marked as Required are mandatory.For more information on fields, refer to the field description table.
Table 4-4 User Management – View- Field Description
Field Name Description User Type User type is always defaulted to ‘Corporate User’. Party ID Party ID mapped to the user. Party ID is defaulted to the mapped Party ID of the Corporate Administrator.
Party Name Party name of Party ID mapped to the user. Party name of Party ID mapped to the logged in Corporate Administrator.
Personal Information User Name Name (login ID) of the user. Title Title of the user. - Mr
- Mrs
- Miss
- Ms
- Dr
- Master
First Name First name of the user. Middle Name Middle name of the user. Last Name Last name/ surname of the user. Date of Birth Date of birth of the user. Contact Details Email ID Email id of the user. Contact Number (Mobile) Displays mobile number of the user alongwith an international subscriber dialing (ISD) code. Contact Number (Land Line) Phone number (land line) number of the user. Address Line 1-4 Address of the user. Country Country of the user. City City in which the user resides. Zip Code The postal code of the city in which the user resides. Limits & Roles User Groups Displays the user groups that are assigned to the user. Limits – Touch Point/Group If limit check is required, assigned limit packages for applicable touch points get displayed here.
Touch Points/ Group Name of touch points/ groups maintained for which the limit packages are mapped. Package Name of the limit package mapped against specific touch points /touch point groups Roles Application roles mapped to the user. Touch Points Select Touch Points The touch points (banking channels) allows a user to perform transactions using the touch points. The touch points could be:
- Mobile Application
- Mobile (Responsive)
- Internet
- Missed Call Banking
- SMS Banking
- Wearables
- Snapshot
- Siri / Chatbot
- API Access
- Soft Token Application
Device Registration Android Devices This option lets the administrator to deregister the android devices/s. Enabling of the device happens when the user installs and registers on the app on the android device. Administrator cannot manually enable the device. If the Administrator deregisters the device, the user gets logged out from all the android devices and his alternate login gets disabled from all the android devices on which the user has installed the application.
iOS Devices This option lets the administrator to deregister the iOS devices/s. Enabling of the device happens when the user installs and registers on the app on the iOS device. Administrator cannot manually enable the device. If the Administrator deregisters the device, the user gets logged out from all the iOS devices and his alternate login gets disabled from all the iOS devices on which the user has installed the application.
Push Notifications Android Devices This option lets the administrator disable push notifications for android devices. Enabling of the push notification is done by user himself and administrator cannot do the same. If the administrator disables this, the user will stop getting notifications as a pop-up message (push notification) on the user's registered mobile number.
iOS Devices This option lets the administrator disable push notifications for iOS devices. Enabling of the push notification is done by user himself and administrator cannot do the same. If the administrator disables this, the user will stop getting notifications as a pop-up message (push notification) on the user's registered mobile number.
Note:
To receive push notifications (for both iOS and android) user will have to allow the same on the device settings - Perform one of the following actions:
- Click Edit to edit the user
details.
The User Management - Edit User screen appears.
- Click Reset Password to reset user’s password. A
warning message Do you want to reset the password? appears on the
screen.
If user clicks Yes, a reset password confirmation screen is displayed. New password gets communicated to the user on registered email address (if the alert for the same is maintained) and the record for that user gets available in the Print password screen, from where it can be printed.
If user clicks No, the action gets cancelled.
- Click Cancel to cancel the operation and navigate back to Dashboard.
- Click Back to go back to the previous screen.
- Click the
 to download the user details.
User Management - Change user status
This section allows you to lock and unlock a user.
To lock or unlock a user:- Enter the search criteria, click
Search.
The search results appear on the User Management screen based on the search parameters.
- Click the
in the Status column to lock / unlock a user.

The User Status Maintenance window appears.
- In the Lock Status field move the slider to lock / unlock a user.
- In the Reason field enter the appropriate description.
- Perform one of the following actions:
- Click Submit to save.
- Click Cancel to close.
User Management - Channel Access Permission
This section allows the administrator to grant / revoke channel access for a user. In case administrator changes the channel access from grant to revoke; user will not be able to access his channel banking.
Note:
Channel Access feature is only available and displayed if the Application is configured on DB Authenticator as Identity Management system.To grant or revoke channel access:- Enter the search criteria, click
Search.
The search results appear on the User Management screen based on the search parameters.
- Click the

in the Channel Access column to grant / revoke channel access to a user.The User Channel Access screen appears.
- In the Channel Access field move the slider to grant / revoke channel access rights for a user.
- In the Reason field enter the appropriate description.
- Perform one of the following actions:
- Click Submit to save.
- Click Cancel to close.
- Click Edit to edit the user
details.
Parent topic: User Management
