6.2 Limit Package Management - Create
This topic provides the systematic instructions for corporate administrators to create limit packages for specific channels or touch points, based on the information provided in the designated fields.
To create a limit package:
- Navigate to the Limit Package Management screen.
- Click Create. The Limit Package Management - Create screen appears.
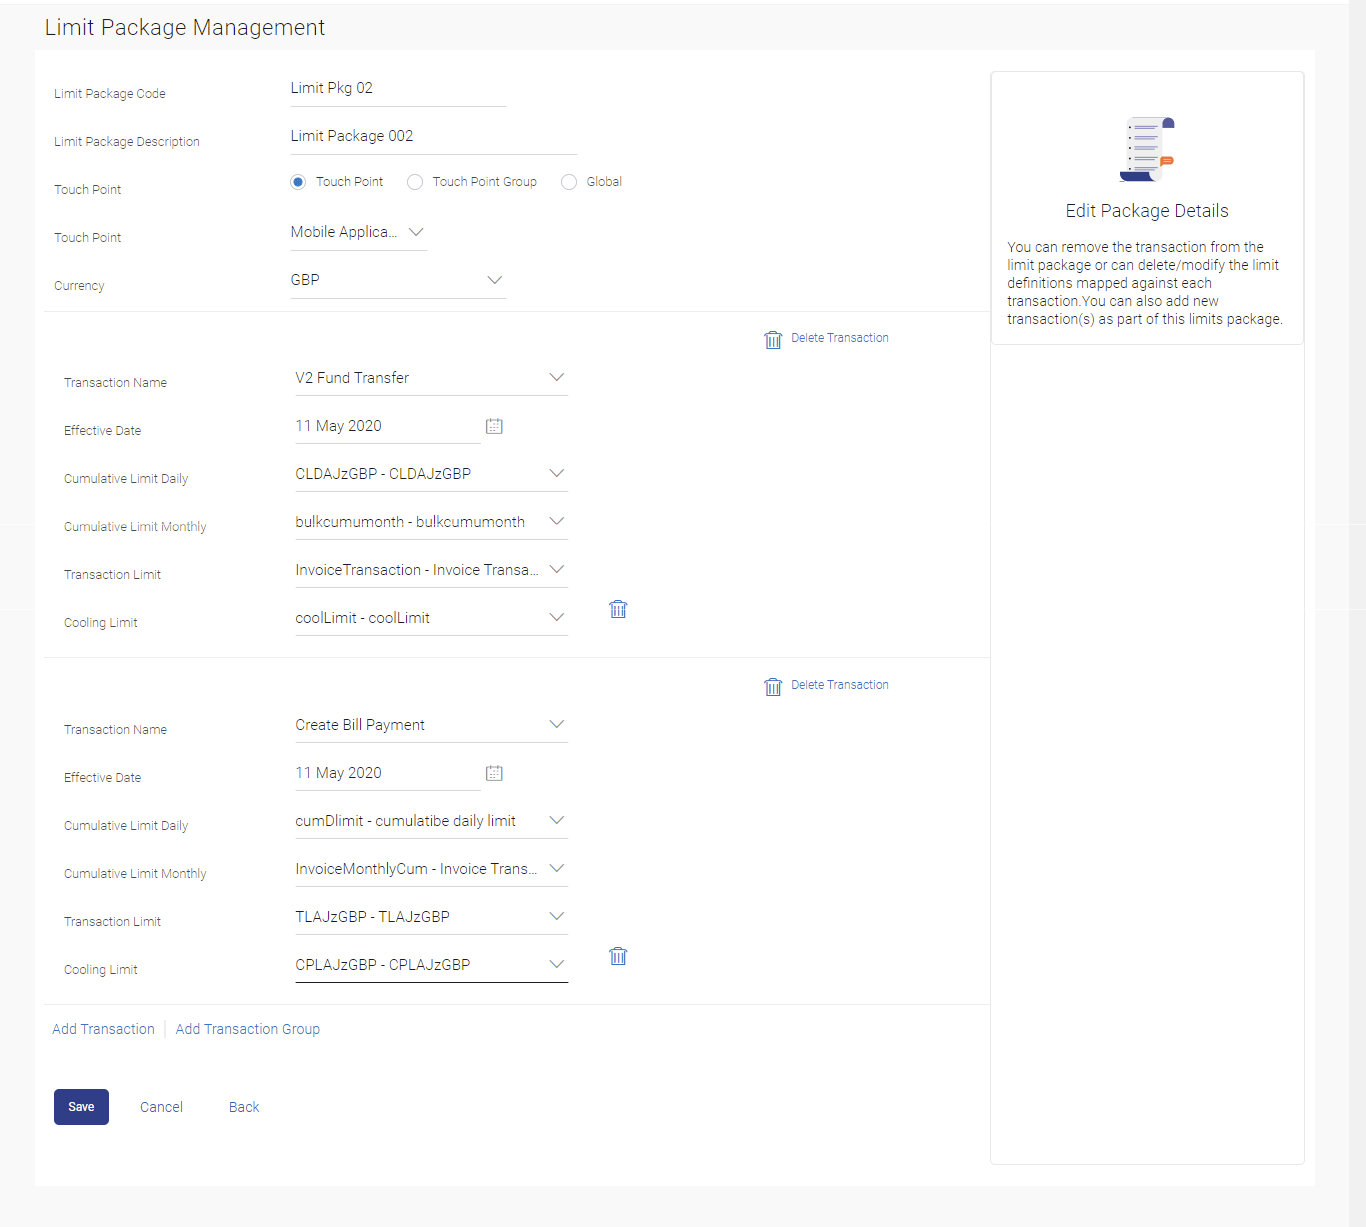
Figure 6-4 Limit Package Management - Create
Note:
The fields which are marked as Required are mandatory.For more information on fields, refer to the field description table.
Table 6-3 Limit Package Management - Create- Field Description
Field Name Description Limit Package Code The unique code /name of the limit package. Limit Package Description Description of the limit package. Touch Point Touch points and the group of touch points mapped with the limit package. The options are:
- Touch Point
- Touch Point Group
- Global: This a group of touch points created automatically (default touch point group has all internal and external touch points).
Touch Point Touch points mapped to the limit package. This field is displayed and enabled if you select Touch Point option in the Touch Point field.
Touch Point Group Touch point group mapped to the limit package. This field is displayed and enabled if you select Touch Point Group option in the Touch Point field.
Currency The currency to be set for the limit package. Transaction Name/ Transaction Group Name Transaction or Transaction Group name, to which the limit has to be assigned. Effective Date The effective date of the limit package, for the selected transaction. Cumulative Limit Daily Select the Cumulative Limit Definition for the selected transaction/transaction group for daily limits. Cumulative Limit Monthly Select the Cumulative Limit Definition for the selected transaction/transaction group for monthly limits. Transaction Limit Select the Transaction Limit Definition for the selected transaction/ transaction group for daily limits. - In the Limit Package Code field, enter the code for the limit package.
- In the Limit Package Description field, enter the description of the limit package.
- In the Touch Point field, select the appropriate option.Perform one of the following actions:
- If you select Touch Point;
- From the Touch Point list, select the appreciate option.
- If you select Touch Point Group;
- From the Touch Point Group list, select the appreciate option.
- If you select Touch Point;
- From Currency list, select the appropriate currency to be
associated with the Limit Package.It enables the Transactions / Transaction Group - Limits section.
- Click the Add Transaction Group link to assign limits to a transaction group. By default system displays Transactions option for assigning the limit.
- From the Transaction Name/Transaction Group Name list, select
the appropriate option.
Note:
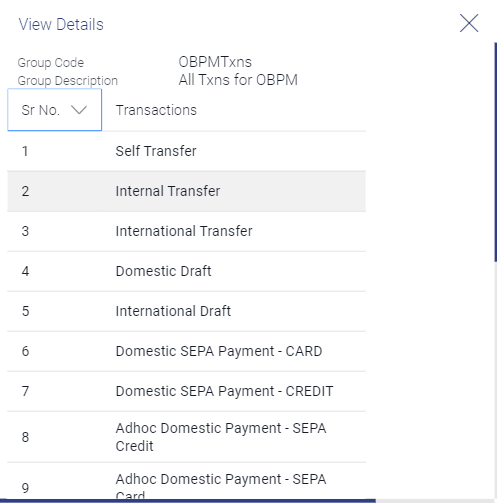
Click View Details link to view transaction group details.Figure 6-5 View Details -Transaction Group Details
Note:
The fields which are marked as Required are mandatory.For more information on fields, refer to the field description table.
Table 6-4 View Details -Transaction Group Details- Field Description
Field Name Description Group Code Unique code/name of the transaction group. Group Description Description of the transaction group. List of Transactions It lists all the transactions available under the transaction group. - Select the Effective Date from the calendar for the limit package in the Transactions / Transaction Group - Limits section.
- From the Cumulative Limit Daily, Cumulative Limit Monthly, Transaction Limit and Cooling Limit lists, select the appropriate limits.
- Perform one of the following actions:
- Click Add Transaction and repeat the steps 4 to 6, if you want to assign limits for more transactions.
- Click Add Transaction Group and repeat the steps 4 to 6, if you want to assign limits for more transactions groups.
- Click Back to navigate to previous screen.
- Perform one of the following actions:
- Click Save to save the
maintenance.
The Review screen appears.
- Click Cancel to cancel the transaction.
- Click Back to navigate to previous screen.
- Click Save to save the
maintenance.
- Perform one of the following actions from the Review
screen:
- Verify the details, and click
Confirm.
The success message of transaction submission appears.
Note:
You can click to delete a transaction limit of a transaction.
- Click Cancel to cancel the transaction.
- Click Back to navigate to previous screen.
- Verify the details, and click
Confirm.
- Click OK to complete the transaction.
Parent topic: Limits Package Management

