7.1 Create Virtual Multi-Currency Account
From the Dashboard, click Toggle menu, click Virtual Account Management, then click Virtual Multi-Currency Account. Under Virtual Multi-Currency Account, click Create Virtual Multi-Currency Account.
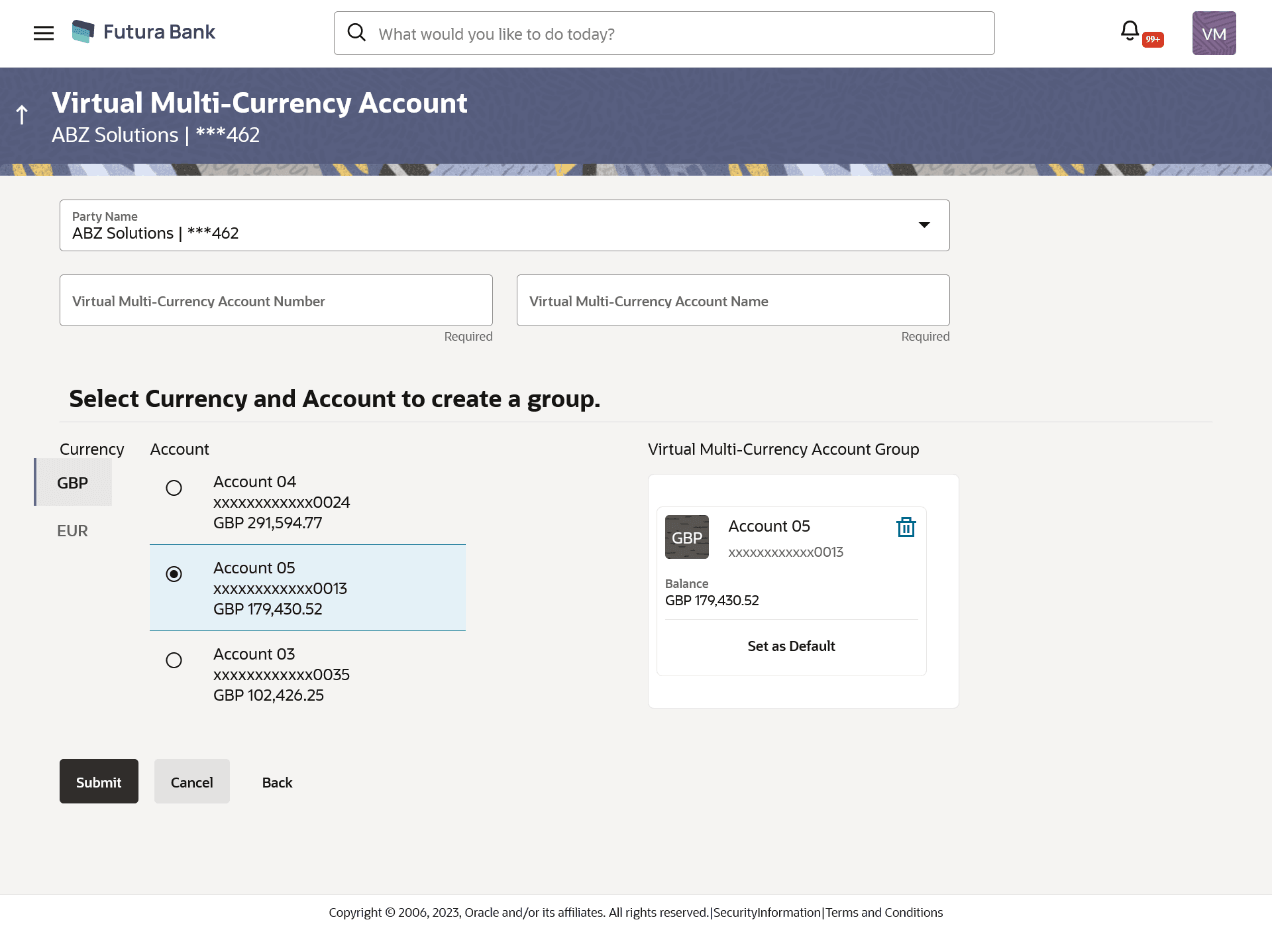
- Perform the following navigation to access the screen.From the Dashboard, click Toggle menu, click Virtual Account Management, then click Virtual Multi-Currency Account. Under Virtual Multi-Currency Account, click Create Virtual Multi-Currency Account.The Virtual Multi-Currency Account screen appears.
For more information on fields, refer to the field description table.Table 7-1 Virtual Multi-Currency Account - Field Description
Field Description Virtual Multi-Currency Account Number Specify the account number of virtual multi-currency account. Virtual Multi-Currency Account Name Specify the name of the virtual multi-currency account holder. Currency Displays the list of currencies for selection. Account Displays the list of the real accounts maintained under the selected currency. Note:
Only one Real account can be selected per currency.Virtual Multi-Currency Account Group Displays the list of Real Accounts selected for creating Virtual Multi-Currency Account. Note:
- Click Delete icon to remove the account
- Click Set as Default to default an account currency.
- In the Party Name field, select the party name and ID from the dropdown list.
- In the Virtual Multi-Currency Account Number field,
enter the account number.
Note:
The fields marked as Required are mandatory. - In the Virtual Multi-Currency Account Name field, enter the account name.
- Click any currency to get all Virtual Accounts Management enabled accessible Real Accounts maintained under that currency.
- Select any one Real Account from the list.Selected currency(s) and account(s) appears in Virtual Multi-currency Group column.
Note:
The user can select multiple such accounts (restricted to one real account per currency) and form a group. The user can also set one of the Real Account as Default to default payments. (This is an optional field). - Selected currency(s) and account(s) will appear in Virtual Multi-currency Group
column.
Note:
User can select multiple such accounts (restricted to one real account per currency) and form a group. User can also set one of the Real Account as “Default“ to default payments. (This is an optional field). - User can perform any one of the following action:
- Click Submit
- Click Cancel to cancel the transaction.
- User can perform any one of the following action:
- Click Submit
- Click Cancel to cancel the transaction.
- On the Review screen, Verify the details and click
Confirm.The success message of Virtual Multi-Currency Account creation appears along with the reference number and status.User can also perform any of the following action.
- Click Cancel to cancel the transaction.
- Click Back to navigate back to the previous screen.
- User can perform any one of the following action:
- Click Home to navigate to the application dashboard screen.
- Click Go To Overview to go to the Virtual Account Management Dashboard.
- Click Create More Virtual Multi-Currency Accounts to create more accounts.
Parent topic: Virtual Multi-Currency Account
