4.1 Create Virtual Account
- Perform any one of the following navigation to access the screen.
- From the Dashboard, click Toggle menu, click Virtual Account Management, then click Virtual Account. Under Virtual Account, click Create Virtual Account.
- From the Dashboard, click Toggle menu, click Virtual Account Management, then click Overview, and then click Virtual Entity Summary. Under Virtual Entity Summary, click Create Virtual Account.
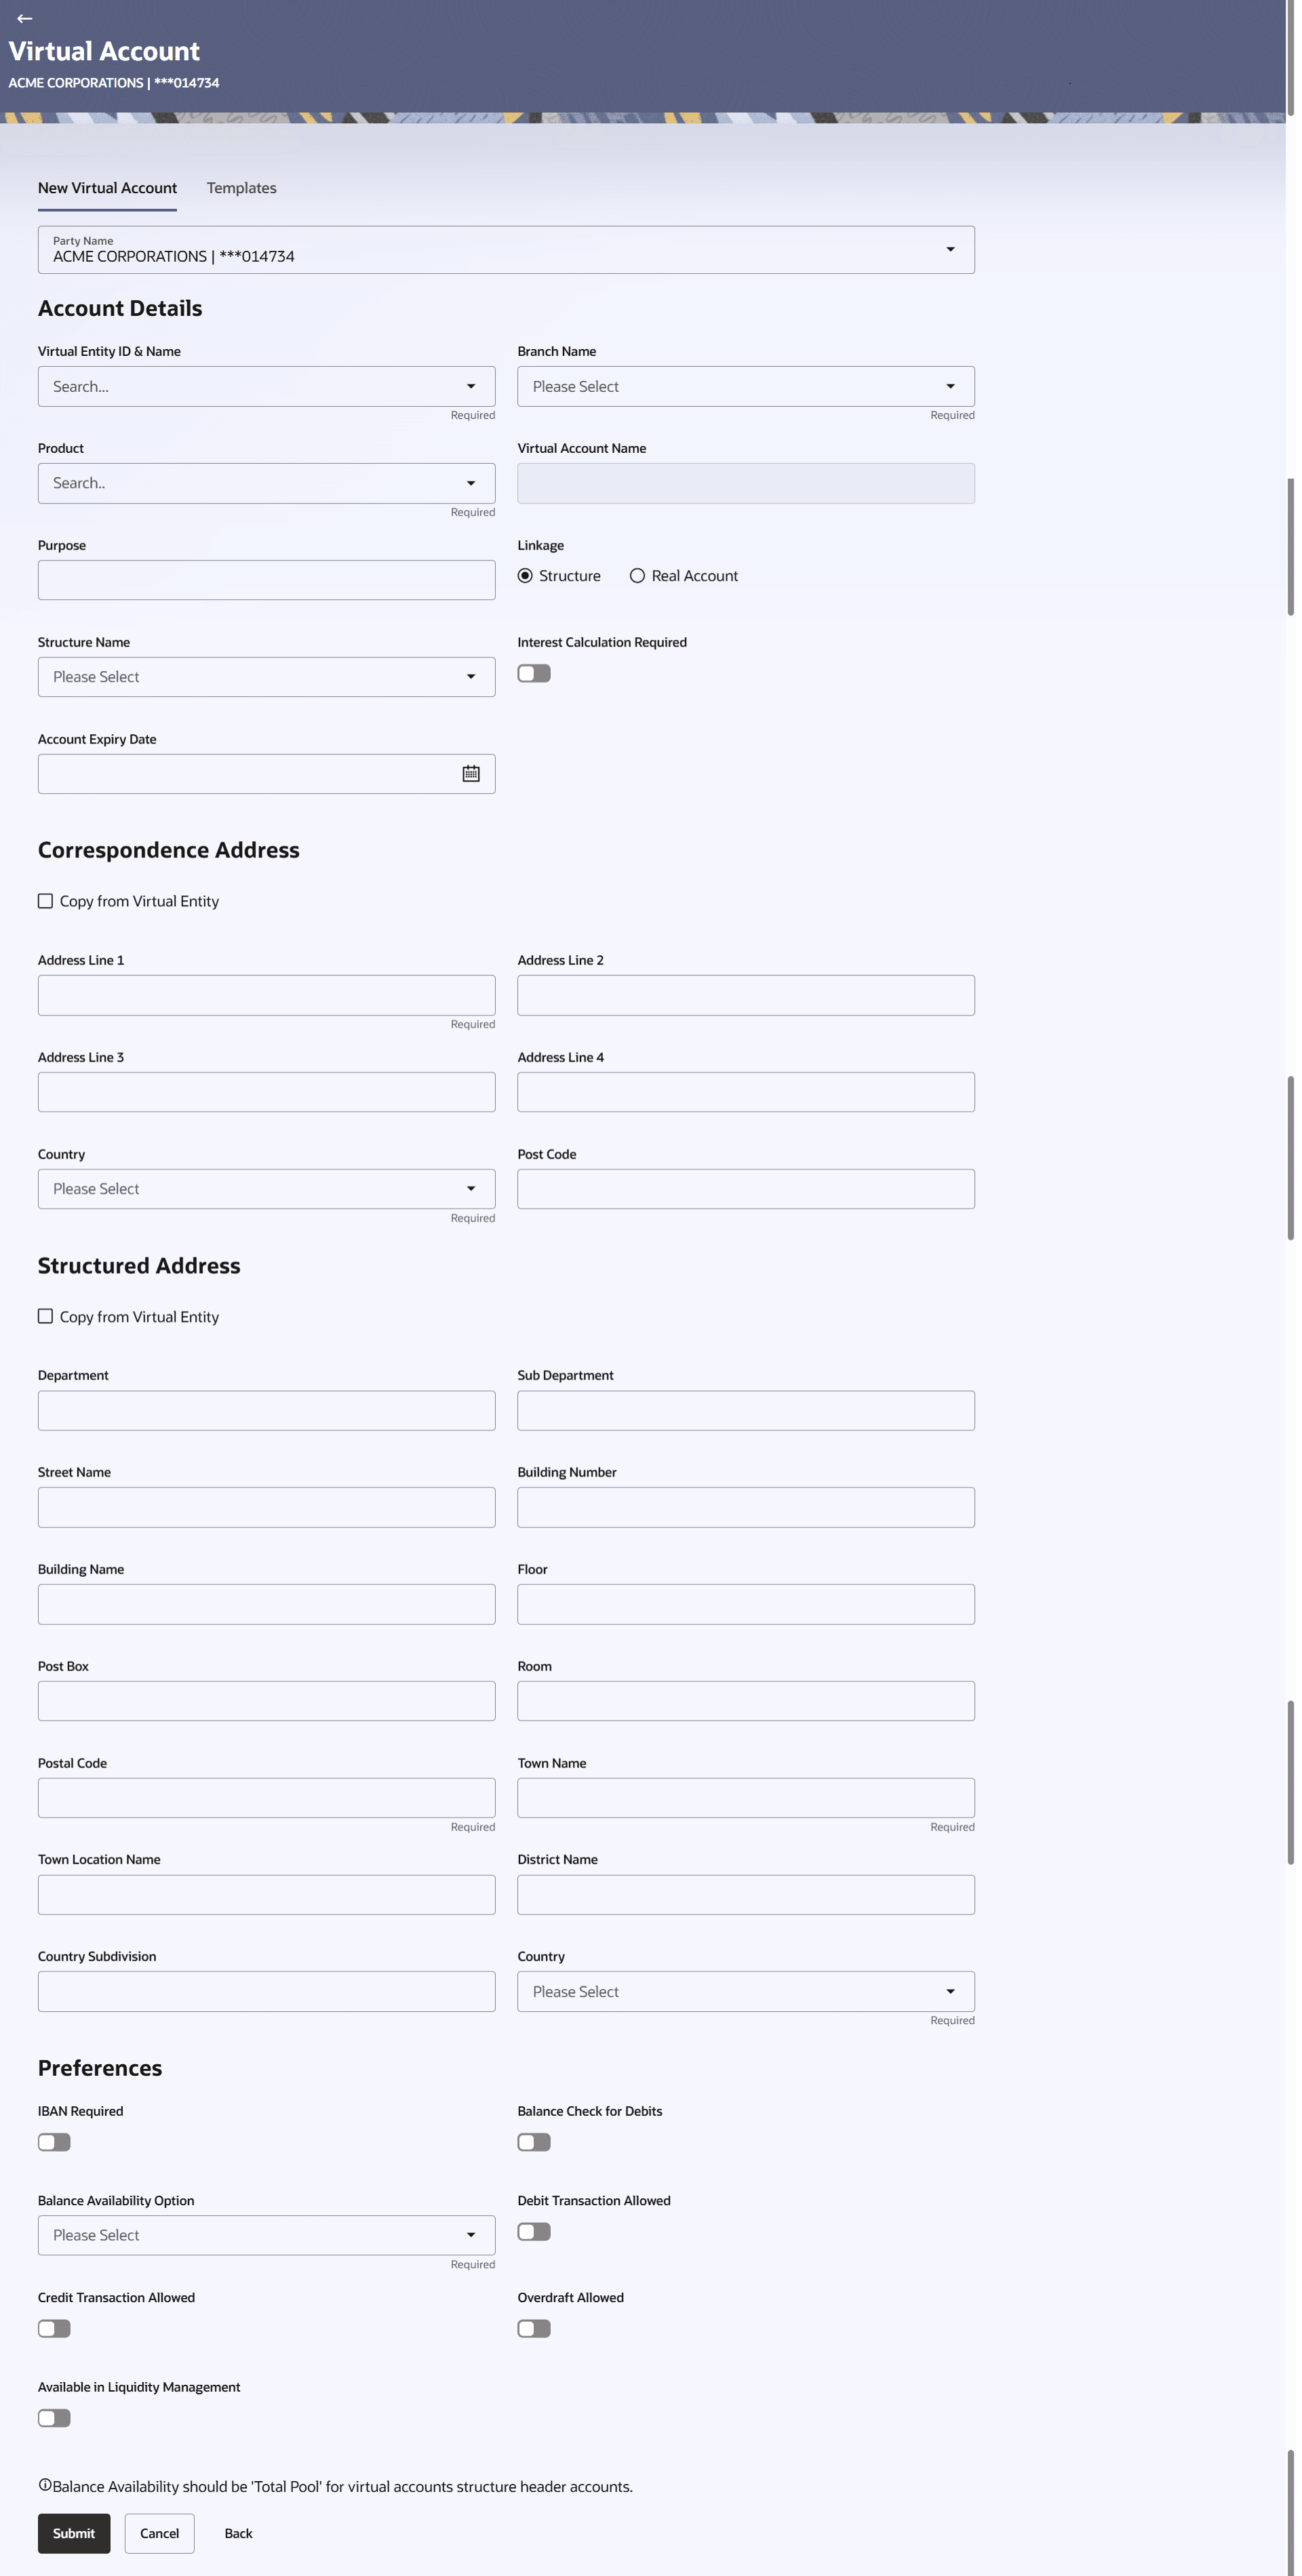
The Create Virtual Account screen appears. For more information on fields, refer to the field description table.Note:
The fields marked as Required are mandatory.Table 4-1 Create a Virtual Account - Field Description
Field Description Party Name Select the party name and ID from the drop-down list in which the Virtual Account must be created. By default, the primary party of the logged-in user is selected. Account details Information specified in below fields are related to Virtual account details Virtual Entity ID & Name Select the virtual entity ID and name under which the Virtual Accounts are created. Branch Name Select the Branch Name where Virtual Account is to be created. Note:
The user can view the branch names for which he has access to.Product Select the Virtual Account Product Virtual Account Name Specify the name of the Virtual Account holder. Note:
Based on the product selection, if the Virtual account name change is permitted at product level, then Virtual Account name will be defaulted from Virtual Entity name and the user will be allowed to change the description as per his choice during the flow.
If the Virtual account name change is not permitted at product level, then Virtual Account name will be defaulted from Virtual Entity Name (Read Only) and user will not be allowed to change the Virtual Account name and the field will remain non editable.
Purpose Specify the purpose of the creating a Virtual Account. Currency Select the currency for Virtual Account. Linkage Select the linkage type. The options are:- Structure
- Real Account
Structure Name Select the structure name to which the Virtual Account has to be added. This field is displayed if Structure is selected as Linkage preference.
Parent Account Number Select the Parent account number to which the Virtual Account has to be linked. This field is displayed if Structure is selected as Linkage preference.
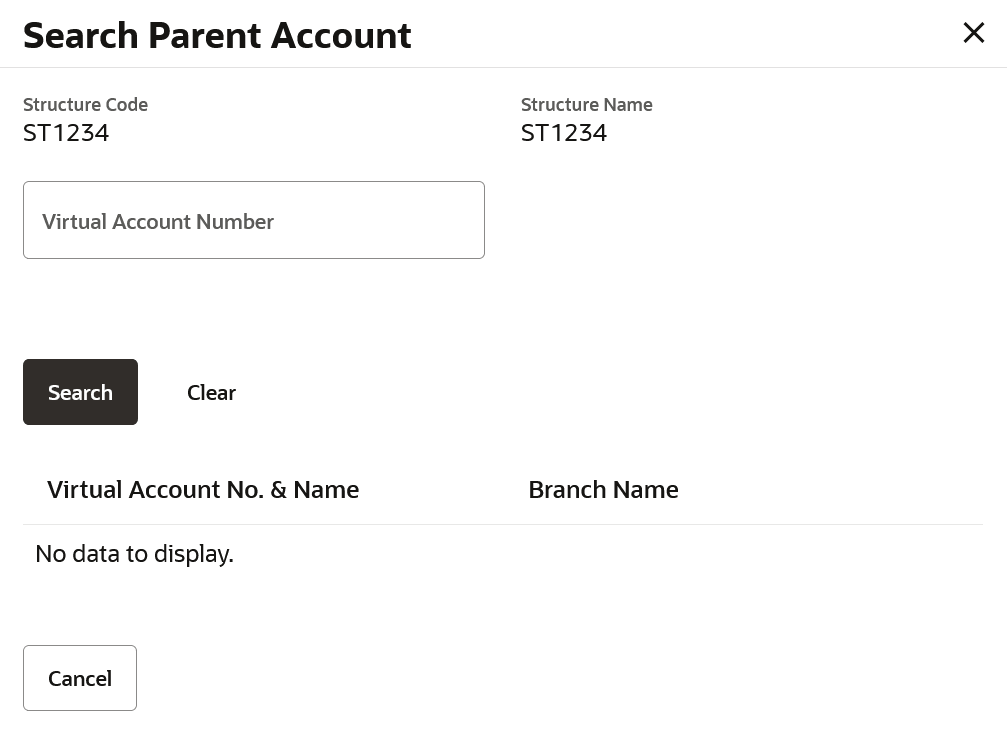
Search Parent Account This section displays the fields related to Search Parent Account. Structure Code Displays the structure code. Structure Name Displays the name of the structure Virtual Account Number Specify the Virtual account number Search Result This section displays the search results. Note:User can view only the configured number of Virtual Account Number in the search results. If the search result count exceeds the configured count, an error message appears to refine the search criteria.
Virtual Account No. & Name Displays the Virtual Account number and name. Branch Name Displays the branch of the account. Real Account Number Select the Real account number to which the Virtual Account has to be linked. This field is displayed if Structure is selected as Linkage preference.
Interest Calculation Required Move the Slider to display the applicable Interest Rates for the selected Virtual Account. Note:
Interest Calculation Required gets automatically enabled, if it is supported for the selected product. It can be disabled if the user does not require it. If the Interest Calculation is not supported for the selected product and it will be in disabled mode, then the user cannot change it.Interest Rates Interest rates link is displayed for only those products where the interest calculation required is supported and toggle is enabled. If the user has not selected the Product, Branch & Currency fields, the appropriate error message will appear.
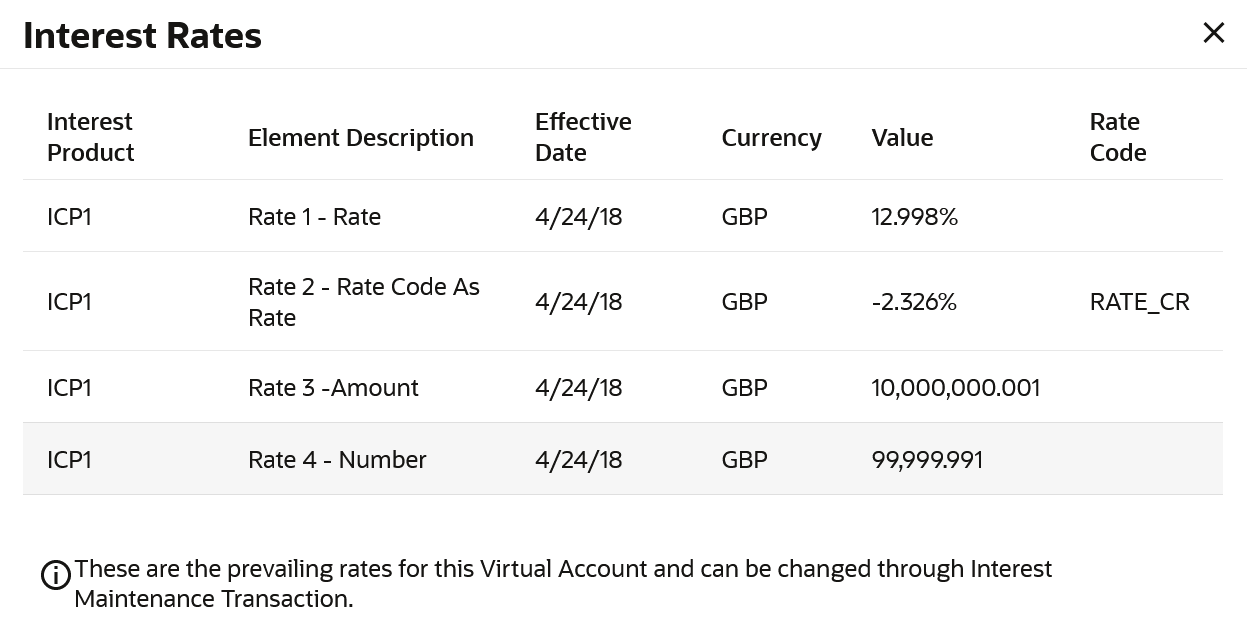
Interest Rates Overlay On selection of Virtual Account product, the application displays the interest rates maintained for the product.
For more information on fields, refer to the field description table.Note:
The Interest Rates pop-up screen appears only if the user selects Product, Currency, and Branch Name.Interest Product Displays the name of the interest product for which the interest rates are maintained. Rate Description Displays the description of the interest rate. Effective Date Displays the date from which the interest rate is effective. Currency Displays the name of the currency name under which the Virtual Account is to be opened. Rate Displays the interest rate maintained for the product. Rate Code Displays the rate code maintained for the product. Account Expiry date Select the future date to set Expiry date for the virtual account. Note: If no date is set, it will indicate that there will be no Expiry date for the Virtual Account in context.
Correspondence Address These fields are blank and by selecting the Copy from Virtual Entity function the fields get auto populated from Virtual entity address in editable format. The user can clear the fields by de-selecting the Copy from Virtual Entity check box.
Address Line 1 Specify the first line of correspondence address of the corporate Virtual Account holder. Address Line 2 Specify the second line of mailing address of the Virtual Account holder. Country Select the country name of the Virtual Account holder. Post Code Specify the post code of the Virtual Account holder. Structured Address These fields are blank and by selecting the Copy from Virtual Entity function the fields of structured address get auto populated from Virtual entity address in editable format. The user can clear the fields by de-selecting the Copy from Virtual Entity check box. Department Specify the department of the Virtual Account holder. Sub-Department Specify the sub-department of the Virtual Account holder. Street Name Specify the street name of the corporate Virtual Account holder. Building Number Specify the building number of the Virtual Account holder. Building Name Specify the building name of the Virtual Account holder. Floor Specify the floor number of the corporate Virtual Account holder. Post Box Specify the post box number of the Virtual Account holder. Room Specify the room number of the corporate Virtual Account holder. Post Code Specify the post code of the Virtual Account holder. Town Name Specify the town name of the corporate Virtual Account holder. Town Location Name Specify the town location name of the corporate Virtual Account holder. District Name Specify the district name of the corporate Virtual Account holder. Country Subdivision Specify the country subdivision of the corporate Virtual Account holder. Country Select the country name of the corporate Virtual Account holder. Preferences This section displays the Preferences related fields. Note: Preferences will be defaulted as per product selected by the user. If preferences are defaulted as No, same cannot be changed later.
IBAN Required Move the slider to avail IBAN. Note:
If the IBAN required is selected as No during Virtual Account creation, the same cannot be modified later.Balance Check For Debits Move the slider to avail balance check while debiting the account. Balance Availability Option Select the balance availability preference in the Virtual Account. The options are:- Own + Child
- Total Pool
- Own + Child + Fixed Amount from Pool
Fixed Amount In Pool Currency Specify the fixed amount to be used from the pool. This field is displayed if you select Fixed Amount In Pool Balance option from the Balance Availability Option list.
Debit Transaction Allowed Move the Slider to avail debit transaction preference on the Virtual Account. Credit Transaction Allowed Move the Slider to avail credit transaction preference on the Virtual Account. Overdraft Allowed Move the Slider to avail overdraft preference on the Virtual Account. Overdraft Amount Specify the fixed amount as overdraft on the Virtual Account. This field is displayed if you select Overdraft Allowed preference.
Available in Liquidity Management Move the slider to avail the Virtual Account to create Liquidity Management structure - Click either of following action to create One or multiple Virtual Account
creation
- Single Virtual Account Creation
- Bulk File Upload
- In the Party Name field, select the party name and ID from the drop-down list.
- In the Virtual Entity ID & Name field, enter the virtual Entity ID or Name, and click Search icon.
- From the Branch Name list, select the branch where Virtual Account is to be opened.
- From the Product list, select the Virtual Account product.
- In the Virtual Account Name field, values will get defaulted as per selected Virtual Entity Name. Defaulted Virtual Account Name is allowed to be updated only if name change is allowed for the selected product.
- In the Purpose field, enter the purpose of account opening.
- From the Currency list, select the Virtual Account currency.
- In the Linkage type, select the linkage type as Structure or Real Account.
- If you select Structure option, select the structure name and parent account number from the respective list.
- In the Parent Account field, click
Search icon to search the parent account
number.The Search Parent Account overlay appears.
- In the Search Parent Account overlay screen, select the required filter criteria in the respective fields.
- User can perform any one of the following action:
- Click Search to search the parent account based on search criteria.
- Click Clear to reset the entered data.
- Click Cancel to cancel the Parent Account selection.
- Search and select the parent account number from the list.
- If you select Real Account option, select the real account number and name from the Real Account Number list.
- Move the Interest Calculation Required to calculate
interest on the Virtual Account.
Note:
The application displays the Interest Rates link for the product where the interest rates are maintained. Click on the link to view the details of interest rates maintained for the selected Virtual Account product. - In the Account Expiry Date field, Select the future date
to set the expiry for Virtual account.Note: The application displays the Interest Rates link for the product where the interest rates are maintained. Click on the link to view the details of interest rates maintained for the selected Virtual Account product.
- To keep Correspondence Address as Virtual Entity address, select the Copy from Virtual Entity check box.
- If the Correspondence Address is not same as entity
address:
- In the Address Line 1 field, enter the first line of the correspondence address.
- In the Address Line 2 field, enter the second line of the correspondence address.
- In the Address Line 3 field, enter the third line of the correspondence address.
- In the Address Line 2 field, enter the fourth line of the correspondence address.
- From the Country list, select the country.
- In the Post Code field, enter the postal code.
- User can perform any one of the following actions:
- To keep Structured Address same as Virtual Entity address, select the Copy from Virtual Entity check box.
- Enter the required information in Structured Address fields.
- Move the IBAN Required slider to avail the IBAN.
- Move the Balance Check for Debits slider to check the account balance while debiting the account.
- Select the appropriate option from the Balance Availability
Option list.
- If you select Fixed Amount In Pool option from the Balance Availability Option list, enter the amount in the Fixed Amount In Pool field.
- Move the Debit Transaction Allowed slider to debit the Virtual Account.
- Move the Credit Transaction Allowed slider to credit the Virtual Account.
- Move the Overdraft Allowed slider to avail the overdraft
facility on the Virtual Account.
- If you select Overdraft Allowed option, enter the fixed overdraft amount in the Overdraft Amount field.
- Move the Available in Liquidity Management slider to enable the Virtual Account for creating Liquidity Management structure.
- Click Submit.User can also perform any one of the following action:
- Click Cancel to cancel the transaction.
- Click Back to navigate to the previous screen.
- The Review screen appears. Verify the details and click
Confirm.User can also perform any one of the following action:
- Click Cancelto cancel the transaction.
- Click Backto navigate to the previous screen.
- The success message of Virtual Account creation appears
along with the reference number and status of the transaction.User can also perform any one of the following action:
- Click Save As Template to save the account details with the template name.
- Click Go To Dashboard to navigate to the dashboard.
- Click Go To Overview to navigate to the Virtual Account management dashboard.
- Click Create More Accounts to create Virtual Accounts.
- Click Create Structure to create structure.
Parent topic: Virtual Account
4.1 To create Virtual Account using Templates:
- In the Party Name field, select the party name and ID from the drop-down list.
- In the Create Virtual Account screen, click Templates tab.
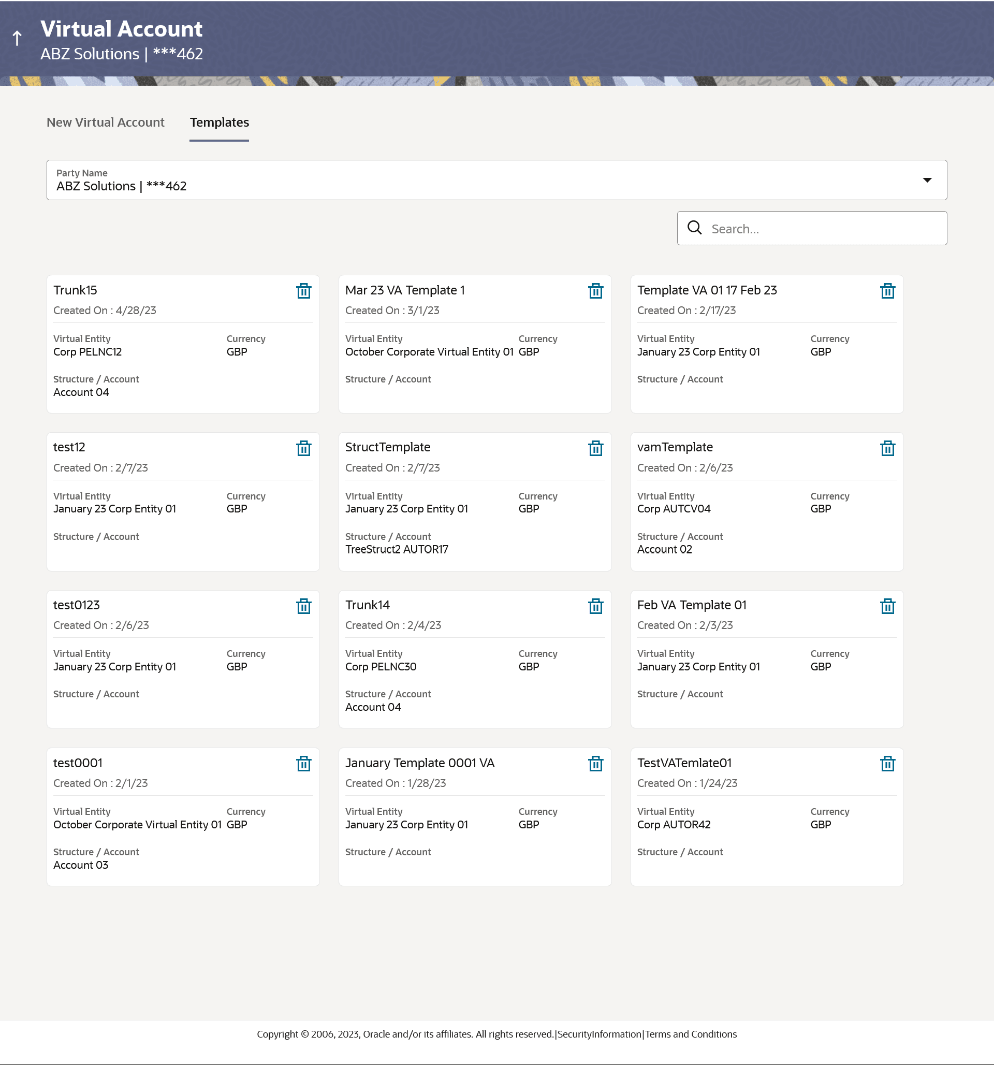
Create Virtual Account - Templates
Table 4-2 Create a Virtual Account - Field Description
Field Description Party Name Select the party name and ID from the drop-down list in which the Virtual Account must be created. By default, the primary party of the logged-in user is selected. Template Name Displays the name of the template Created on Displays the date when the template is created Virtual Entity Displays the Virtual Entity to which the Virtual Account is linked. Currency Displays the currency of the Virtual Account. - In the Search field, specify and search the required template name.
- From the Templates list, select the required template.The Create Virtual Account screen is displayed with the details pre-populated.
- Modify the Virtual Account details, if required.Note:
Virtual Account Name gets defaulted from Virtual Entity Name.
Based on the product selection, if the Virtual account name change is permitted at product level, then the user will be allowed to change the description as per his choice during the flow.
If the Virtual account name change is not permitted at product level, then the user will not be allowed to change the Virtual Account name and the field will remain non editable.
- User can also perform any one of the following action:
- Click Submit.
- Click Cancel to cancel the transaction.
- Click Backto navigate to the previous screen.
- The Review screen appears. Verify the details and
click Confirm.User can also perform any one of the following action:
- Click Cancelto cancel the transaction.
- Click Backto navigate to the previous screen.
- The success message of Virtual Account creation
appears along with the reference number and status of the transaction.User can also perform any one of the following action:
- Click Save As Template to save the account details with the template name.
- Click Go To Dashboard to navigate to the dashboard.
- Click Go To Overview to navigate to the Virtual Account management dashboard.
- Click Create More Accounts to create Virtual Accounts.
- Click Create Structure to create structure.
- Click Save As Template on the success message of Virtual Account creation screen. The Save Template pop-up appears
- In Template Name field, specify the template name.
- User can perform any one of the following actions:
- Click Save to save the Virtual Account template.
- Click Cancel to cancel the transaction.
Note:
On saving an existing template (with or without modifications), it will always be saved as a new template.
User is not allowed to save a template with an existing name.
Please note that Virtual Account number is note generated in OBDX, auto generation should be enabled at OBVAM side for VA creation.


