30.3 Initiate Shipping Guarantee - Shipping Guarantee Details
This topic provides the systematic instructions to initiate an Shipping Guarantee - Shipping Guarantee Details in the application.
Using this option, you can initiate a shipping guarantee in the application. To initiate a shipping guarantee in the application, you must enter details such as, Shipping Guarantee Details, Shipment Details, Linkages, Instructions, and Attachments etc.
To initiate a Shipping Guarantee:
- Navigate to Initiate Shipping Guarantee screen.
- On Initiate Shipping Guarantee screen, then click
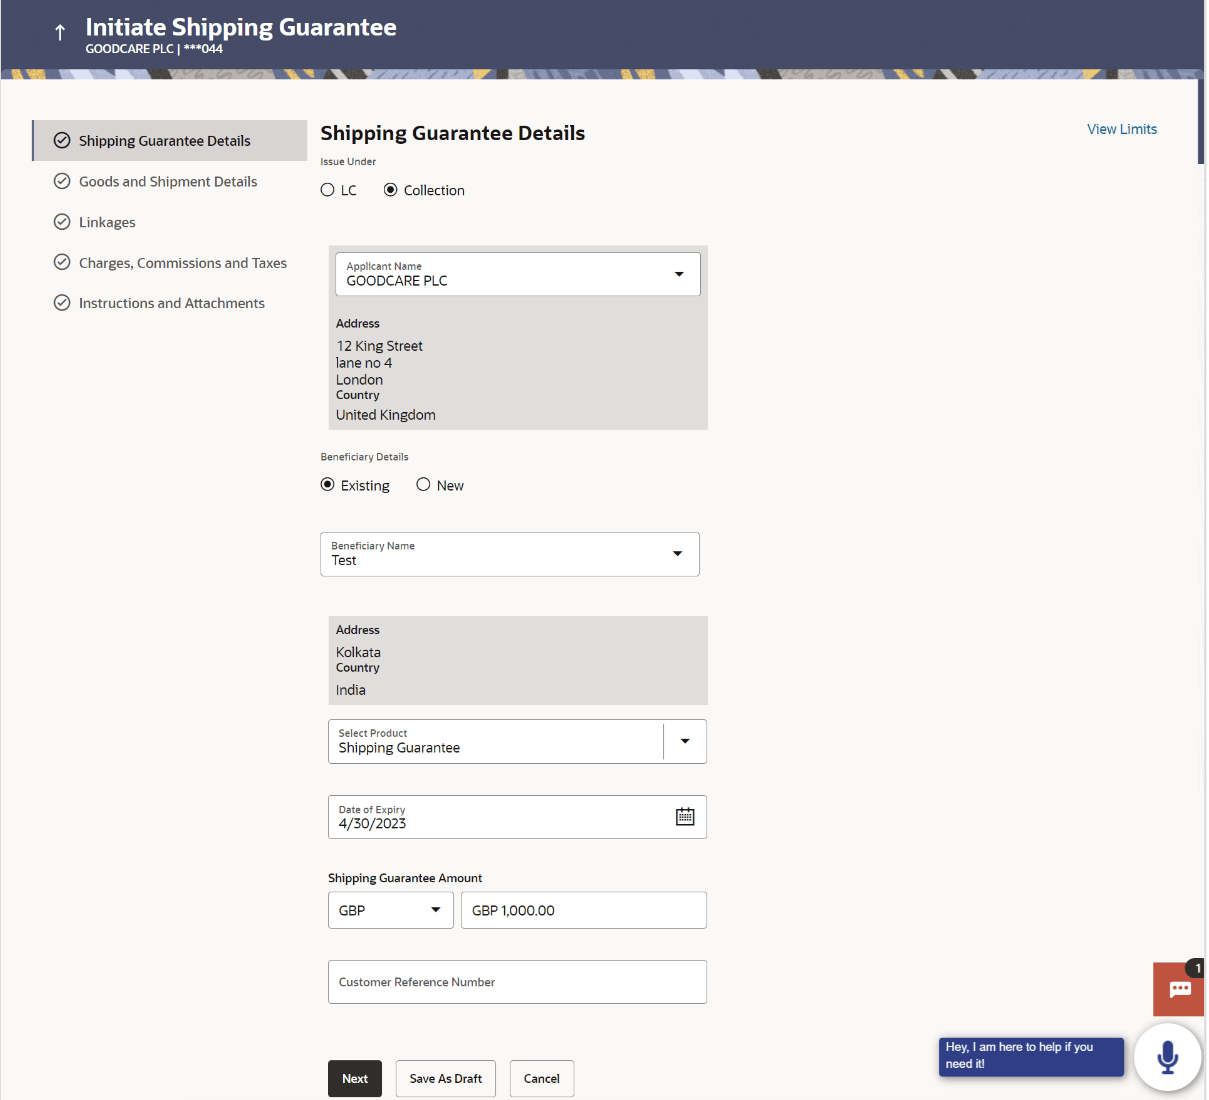
Initiate Shipping Guarantee. The Initiate Shipping Guarantee - Shipping Guarantee Details screen appears.
Figure 30-3 Initiate Shipping Guarantee - Shipping Guarantee Details

Description of the illustration initiate-shipping-guarantee-shipping-guarantee-details.pngNote:
The fields which are marked as Required are manadatory.For more information refer to the field description table below:
Table 30-3 Initiate Shipping Guarantee - Shipping Guarantee Details - Field Description
Field Name Description Issue Under Select the option whether the shipping is initiated under LC or Collection.
The options are:
- LC
- Collection
Lookup LC Reference No. Select the LC reference number. This field appears if you select LC option in the Issue Under filed.
Advanced Lookup Below fields appear if you click Advanced lookup link. Applicant Name Specify the applicant name. Beneficiary Name Specify the name of the beneficiary. Status Specify the status of the LC. Advanced Lookup Search Results Below fields appear if you click Advanced lookup link. Amount From - Amount To Specify the LC amount range used for searching. LC Number Displays the LC reference number. Beneficiary Name Displays the name of the beneficiary. Issue Date Displays the Issue date of LC. Date of Expiry Displays the date on which the LC expires. LC Status Displays the status of the LC. LC Amount Indicates the amount for the Letter of Credit along with the currency under which the LC is issued. Outstanding Amount Displays any outstanding amount available along with the currency. Applicant Details Below applicant related fields appear if you select Collection option in the Issue Under filed. Applicant Name Select the applicant name. Address Displays the LC applicant address. Country Displays the country of the applicant. Date of Application Application date when Bill has to be initiated. Beneficiary Details The option to select the beneficiary type. The options are:
- Existing
- New
Beneficiary Name The name of the beneficiary. This field allows the user to select the beneficiary name from drop-down, if Existing option is selected in the Beneficiary Details field.
This field allows the user to specify the beneficiary name, if New option is selected in the Beneficiary Details field.
Address Specify the address of the LC beneficiary. This field is enabled to enter the address details, if New option is selected in the Beneficiary Details field.
Country Specify the country of the LC beneficiary. This field is enabled to enter the country name, if New option is selected in the Beneficiary Details field.
Select Product Select the product type as coming from Host. The values in the drop-down is listed according to the value selected in the Form of Undertaking field.
Date of Expiry Select the expiry date of the guarantee. The expiry date must be later than the application date.
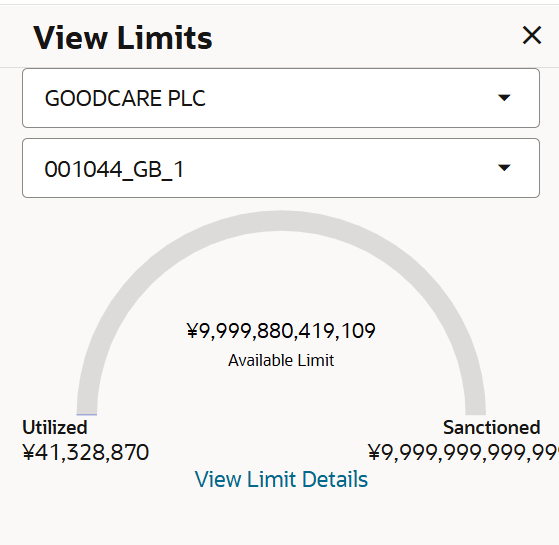
Shipping Guarantee Amount Specify the shipping guarantee amount along with the currency Customer Reference Number Specify the customer reference number. View Limits Indicates the available limits for applicant under the selected Line. The limit details are also represented in a graphical manner with available, sanctioned and utilized limit details for the users.
View Limit Details Click the link to open the Facility Summary screen. - Select the appropriate option from Issue Under field.
- If you select LC option:
- Perform any of the following actions:
- Select the LC reference number from the Lookup LC Reference No
- Click the Advanced Lookup link.
- Click Verify to verify the LC
- Click Reset to cancel the entered LC reference number.
- Perform any of the following actions:
- If you select Collection; option from Issue Under field, select the appropriate applicant, from the Applicant Name list.
- In the Beneficiary Details field, select the appropriate option to select the
beneficiary.
- If you select Existing option; select the beneficiary from the Beneficiary Name field.
- If you enable New option; specify the name of the beneficiary in the Beneficiary Name field.
- Specify the address of the beneficiary in the Address field.
- Select the appropriate country, from the Country list.
- Click the View Limits link. The View Limits overlay screen appears.
- On the View Limits screen, perform the following actions:
For more information on fields, refer to the field description table.
Table 30-4 View Limits
Field Name Description Party ID Select the The party Id of the LC product. Limit Select the limit. Line Limit Display the available limits, utilized and sanctioned limits for Accountee under the selected Line in a graphical format. - From the Party ID list, select the appropriate party Id.
- From the Limits list, select the appropriate limit.
- Click View Limit Details link to open the Facility Summary screen. The bottom graph appears.
- Click Reset to reset the limit details. The Reset popup appears.
- Select the appropriate option, from the Select Product list.
- Select the expiry date of the shipping guaranteen in the Date of Expiry field.
- Select the appropriate currency for the guarantee from the Currency list.
- Specify the amount for the guarantee in the Shipping Guarantee Amount field.
- Specify the customer reference number in the Customer Reference Number field.
- Perform any one of the following actions:
- Click Next to proceed to the next
tab.
The Goods and Shipment Details tab appears in the Initiate Shipping Guarantee screen.
- Click Save As Draft, system allows transaction details to be saved as a template or draft. (For more details, refer Save As Template or Save As Draft sections.)
- Click Cancel to cancel the
transaction.
The Dashboard appears.
- Click Next to proceed to the next
tab.
Parent topic: Initiate Shipping Guarantee
