1.6 Personal Information

This topic describes the section of the application in which personal information of the applicant/s is captured.

You can opt to upload your ID proof so as to have your information pre-populated on the basis of the ID document. In the case of joint applications, the personal information of both applicants i.e., the primary applicant as well as the joint applicant will need to be captured. There will be two separate sections to capture this information of each applicant, which will have headers as Primary Applicant – Personal, Joint Applicant – Personal, respectively.

Note:

In case the joint applicant is an existing customer of the bank, the section in which personal information of the joint applicant is to be entered, will not be part of the application form.

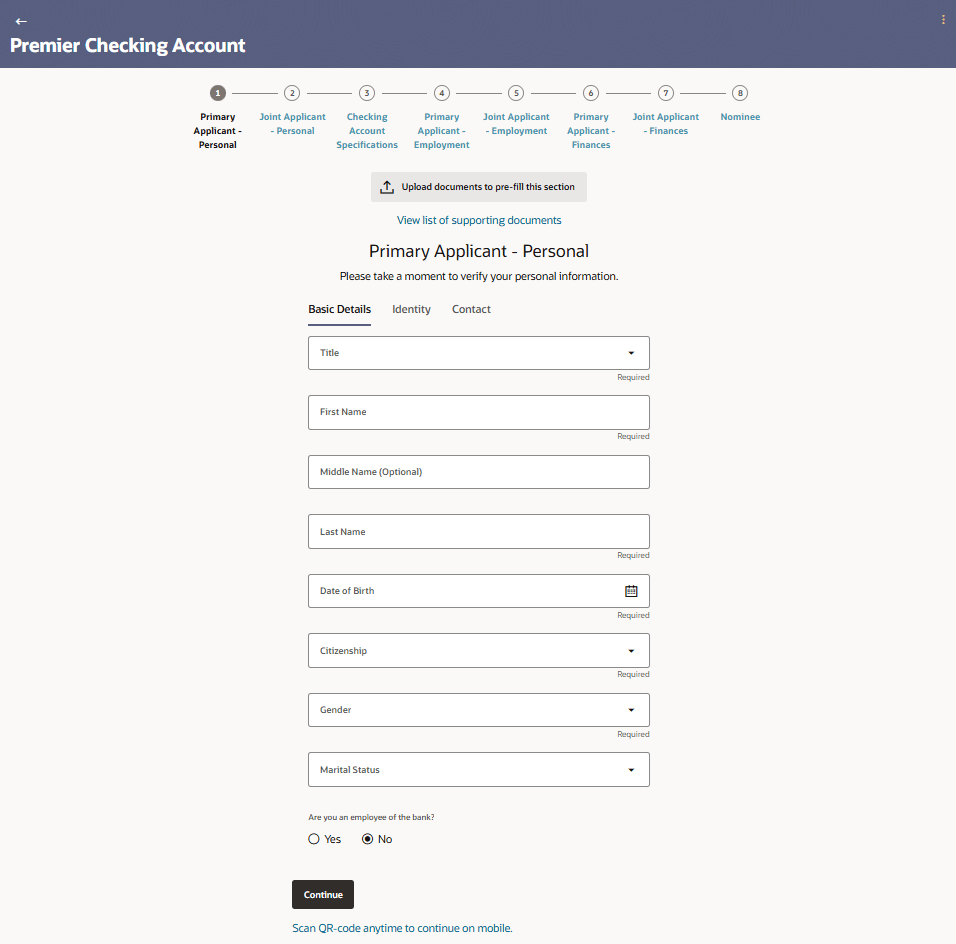
Figure 1-9 Personal Information - Basic Details


Note:

The fields which are marked as Required are mandatory.

For more information on fields, refer to the field description table.

Table 1-7 Personal Information - Basic Details - Field Description

Field Name Description
Upload documents to prefill this section Click this link to upload an ID proof document so as to auto fill this section with the information available in your ID proof. These documents will also serve to support your application.
View list of supporting documents Click on the link to view the documents supported for this section to be prefilled with data.
Title The salutation/title applicable to the applicant. Examples of salutation are Mr., Mrs., Dr. etc.
First Name Specify the first name of the applicant.
Middle Name Specify the middle name of the applicant, if applicable.
Last name Specify the last name of the applicant.
Date of Birth Specify the date of birth of the applicant.

The system validates the date of birth to ascertain whether you have attained the age of majority.

The format of the date should be DD/MM/YYYY.

Gender Select the gender of the applicant from the drop-down list.

The options are:

  • Male
  • Female
  • Other
  • Do not wish to disclose
Marital Status Select the marital status of the applicant from the drop-down list.
The options are:
  • Legally Separated
  • Married
  • Unmarried
  • Widow
Citizenship Specify the country of your citizenship.
Are you an employee of the bank? This field captures the applicant's relationship with the bank in terms of employment i.e. whether the applicant is an employee of the bank or not. This information is captured to handle possible conflicts of interest and to provide special employee benefits, if applicable.
The options are:
  • Yes
  • No

  1. Click on Upload documents to prefill this section option to upload the supporting documents to prefill the section.
  2. In the Basic Details section, enter the required details.
    1. From the Title list, select the title that applies to you.
    2. In the First Name field, enter your first name.
    3. In the Middle Name field, enter your middle name, if applicable.
    4. In the Last Name field, enter your last name.
    5. From the Date of Birth date picker, select your date of birth of yours.
    6. In the Citizenship list, select the country of which the applicant is a citizen.
    7. From the Gender list, select your gender.
    8. From the Martial Status list, select your marital status.
    9. Under the Are you an employee of the bank? field, select Yes if you are currently serving as an employee of the bank, or select No if you are not an employee of the bank.
  3. Click Continue to move to next sub-section.
    The Identity sub-section is displayed.

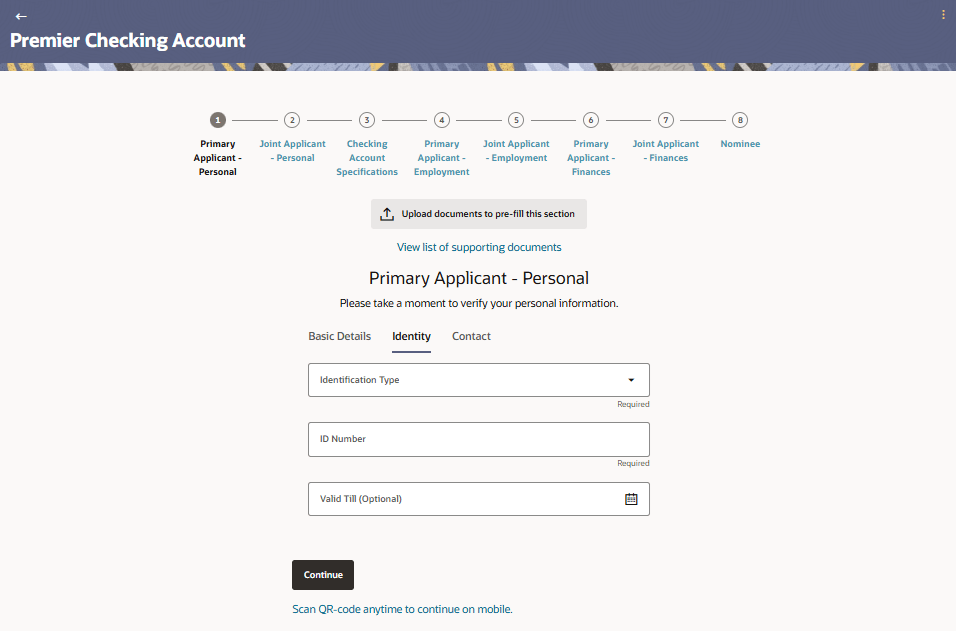
    Figure 1-10 Personal Information - Identity


  4. In the Identity sub-section, Specify the required details.

    Note:

    The fields which are marked as Required are mandatory.

    For more information on fields, refer to the field description table.

    Table 1-8 Personal Information - Identity - Field Description

    Field Name Description
    Identification Type Select the type of identification that the applicant wishes to provide as proof of identity.

    The options are:

    • Passport
    • Driving License
    ID Number The applicant’s identity number of the proof of identity selected.
    Valid Till The date till which the identification document is valid. This field is optional.
  5. In the Identity sub section;
    1. From the Identification Type list, select the type of identification that you wish to provide as proof of identity.
    2. In the ID Number field, enter the identity number of the proof of identity selected.
    3. From the Valid till date picker, select the date till which the identification document is valid.
  6. Click Continue to move to next sub-section.
    The Contact sub-section is displayed.

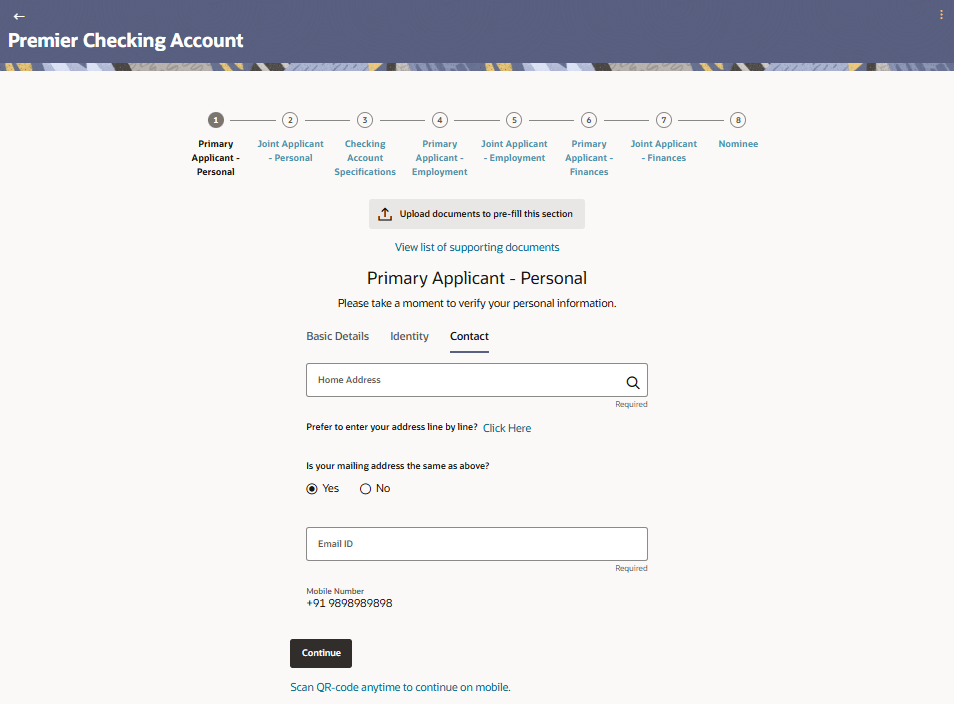
    Figure 1-11 Personal Information - Contact


  7. In the Contact sub-section, specify the required details.

    Note:

    The fields which are marked as Required are mandatory.

    For more information on fields, refer to the field description table.

    Table 1-9 Personal Information - Contact - Field Description

    Field Name Description
    Is your Home Address same as Primary Applicant's Home Address? This field will be displayed only under the Contact sub section of the Joint Applicant’s personal information section.
    The options are:
    • Yes
    • No
    Home Address Enter the applicant’s address in this field.

    In case the option Yes has been selected in the above field (applicable only in the Joint Applicant’s Personal Information section) then the Primary Applicant’s Home address will be prefilled in this field.

    Home Address Overlay This overlay is displayed when you click on the Click Here link available under the Home Address field. On this overlay, you can enter the applicant’s address line by line.
    House/Unit Number Enter the applicant’s house or flat number.
    Building Name Enter the building name of the applicant’s home address.
    Street Specify the street address of the applicant’s home address.
    Country Specify the country in which the applicant’s home address is located.
    City Specify the city in which the applicant resides.
    State Select the state in which the applicant’s home address is located.
    Locality Specify the locality in which the applicant’s home address is located.
    Zip Code Enter the zip code of the applicant’s home address.
    Is your mailing address the same as above? Identify if the applicant's mailing address is the same as the home address entered.
    The options are:
    • Yes
    • No
    Mailing Address Enter the applicant's mailing address in this field. This option will appear only if you have selected option No under the Is your mailing address the same as above? field.
    Mailing Address Overlay This overlay is displayed when you click on the Click Here link available under the Mailing Address field. On this overlay, you can enter your mailing address line by line.
    House/Unit Number Enter the house or flat number of the applicant’s mailing address.
    Building Name Enter the building name of the applicant’s mailing address.
    Street Specify the street address of the applicant’s mailing address.
    Country Specify the country in which the applicant’s mailing address is located.
    City Specify the city in which the applicant’s mailing address is located.
    State Specify the state in which the applicant’s mailing address is located.
    Locality Specify the locality in which the applicant’s mailing address is located.
    Zip Code Enter the zip code of the applicant’s mailing address.
    Email ID Enter the applicant’s email ID.
    Mobile Number Displays the mobile number that you had entered on the mobile verification page.

    This is applicable in the case of single applicant application forms and also for Primary Applicant’s Contact sub section. When entering contact information of the joint applicant, this field will be blank and you will be required to specify the joint applicant’s mobile number in this field.

  8. In the Contact sub section;
    1. In the Home Address field, enter your home address.
    2. Click on the Click Here link provided under theHome Address field to invoke the overlay on which you can enter your address line by line.
    3. If you have clicked the Click Here link, the Home Address overlay is displayed. You can specify your home address as follows:
      1. In the House/Unit Number field, enter your house or flat number.
      2. In the Building Name field, enter the building/house name of your permanent address, if applicable.
      3. In the Street field, enter the name of the street on which your permanent address is located.
      4. From the Country field, select the country in which your home address is located.
      5. In the City field, specify the city in which your home address is located.
      6. From the State field, select the state in which your home address is located.
      7. In the Locality field, enter the locality in which your permanent address is located.
      8. In the Zip Code field, enter the zip code of your permanent address.
      9. Click the Add button to add the address.

        The overlay window will be closed and the address will be updated in the Home Address field under the Contact Details section on the Personal Information page.

      10. From the Current Location list, select your current location in terms of home address.
    4. In the Is your mailing address the same as above? field, select the option of choice;
      Perform any of the following actions:
      • If you select No;
        1. In the Mailing Address field, enter your mailing address.
        2. Click on the Click Here link provided under the Mailing Address field to invoke the overlay on which you can enter your address line by line.
        3. If you have clicked the Click Here link, the Mailing Address overlay is displayed. You can specify your mailing address as follows:
          1. In the House/Unit Number field, enter your house or flat number.
          2. In the Building Name field, enter the building/house name of your mailing address, if applicable.
          3. In the Street field, enter the name of the street on which your mailing address is located.
          4. From the Country field, select the country in which your mailing address is located.
          5. In the City field, enter the name of the city in which your mailing address is located.
          6. From the State field, select the name of the state in which your mailing address is located.
          7. In the Locality field, enter the locality in which your mailing address is located.
          8. In the Zip Code field, enter the zip code of your mailing address.
          9. Click the Add button to add the address. The overlay window will be closed and the address will be updated in the Mailing Address field under the Contact Details section on the Personal Information page.
      • If you select Yes, your home address will be considered as your mailing address.
  9. In the Email ID field, enter your email ID.
  10. Perform any of the following actions:
    1. Click Continue to proceed to the next step in the application.
    2. Click Back to navigate back to the previous step in the application.
    3. Click on the Scan QR-code anytime to continue on mobile link to continue the application on mobile or tablet device.
    4. Under the kebab menu, perform any of the following actions:
      1. Click the Save and Continue Later option to save the application.
      2. Click the Continue on Mobile option to continue the application on a mobile device.