9 Multiple Transfers
This topic provides the systematic instructions to users to initiate fund transfers to a group of recipients within a single transaction.
Through this feature, users can initiate transfers towards registered payees of different transfer type’s i.e. Within Bank, Domestic and Cross Border transfers, with different transfer dates, all at once from a single screen. The kebab menu is provided to access other payment related transactions.
Note:
The fields appearing in the domestic payments for both payee and payment are not regionalisation supported.Pre-requisites:
- Transaction and account access are provided to the corporate user
- Approval rule set up for the corporate user to perform the actions
- Payees are maintained
- Transaction limits are assigned to the user to perform the transaction
Features supported in the application
- Multiple transfers allow the user to make payments
- To Existing Payees – by selecting registered payees
Figure 9-1 Multiple Transfers - Workflow
To transfer funds to multiple payees:
- Perform anyone of the following navigation to access the Multiple
Transfers screen.
- From the Dashboard, click Toggle menu, click
Menu, then click Payments .
Under Payments , then click More Actions, and then click Multiple Transfers.
- From the Search bar, type Payments - Multiple Transfersand press Enter.
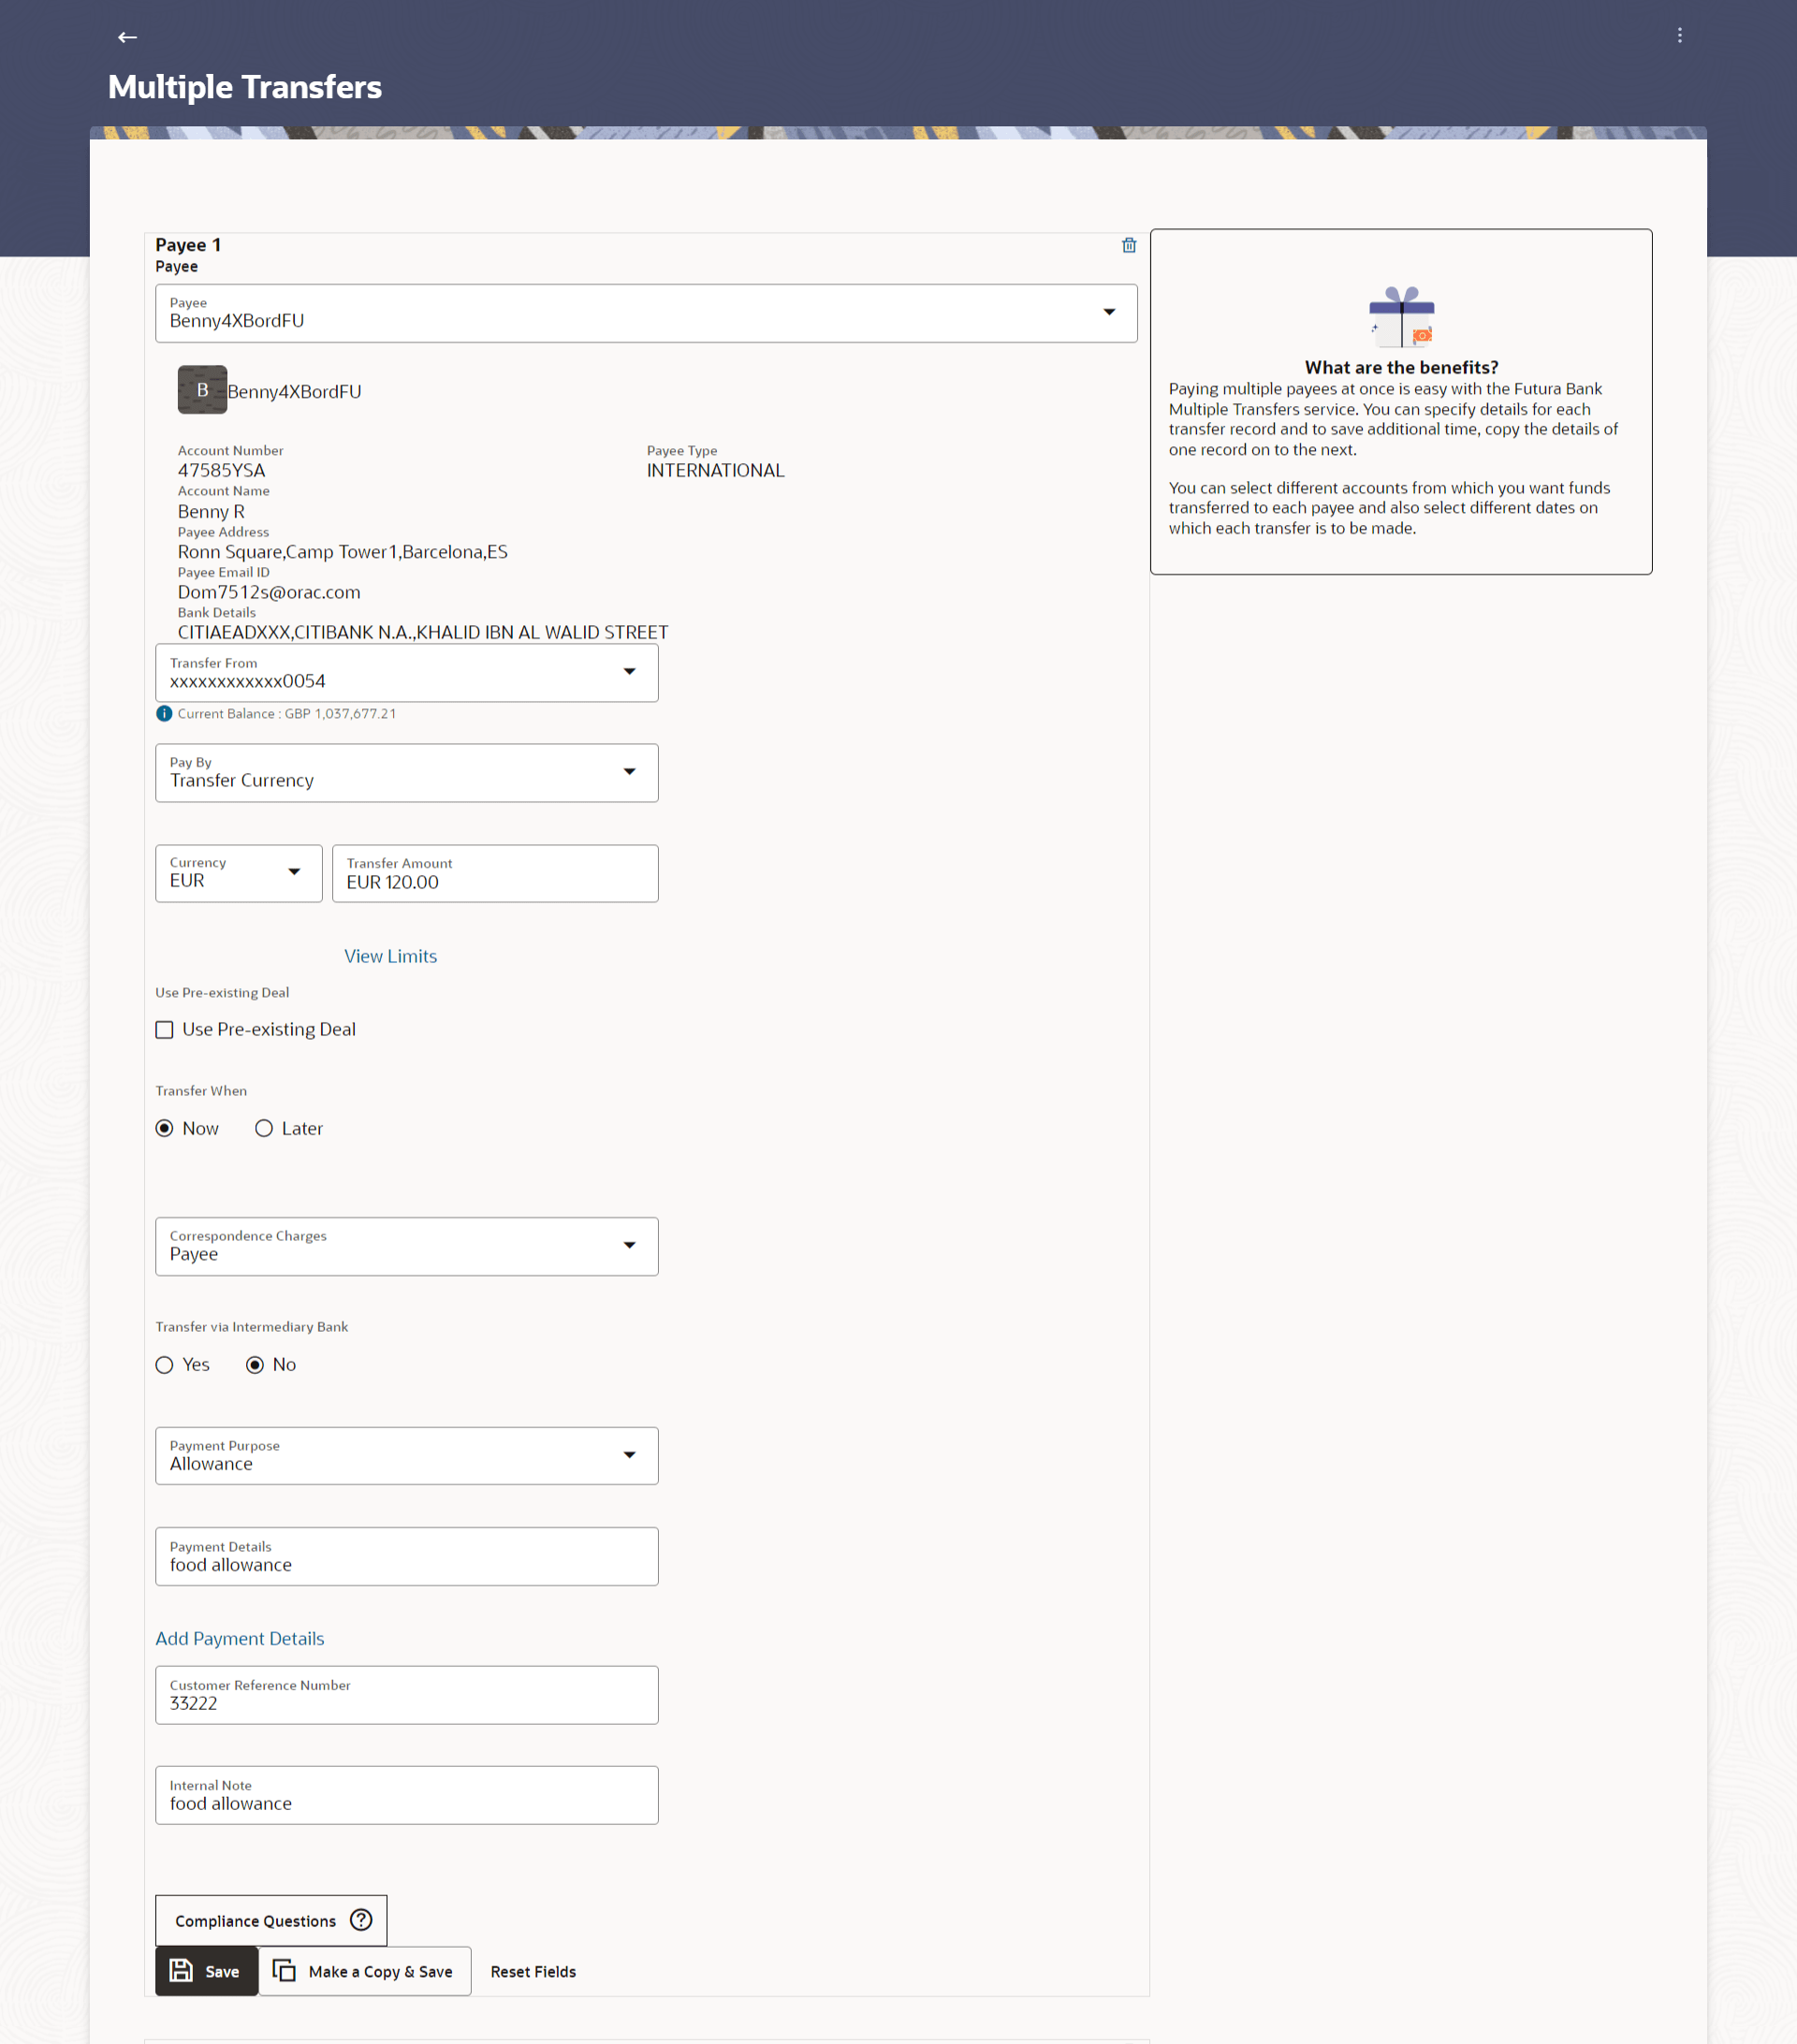
The Multiple Transfers screen appears.
Figure 9-2 Multiple Transfers
Note:
The fields which are marked as Required are mandatory.For more information on fields, refer to the field description table.
Table 9-1 Multiple Transfers- Field Description
Field Name Description The following fields are applicable for each individual transfer record that comprises the multiple transfers transaction: Payee Record Number Payee Record Number. The payee record number appears on the top of each record so as to identify the number of payees being added. Payee Select the payee to whom funds transfer needs to be made. Each payee is identified by the payee nickname defined at the time of payee registration. Once a payee has been selected, the details of the payee including the payee photo, payee nickname, account number, account type, etc. will be displayed on the screen. Account Number On selecting the payee, the account number associated with the payee appears. Payee Type The type of account or transfer type associated with the payee appears, once a payee is selected. Account Name The name of the payee in the bank account appears. Payee Address Address of the payee in the bank account. This field appears for Cross Border type of payee.
Bank Details The details of the bank i.e. the name and address of the bank’s branch in which the payee’s account is held appears. Note:
Bank Details do not get displayed for Within Bank Payees.Transfer From Select the source account from which the funds are to be transferred. Balance On selecting a source account, the net balance of the account appears below the Transfer From field. Currency Select the currency in which the transfer is to take place. Note:
Currency is defaulted to the destination account currency for Own and Within Bank Account Transfers and to the local currency for Domestic Transfers.For Cross Border transfers, the user can select the currency from the list.
Amount Specify the amount to be transferred. View Limits Link to view the transaction limits applicable to the user. For more information on Limits, refer View Limits section.
Transfer When The facility to specify when the funds are to be transferred. The options are:
- Pay Now: transfer funds on the same day
- Pay Later: transfer funds on a future date
Pay Via Select the network through which the transfer is to take place. This field is displays the networks available for payment, for domestic payments.
Transfer Date The date on which the transfer is to take place. This field appears if the option Later is selected from the Transfer When list.
Correspondence Charges The facility to select the party by whom transfer charges are to be borne. The options are:
- Payee: transfer charges are to be borne by the payee
- Payer: transfer charges are to be borne by the ordering customer
- Shared: transfer charges are to be borne by both the payee and payer
This field appears against a record where the transfer is being made towards an Cross Border payee.
Transfer via Intermediary Bank Specify whether the fund transfer is to be done through intermediary bank. Note:
This field appears only for Cross Border Payee.Pay Via Network for payment. The options are:
- Swift Code
- NCC (National Clearing code)
- Bank Details
This field appears if you select Yes option from Transfer via Intermediary Bank field.
SWIFT / National clearing code value SWIFT code /National Clearing code value. SWIFT code Look up Below fields appears if the SWIFT Code option is selected in Pay Via field. Lookup Swift Code Link to search the SWIFT code. SWIFT Code SWIFT code value. Bank Name Bank name to search the SWIFT code. Country Country name to search the SWIFT code. City City name to search the SWIFT code. SWIFT Code Lookup - Search Result Bank Name Name of the bank. Address Displays complete address of the bank. SWIFT Code SWIFT code /National Clearing code value. National clearing code Look up Below fields appears if the National clearing code option is selected in Pay Via field.
Lookup National clearing code Link to search the National clearing code. NCC Type NCC type of the bank branch. NCC Code NCC code of the bank branch. Bank Name Name of the bank. City City to which the bank belongs. NCC Lookup - Search Result Bank Name Name of the bank. Branch Bank branch name. Address Address of the bank. NCC Code NCC code of the bank branch. Bank Details Bank details based on the Swift / National clearing code selected for the bank. Below fields appears if the Bank Details option is selected in Pay Via field. Bank Name Name of the bank. Bank address Complete address of the bank. Country Country of the bank. City City to which the bank belongs. Payment Details Specify payment details. This field appears against a record where the transfer is being made towards an Cross Border payee.
Add Payment Details The link to add more details of the transfer. This field appears only for Cross Border Payee.
Customer Reference Number The unique customer reference number for the transaction. Note Specify a note or remarks against the transfer. Compliance Questions The questions appear in compliance popup for regulatory purpose of AML. - From the Dashboard, click Toggle menu, click
Menu, then click Payments .
- From the Payee list, select the payee towards whom you wish to
transfer funds. The payee details of the selected payee appear.
- If the Payee type is Within Bank.
- From the Transfer From account list, select the account from which the transfer needs to be made.
- From the Pay By list, select the currency type in which amount is transferred.
- From the Currency list, select the appropriate currency.
- In the Transfer Amount field, enter the transfer amount.
- In the Transfer When field, select the option to indicate
when the transfer is to take place.Perform one of the following actions:
- If you select the option Now, the transfer will be made on the same day.
- If you select the option Later, from the
Transfer When field, select the appropriate future date
for when the transfer is to take place.
- From the Transfer Date list, select the date on which the transfer is to take place.
- In the Charges to be debited from Debit Account field, choose which debit account to use when paying the charges.
- If the Payee type is Domestic;select the network through which the transfer is to be processed. If the transfer is a domestic (India region) transfer, only those networks that are enabled on the basis of transfer details specified, will be selectable.
- If the Payee type is Cross Border;
- From the Transfer From account list, select the account from which the transfer needs to be made.
- From the Pay By list, select the currency type in which amount is transferred.
- From the Currency list, select the appropriate currency.
- In the Transfer Amount field, enter the transfer amount.
- In the Transfer When field, select the option to indicate
when the transfer is to take place.Perform one of the following actions:
- If you select the option Pay Now, the transfer will be made on the same day.
- If you select the option Pay Later, from the
Transfer When field, select the appropriate future date
for when the transfer is to take place.
1. From the Transfer Date list, select the date on which the transfer is to take place.
- From the Transfer Date list, select the date on which the transfer is to take place.
- From the Correspondence Changes list, select the party by whom transfer charges are to be borne.
- In the Charges to be debited from Debit Account field, choose which debit account to use when paying the charges.
- In the Transfer via Intermediary Bank field, select the appropriate option.
- If you have selected Yes option in the Transfer
via Intermediary Bank field, select the appropriate network for payment
in the Pay Via field.Perform one of the following actions:
- If you select Swift option:
- In the SWIFT code field, enter the SWIFT code or search and select it from the lookup.
- Click Verify to fetch bank details based on Bank Code (BIC).
- If you select National Clearing code option:
- In the National Clearing code field, enter the National Clearing code or search and select it from the lookup.
- Click Verify to fetch bank details based on Bank Code (BIC).
- If you select Bank details option:
- In the Bank Name field, enter the bank name.
- In the Bank Address field, enter the complete address of the bank.
- From the Country list, select the country of the bank.
- From the City list, select the city to which the bank belongs.
- If you select Swift option:
- In the Payment Details field, enter the details of the fund transfer.
- In the Note field, specify a note or remarks.
- In the Customer Reference Number field, enter the customer reference number for the transaction.
- Click in the Compliance Questions field, the system displays the
overlay window. Add the answer the question and Submit. This field is enabled only for Within Bank & Domestic payee.
- Perform one of the following actions:
- Click Save to save the payment record.
- Click Make a Copy and Save, if you want to save a copy of the transaction.
- Click Reset fields to clear the entered data.
- Perform one of the following actions:
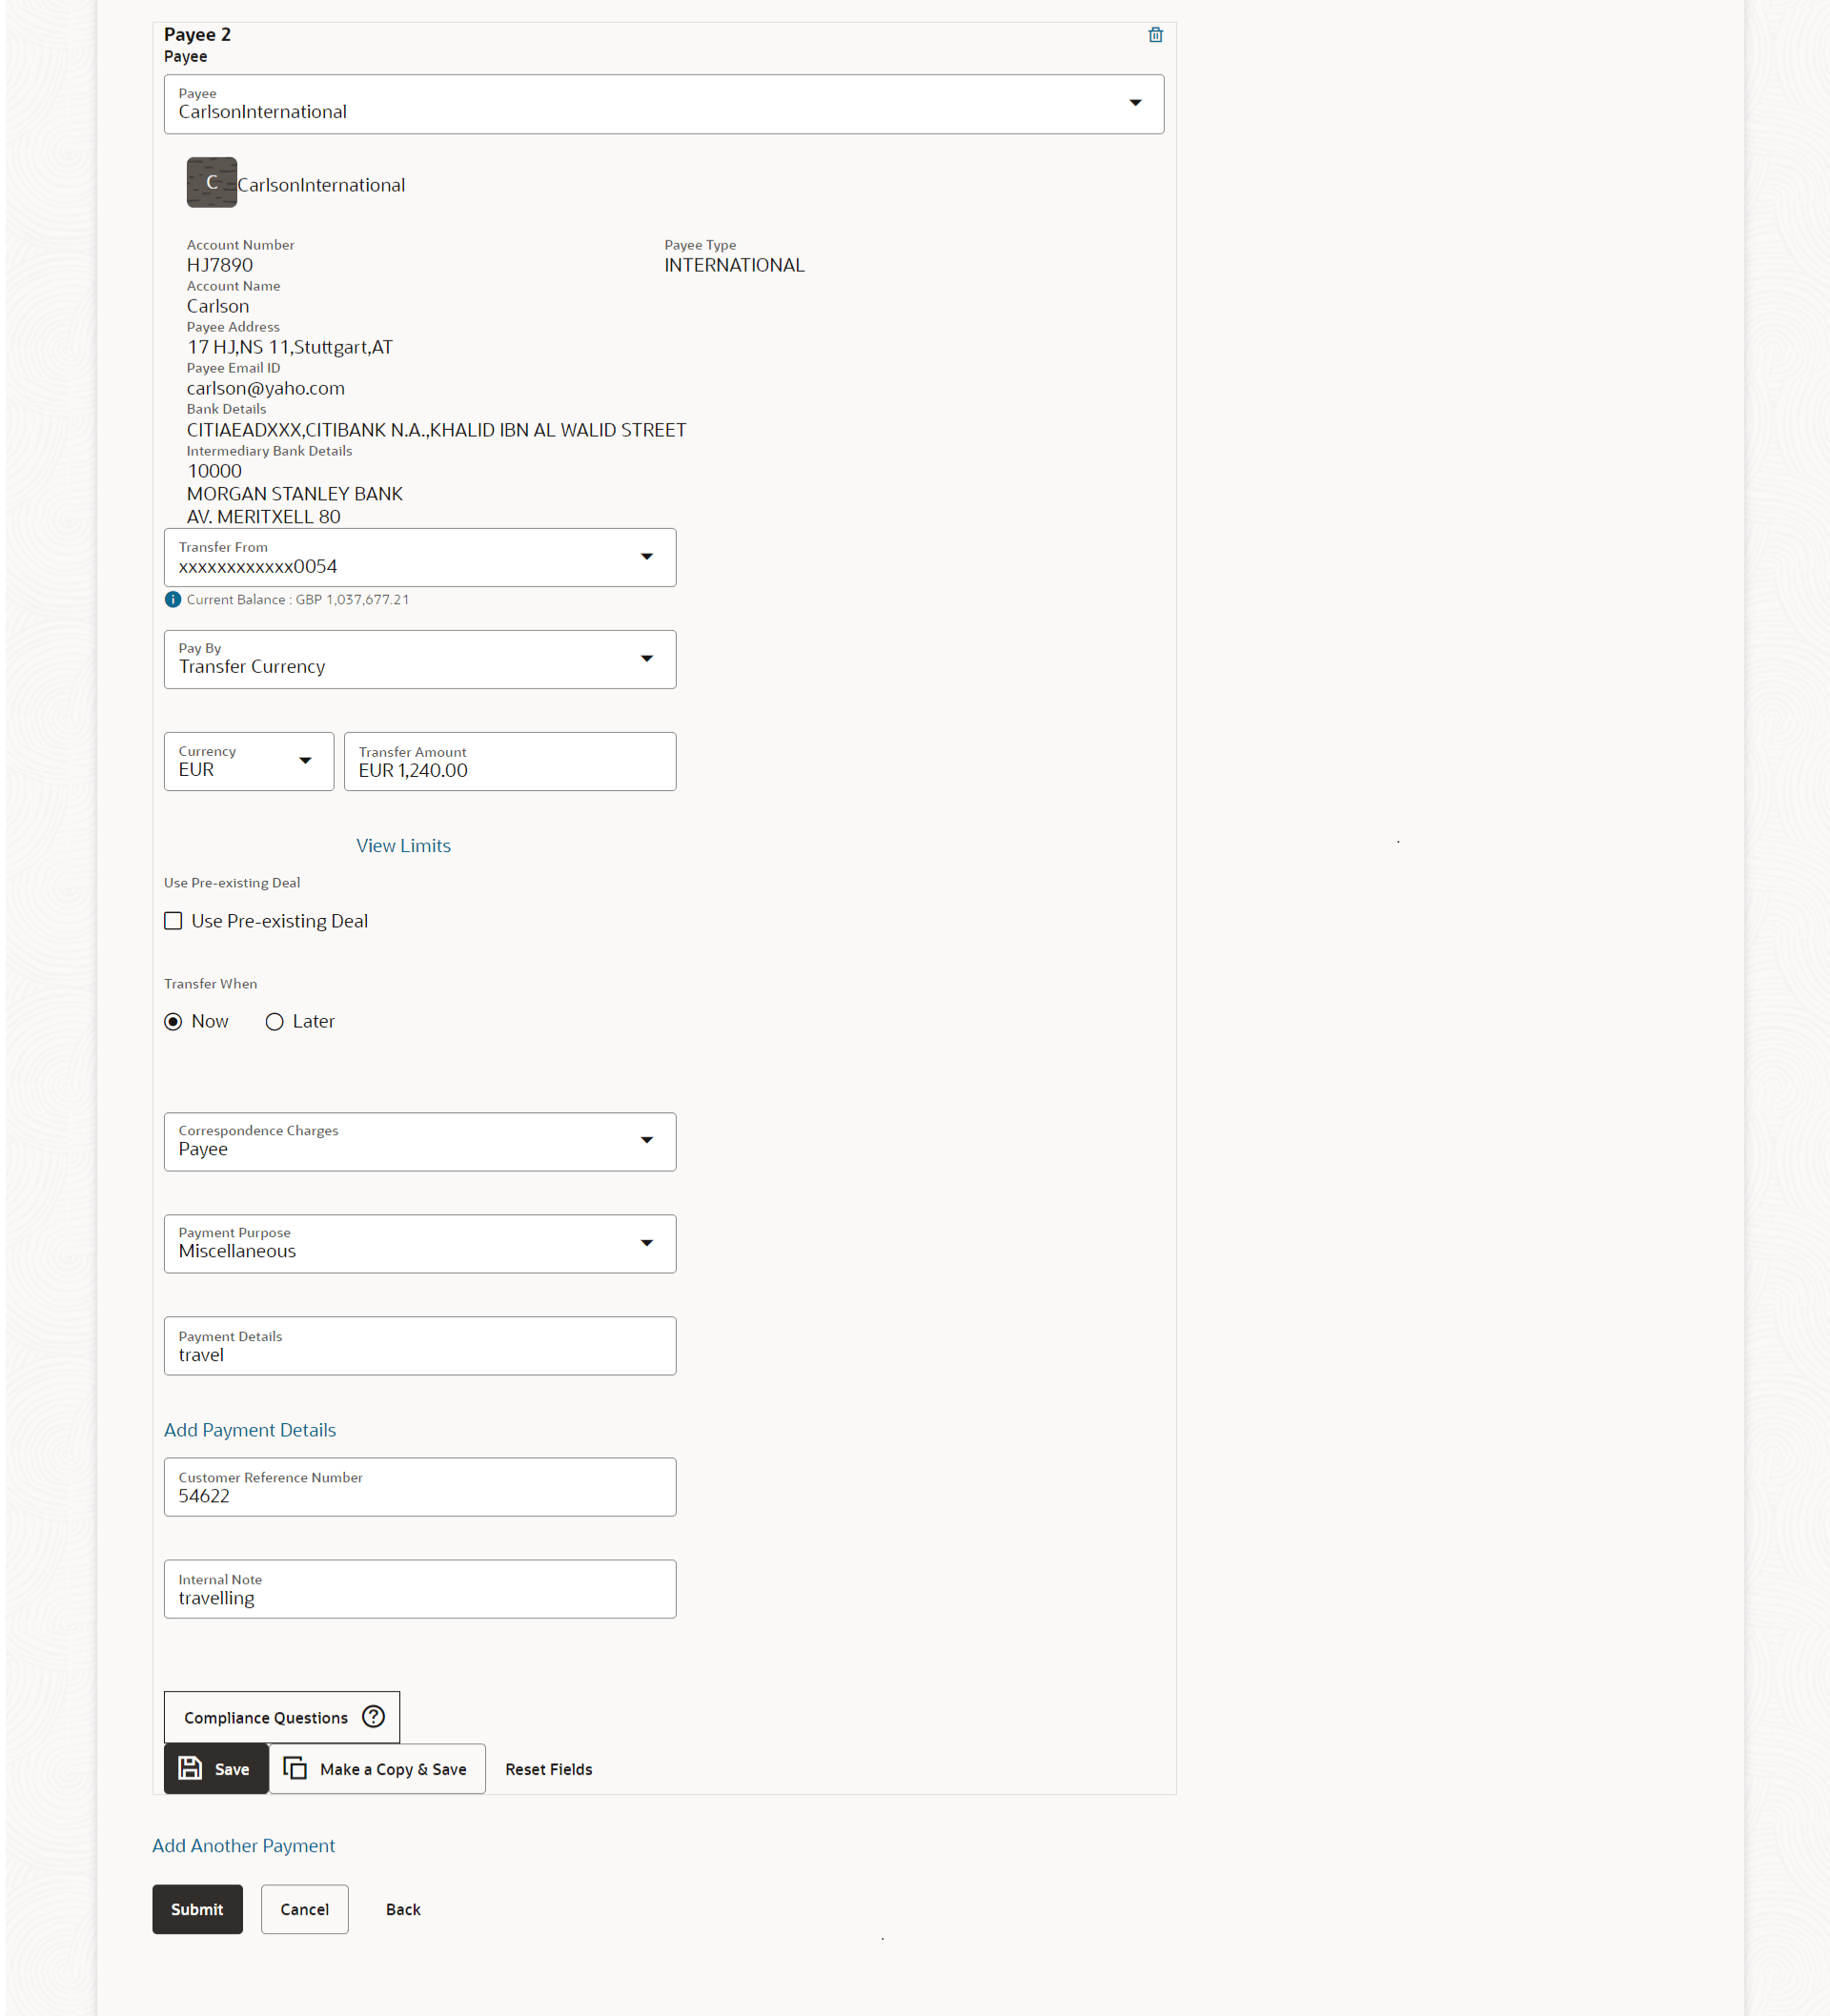
- Repeat Steps similar steps Payee 2 based on payee type.
- Click Add Another Payment if you want to add another payment record.
- Perform one of the following actions:
- Click the
 icon against a saved record to edit the transfer details of that
record.
- Click on the
 icon against a record to delete that record.
- Click the
- Perform one of the following actions:
- Click Submit to submit all the transfer records
to the bank.
The Review screen appears.
- Click Cancel to cancel the transaction.
- Click Back to navigate back to the previous page.
- Click Submit to submit all the transfer records
to the bank.
- Perform one of the following actions:
- Verify the details and click
Confirm.
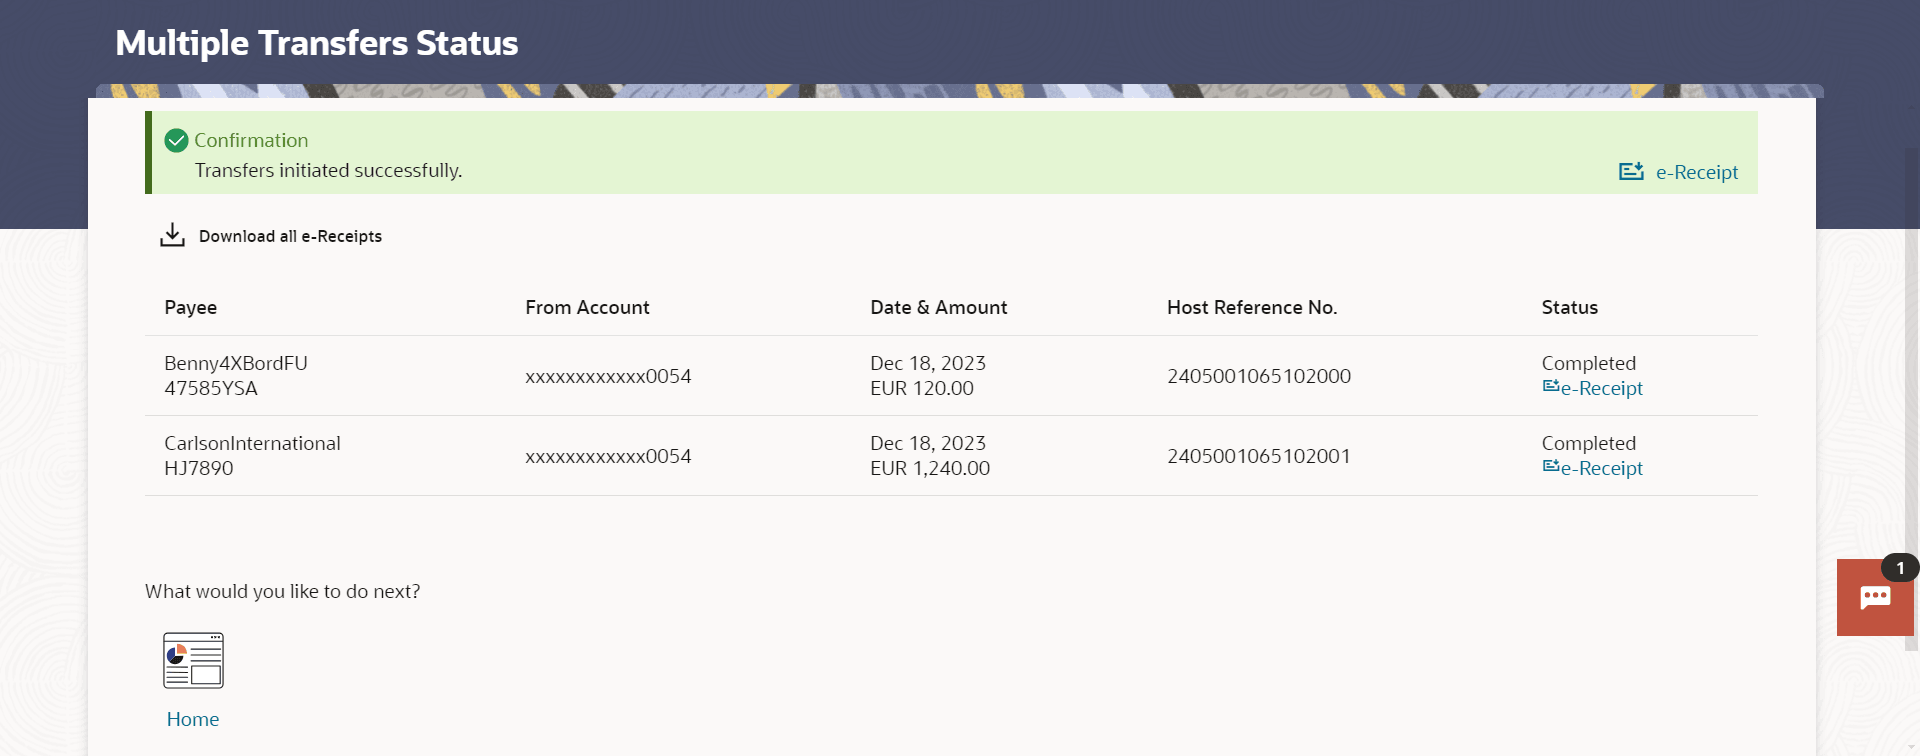
The success message appears along with the status of transaction.
- Click Expand All to view the payment
details.
Click Collapse All to hide the payment details.
- Click Cancel to cancel the transaction.
- Click Back to edit the transfer details.
The Multiple Transfers screen with saved fund transfer details appear in editable form.
- Verify the details and click
Confirm.
- Perform one of the following actions:
- Click Home to navigate to the dashboard.
- Click Click Here to view the status of each transfer.
The Multiple Transfer - Status screen appears.
Note:
The fields which are marked as Required are mandatory.For more information on fields, refer to the field description table.
Table 9-2 Multiple Transfers Status - Field Description
Field Description Payee The payee towards whom fund transfer has been initiated. The payee nickname and the payee’s account number are displayed. From Account The source account from which the funds are transferred. Date & Amount The date of transfer along with the amount that is transferred towards the payee’s account. Host Reference Number The unique number generated on completion of the transaction in the Core Banking application. Status The status of the transaction. It could be:
- Completed
- Failed
Action The link to download the e-receipt of transaction. Failure Reason The reason for which a transfer failed is displayed against the specific transfer record. - Perform one of the following actions:
- Click the e-Receipt link against a particular record for which you want to download the e-receipt.
- Click Download all e-Receipts link to download the e-receipts for all the transactions.


