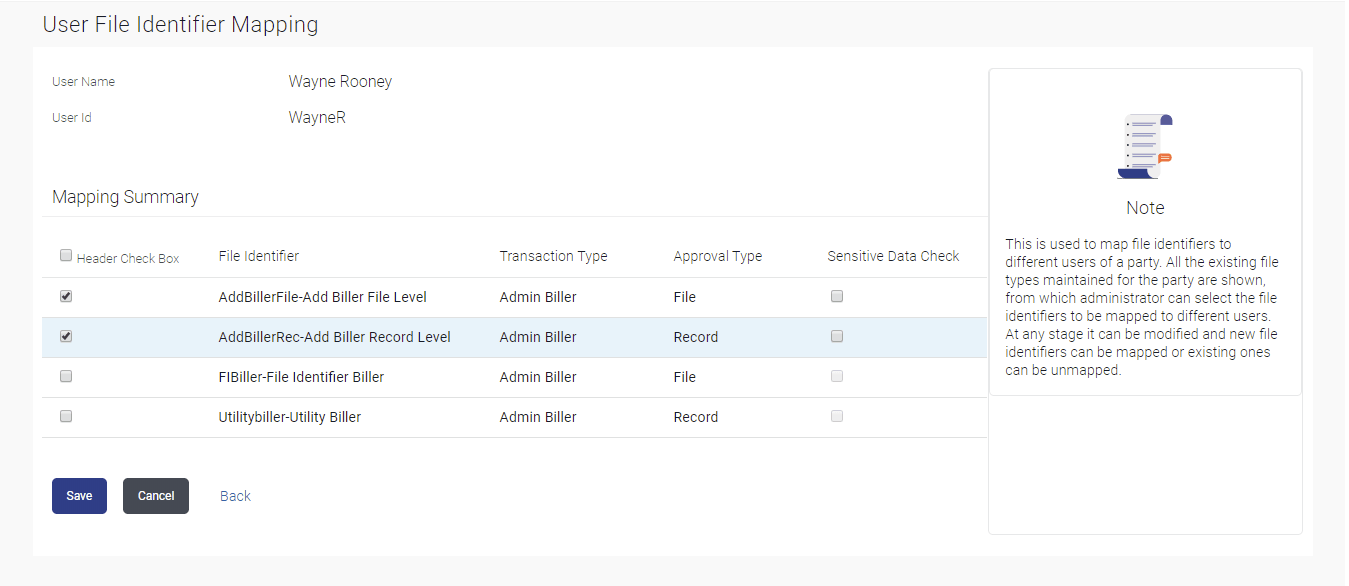
9.4 User File Identifier Mapping – Edit
This topic provides the systematic instructions to corporate administrators for updating user file identifier mappings.
To edit a file identifier:
- Navigate to the User File Identifier Mapping - View screen.
- Click the
 icon of file identifier record, for which you want to edit the mapping. The User File Identifier Mapping - Edit screen appears.
Figure 9-6 User File Identifier Mapping – Edit
Note:
The fields which are marked as Required are mandatory.For more information on fields, refer to the field description table.
Table 9-5 User File Identifier Mapping – Edit - Field Description
Field Name Description User Name User name of the corporate user. User ID User ID of the user. Mapping Summary File Identifier Unique code assigned to the uploaded file. Transaction Type Type of transaction: The Transaction type can be:- Internal funds Transfer,
- Domestic Funds Transfer,
- International Funds Transfer,
- Mixed Transfer
- Internal / Domestic / International / Mixed Payees
- Create Virtual Accounts
- Create Virtual Accounts Structure
- Create Virtual Identifier
- Create Invoice
Approval Type The approval type is at file level or record level. - File Level - The approver accepts or rejects the entire file, and all records are either processed or rejected.
- Record Level - The approver could approve some records, and rejects others. Payments are processed only for approved records.
Sensitive Data Check If selected, the users are barred from viewing the contents of the file. View the details of File Identifier mapping already saved.
- Select the check box to map / un-map a File Identifier to a user and to enable or disable the Sensitive Data Check, select the check box.
- Perform one of the following actions:
- Click Saveto save the modified
details.
The User File Identifier Mapping – Edit – Review screen appears.
- Click Cancel to cancel the transaction.
- Click Back to navigate to the previous screen.
- Click Saveto save the modified
details.
- Perform one of the following actions:
- Verify the details, and click
Confirm.
The success message of submitting the File Identifier Mapping appears along with the transaction reference number and status.
- Click Cancel to cancel the transaction.
- Click Back to navigate to the previous screen.
- Verify the details, and click
Confirm.
- Click OK to complete the transaction and navigate back to Dashboard.
Parent topic: User File Identifier Mapping
