5.2 Limits Definition - Create
This topic provides the systematic instructions for corporate administrators to create limits as needed.
To create a transaction limit:
- Navigate to the Limits Definition screen.
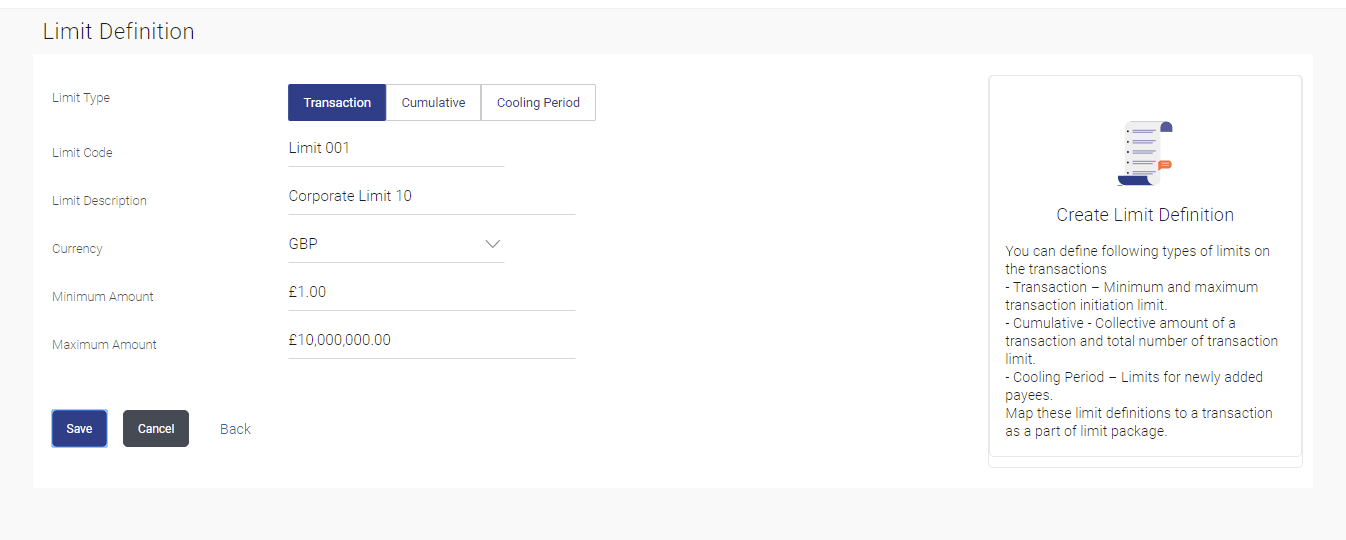
- Click Create. The Limits Definition - Create screen with Transaction tab appears.
Figure 5-4 Limits Definition - Transaction - Create
Note:
The fields which are marked as Required are mandatory.Note:
The fields which are marked as Required are mandatory.For more information on fields, refer to the field description table.
Table 5-2 Limits Definition - Transaction - Create- Field Description
Field Name Description Limit Type The limit type for selection are: - Transaction – It is the initiation limit with minimum and maximum amount
- Cumulative – It is a duration based limit with maximum amount and number of transactions for a day / month
Limit Code Name/unique identifier of the limit. Limit Description Description of the limit. Currency The currency to be set for the limit. Minimum Amount The minimum amount for a transaction in local currency. Maximum Amount The maximum amount for a transaction in local currency. - In the Transaction tab screen, enter the code in the Limit Code field.
- In the Limit Description field, enter the description of the limit.
- From the Currency field, select the appropriate currency for the limits.
- In the Minimum Amount and Minimum Amount field, enter the minimum and maximum amount for a transaction in local currency.
- Perform one of the following actions:
- Click Save to save the
maintenance.
The Review screen appears.
- Click Cancel to cancel the transaction.
- Click Back to navigate to previous screen.
- Click Save to save the
maintenance.
- Perform one of the following actions from the Review
screen:
- Verify the details, and click
Confirm.
The success message of transaction submission appears.
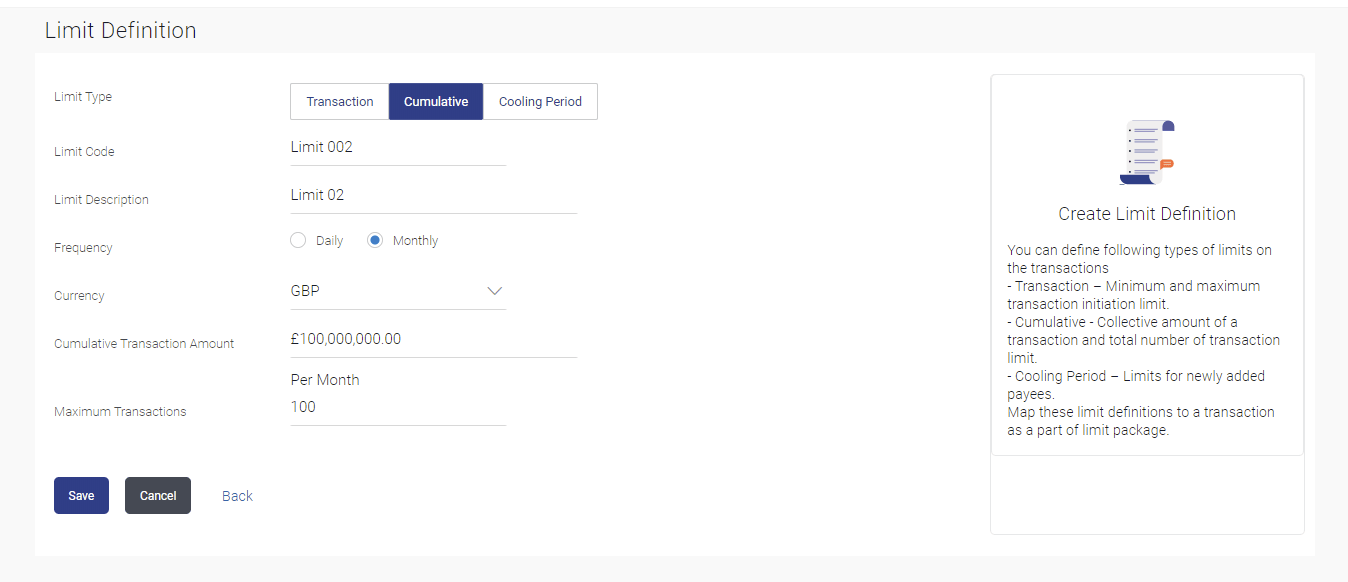
Figure 5-5 Limits Definition - Cumulative - Create
Note:
The fields which are marked as Required are mandatory.For more information on fields, refer to the field description table.
Table 5-3 Limits Definition - Cumulative - Create - Field Description
Field Name Description Limit Type Limit type for selection are: - Transaction – It is the initiation limit with minimum and maximum amount
- Cumulative – It is a duration based limit with maximum amount and number of transactions for a day / month
Limit Code Name/unique identifier of the limit. Limit Description Description of the limit. Frequency The specific duration for which the limits can be utilized and available. The options are:
- Daily
- Monthly
Currency The currency to be set for the limit. Cumulative Transaction Amount The collective amount in local currency for transactions that can be performed in a day. Maximum Transactions The maximum number of transactions that can be performed per day. - Click Cancel to cancel the transaction.
- Click Back to navigate to previous screen.
- Verify the details, and click
Confirm.
- Click OK to complete the transaction.
To create a cumulative limit:
- In the Cumulative tab screen, Enter the relevant information in Limit Code and Limit Description field.
- From the Frequency field, select the appropriate duration for the limits.
- From the Currency field, select the appropriate currency for the limits.
- In the Cumulative Transaction Amount field, enter the collective amount of transaction in local currency.
- In the Maximum Transactions field, enter the value for maximum number of transactions.
- Perform one of the following actions:
- Click Save to save the created
limit.
The Review screen appears.
- Click Cancel to cancel the transaction.
- Click Back to navigate to previous screen.
- Click Save to save the created
limit.
- Perform one of the following actions:
- Verify the details, and click
Confirm.
The success message of transaction submission appears.
- Click Cancel to cancel the transaction.
- Click Back to navigate to previous screen.
- Verify the details, and click
Confirm.
- Click OK to complete the transaction.
Parent topic: Limits Definition

