1.2 Configure Application Root PDB Model
This topic explains systematic instructions to build the application for setup using the installer.
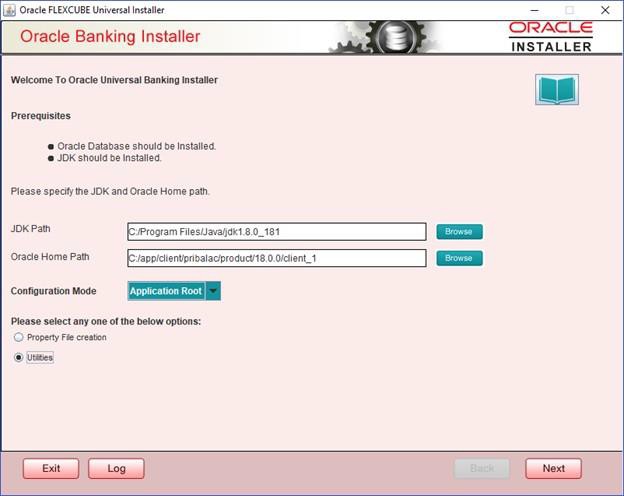
- Double-click the FCUBSInstaller.bat batch file to launch Oracle Universal Banking Installer.The Welcome to Oracle Universal Banking Installer screen displays.
Figure 1-1 Welcome to Oracle Universal Banking Installer
- In the Configuration Mode field, select Application Root from the drop-down list.
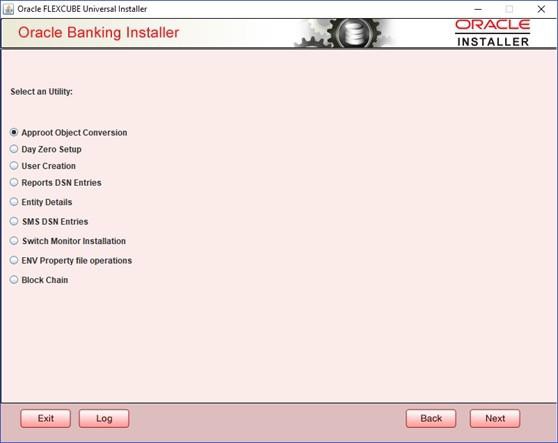
- Select the Utilities option, and click Next.The Select an Utility screen displays.
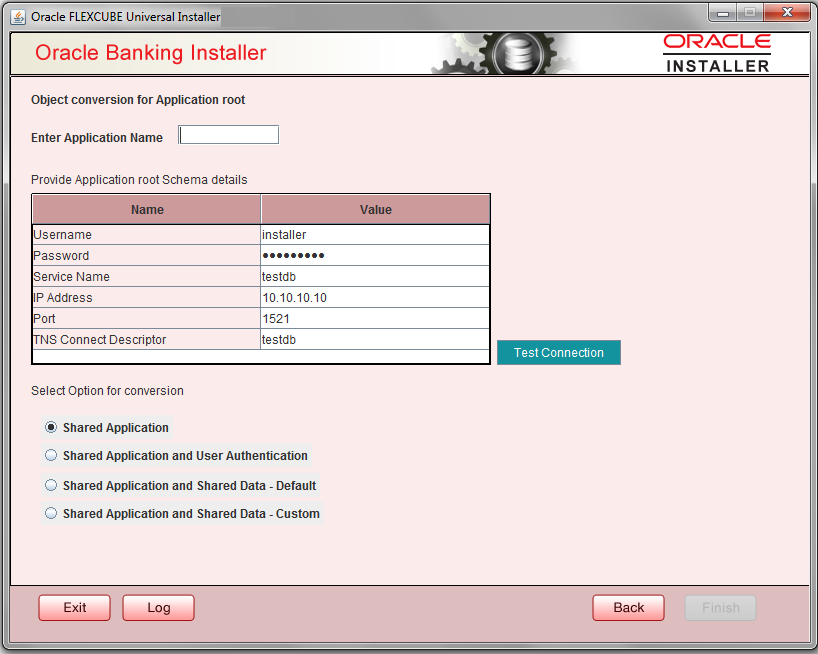
- On the Select an Utility screen, select the Approot Object Conversion option, and click Next.The Object Conversion for Application Root screen displays.
Figure 1-3 Object Conversion for Application Root
- On the Object Conversion for Application Root screen, specify the application name and Approot schema details where the conversion has to apply.
Note:
When the application name is not inputted, an error will be displayed to input the same. The user has to make sure that the application name is the one mentioned in the prerequisites with installation done for version 1.0. - On the Object Conversion for Application Root screen, select an appropriate conversion option.The following are the conversion options:
- Shared Application
- Shared Application and User Authentication
- Shared Application and Shared Data – Default
- Shared Application and Shared Data – Custom
Table 1-1 Conversion Options
Conversion Options Description Shared Application When the Shared Application option is selected, there will not be any common data, and only the application is shared. Shared Application and User Authentication When the Shared Application and User Authentication option is selected, only user authentication related data will be shared along with a shared application. Shared Application and Shared Data – Default When the Shared Application and Shared Data – Default option is selected, all the function groups listed will be installed in the application root. Shared Application and Shared Data – Custom When the Shared Application and Shared Data – Custom option is selected, all the function groups listed will be installed in the application root. - After selecting the conversion option, click Test Connection.Once the connection is successful, Finish will be enabled to take through the steps of movement of function IDs to PDBs, and the object conversion will be completed.
- On the Object Conversion for Application Root screen, click Finish.The Movement of Application Root Function IDs to PDB screen displays.
Figure 1-4 Movement of Application Root Function IDs to PDB
- In this screen, you can select the entities that are not required to be candidates for approot, and those function IDs will be moved to PDB.In this screen, there are two multiblocks available -
- The first multiblock lists the details of function groups which are the Approot candidates.
- The second multiblock lists the function IDs corresponding to each of the function groups in the first block.
This multiblock has the Move to PDB checkbox against each function ID.
- Select the required function group from the Function Group Description columns, and click View Details.The respective function IDs will also be appended to the second multiblock against the function group.
Note:
You can select more than one function group. - From the second multiblock, select function IDs that have to move to PDB by checking the respective Move to PDB box.
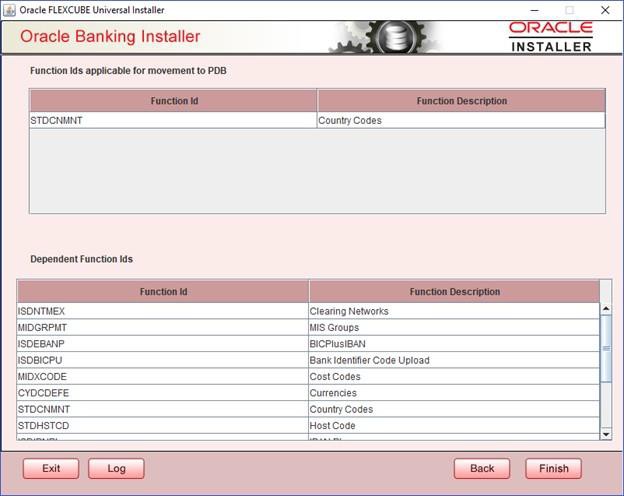
- Once the selection is completed, click Next.The Function IDs Applicable For Movement to PDB screen displays.The dependent function IDs of the selected functions that opted to move to PDB are listed in this screen.
Figure 1-5 Function IDs Applicable For Movement to PDB
- Click Finish to complete the object conversion.Post execution, the Compilation Success message displays in the front end.
Note:
The execution process takes a few minutes. - Close the pop-up message.
Parent topic: Application Root Object Conversion


