1.6 Configuring Scheduler
If Scheduler Standalone is chosen during plug-in selection time, all the below screens mentioned under scheduler configuration is not applicable.
This topic describes the method to configure scheduler data source. System displays the following screen:
Specify the following details:
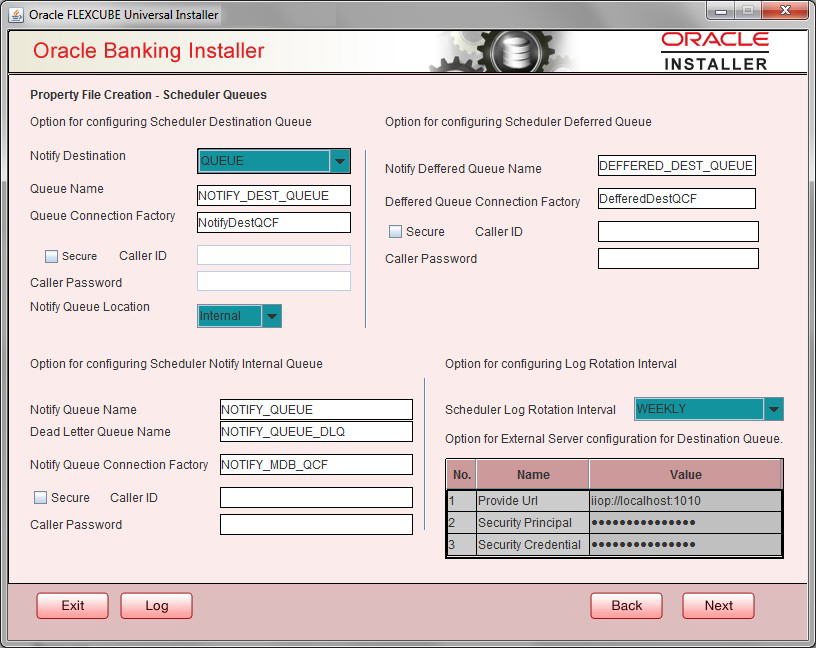
Click Next and the following screen is displayed.
Table 1-8 Scheduler Queues
| Field | Description |
|---|---|
| Scheduler Log Rotation Interval | Select the interval between each rotation of scheduler log. Given options are – DAILY, WEEKLY and MONTHLY. |
| Notify Destination | Specify the notify destination. Select one of the following
options:
|
| Queue Name | Set NOTIFY_DEST_QUEUE as the destination queue name. |
| Queue Connection Factory | Set NotifyDestTCF as the queue connection factory. |
| Secure | Select this check box to indicate that it is a secured queue
connection factory. If you select this check box, you are prompted
to specify the Caller ID and Caller Password as shown in the
following screen.
Specify the following details:
|
| Secure | Select this check box to indicate that it is a secured deffered
queue connection factory. If you select this check box, you are
prompted to enter the caller ID and caller password.
Specify the
following details:
|
| Secure | Select this check box to indicate that it is a secured queue connection factory. If you select this check box, you are prompted to enter the caller ID and caller password as shown in the following screen |
| Notify Queue Location | Specify the notify queue location. Select one of the following
options:
Note: For Oracle WebLogic Application Server, the notify queue location should be selected as Internal.
|
| Provider URL | Specify the provide URL
(<iiop://localhost:1010>).
1010 is the default IIOP port. Refer URL table |
| Security Principal | Specify the login ID to access the application. server. |
| Security Credentials | Specify the password to access the application server.
Click Next to proceed with scheduler configuration. Note: If you choose Internal as the Notify Queue Location, this screen is not displayed. |
Table 1-9 URL
| Application Server | EMS Out Initial Context Factory |
|---|---|
| Oracle WebLogic | t3://<ip_adress>:port
For example: <t3://10.10.10.10:1010> Here, 10.10.10.10 represents the local host and 1010 to the target server default port (AdminServer/ManagedServer). |
Parent topic: Creating Property File for Oracle FLEXCUBE Installer
