- Netting User Guide
- Netting Management
3 Netting Management
This topic describes the systematic instruction to accept, reject or payout a netting transaction that gets created post netting creation batch for a particular subsidiary/participant.
- On Home screen, click Cash Management. Under Cash Management, click Netting.
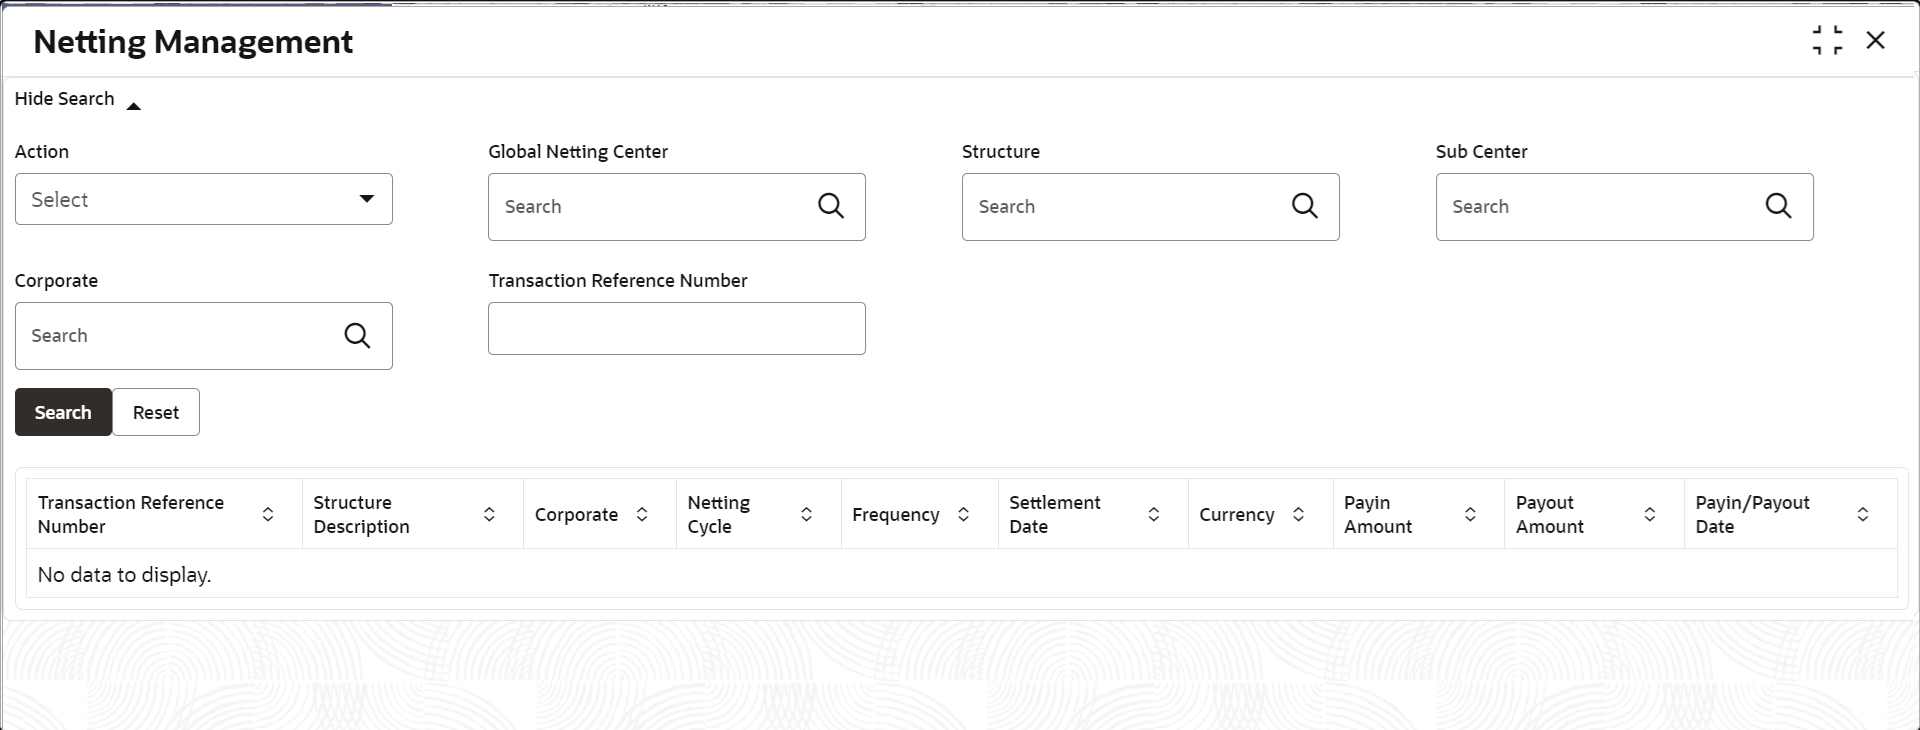
- Under Netting, click Netting Management.The Netting Management screen displays.
- Specify the fields on the Netting Management screen to search, and view the Netting transaction records.For more information on fields, refer to the field description table.
Note:
The fields marked as Required are mandatory.Table 3-1 Netting Management - Field Description
Field Description Action Select the action whether the netting transaction has to be accepted/rejected. The options are:- Accept Netting Transaction
- Reject Netting Transaction
- Payout - Corporate to Sub Center
- Payout - Corporate to Global Netting Center
- Payout - Sub Center to Global Netting Center
- Payout - Sub Center to Corporate
- Payout - Global Netting Center to Sub Center
- Payout - Global Netting Center to Corporate
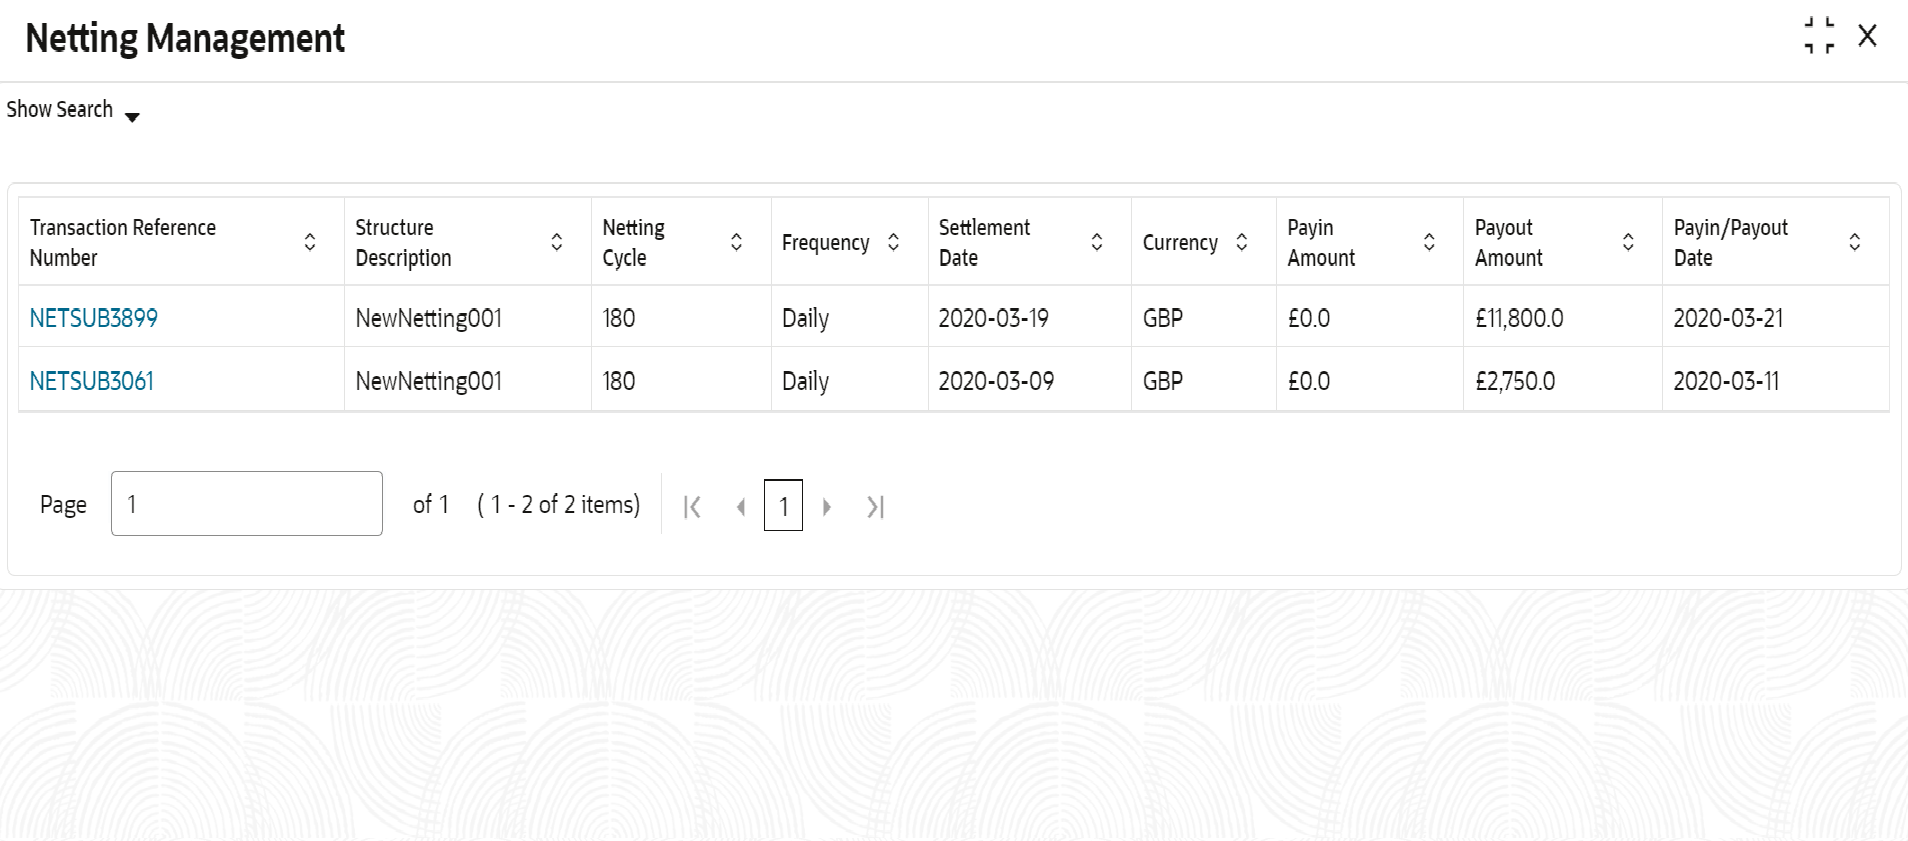
Global Netting Center Click the Search icon to view and select the Global Netting Center for which the netting transactions have to be filtered. Structure Click the Search icon to view and select the Netting Structure for netting transactions filtering. Sub Center Click the Search icon to view and select the Sub Center for the netting transactions filtering. Corporate Click the Search icon to view and select the corporate details for netting transactions filtering. Transaction Reference Number Specify the transaction reference number of the netting transaction for filter purposes. - Click Search to view the search results.The Netting Management - Search Results screen displays.For more information on fields, refer to the field description table.
Figure 3-2 Netting Management - Search Results
Table 3-2 Netting Management - Search Results - Field Description
Field Description Transaction Reference Number Displays the transaction reference number of the netting transaction. Structure Description Displays the description of the netting structure. Netting Cycle Displays the unit of duration (daily, weekly or monthly) that can be in present, past or future based on which the invoices have been picked up for netting associated to that netting transaction. Frequency Displays the frequency of netting creation batch for that specific netting transaction. The options are:- Daily
- Weekly
- Monthly
Settlement Date Displays the date on which the netting transaction will get settled post netting creation. Currency Displays the currency of the netting structure. PayIn Amount Displays the amount which will be received by the party that has payin obligation. PayOut Amount Displays the amount which will be remitted from the party that has the payout obligation. PayIn/PayOut Date Displays the date by when the netting transaction amount should get paid. This field is applicable only for MIS purpose.
Basic Details:
This data segment provides the basic details about the netting transaction.
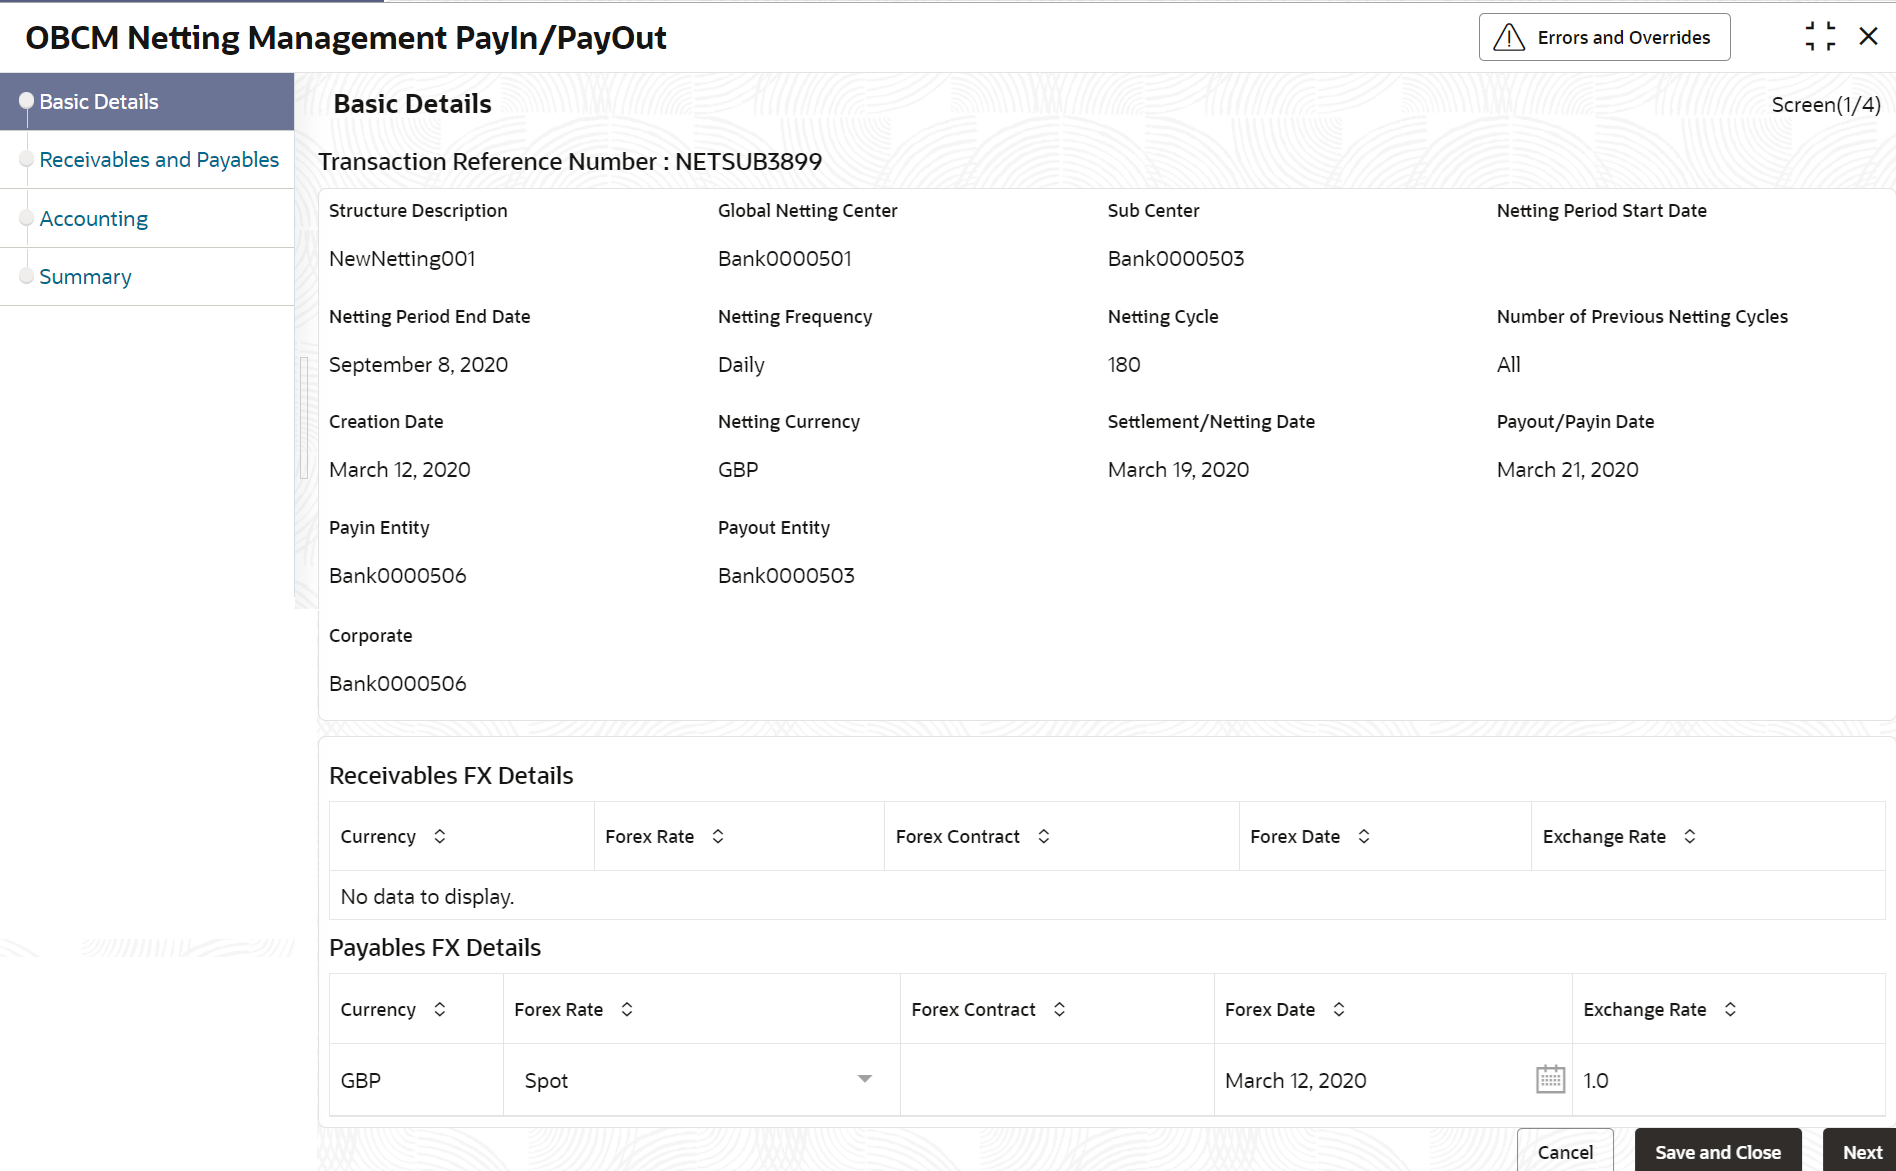
- Click on the hyperlink in the Transaction Reference Number column to view more details of the record.The Netting Management - Basic Details data segment screen displays.
Figure 3-3 Netting Management - Basic Details
- Modify the foreign exchange rate if required for net payin/payout
calculation.For more information on fields, refer to the field description table.
Note:
The fields marked as Required are mandatory.Table 3-3 Netting Management - Basic Details - Field Description
Field Description Transaction Reference Number Displays the transaction reference number. Structure Description Displays the description of the selected netting structure. Global Netting Center Displays the global netting center of the selected netting transaction. Sub Center Displays the sub center of the selected netting transaction. Netting Period Start Date Displays the date from when the invoices are considered for netting purpose based on the payment due date. Netting Period End Date Displays the date till when the invoices are considered for netting purpose based on the payment due date. Netting Frequency Displays the frequency of the netting creation batch for the specific netting transaction. The options are:- Daily
- Weekly
- Monthly
Netting Cycle Displays the unit of duration (daily, weekly or monthly) that can be in present, past or future based on which the invoices have to be picked up for netting associated to that netting transaction. Number of Previous Netting Cycles Displays the number of previous netting cycle based on which the invoices that were not netted, have been included for that netting specific to that netting transaction. Creation Date Displays the netting transaction creation date. Netting Currency Displays the netting currency. Settlement/Netting Date Displays the date on which the netting transaction will get settled. Payout/Payin Date Displays the date by when the netting payin/payout should completed. This field is applicable only for MIS purpose.
Payin Entity Displays the entity name for which the payin transaction has to be processed. Note: This field appears only for the Payout actions.
Payout Entity Displays the entity name for which the payout transaction has to be processed. Note: This field appears only for the Payout actions.
Corporate Displays the corporate of the selected netting transaction. Note: This field appears at this position for the Payout actions.
Receivables/Payables Forex Details Modify the Receivables/Payables Forex Details of the Netting Transaction. Currency Displays the currency of the invoices associated with the netting transaction. Forex Rate Select the type of the forex range required for the conversion of invoice currency to settlement/netting currency. The options are:- Spot
- Forward
Note: This option appears only if the Invoice Currency is different from the Settlement Currency.
Forex Contract Specify the forward contract number. Note: This field gets enabled only if the Forex Rate is selected as Forward.
Forex Date Select the date of the forward contract. Note: This field gets enabled only if the Forex Rate is selected as Forward.
Exchange Rate Specify the forward exchange rate for the currency conversion. Note: This field is editable only if the Forex Rate is selected as Forward.
OR
Displays the spot exchange rate for the currency conversion.
Note: This field is non-editable if the Forex Rate is selected as Spot.
- Perform any one of the following actions:
- Click Next button to navigate to the next data segment.
- Click Save and Close button to save the changes and close the record.
- Click Cancel button to discard the changes and close the record.
Receivables and Payables:
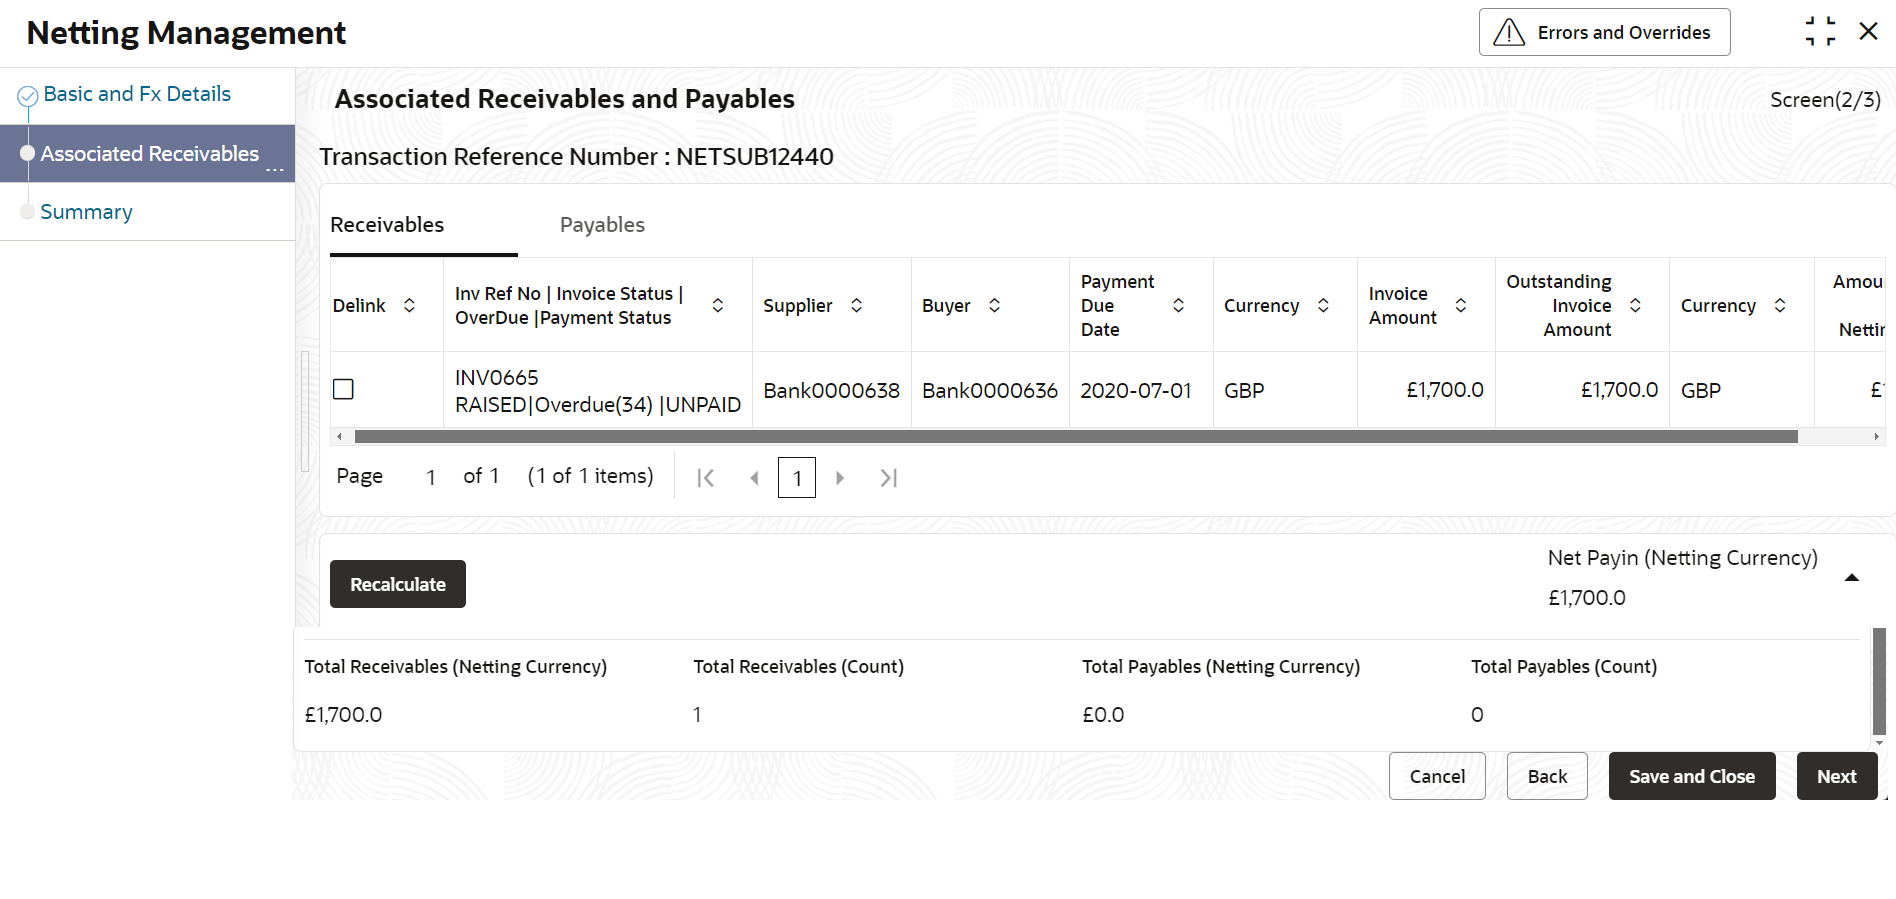
The user can view the receivables and payables details associated with the netting transaction in this data segment. The user can delink the invoices and application recalculates the total receivables and payables (Count, Amount and Net Payin/Payout)
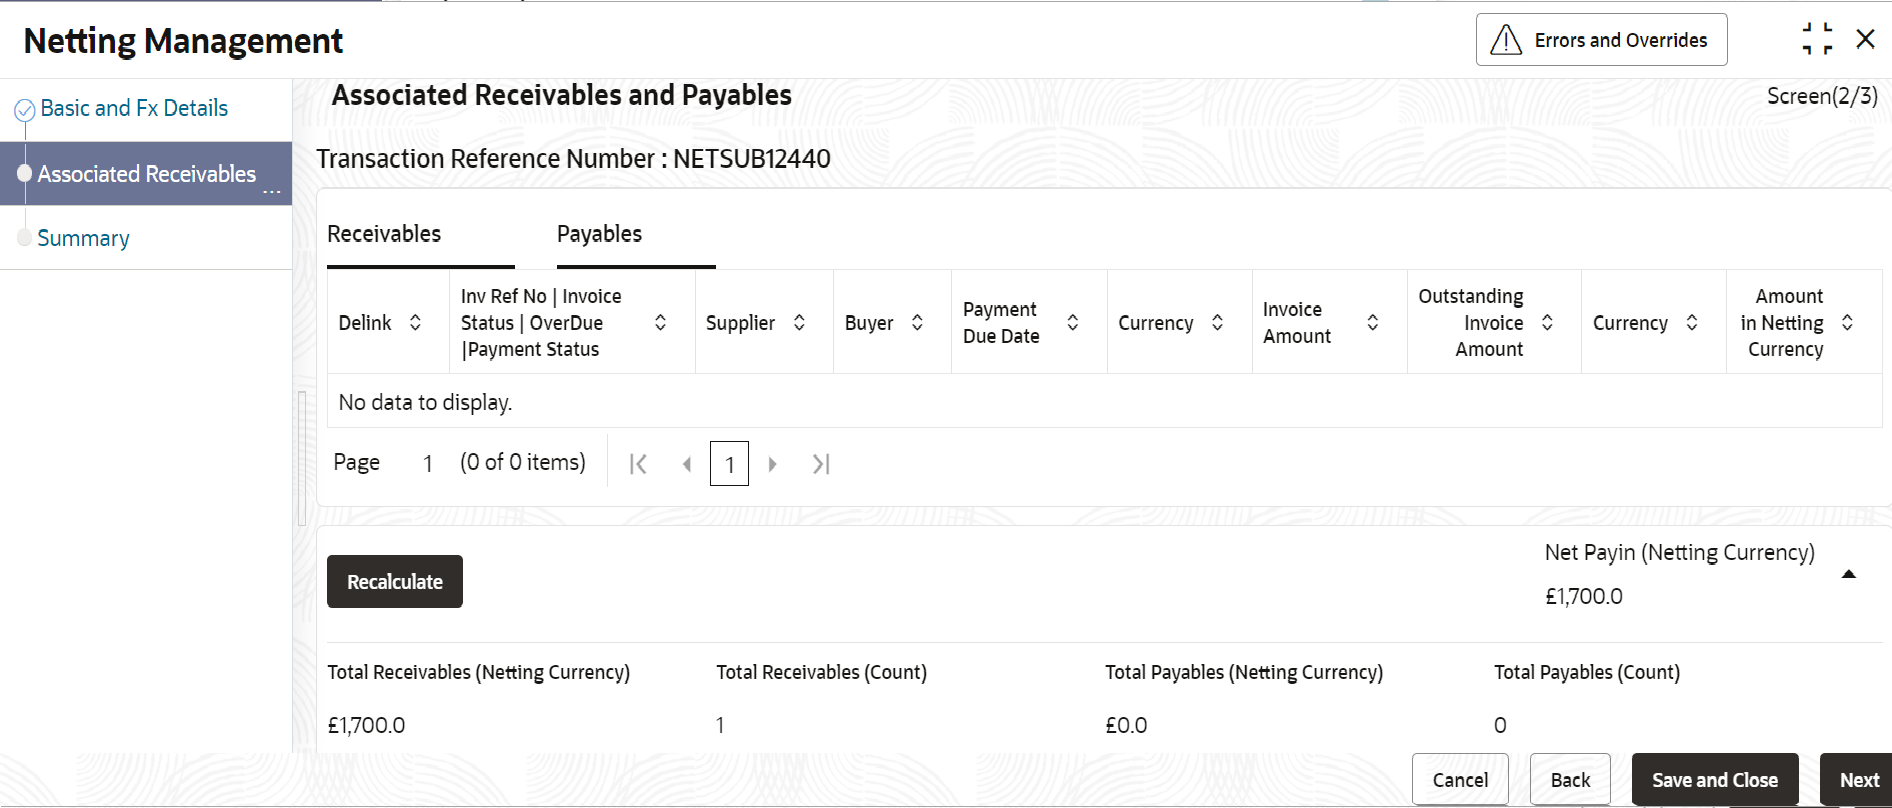
- Click Next button in the Basic Details data segment.If the Action field is selected as Accept/Reject,The Netting Management - Receivables - Accept/Reject data segment screen displays.
Figure 3-4 Netting Management - Receivables - Accept/Reject
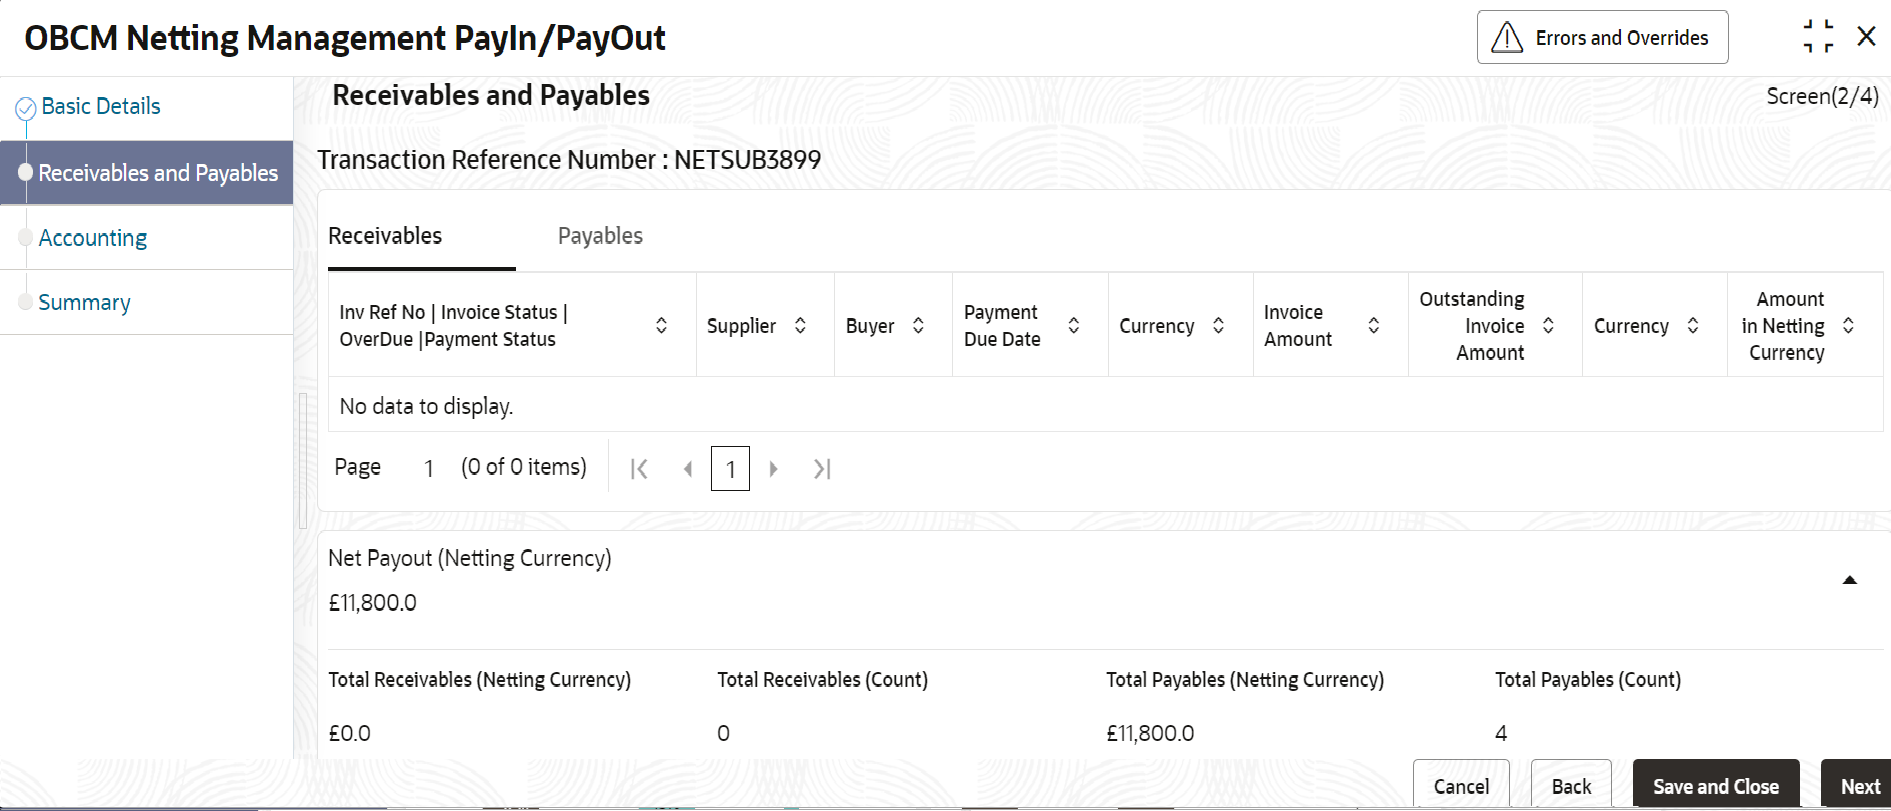
If the Action field is selected as Payout,
The Netting Management - Receivables - Payout data segment screen displays.Figure 3-5 Netting Management - Receivables - Payout
- Click Payables tab to view the payables associated with the netting transaction.If the Action field is selected as Accept/Reject,The Netting Management - Payables - Accept/Reject data segment screen displays.
Figure 3-6 Netting Management - Payables - Accept/Reject
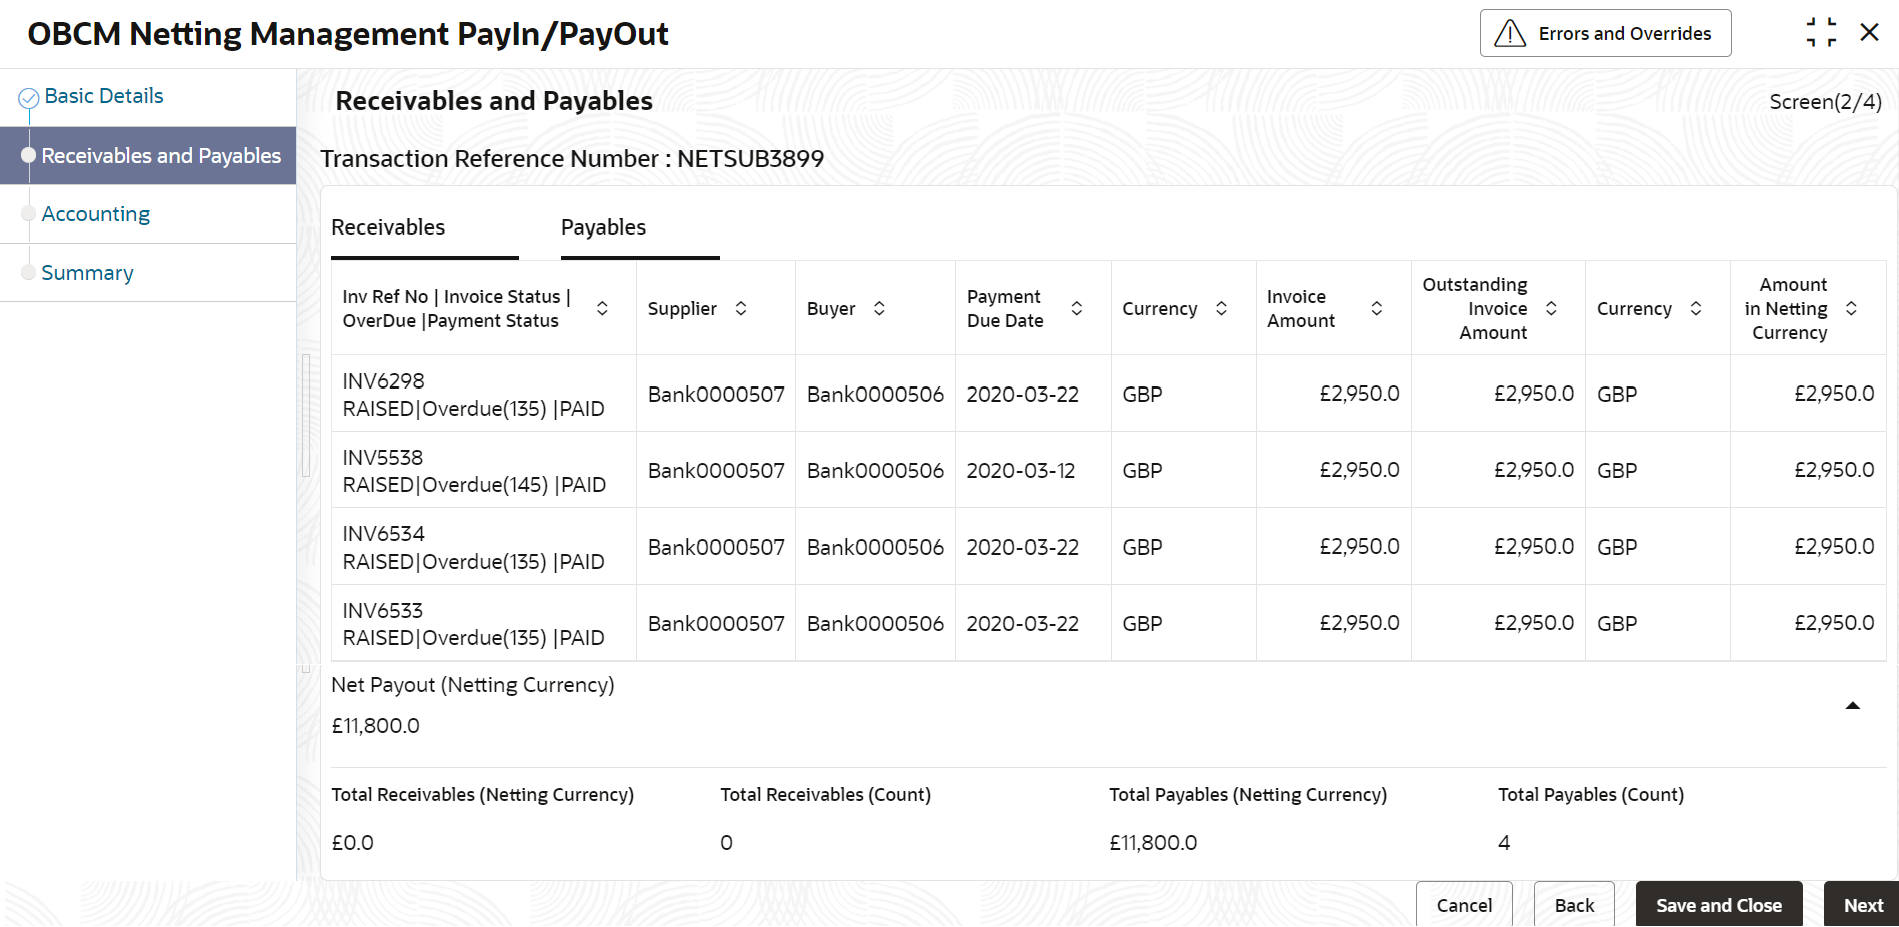
If the Action field is selected as Payout,
The Netting Management - Payables - Payout data segment screen displays.Figure 3-7 Netting Management - Payables - Payout
- Perform the following steps to delink the invoices and recalculate the total receivables and payables (Count, Amount and Net Payin/Payout).
Note:
This option is applicable for the Accept/Reject action.- Select the checkbox in the Delink column under the Receivables and Payables tab to delink the respective invoices from the netting transaction.
- Click Recalculate button to recalculate the net receivables and payables.
- Perform any one of the following actions:
- Click Back button to navigate to the previous data segment.
- Click Next button to navigate to the next data segment.
- Click Save and Close button to save the changes and close the record.
- Click Cancel button to discard the changes and close the record.
Accounting:This data segment provides the accounting details associated with the netting transaction.
Note:
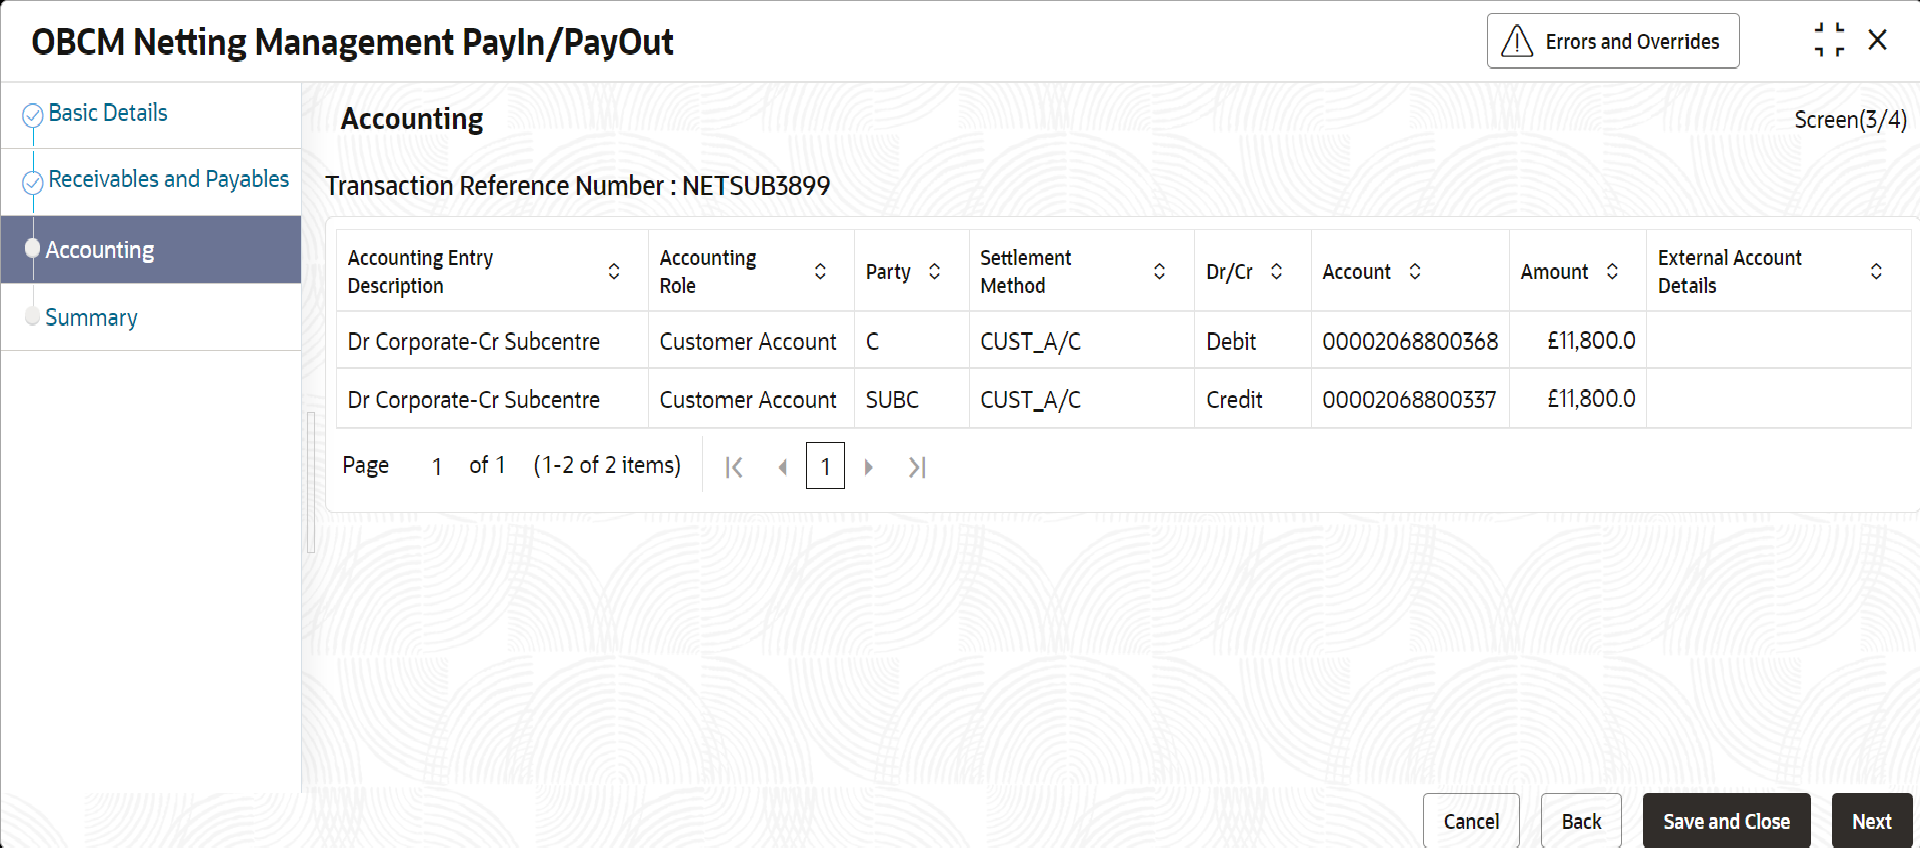
- Click Next button in Receivables and Payables data segment.The Netting Management - Accounting data segment screen displays.
Figure 3-8 Netting Management - Accounting
- Perform any one of the following actions:
- Click Back button to navigate to the previous data segment.
- Click Next button to navigate to the next data segment.
- Click Save and Close button to save the changes and close the record.
- Click Cancel button to discard the changes and close the record.
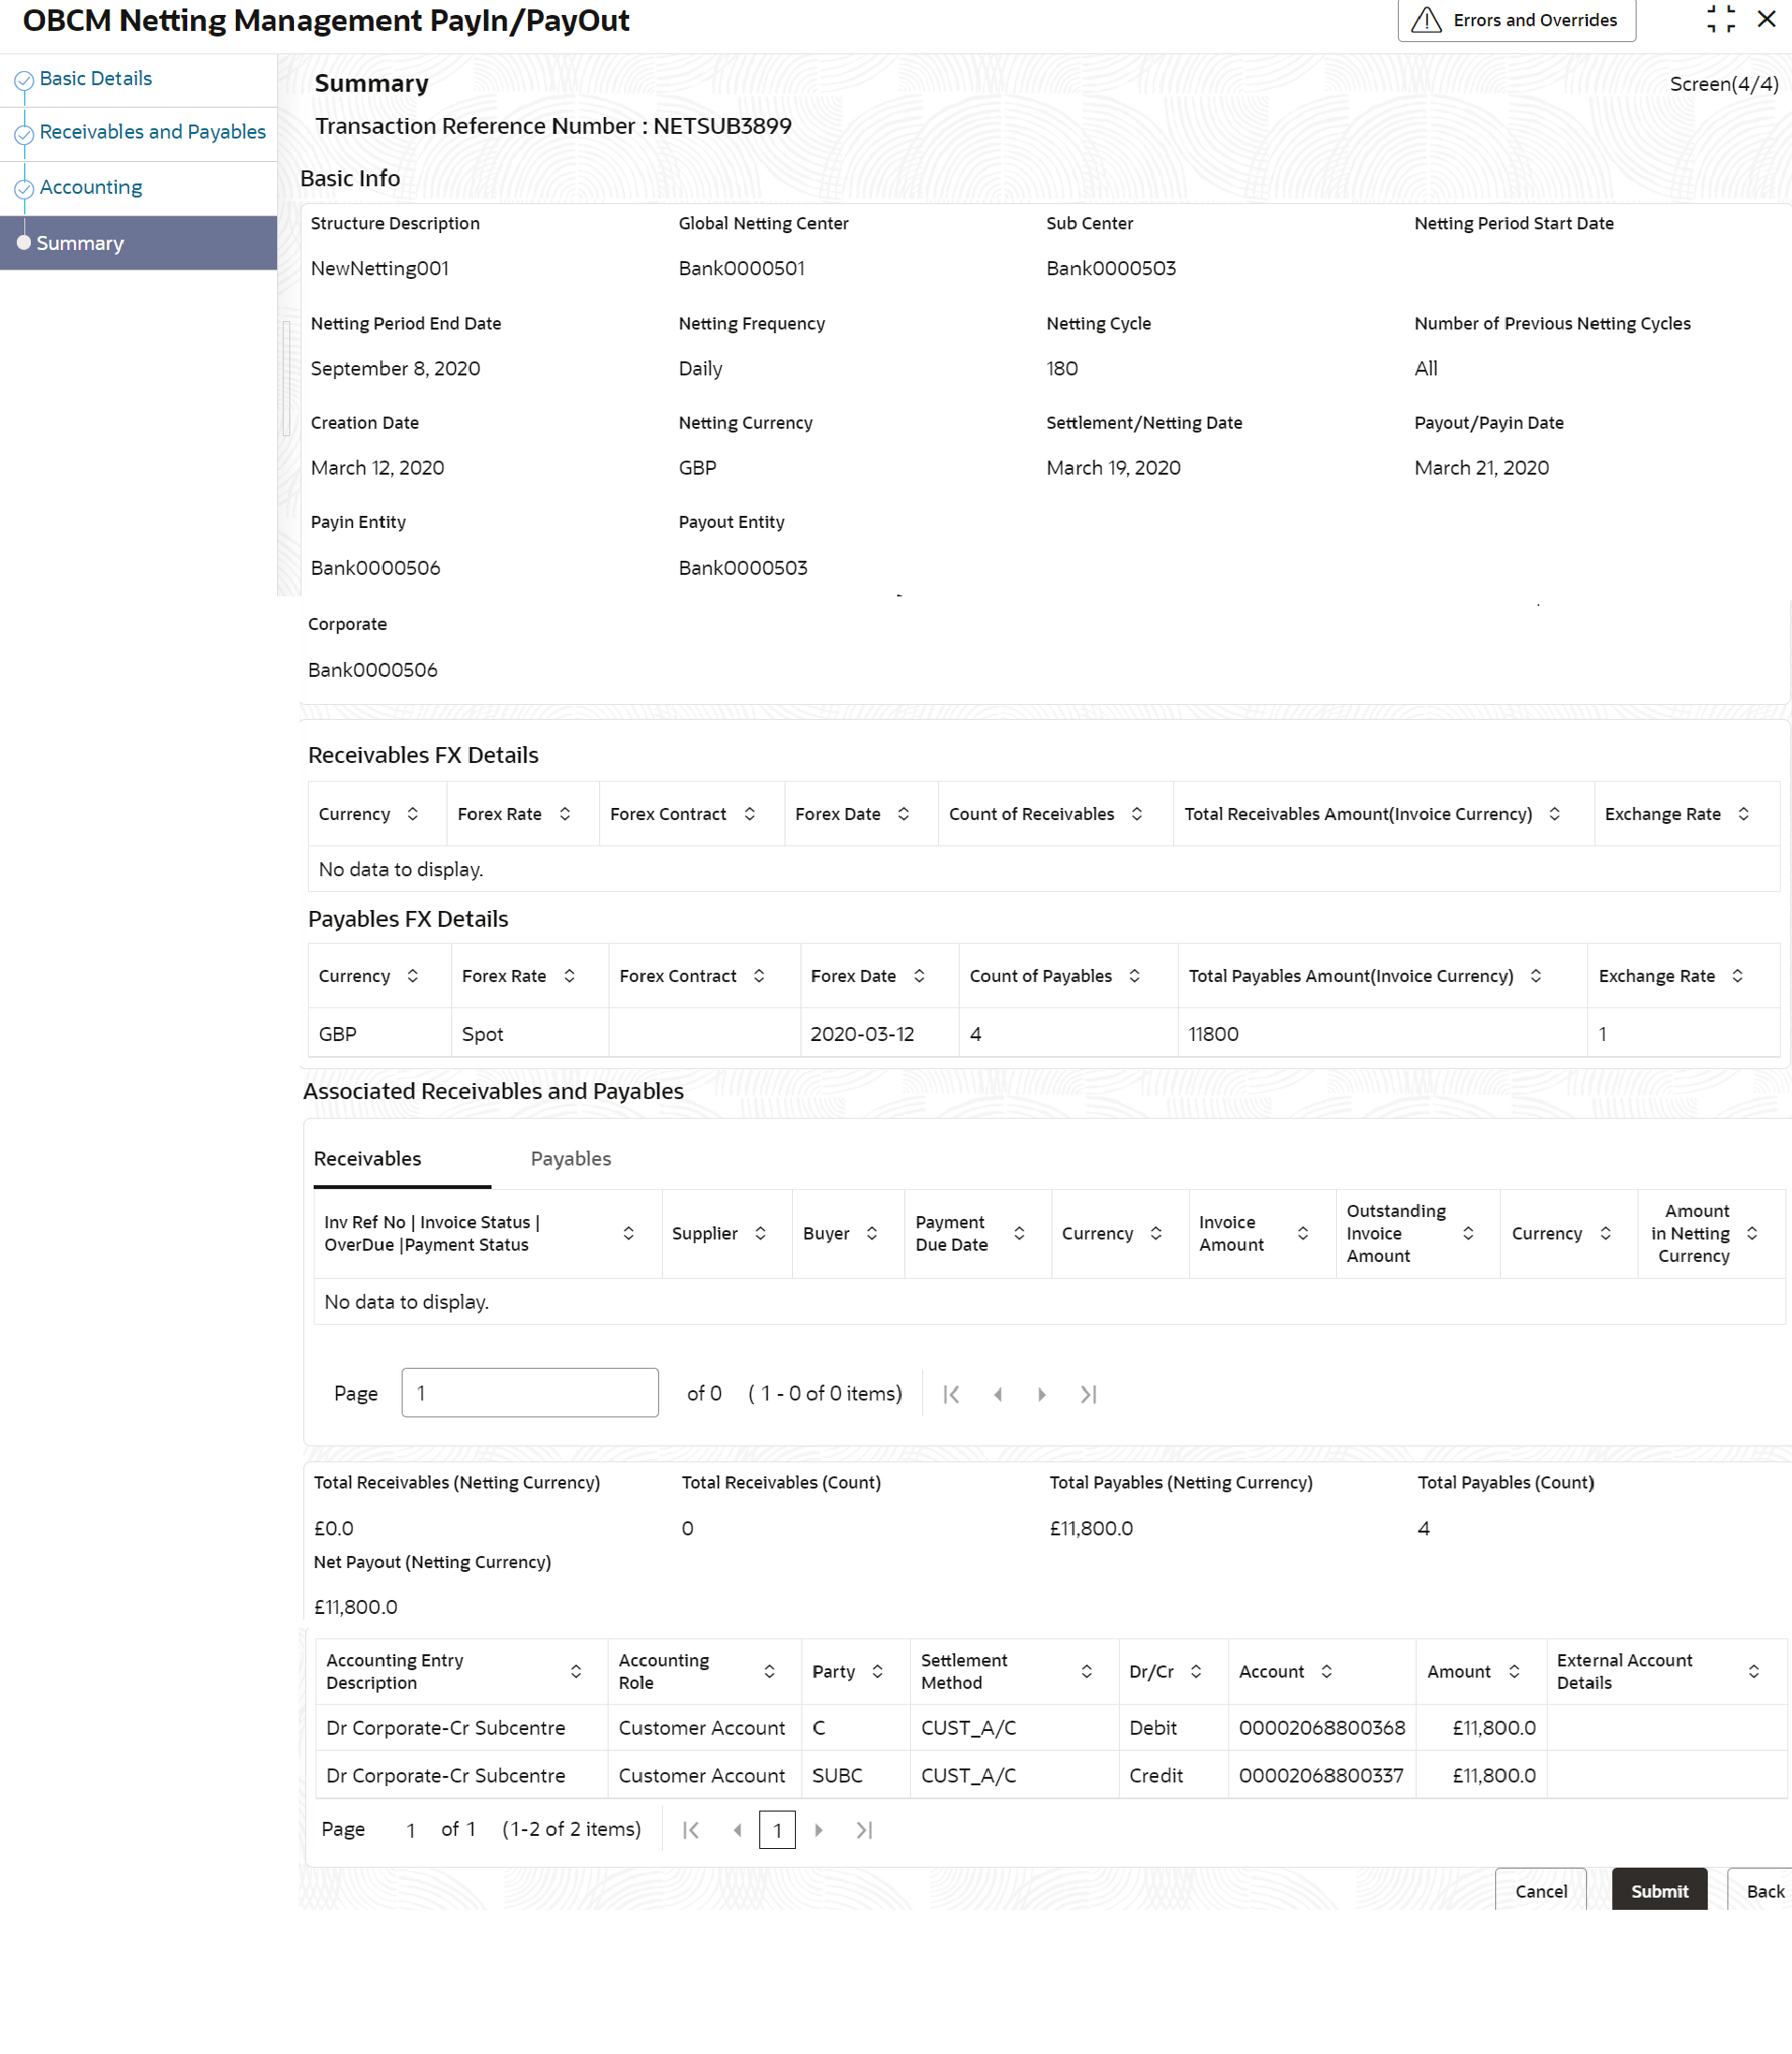
Summary:
The user can view the basic details, receivables and payables of netting transaction in this data segment.
- Click Next button in Receivables and Payables/Accounting data segment.The Netting Management - Summary data segment screen displays.
- Perform any one of the following actions:
- Click Submit button to accept/reject the netting transaction.
- Click Back button to navigate to the previous data segment.
- Click Cancel button to discard the changes and close the record.
