- Netting User Guide
- Maintenance for Netting
- Netting Structure
- Create Netting Structure
2.1.1 Create Netting Structure
This topic describes the systematic instruction to create the netting structure so that the appropriate subsidiaries and corporates can be linked to the global netting center and sub centers. The same can be enriched with netting parameters, invoice parameters and scheduling parameters.
Structure Details:
The Structure Details data segment allows to capture the basic details of the netting structure.
- On Home screen, click Cash Management. Under Cash Management, click Netting.
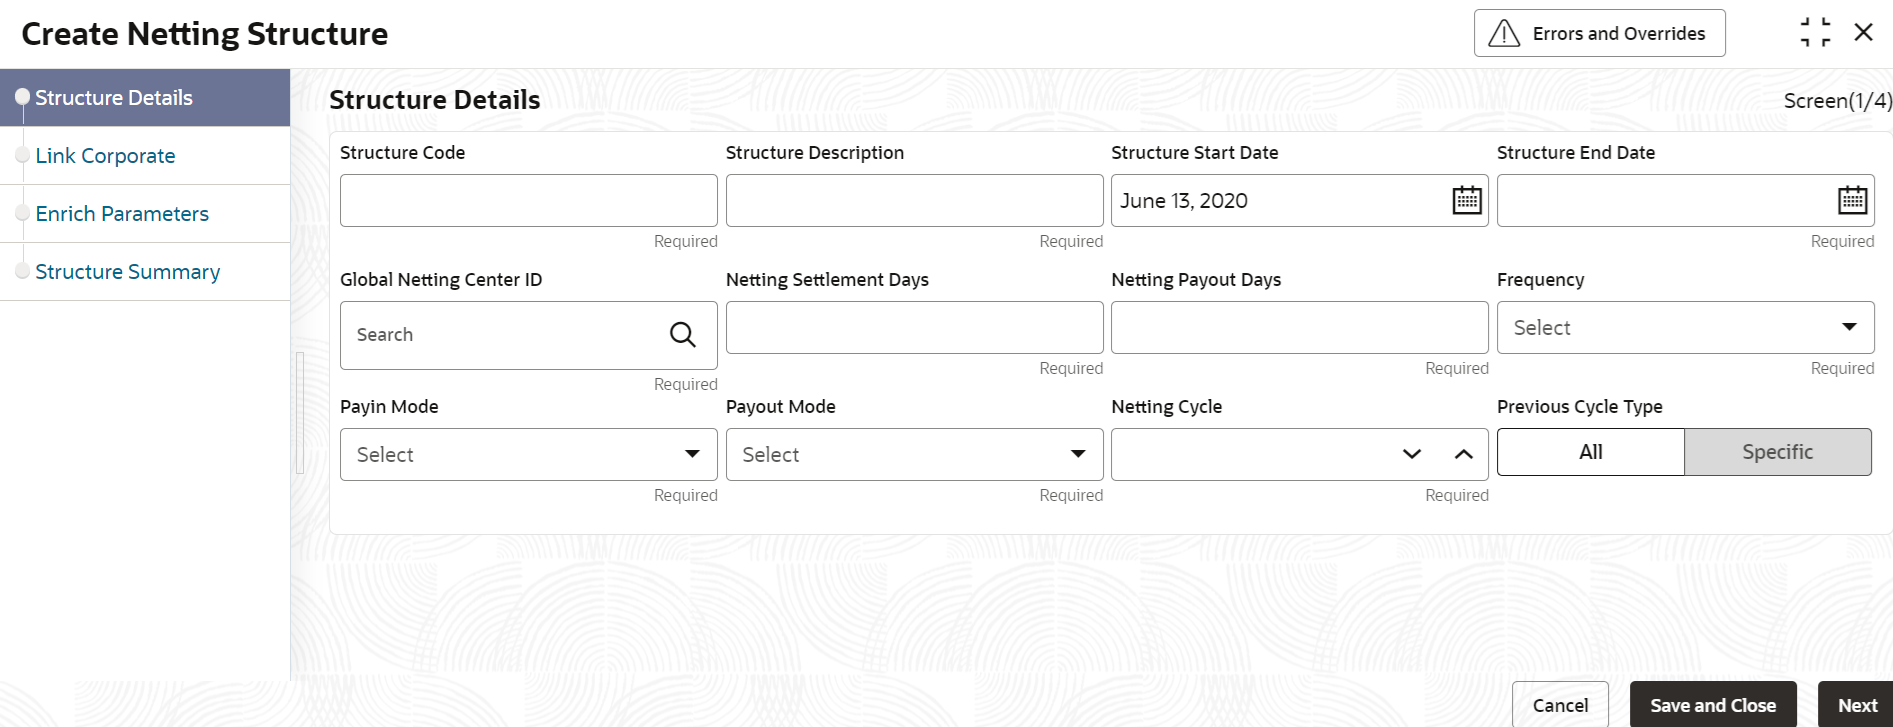
- Under Netting, click Maintenance. Under Maintenance, click Create Netting Structure.The Create Netting Structure - Structure Details screen displays.
Figure 2-1 Create Netting Structure - Structure Details
- Specify the fields on Create Netting Structure - Structure Details screen.For more information on fields, refer to the field description table.
Note:
The fields marked as Required are mandatory.Table 2-1 Structure Details - Field Description
Field Description Structure Code Specify the unique code for the netting structure. Structure Description Specify the description for the netting structure. Structure Start Date Select the date from when the structure should be effective. Structure End Date Select the date till when the structure should be effective. Global Netting Center ID Click the Search icon to view and select the global netting center ID from the list. Netting Settlement Days Specify the number of days post the netting transaction creation date by when the settlement batch should be executed. Netting Settlement Date = Netting Transaction Creation Date + Netting Settlement Days
Netting Payout Days Specify the number of days post the settlement batch date by when the payout transactions should get completed. Netting Payout Date = Netting Settlement Batch Date + Netting Payout Days
This field is only for MIS purpose.
Frequency Select the frequency based on which the netting transaction creation batch should get executed for a specific netting structure. The available options are:- Daily
- Monthly
- Weekly
Payin Mode Select the payin mode for receiving funds from the subsidiary/corporate party. The options are:- Account Cr/Dr
- EFT
Payout Mode Select the payout mode for remitting funds to the beneficiary party. The options are:- Account Cr/Dr
- EFT
Netting Cycle Specify the unit of duration (weekly, monthly, daily) that can be in present, past, or future based on which the invoices will be picked up for netting. Previous Cycle Type Select All or the Numbers option to include the invoices that are not netted for all the previous netting cycles or for the specific previous netting cycles. - Perform any one of the following actions:
- Click Next button to navigate to the next data segment.
- Click Save and Close button to save and close the record.
- Click Cancel button to discard the changes and close the record.
Link Corporate:
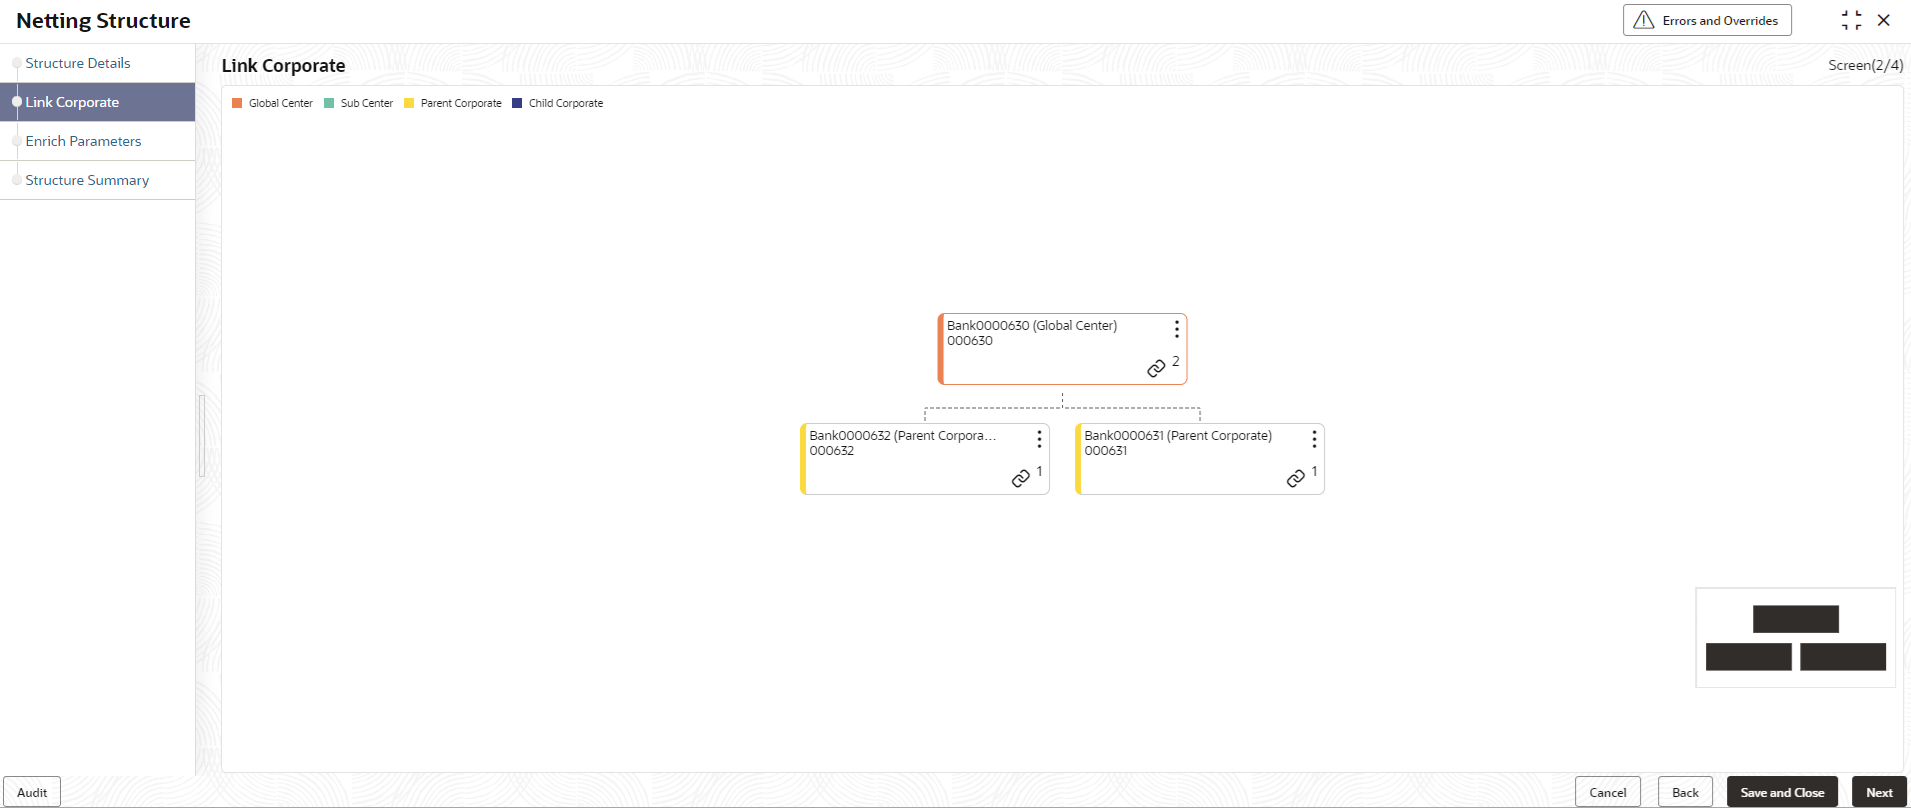
The Link Corporate data segment allows to link sub center to the global netting center and further link the multiple corporates/subsidiaries to sub centers or directly to global netting center. User can also link multiple child corporates to parent corporate basis trading relationship between parent and child corporate. Both child corporate and parent corporate are subsidiaries in multilateral netting set up.
- Click Next button in the Structure Details data segment.The Create Netting Structure - Link Corporate data segment displays.
Figure 2-2 Create Netting Structure - Link Corporate
Link Sub Center:
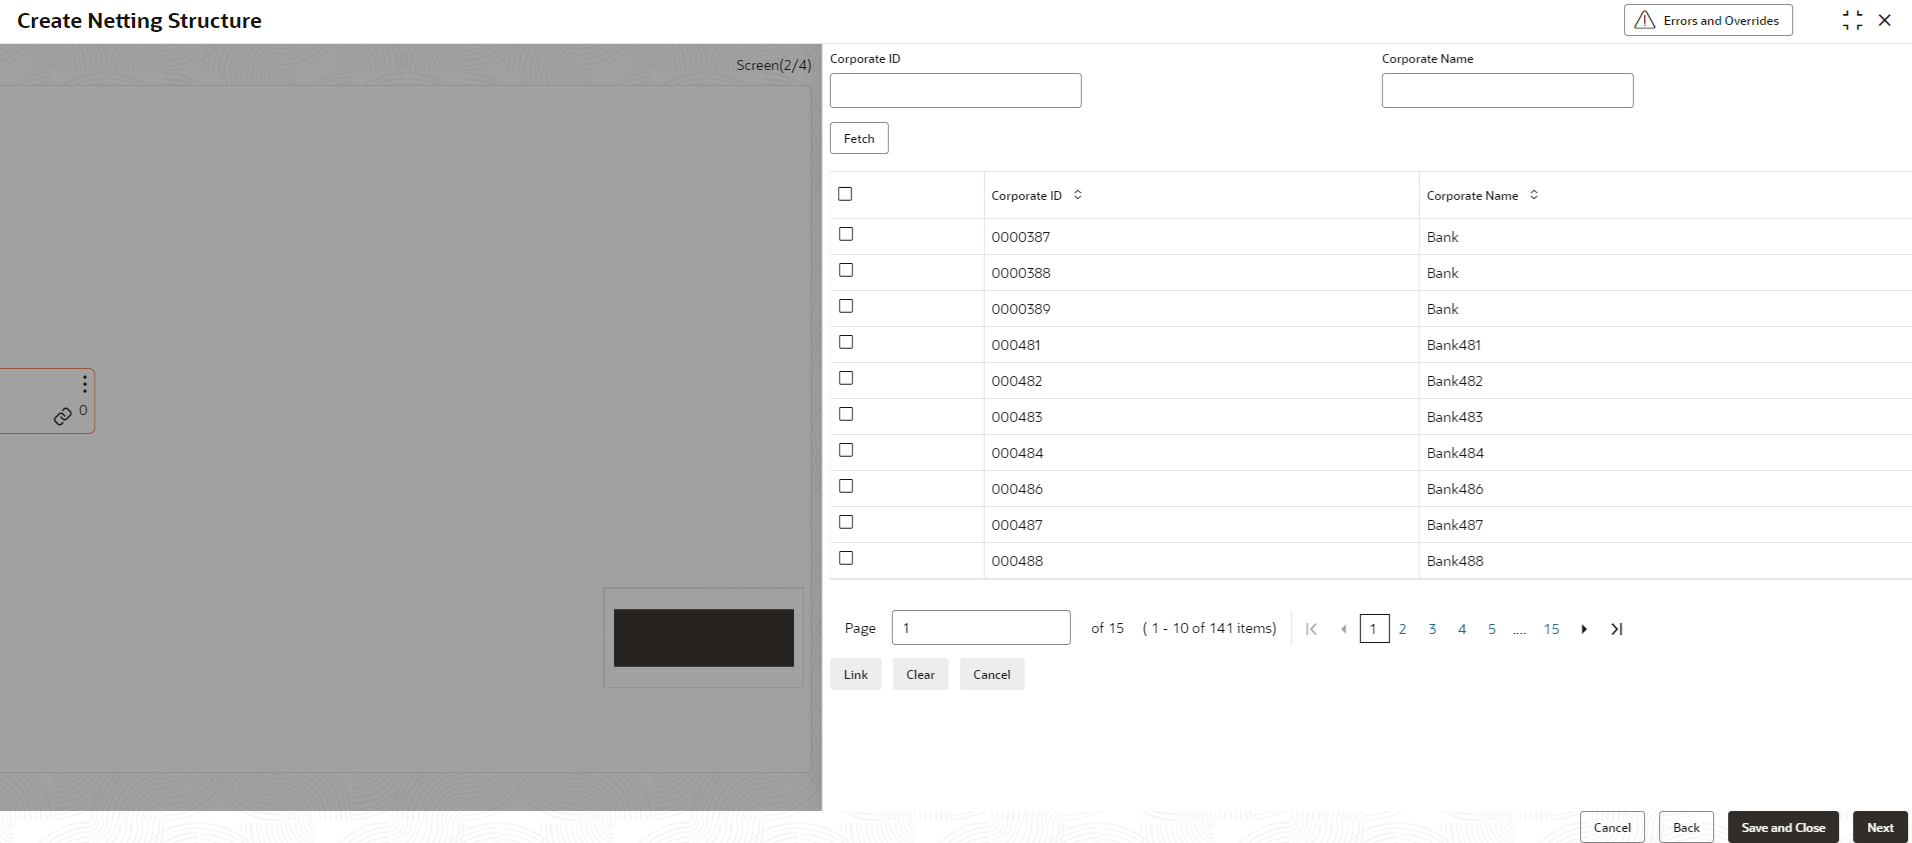
The Link Sub Center overlay screen allows to link a sub center to the global netting center.
- Perform the following actions to link the sub center.
- Click Link icon on the applicable node and
select Link Sub Center option to link the sub
center to the global center.The Link Sub Center overlay screen displays.
- Specify the fields on Link Sub Center overlay
screen.For more information on fields, refer to the field description table.
Table 2-2 Link Sub Center - Field Description
Field Description Search Customer Specify the customer ID/name to filter the subsidiary from the list. Customer ID Displays the unique ID of the customer. Customer Name Displays the name of the customer. - Select the customer checkbox from the list and click Link to link a subsidiary to the global center/sub center/parent corporate/child corporate..
- Click Link icon on the applicable node and
select Link Sub Center option to link the sub
center to the global center.
Link Parent Corporate:
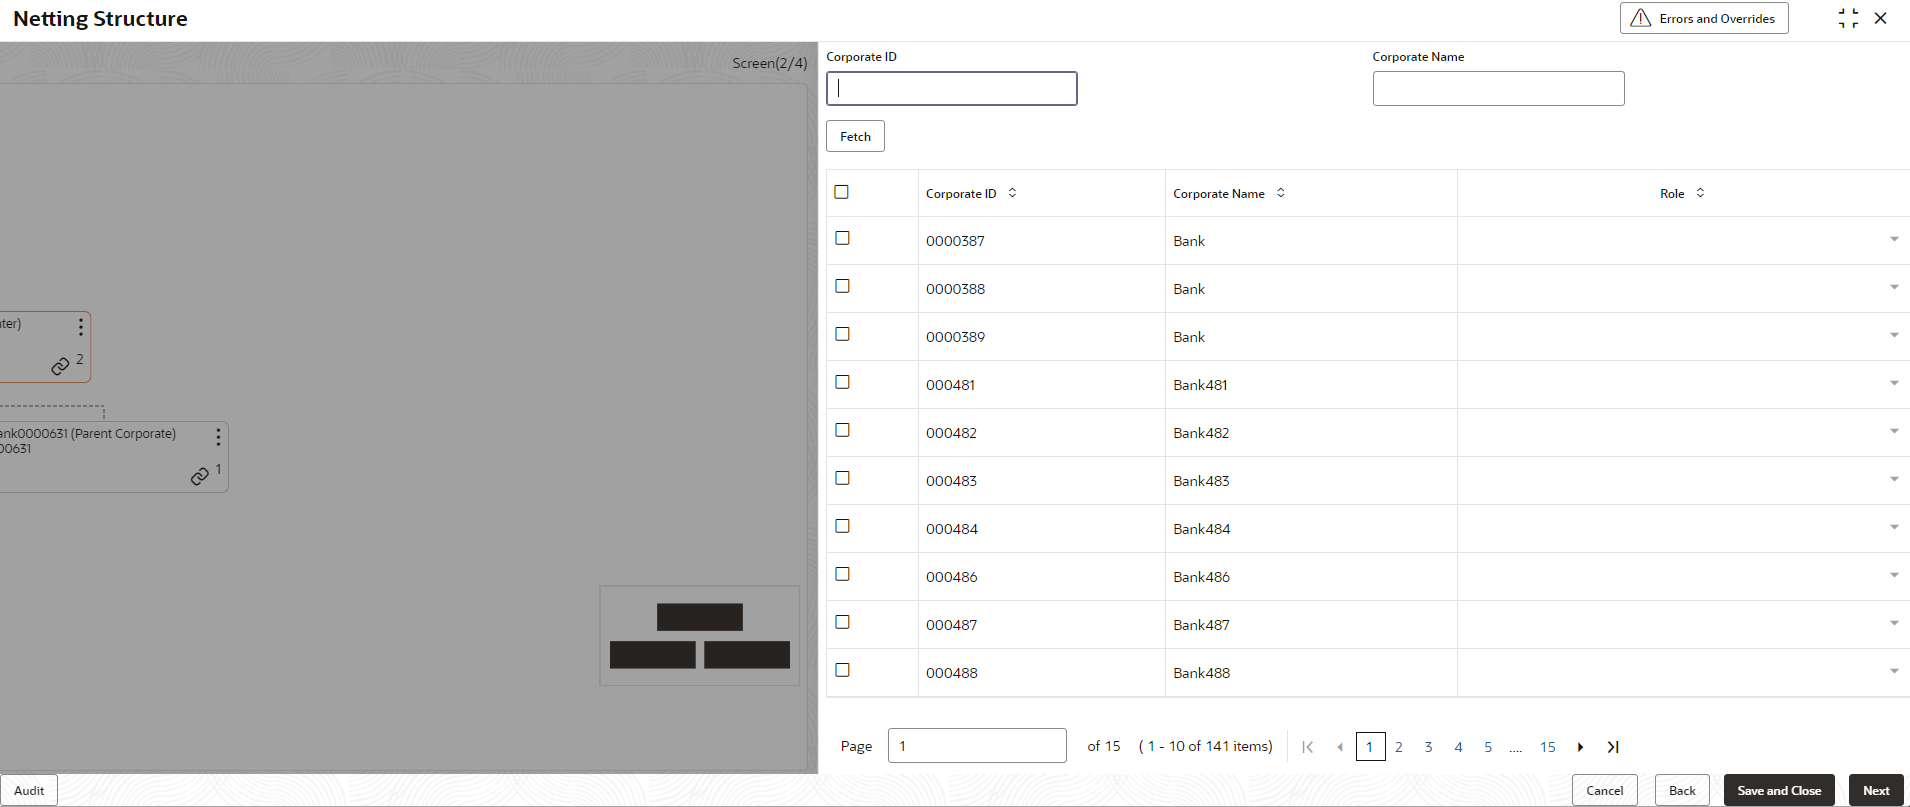
The Link Parent Corporate overlay screen allows to link parent corporate to the global center or sub center.
- Perform the following actions to link parent corporate.
- Click Link icon on the global netting center
node or sub center node and select Link Parent
Corporate option to link the parent corporate to the
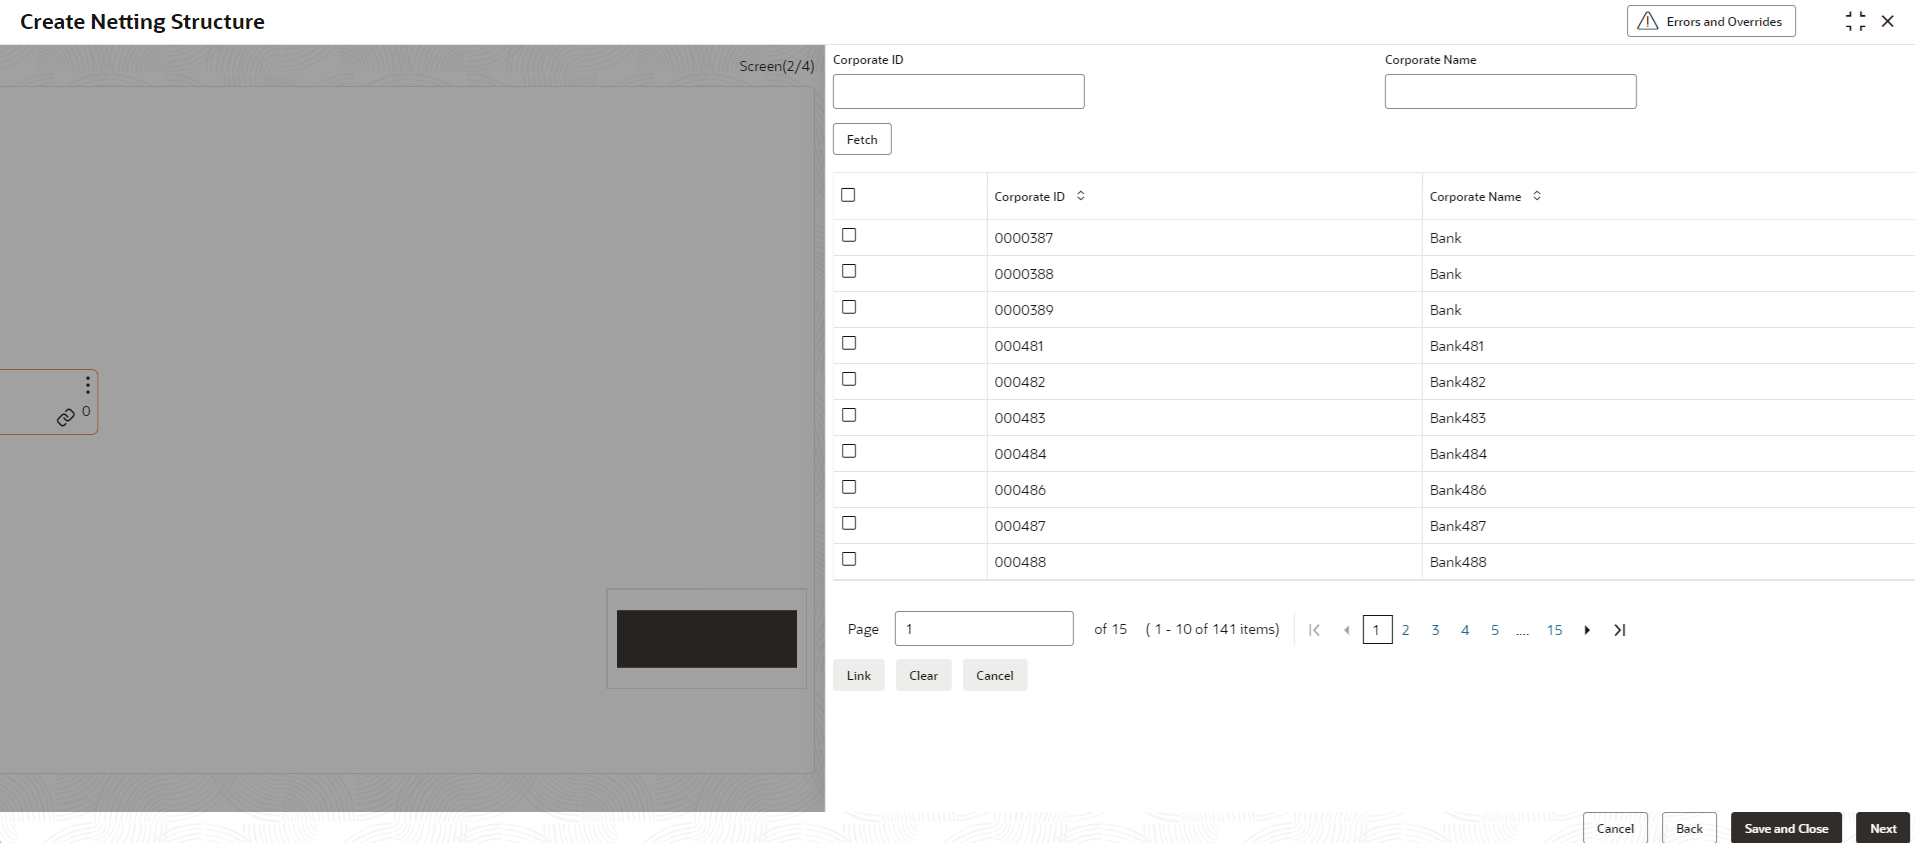
global netting center or sub center.The Link Parent Corporate overlay screen displays.
- Specify the fields on Link Parent Corporate
overlay screen.For more information on fields, refer to the field description table.
Table 2-3 Link Parent Corporate - Field Description
Field Description Search Customer Specify the customer ID/name to filter the sub center from the list. Customer ID Displays the unique ID of the customer. Customer Name Displays the name of the customer. - Select the customer check box from the list and click Link to link the parent corporate to the global netting center or sub center.
- Click Link icon on the global netting center
node or sub center node and select Link Parent
Corporate option to link the parent corporate to the
global netting center or sub center.
Link Child Corporate:
The Link Child Corporate overlay screen allows to link child corporate to the parent corporate.
- Perform the following actions to link child corporate.
- Click Link icon on the applicable node and select Link Child Corporate option to link the child corporate to parent corporate.The Link Child Corporate overlay screen displays.
- Specify the fields on Link Child Corporate overlay screen.For more information on fields, refer to the field description table.
Table 2-4 Link Child Corporate - Field Description
Field Description Search Customer Specify the customer ID/name to filter the sub center from the list. Customer ID Displays the unique ID of the customer. Customer Name Displays the name of the customer. Role Select the role type for the child corporate. The available options are:
- Buyer
- Supplier
- Select the customer check box from the list and click Link to link a child corporate to the parent corporate/child corporate..
- Click Link icon on the applicable node and select Link Child Corporate option to link the child corporate to parent corporate.
- Perform any one of the following actions:
- Click Back button to navigate to the previous data segment.
- Click Next button to navigate to the next data segment, once the netting structure is created in the required hierarchy.
- Click Save and Close button to save and close the record.
- Click Cancel button to discard the changes and close the record.
Enrich Parameters:
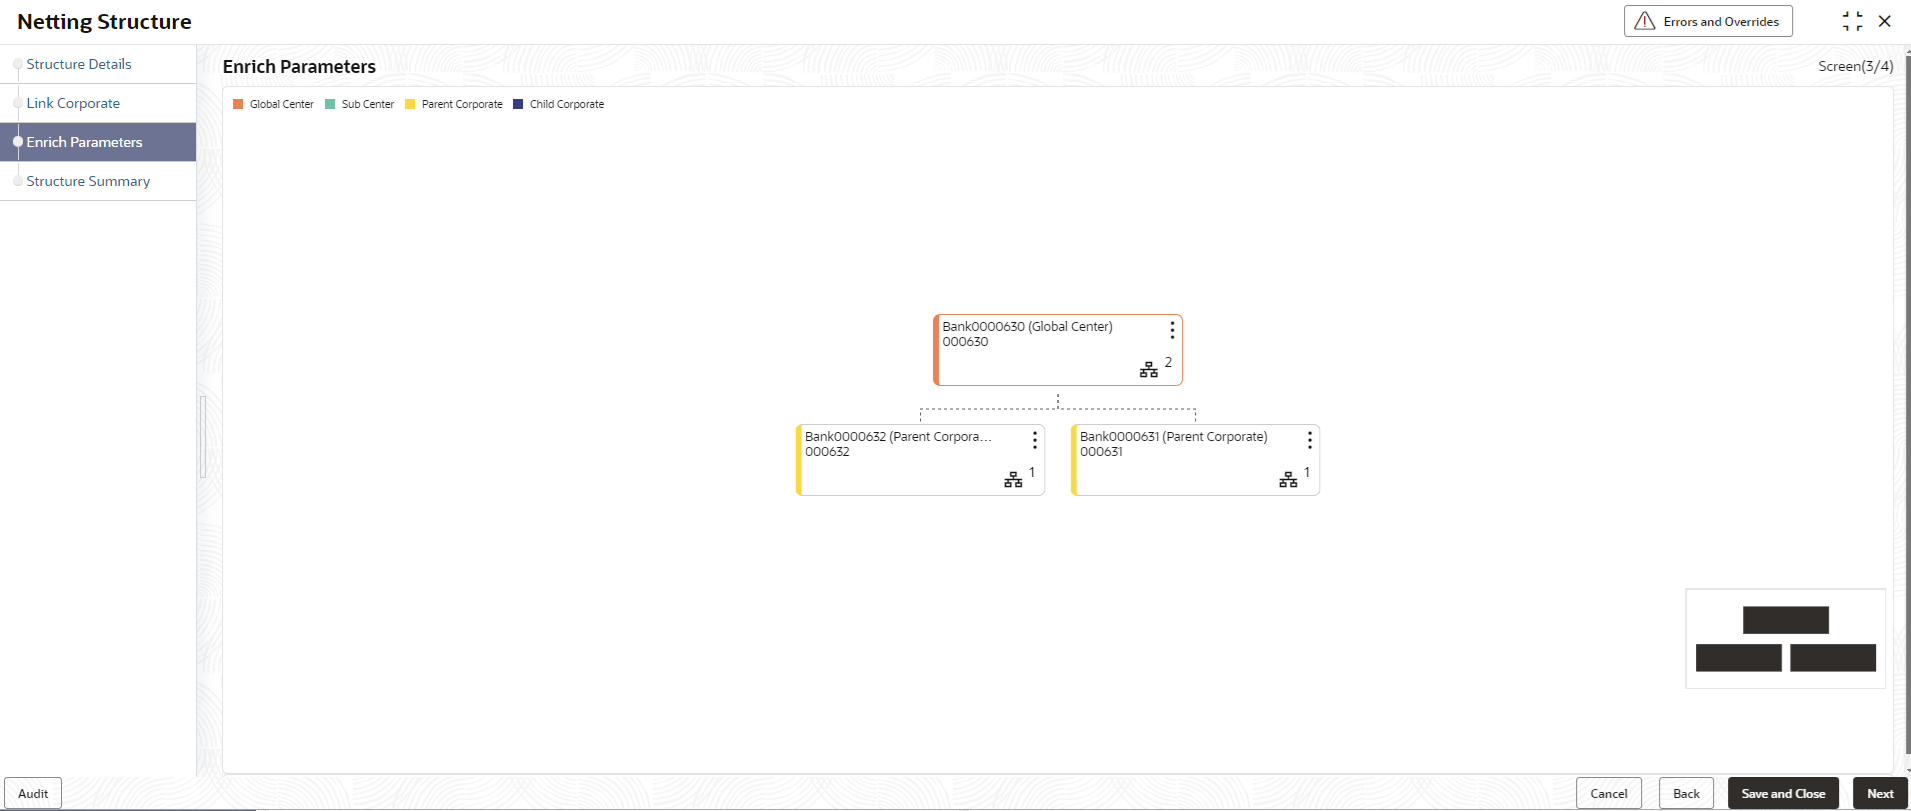
The Enrich Parameters data segment allows to define the netting parameters at sub center and parent corporate level, and the netting/invoicing parameters at the child corporate level.
- Click Next button in the Link
Corporate data segment.The Create Netting Structure - Enrich Parameters data segment displays.
Figure 2-6 Create Netting Structure - Enrich Parameters
Edit Sub Center Parameters:
- Perform the following actions to edit the Sub Center parameters:
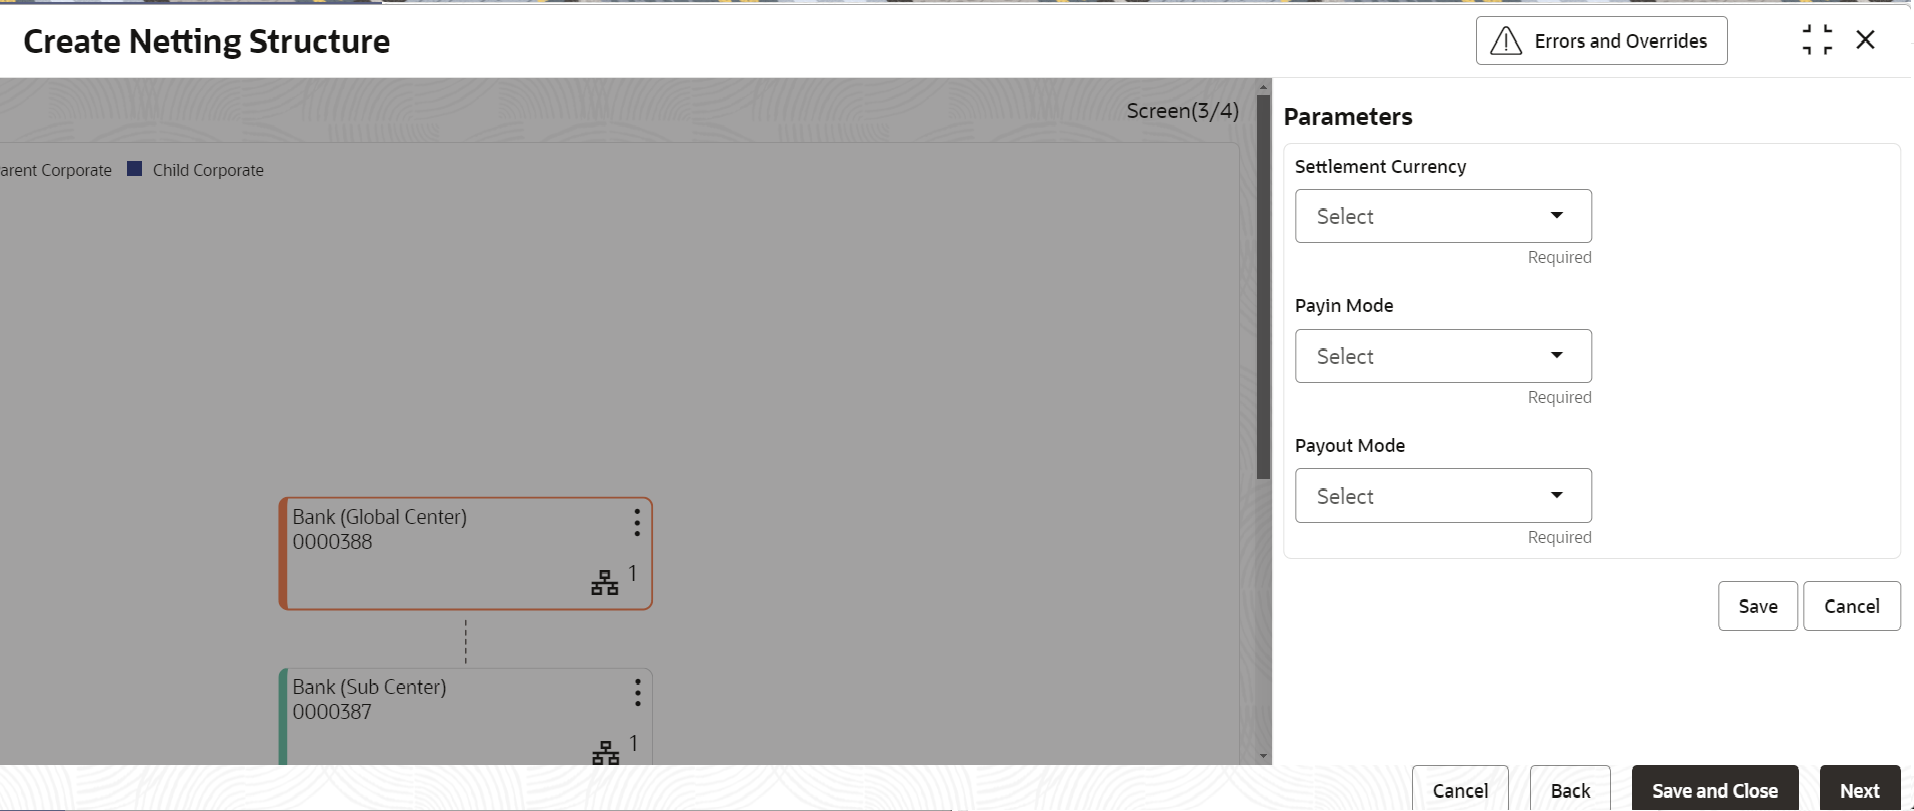
- On Sub Center node, click Options icon and select the Edit Parameters option.The Edit Sub Center Parameters overlay screen displays.
- Specify the fields on Edit Sub Center Parameters overlay screen.For more information on fields, refer to the field description table.
Note:
The fields marked as Required are mandatory.Table 2-5 Edit Sub Center Parameters - Field Description
Field Description Settlement CCY Select the settlement/netting currency for the netting transaction at subsidiary level. All invoices amounts will be converted to Netting Currency amount and then netted off. Payin Mode Select the payin mode for receiving funds from the subsidiary/corporate party/global netting center. The available options are:- Account Cr/Dr
- EFT
Payout Mode Select the payout mode for remitting funds to the beneficiary party. The available options are:- Account Cr/Dr
- EFT
- Click Save to save the details.
- On Sub Center node, click Options icon and select the Edit Parameters option.
Edit Parent Corporate Parameters
- Perform the following actions to edit the Parent Corporate parameters:
- On Parent Corporate node, click
Options icon and select the Edit
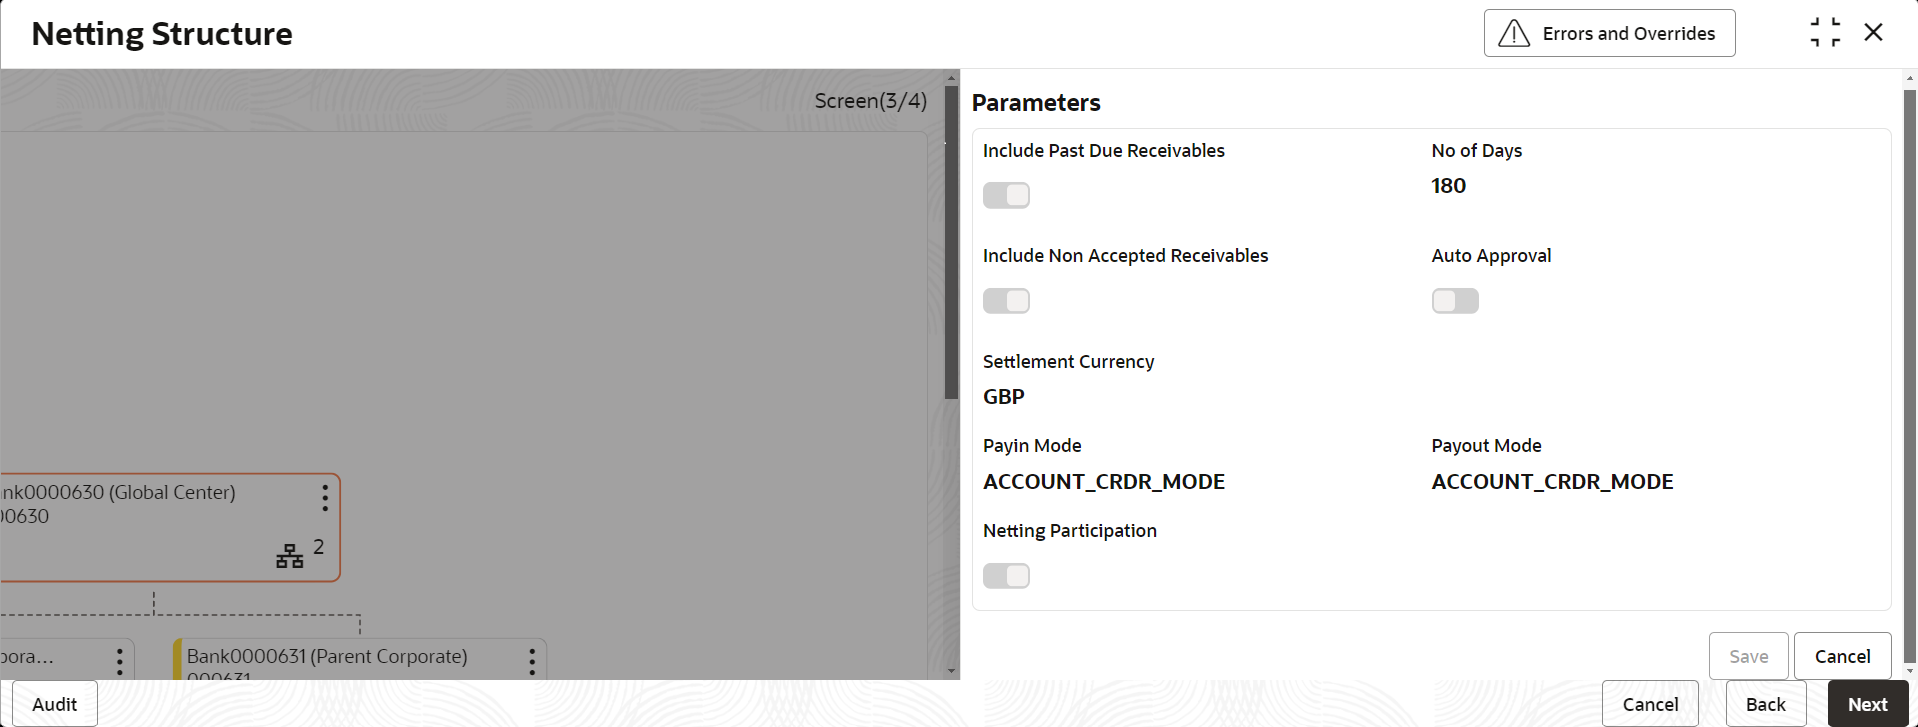
Parameters option.The Edit Parent Corporate Parameters overlay screen displays.
Figure 2-8 Edit Parent Corporate Parameters
- Specify the fields on Edit Parent Corporate Parameters
overlay screen.For more information on fields, refer to the field description table.
Note:
The fields marked as Required are mandatory.Table 2-6 Edit Parent Corporate Parameters - Field Description
Field Description Include Past Due Receivables Select the toggle to include the overdue receivables for netting. No of Days Specify the maximum aging days of overdue invoices to be considered for netting. Include Non Accepted Receivables Select the toggle to specify whether non accepted invoices should be considered for netting. Auto Approval Select the toggle to approve the specify whether netting transaction should get auto approved/auto accepted in case corporate user does not manually accept or reject netting transaction Settlement Currency Select the settlement/netting currency for the netting transaction at subsidiary level. All invoices amounts will be converted to Netting Currency amount and then netted off. Payin Mode Select the payin mode for receiving funds from the subsidiary/global netting center/sub center/child corporate party. The available Options are- Account Cr/Dr
- EFT
PayoutMode Select the payout mode for remitting funds to the beneficiary party. The available options are:
- Account Cr/Dr
- EFT
NettingParticipation Click on the toggle to specify whether the parent corporate should participate in next netting cycle. - Click Save to save the details.
- On Parent Corporate node, click
Options icon and select the Edit
Parameters option.
Edit Child Corporate Parameters
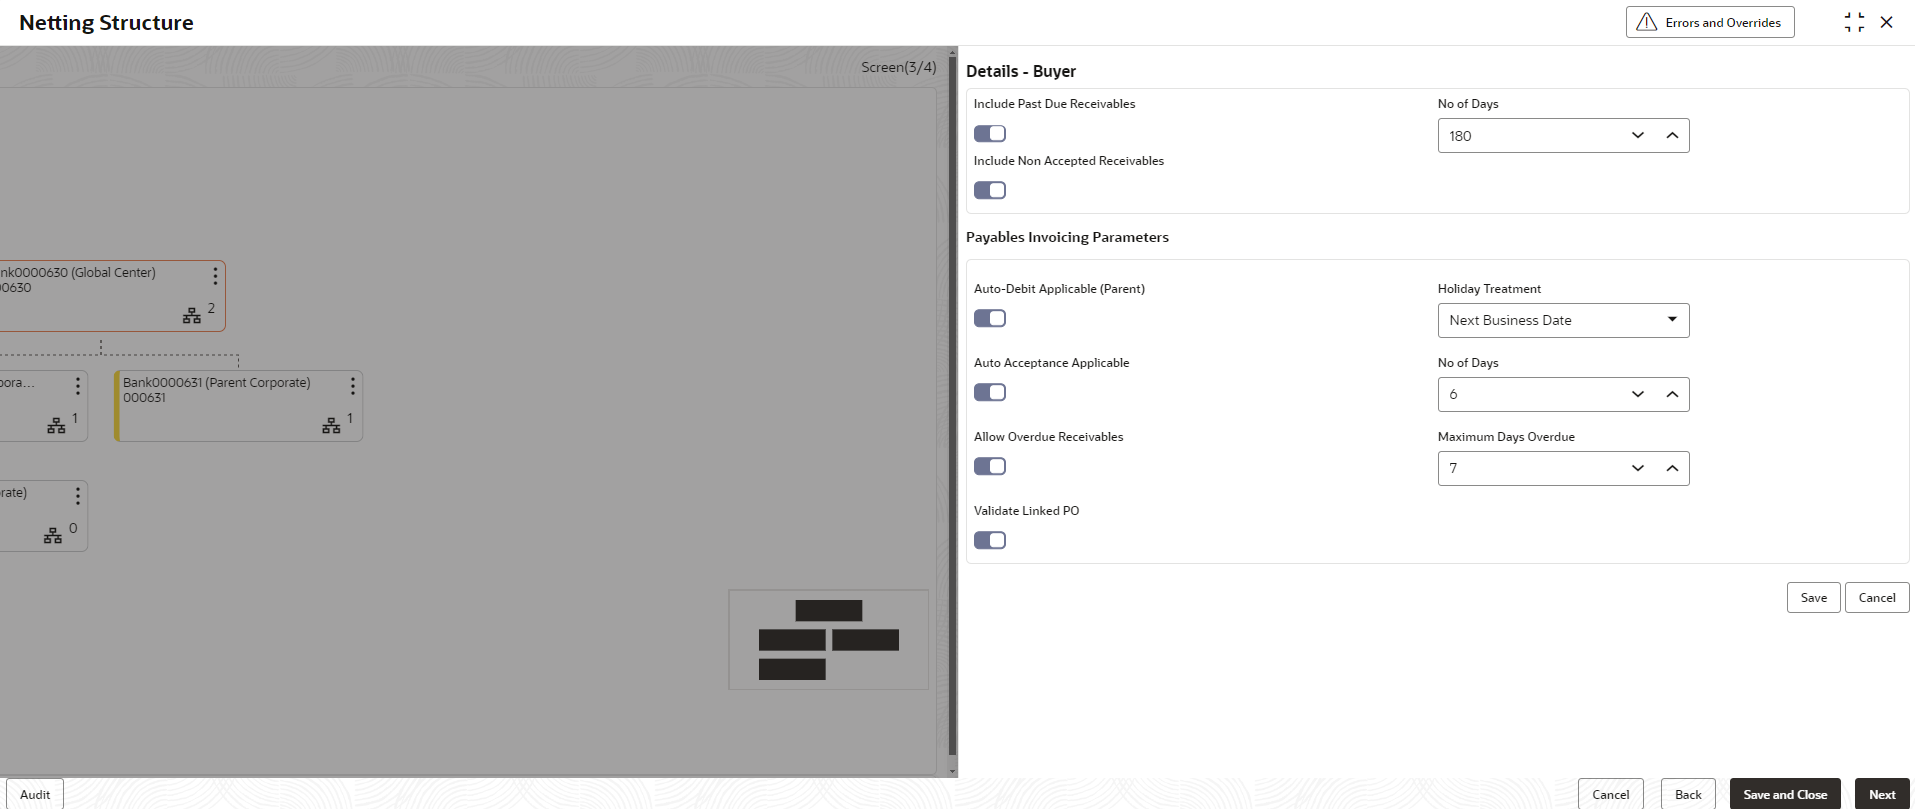
- Perform the following actions to edit the Buyer details of Child Corporate Parameters:
- On Buyer Of Child Corporate Parameter nodes, click Options icon and select the Edit Parameters option.The Edit Details - Buyer overlay screen displays.
- Specify the fields on Edit Details - Buyer overlay screen.For more information on fields, refer to the field description table.
Note:
The fields marked as Required are mandatory.Table 2-7 Edit Details - Buyer - Field Description
Field Description Include Past Due Receivables Select the toggle to include the overdue receivables for netting. No of Days Specify the maximum aging days of overdue invoices to be considered for netting. Include Non Accepted Receivables Select the toggle to specify whether non accepted invoices should be considered for netting. Payables Invoicing Parameters Select the parameters required for processing/managing payables in the following fields. Auto-Debit Applicable (Parent) Select the toggle whether the automatic debit facility is applicable for payables at the relationship level. Holiday Treatment Select the value to specify how to treat auto-debit transactions falling on holidays. The options are:- Previous Business Date
- Next Business Date
Auto Acceptance Applicable Select the toggle whether the auto acceptance should be enabled for the payables. No of Days Specify the number of day(s) post which the auto-acceptance is triggered for the payables, if the invoices are not manually accepted. Note: This field displays only if the Auto Acceptance Applicable toggle is enabled.
Allow Overdue Receivables Select the toggle to allow the creation of overdue invoices and debit notes for the relationship. Maximum Days Overdue Specify the maximum number of days post the payment due date (if maintained), until when the creation of the payable is allowed. Note: This field displays only if the Allow Overdue Receivables toggle is enabled.
Validate Linked PO Select the toggle to validate the purchase orders linked with invoice during creation or upload. - Click Save to save the details.
- On Buyer Of Child Corporate Parameter nodes, click Options icon and select the Edit Parameters option.
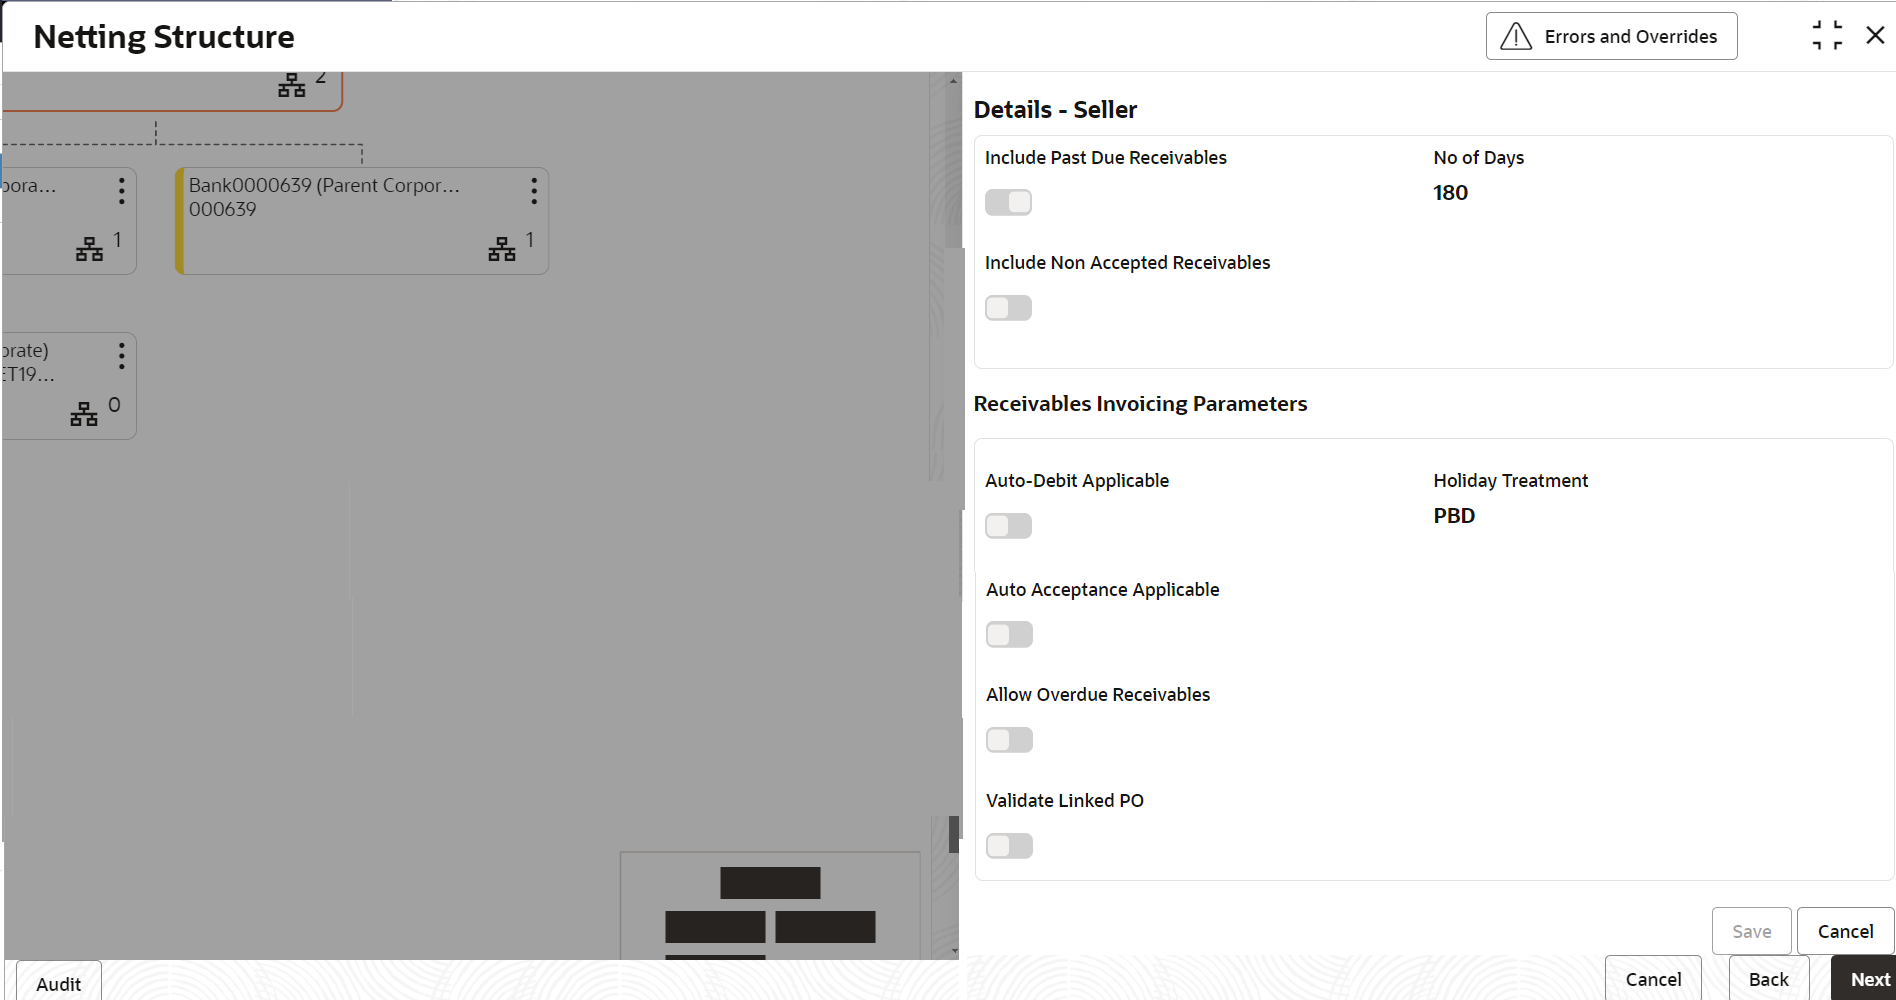
- Perform the following actions to edit the Supplier details of Child Corporate
Parameters:
- On the Supplier Of Child Corporate Parameter
nodes, click Options icon and select the
Edit Parameters option.The Edit Details - Supplier overlay screen displays.
- Specify the fields on Edit Details - Supplier
overlay screen.For more information on fields, refer to the field description table.
Note:
The fields marked as Required are mandatory.Table 2-8 Edit Details - Supplier - Field Description
Field Description Include Past Due Receivables Select the toggle to include the overdue receivables for netting. No of Days Specify the maximum aging days of overdue invoices to be considered for netting. Include Non Accepted Receivables Select the toggle to specify whether non accepted invoices should be considered for netting. Receivables Invoicing Parameters Select the parameters required for Receivables in the following fields. Auto-Debit Applicable (Parent) Select the toggle whether the automatic debit facility is applicable for payables at the relationship level. Holiday Treatment Select the value to specify how to treat auto-debit transactions falling on holidays. The options are:- Previous Business Date
- Next Business Date
Auto Acceptance Applicable Select the toggle whether the auto acceptance should be enabled for the payables. No of Days Specify the number of day(s) post which the auto-acceptance is triggered for the payables, if the invoices are not manually accepted. Note: This field displays only if the Auto Acceptance Applicable toggle is enabled.
Allow Overdue Receivables Select the toggle to allow the creation of overdue invoices and debit notes for the relationship. Maximum Days Overdue Specify the maximum number of days post the payment due date (if maintained), until when the creation of the payable is allowed. Note: This field displays only if the Allow Overdue Receivables toggle is enabled.
Validate Linked PO Select the toggle to validate the purchase orders linked with invoice during creation or upload. - Click Save to save the details.
- On the Supplier Of Child Corporate Parameter
nodes, click Options icon and select the
Edit Parameters option.
- Perform any one of the following actions:
- Click Back button to navigate to the previous data segment.
- Click Next button to navigate to the next data segment, once the netting/invoicing parameters is configured in the respective nodes.
- Click Save and Close button to save and close the record.
- Click Cancel button to discard the changes and close the record.
Structure Summary:
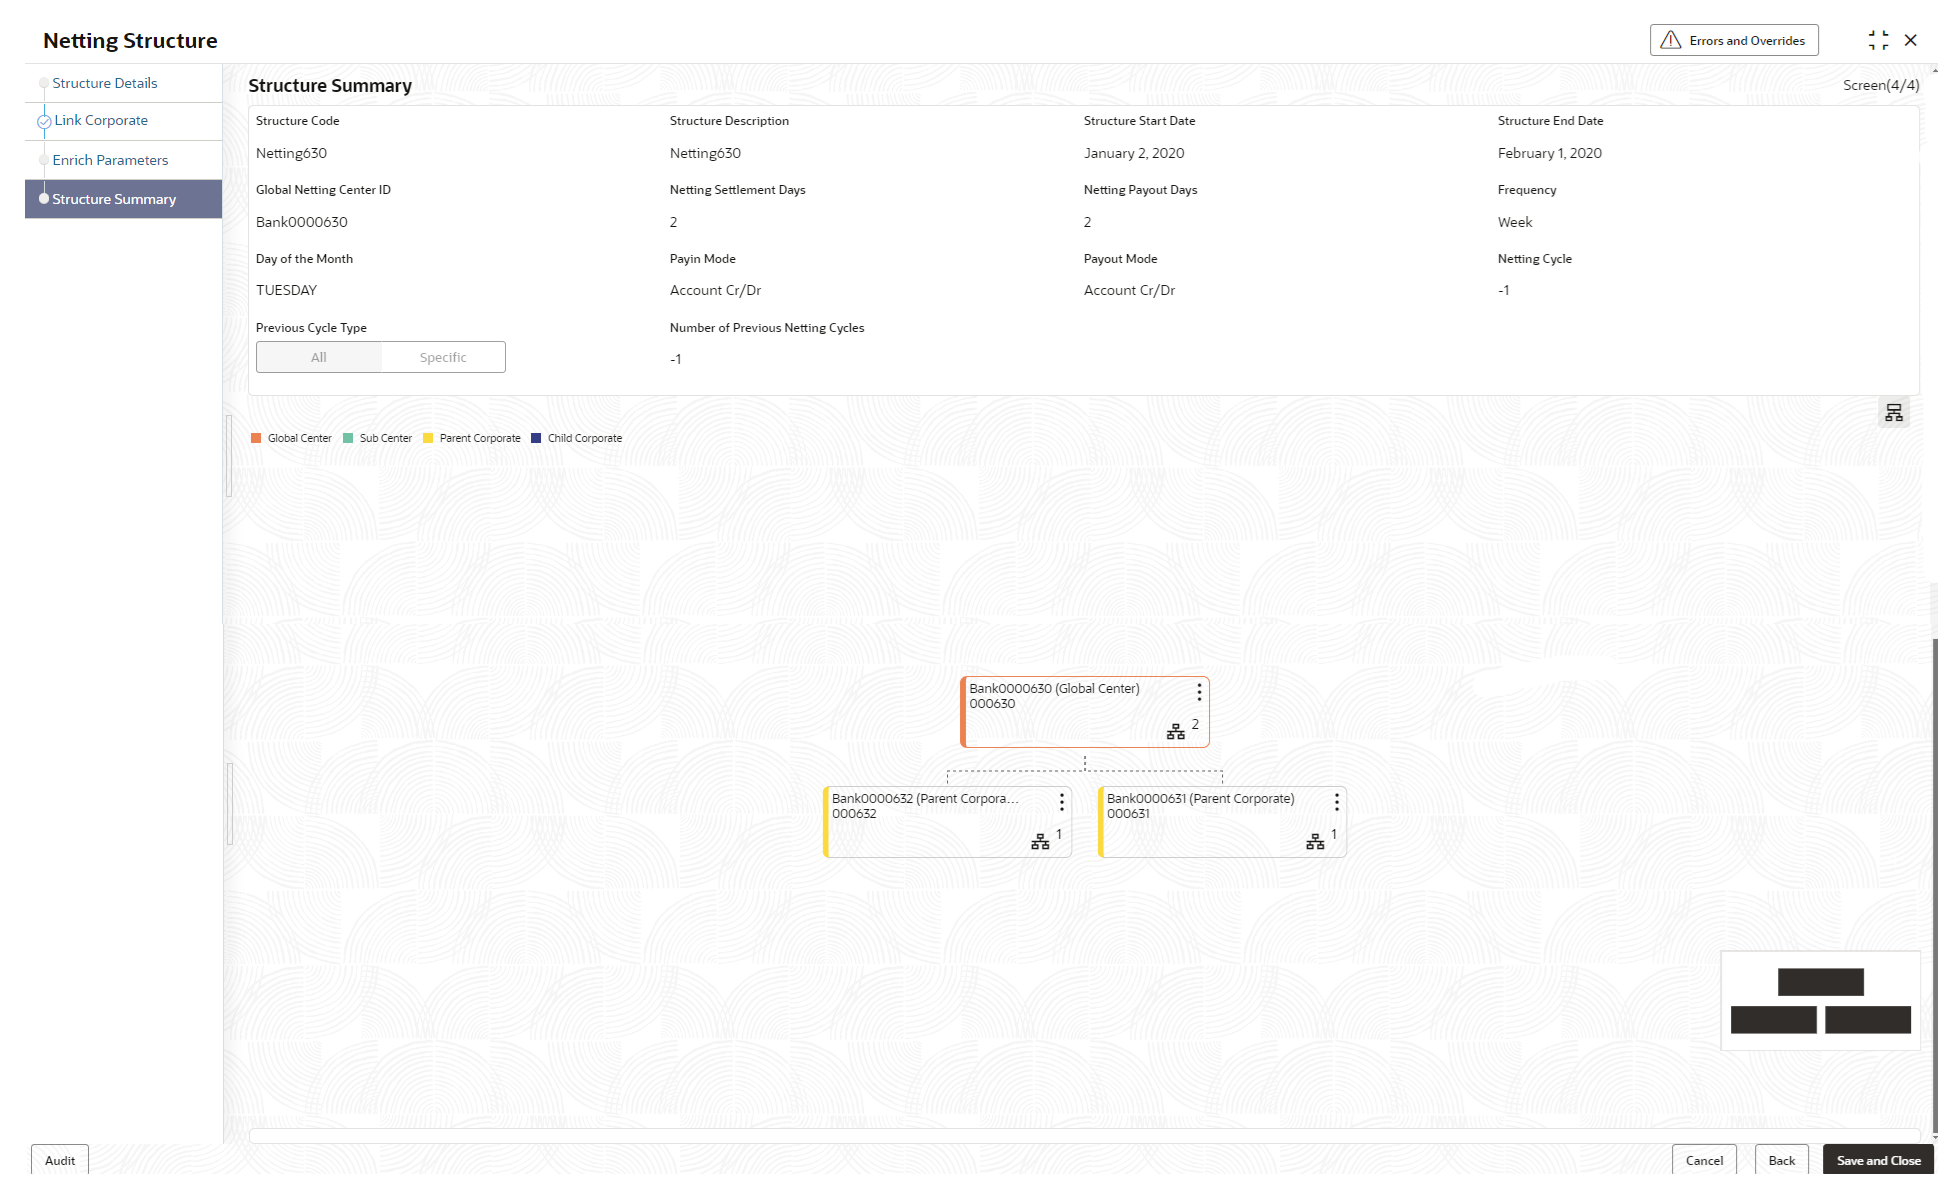
The Structure Summary data segment allows to view all the configured parameters for the netting structure.
- Click Next button in the Enrich Parameters data segment.The Create Netting Structure - Structure Summary data segment displays.
Figure 2-11 Create Netting Structure - Structure Summary
- Perform any one of the following actions:
- Click Back button to navigate to the previous data segment.
- Click Save and Close button to save the record and send it for authorization.
- Click Cancel button to discard the changes and close the record.
Parent topic: Netting Structure
